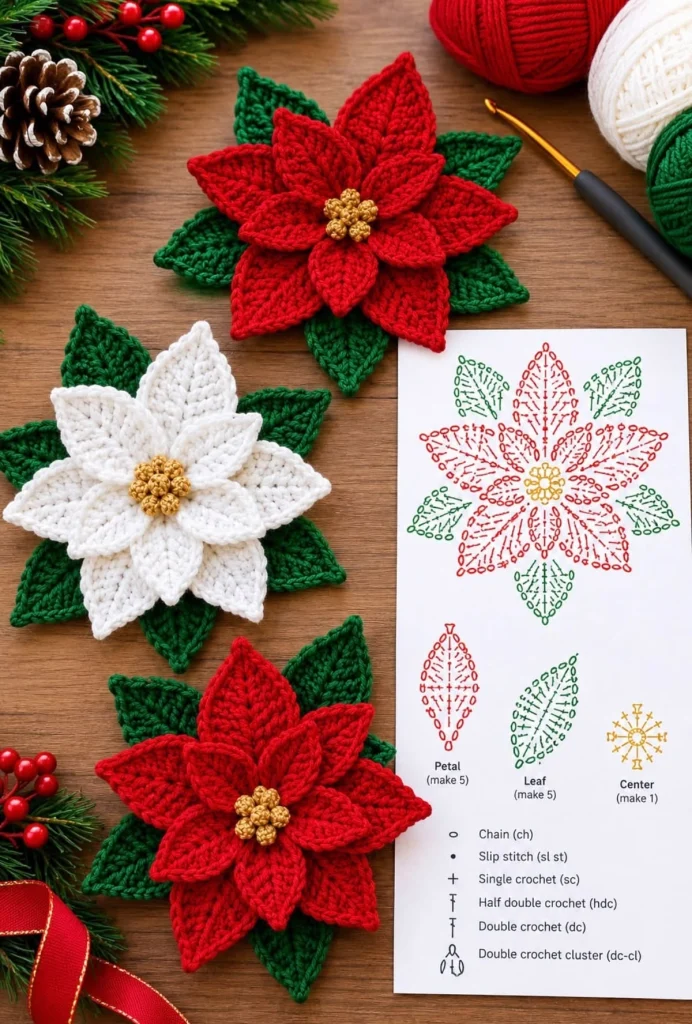
Beautiful Crochet Poinsettia Flowers – Free Advanced Pattern
Create stunning handmade crochet poinsettia flowers with this free advanced pattern. Featuring beautifully shaped red or ivory petals, deep green leaves, and textured golden centers, these elegant flowers are perfect for festive wreaths, garlands, table arrangements, gift decorations, and seasonal home décor.
Inspired by the reference design, each poinsettia features overlapping layers of pointed crochet petals, five green leaves, and a raised golden center made from small clustered stitches. The result is a richly textured, dimensional flower that looks beautiful from every angle.
This advanced crochet pattern uses separately constructed components, careful shaping, layered assembly, and decorative finishing techniques to achieve a realistic botanical appearance.
Pattern Overview
- Skill Level: Advanced
- Finished Diameter: Approximately 18–22 cm
- Construction: Separate petals, leaves, and center
- Flower Colors: Deep red or ivory white
- Leaf Color: Forest green
- Center Color: Golden yellow
- Yarn Weight: DK cotton yarn
- Hook Size: 3 mm or 3.5 mm
- Terminology: US crochet terms
- Estimated Time: 4–6 hours per flower
Materials
- DK cotton yarn in deep red
- DK cotton yarn in ivory white
- DK cotton yarn in forest green
- Small amount of golden yellow yarn
- 3 mm crochet hook
- 3.5 mm crochet hook
- Tapestry needle
- Scissors
- Stitch markers
- Optional thin floral wire for shaping
- Optional fabric stiffener
- Optional felt circle for backing
- Optional brooch pin or hanging loop
Abbreviations
- MR: Magic ring
- ch: Chain
- sl st: Slip stitch
- sc: Single crochet
- hdc: Half double crochet
- dc: Double crochet
- tr: Treble crochet
- inc: Increase
- dec: Decrease
- FLO: Front loop only
- BLO: Back loop only
- FO: Fasten off
- rep: Repeat
Flower Construction
Each flower is assembled from:
- 5 large outer petals
- 5 smaller upper petals
- 5 pointed green leaves
- 1 golden center base
- 8–10 raised golden center bobbles
- 1 optional backing circle
The petals are layered to create the full dimensional poinsettia shape shown in the reference image.
Part 1: Crochet the Large Outer Petals
Make 5 large petals in red or ivory.
Use a 3.5 mm hook.
Foundation
Ch 16.
Round 1
Starting in the second chain from the hook:
Sc in next 2 stitches.
Hdc in next 3 stitches.
Dc in next 5 stitches.
Tr in next 3 stitches.
Dc in next stitch.
Work 3 sc into the final chain to turn around the tip.
Continue along the opposite side of the foundation chain.
Dc in next stitch.
Tr in next 3 stitches.
Dc in next 5 stitches.
Hdc in next 3 stitches.
Sc in final 2 stitches.
Join with a sl st.
Round 2: Petal Shaping
Ch 1.
Work sc in the first 3 stitches.
Hdc in next 3 stitches.
Dc in next 5 stitches.
Work 2 dc in each of the next 2 stitches.
At the pointed tip, work (dc, ch 2, dc).
Continue symmetrically down the opposite side.
Join with a sl st.
Round 3: Raised Petal Edge
Work sc evenly around the petal.
At the tip, work (sc, ch 2, sc).
FO, leaving a 20 cm yarn tail for assembly.
Repeat until you have 5 large petals.
Part 2: Crochet the Smaller Upper Petals
Make 5 smaller petals in the same flower color.
These petals create the raised inner layer.
Foundation
Ch 12.
Round 1
Starting in the second chain from the hook:
Sc in next 2 stitches.
Hdc in next 2 stitches.
Dc in next 4 stitches.
Tr in next 2 stitches.
Work 3 sc into the final chain.
Continue along the opposite side.
Tr in next 2 stitches.
Dc in next 4 stitches.
Hdc in next 2 stitches.
Sc in final 2 stitches.
Join with a sl st.
Round 2
Work sc around the petal.
At the pointed tip, work (sc, ch 2, sc).
FO, leaving a long yarn tail.
Repeat for all 5 smaller petals.
Part 3: Add Raised Petal Veins
The reference flowers feature beautifully defined central veins and sculpted petal surfaces.
Central Vein
Attach matching yarn at the base of a petal.
Work surface slip stitches along the center of the petal toward the pointed tip.
Keep the stitches slightly raised but not tight.
Side Veins
Work short diagonal surface stitches branching outward from the central vein.
Repeat on both sides.
These details create a realistic botanical texture.
Repeat for all 10 petals.
Part 4: Crochet the Green Leaves
Make 5 pointed leaves using forest green yarn.
Foundation
Ch 14.
Round 1
Starting in the second chain from the hook:
Sc in next 2 stitches.
Hdc in next 3 stitches.
Dc in next 4 stitches.
Tr in next 2 stitches.
Dc in next stitch.
Work 3 sc into the final chain.
Continue along the opposite side.
Repeat the stitch sequence in reverse.
Join with a sl st.
Round 2
Work sc evenly around.
At the tip, work (sc, ch 2, sc).
FO.
Leaf Veins
Use surface slip stitches to create a raised central vein.
Add two or three diagonal side veins on each side.
Repeat for all 5 leaves.
Part 5: Crochet the Golden Center
The golden center consists of a small circular base decorated with raised bobbles.
Center Base
Using golden yellow yarn and a 3 mm hook:
Round 1: Work 6 sc into a MR. (6)
Round 2: Work 2 sc in each stitch. (12)
Round 3: *Sc in next stitch, inc in next stitch.* Repeat around. (18)
Sl st to join.
FO, leaving a long tail.
Golden Bobbles
Make 8–10 small bobbles.
For each bobble:
Ch 2.
Work 4 unfinished dc stitches into the second chain from the hook.
Yarn over and pull through all loops.
Ch 1 to secure.
FO, leaving a short sewing tail.
Sew the bobbles closely together on the center base.
Arrange them into a rounded cluster.
Part 6: Assemble the Poinsettia Flower
Step 1: Arrange the Green Leaves
Place the 5 green leaves in a star-shaped arrangement.
Overlap the bases slightly.
Sew the bases together securely.
Step 2: Attach the Large Petals
Position the 5 large petals over the green leaves.
Rotate them slightly so the green leaves remain visible between the red or ivory petals.
Sew the petal bases together.
Step 3: Add the Upper Petal Layer
Place the 5 smaller petals over the larger petals.
Offset their positions to create a natural layered appearance.
Attach each smaller petal only at its base so the tips remain slightly raised.
Step 4: Attach the Golden Center
Position the golden bobble center over the joined petal bases.
Sew securely through all layers.
Adjust the petals to create a balanced, full flower.
Part 7: Optional Backing Circle
A backing circle helps stabilize the flower when used as a hanging decoration or attached to another crochet project.
Using green yarn:
Round 1: 6 sc in MR. (6)
Round 2: Inc around. (12)
Round 3: *Sc 1, inc.* Repeat around. (18)
Round 4: *Sc 2, inc.* Repeat around. (24)
Round 5: *Sc 3, inc.* Repeat around. (30)
FO.
Sew the backing circle to the underside of the completed flower.
Part 8: Create the White Poinsettia Variation
To make the elegant white version shown in the reference image, follow the same instructions using ivory cotton yarn for all petals.
Keep the green leaves and golden center unchanged.
The ivory petals create a soft, classic look that pairs beautifully with deep green foliage.
Part 9: Advanced Shaping and Finishing
For a realistic dimensional appearance, gently shape each petal by hand.
- Curve the large outer petals slightly downward.
- Lift the smaller upper petals toward the center.
- Keep the petal tips pointed.
- Spread the green leaves evenly behind the flower.
- Adjust the golden bobbles into a compact cluster.
- Use light steam blocking if suitable for your yarn.
- Allow the flower to dry completely before handling.
For decorative projects that require extra structure, use a small amount of fabric stiffener on the underside of the petals.
Creative Ways to Use Crochet Poinsettias
- Decorate handmade door wreaths.
- Create festive table centerpieces.
- Attach flowers to crochet garlands.
- Make decorative gift toppers.
- Embellish crochet baskets.
- Create handmade ornaments.
- Decorate pillow covers.
- Make seasonal wall hangings.
- Attach flowers to handmade stockings.
- Create elegant floral arrangements.
Tips for a Professional Finish
- Use cotton yarn for crisp stitch definition.
- Maintain consistent tension across all petals.
- Make all petals of the same size before assembly.
- Block petals individually for a more uniform appearance.
- Keep the center stitches compact.
- Use matching yarn for invisible assembly.
- Secure each layer firmly at the center.
- Do not flatten the upper petal layer.
- Keep the green leaves visible between the flower petals.
- Use a smaller hook for a firmer flower structure.
Frequently Asked Questions
Is this crochet poinsettia pattern beginner-friendly?
This pattern is designed for advanced crocheters because it includes separate shaped components, raised surface details, layered assembly, and dimensional finishing.
How many petals does each flower need?
Each flower uses 5 large petals and 5 smaller petals, creating a total of 10 petals.
How many green leaves should I make?
Make 5 green leaves for each flower.
Can I use acrylic yarn?
Yes, although cotton yarn generally provides better stitch definition and a firmer shape.
Can I make smaller flowers?
Yes. Use finer yarn and a smaller crochet hook to reduce the finished dimensions.
Can I use different colors?
Absolutely. Burgundy, blush pink, cream, and dusty rose can create beautiful variations.
How do I make the petals hold their shape?
Use firm crochet tension, block the individual petals, and apply optional fabric stiffener when needed.
Can these flowers be attached to wreaths?
Yes. Sew or securely tie the finished flowers to a wreath base.
Are the golden centers crocheted?
Yes. The center is made from a small crochet circle decorated with raised golden bobbles.
Can I sell finished flowers made from this pattern?
Yes. You may sell handmade finished items created using this original pattern. Designer credit is appreciated.
Care Instructions
- Spot clean gently when possible.
- Hand wash in cool water if necessary.
- Use mild detergent.
- Avoid wringing the petals.
- Reshape while damp.
- Lay flat to dry.
- Store in a dry place.
- Avoid crushing the layered petals during storage.
Final Thoughts
These red and white crochet poinsettia flowers are a beautiful way to add handmade elegance to seasonal decorations. Their sculpted petals, detailed green leaves, and textured golden centers create a dimensional botanical design that looks impressive on wreaths, garlands, table arrangements, and decorative accessories.
Whether you choose traditional deep red or elegant ivory white, this advanced crochet flower pattern offers a rewarding project for crocheters who enjoy intricate handmade details.
Love this free crochet poinsettia pattern? Save it to Pinterest and share it with your crochet friends for more beautiful handmade inspiration!

