Blue Daisy Granny Square Crochet Tote Bag
Advanced
For experienced crocheters who enjoy complex shaping, fine detail, and ambitious construction
Single-Day Project
A satisfying project you can complete in a single afternoon or evening.
Handmade Gift
A beautiful keepsake — free forever. Read online or print at home.
About This Blue Daisy Granny Square Crochet Tote Bag
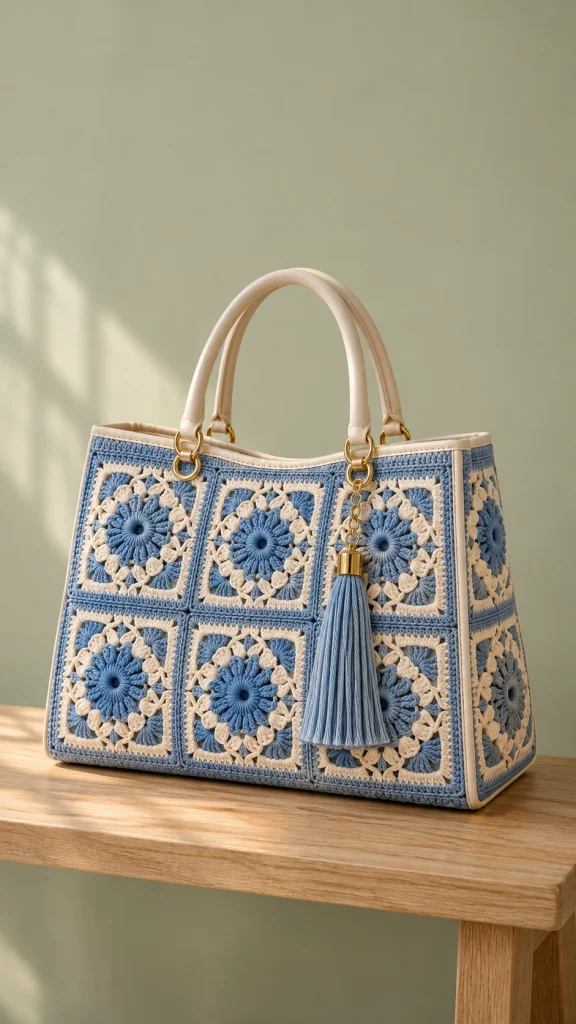
This daisy granny square bag crochet pattern creates a structured tote with dusty-blue flowers, cream openwork, and neatly framed square motifs. Six floral squares form each broad face, while narrow side panels, cream trim, rounded handles, and gold hardware give the bag its recognizable shape.
The flowers use raised puff stitches surrounded by cream clusters and a carefully counted square border. A firm crochet base, reinforced lining, and supported handle attachments help the openwork fabric function as an everyday handbag. A long blue tassel finishes the front.
Allow approximately 30–40 hours for the crochet, blocking, sewing, and finishing. This advanced project suits makers comfortable with counted motif work, precise seams, and fitting a fabric lining. The instructions below are an original interpretation of the photographed bag; they have not been physically tested.
Materials
- DK cotton yarn in dusty blue: approximately 850 m, including swatching and tassel.
- DK cotton yarn in warm cream: approximately 400 m.
- 3.0 mm crochet hook, or size needed to obtain the stated measurements.
- Two cream handbag handles, approximately 40–45 cm long, each supplied with two gold rings and four sew-on attachment tabs in total.
- Four short lengths of 25 mm cotton webbing, approximately 12 cm each, to reinforce the handle attachments.
- Approximately 0.6 m woven cotton lining fabric, at least 110 cm wide.
- Approximately 0.6 m firm sew-in bag interfacing, at least 90 cm wide.
- One removable bag-base insert, approximately 35 × 11 cm, with rounded corners.
- One gold tassel cap with an internal attachment loop, approximately 15 mm wide, plus a short chain and lobster clasp.
- Strong matching sewing thread, sewing needle, and sewing machine if available.
- Tapestry needle, scissors, stitch markers, ruler, blocking mat, and rustproof pins.
- A piece of cardboard approximately 18 cm long for winding the tassel.
Abbreviations
chchainsl stslip stitchscsingle crochetdcdouble crochetst / stsstitch / stitchesspspaceMRmagic ringpuffYarn over, insert hook into the indicated stitch, yarn over and draw up a loop four times; yarn over and draw through all nine loops, then ch 1 to close. This closing chain is part of the puff.3-dc clusterWork three unfinished dc into the same space, retaining the last loop of each on the hook; yarn over and draw through all four loops.Floral Squares — Make 16
- Round 1, dusty blue: Make an MR, ch 3, work 11 dc into the ring, and sl st to the top of the beginning ch 3. Tighten the ring enough to leave a small, neat center. Count: 12 dc.
- Round 2, dusty blue: Ch 1. Work one puff in each dc, followed by ch 2 after every puff. Join with a sl st to the closing chain of the first puff. Count: 12 puffs and 12 ch-2 spaces. Fasten off.
- Round 3, cream: Join in any ch-2 space. Ch 1, work a 3-dc cluster in that space, then ch 3. Work a 3-dc cluster and ch 3 in each of the remaining 11 ch-2 spaces. Join to the top of the first cluster. Count: 12 clusters and 12 ch-3 spaces.
- Round 4, cream: Sl st into the next ch-3 space and ch 1. Work (3 dc, ch 2, 3 dc) in this space, ch 1, work 3 dc in the next space, ch 1, work 3 dc in the next space, ch 1. Repeat this complete sequence three more times, using all 12 spaces. Join to the first dc and fasten off. Count: 48 dc, 12 ch-1 spaces, and four corner ch-2 spaces.
- Round 5, dusty blue: Join in any corner ch-2 space and ch 1. Work (sc, ch 2, sc) in that corner. Work one sc in each dc and one sc in each ch-1 space until the next corner. Repeat around, placing (sc, ch 2, sc) in each remaining corner. Join to the first sc. Count: 68 sc and four corner ch-2 spaces; 17 sc between adjacent corner spaces.
- Round 6, dusty blue: Sl st into the corner space and ch 1. Work (2 dc, ch 2, 2 dc) in that space. Work one dc in each sc to the next corner. Repeat around with the same corner treatment and join to the first dc. Count: 84 dc and four corner ch-2 spaces; 21 dc between adjacent corner spaces.
- Round 7, dusty blue: Sl st into the corner space and ch 1. Work (sc, ch 2, sc) in that space. Work one sc in each dc to the next corner. Repeat around and join to the first sc. Count: 92 sc and four corner ch-2 spaces; 23 sc between adjacent corner spaces. Fasten off.
- Weave in the ends securely without tightening the flower center or corner spaces. Block every square to 12 × 12 cm, keeping each edge straight and the corners square.
Panel Layout and Motif Seams
- Arrange six squares in three columns and two rows for the front. Repeat for the back. Arrange two squares vertically for each side. Total: 6 front + 6 back + 2 left side + 2 right side = 16 squares.
- For every motif seam, hold the squares right sides together. With dusty blue and a tapestry needle, whipstitch through the corresponding outer loops of the 23 edge stitches. Anchor the seam through both corner chain spaces at each end without gathering them.
- Join the two squares in each vertical column first. Each column measures approximately 12 × 24 cm.
- Join three columns along their long edges to complete the front, then repeat for the back. Each broad panel measures approximately 36 × 24 cm before outer assembly.
- Join the two squares of each side panel along one horizontal edge. Each side panel measures approximately 12 × 24 cm. Check that all four panels have matching heights.
Firm Crochet Base
- Row 1, dusty blue: Ch 73. Sc in the second chain from the hook and each remaining chain. Count: 72 sc.
- Rows 2–29: Ch 1, turn, and sc in each stitch across. Count: 72 sc in every row. After Row 29, fasten off. The rectangle should measure approximately 36 × 12 cm.
- Mark the four corners. Along each long edge, place markers after every 24 stitch positions to identify three equal sections. Along each short edge, mark its midpoint. These markers guide the base-to-panel seams.
- Lay the base against the blocked panels before sewing. Its long edges must match the three-square panel widths, and its short edges must match the one-square side widths. Correct gauge or reblock before proceeding if the pieces pull or buckle.
Bag Assembly and Cream Vertical Trim
- With right sides facing inward, sew one side panel to the front along the full 24 cm edge, using dusty blue and a mattress seam through corresponding edge stitches and corner spaces. Repeat with the second side panel on the opposite front edge.
- Sew the back panel to the two free side edges to form an open tube. Turn right side out and check that the four lower corners align.
- Pin the base into the lower opening, with its right side facing outward. Match each long-edge section to one square and each short edge to one side panel. Sew through the base edge and the panel edge with small, closely spaced backstitches. Distribute the seam evenly; the number of base stitches and motif-edge stitches is intentionally different.
- For each of the four upright corner seams, join cream at the lower corner. Surface sl st upward through the seam at approximately 24 stitches per 10 cm, making 58 loose surface stitches over the 24 cm seam. Fasten off. Keep the chain flat and do not shorten the panel height.
- Repeat the cream surface seam on the remaining three upright corners. Check the bag on a flat surface before adding the upper band.
Upper Band
- Round 1, dusty blue: Join at the back-left upper corner and ch 1. Across the top edge of each of the eight squares around the opening, work one sc in its first corner space, one sc in each of its 23 edge stitches, and one sc in its second corner space. Join to the first sc. Count: 200 sc. At shared seams, work separately into each square’s corner space.
- Round 2, dusty blue: Ch 1, sc in every stitch around, and join to the first sc. Count: 200 sc. Fasten off.
- Round 3, cream: Join at the back-left corner, ch 1, sc in every stitch around, and join to the first sc. Count: 200 sc.
- Round 4, cream: Ch 1, sc in every stitch around, and join to the first sc. Count: 200 sc. Fasten off and weave in the ends. The finished crochet shell is approximately 26 cm tall.
Reinforced Lining and Handles
- Measure the assembled interior before cutting. For the nominal 36 × 26 × 12 cm interior and 1 cm seam allowances, cut two lining rectangles 38 × 28 cm for the front and back, two 14 × 28 cm side rectangles, and one 38 × 14 cm base rectangle. If your shell differs, use its measured interior dimensions plus 2 cm in each cutting direction.
- Cut sew-in interfacing to the finished dimensions of the five lining panels, excluding seam allowances. Baste it to the wrong side of each corresponding fabric piece.
- Position one handle on each broad face. Center its two attachment tabs approximately 6 cm inward from the left and right upper corners. Keep all four tabs at the same height and make sure the handles face the correct way.
- On the wrong side of each broad lining panel, center a webbing strip behind each tab position. Position each strip vertically, with its upper end just below the lining’s folded top edge. Stitch its perimeter securely to the lining and interfacing.
- Sew each handle tab through the crochet shell, lining panel, and webbing reinforcement, using the tab’s supplied holes and doubled strong thread. Make several passes through every hole. Keep the lining seam allowances free.
- Sew the four lining wall panels into a tube using 1 cm seams, with right sides together. Sew the lining base into the lower opening, matching corners carefully. Press the seams and turn the top allowance 1 cm to the wrong side.
- Lower the lining into the bag with its wrong side against the crochet. Position the folded lining edge approximately 5 mm below the cream upper edge and hand-sew it to the inner band with small stitches. Ease in any tiny difference without pleating the crochet.
- Cover the rounded base insert with a snug fabric sleeve and slip it into the finished bag. Check that it lies flat and can be removed before washing.
Long Blue Tassel
- Wrap dusty-blue yarn 70 times around an 18 cm cardboard guide. Slide a strong 30 cm yarn tie beneath the wraps at one end and knot tightly around the bundle.
- Cut the wraps at the opposite end of the guide. Fold the strands downward around the tied midpoint. This produces approximately 140 hanging ends before trimming.
- Pass the attachment tie through the tassel cap’s internal loop and secure it according to the cap construction. Seat the folded head inside the cap and conceal the tie ends within the tassel.
- Trim the hanging yarn evenly to approximately 17 cm below the cap. Attach the cap to the short gold chain and clasp it to a front handle ring. Check that the tassel ends remain above the base.
Finishing
- Inspect every motif join, base seam, and handle attachment. Secure loose tails by weaving them in along two directions through dense stitches.
- Shape the bag around loosely folded towels. Smooth the floral panels by hand and allow any dampened areas to dry completely before removing the towels.
- Place a few light items inside and check that the base stays level, the lining supports the shell, and the handle tabs remain flat. Reinforce any shifting attachment before regular use.
The cream edges and gold fittings bring the floral panels together. Take time to settle the lining into the corners and straighten the tassel; these small finishing steps give the tote a tidy, balanced shape.
Tips for Success
- Pull every puff loop to the same height so all twelve petals sit evenly around the center.
- Mark the four corner spaces after Round 4 and move the markers upward after each border round.
- Block all sixteen motifs together when possible, using the same 12 cm template.
- Keep surface slip stitches loose enough that the vertical cream trim does not draw the corners upward.
- Use the reinforced lining to spread handle strain across the fabric rather than concentrating it in the openwork motifs.
Common Mistakes to Avoid
- Counting the puff’s closing chain as its following ch-2 space creates extra stitches. Close the puff first, then make two additional chains.
- Placing square corners too frequently distorts Round 4. Each corner is followed by two ordinary 3-dc groups before the next corner.
- Skipping one of the two corner spaces at a panel seam reduces the upper-band count. Pick up 25 sc per square for exactly 200 sc.
- Sewing an unblocked base to blocked panels can cause puckering. Check both dimensions before assembly and distribute the seam by marked sections.
- Attaching handles only to crochet can stretch the upper edge. Sew through the tabs, shell, lining, and webbing backing.
Ways to Customize This Pattern
- Use navy for the flower centers and dusty blue for the remaining petal round; keep all stitch counts unchanged.
- Make a narrower tote with two columns on each broad face: use 12 motifs total, a 48-sc base worked for 29 rows, and 150 sc around the six-square opening. Resize the lining and base insert accordingly.
- Add an internal patch pocket to a broad lining panel before assembling the lining, keeping it clear of the handle reinforcement.
- Replace the tassel with a short detachable charm to leave more of the front flower visible.
- Add a magnetic snap through reinforced lining patches centered on the front and back, following the hardware manufacturer’s installation directions.
Frequently asked questions
Cotton is the intended yarn because it produces firm stitches and defined petals. Acrylic can work, but make a complete motif and base swatch first, and retain the firm lining, webbing reinforcement, and base insert.
The base uses dense single crochet at its own gauge. The upper band is picked up from eight motif edges. Their counts serve different constructions; the base seam is matched by measured lengths and marked sections.
The lining is part of this bag’s supporting construction. The cream openwork can catch small objects, and the handle attachments need reinforcement. Keep the lining for the intended finish and function.
Remove the tassel and base insert, then spot-clean according to the yarn and handle care instructions. Avoid soaking leather or imitation-leather fittings. Reshape the bag and let it dry fully before replacing the insert.
The finished Blue Daisy Granny Square Crochet Tote Bag

