Blue Granny Square Crochet Flower Bag Pattern
Beginner Friendly
Perfect for those just starting their crochet journey, with clear instructions and simple techniques
Single-Day Project
A satisfying project you can complete in a single afternoon or evening.
Handmade Gift
A beautiful keepsake — free forever. Read online or print at home.
About This Blue Granny Square Crochet Flower Bag Pattern
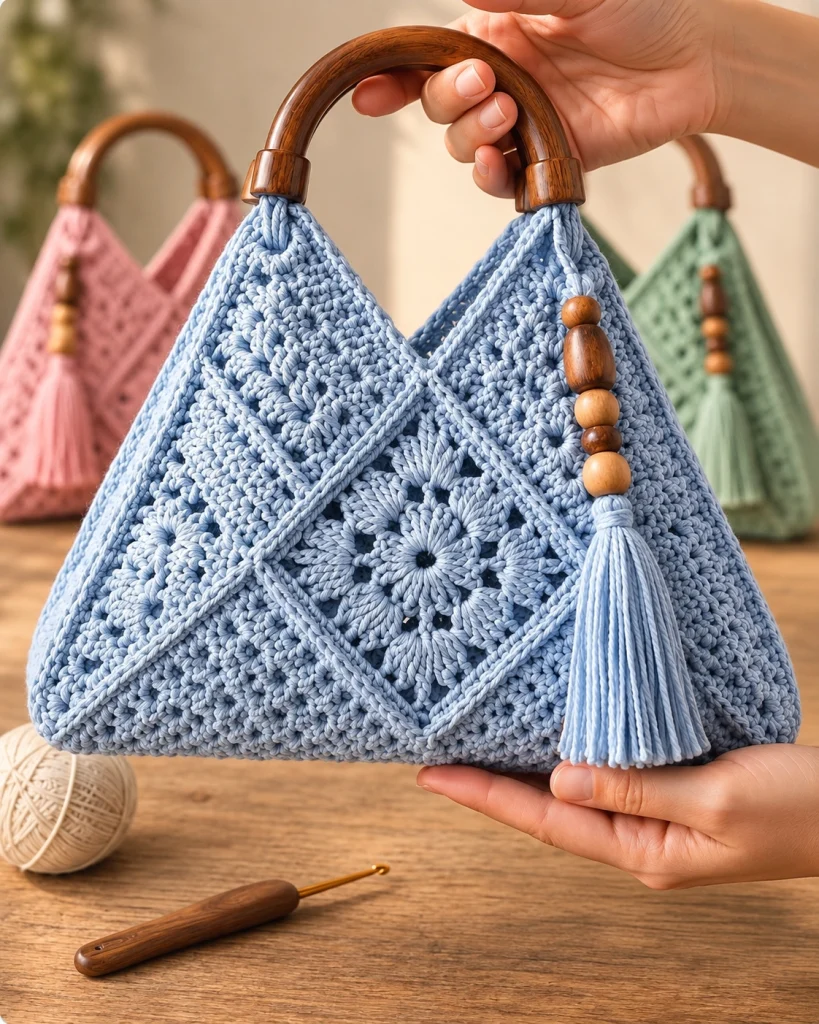
This crochet flower bag pattern creates an elegant structured handbag from textured blue granny squares, a raised floral center, smooth wooden handles, decorative wooden beads, and a long matching tassel. The overlapping diamond layout gives the bag its distinctive geometric shape while keeping the soft handmade character of traditional crochet.
This is an advanced project designed for crocheters who are comfortable working in rounds, joining motifs, changing stitch heights, blocking pieces to size, sewing firm seams, and assembling a lined or unlined handbag. Allow roughly 10-14 hours for the crochet and assembly, depending on your speed and how carefully you block and join the motifs. The finished bag is approximately 30 cm wide and 25 cm tall before the handles.
The construction uses individually crocheted motifs rather than one continuous body. This makes it important to keep your tension consistent and block every square before assembly. The finished result works especially well as a spring or summer handbag, handmade gift, or statement accessory.
Materials
- DK / light worsted cotton or cotton-blend yarn in powder blue approximately 450-500 m
- 3.5 mm crochet hook or size needed for a firm fabric
- Wooden semicircular bag handles 2 handles, approximately 15-17 cm wide
- Wooden beads 4 beads in mixed sizes for the tassel decoration
- Yarn needle for joining and weaving in ends
- Stitch markers 4-6 recommended
- Scissors 1 pair
- Blocking mat and rustproof pins for shaping the motifs
- Matching sewing thread and needle for reinforcing handle attachments
- Cotton lining fabric optional, approximately 40 × 70 cm
- Magnetic snap optional, 1 set
Abbreviations
MRmagic ringchchainsl stslip stitchscsingle crochethdchalf double crochetdcdouble crochettrtreble crochetFPdcfront post double crochetststitchstsstitchesspspaceskskipRSright sideYOyarn overTextured Granny Square Motifs – Make 6
- Round 1: Make a MR. Ch 3, working into the ring make 2 dc, ch 2, then (3 dc, ch 2) 3 times. Join with sl st to top of beginning ch-3. Pull the ring closed. You have 4 groups of 3 dc and 4 corner ch-2 spaces.
- Round 2: Sl st across to first corner ch-2 sp. Ch 3, 2 dc, ch 2, 3 dc in the same corner sp. Ch 1. In each remaining corner work (3 dc, ch 2, 3 dc), placing ch 1 between corners. Join with sl st. You have 8 groups of 3 dc.
- Round 3: Sl st to first corner. Ch 3, 2 dc, ch 2, 3 dc in corner. Ch 1, 3 dc in next ch-1 sp, ch 1. Repeat around, working (3 dc, ch 2, 3 dc) in every corner and 3 dc in each side ch-1 sp. Join with sl st. You have 12 groups of 3 dc.
- Round 4: Sl st to first corner. Ch 3, 2 dc, ch 2, 3 dc in corner. Ch 1, 3 dc in each of the next 2 ch-1 spaces with ch 1 between groups. Repeat around, maintaining (3 dc, ch 2, 3 dc) in every corner. Join with sl st. You have 16 groups of 3 dc.
- Round 5: Sl st to first corner. Ch 1, (2 sc, ch 2, 2 sc) in corner. Work 1 sc in each dc and 1 sc in each ch-1 sp across the side. Repeat around, working (2 sc, ch 2, 2 sc) in each corner. Join with sl st.
- Round 6: Ch 3. Dc in each st across. In every corner ch-2 sp work (2 dc, ch 2, 2 dc). Continue around and join with sl st to beginning ch-3.
- Round 7: Ch 1. Sc in each dc around, working (2 sc, ch 2, 2 sc) into each corner ch-2 sp. Join with sl st. Fasten off, leaving a long tail on motifs that will be sewn to neighboring squares.
- Block each finished motif into a crisp 14 × 14 cm square. Pin all four corners first, then straighten each side without overstretching the center.
Raised Flower Center Motif – Make 2
- Round 1: Make 6 sc in MR. Join with sl st to first sc. (6 sts)
- Round 2: Ch 1. Work 2 sc in each st around. Join with sl st. (12 sts)
- Round 3: Ch 1. (Sc in next st, 2 sc in next st) 6 times. Join. (18 sts)
- Round 4: Create 6 petal foundations: (ch 4, sk 2 sts, sl st in next st) 6 times. You now have 6 ch-4 loops evenly spaced around the center.
- Round 5: Into each ch-4 loop work (sc, hdc, 3 dc, hdc, sc). Repeat for all 6 loops. Join with sl st. You have 6 raised petals.
- Round 6: Working behind the petals, sl st around the skipped stitch between petals, ch 5, then sl st around the next skipped stitch. Repeat around to create 6 larger back loops.
- Round 7: Into each ch-5 loop work (sc, hdc, dc, 3 tr, dc, hdc, sc). Repeat around. Join with sl st. You have 6 larger outer petals.
- Round 8: Working behind the flower, ch 3, then work 1 sc into each of the 18 stitches from Round 3, placing the chains behind the petals as needed. Join. This creates a stable foundation around the flower. (18 sc)
- Round 9: Ch 3, dc in same st, dc in next 3 sts, (2 tr, ch 2, 2 tr) in next st, dc in next 4 sts, (2 tr, ch 2, 2 tr) in next st, dc in next 4 sts, (2 tr, ch 2, 2 tr) in next st, dc in next 3 sts, then work (2 tr, ch 2, 2 tr) into the base of the beginning ch-3 area to form the fourth corner. Join. The circular flower is now beginning to square off.
- Round 10: Ch 1. Sc evenly along each side. In every corner ch-2 sp work (2 sc, ch 2, 2 sc). Keep the four sides equal by placing 1 sc in every stitch between corners. Join with sl st.
- Round 11: Ch 3. Dc in each st across each side; work (2 dc, ch 2, 2 dc) in every corner. Join with sl st.
- Round 12: Ch 1. Sc in every dc, working (2 sc, ch 2, 2 sc) into each corner. Join and fasten off. Block to the same 14 × 14 cm measurement as the textured squares.
Front Panel Assembly
- Place one raised flower square on point so it forms a diamond in the center of the front panel.
- Position one textured granny square against the upper-left edge of the flower diamond and another against the upper-right edge, matching complete edges rather than stretching individual stitches.
- Position a third textured square beneath the flower motif so its upper edges meet the two lower edges of the flower diamond. The arrangement should create the triangular lower silhouette visible in the finished bag.
- With RS facing outward, join adjoining edges using mattress stitch through corresponding edge stitches. Check alignment every 8-10 stitches so the corners meet cleanly.
- Reinforce every point where three motif corners meet by passing the yarn through the corner spaces twice before weaving in the tail.
Back Panel Assembly
- Repeat the front-panel layout using the second flower square and the remaining three textured granny squares.
- Arrange the motifs on a flat surface before sewing and compare the completed layout directly with the front panel.
- Join all touching edges with mattress stitch, keeping the same seam tension used on the front.
- Steam or wet block both assembled panels lightly so their outer edges and top points match before joining the bag.
Joining the Bag Body
- Place the front and back panels together with WS facing each other and align the lower edges and side points.
- Attach yarn at one upper side point. Working through both layers, sc evenly down the first side, across the bottom, and up the opposite side. Leave the V-shaped top edges open.
- At each lower corner, place 2 sc in the corner space so the seam turns without pulling. Keep the remaining seam at approximately 1 sc per matching edge stitch.
- Fasten off at the opposite upper point. Turn the bag right side out and gently shape the bottom corners with your fingers.
Top Edging
- With RS facing, join yarn at one side seam. Ch 1 and sc evenly around the entire open top edge, placing approximately 1 sc per edge stitch and 2 sc at each upper point. Join with sl st.
- Round 2: Ch 1, sc in each st around. At each deep V between the handle points, work sc2tog over the stitch immediately before and after the lowest point to strengthen the indentation. Join with sl st.
- Round 3: Ch 1, sc in each st around without increasing. Join with sl st and fasten off. The top edge should feel firm but should not pucker.
Wooden Handle Tabs – Make 4
- Row 1: Ch 9. Sc in second ch from hook and in each remaining ch. Ch 1, turn. (8 sc)
- Rows 2-12: Sc in each st across. Ch 1, turn. (8 sc)
- Row 13: Sc in each st across. Fasten off, leaving a 35 cm sewing tail. (8 sc)
- Wrap one tab firmly around the lower end of a wooden handle and fold it so the short edges meet against the inside of the bag.
- Sew the tab securely to the upper point of the bag through both the crocheted tab and top edging. Repeat at the opposite end of the handle.
- Repeat with the second handle on the back panel. Reinforce each attachment several times because these four tabs carry the weight of the bag.
Decorative Tassel
- Cut approximately 35 strands of blue yarn, each 24 cm long. Keep the strand lengths as even as possible.
- Fold the bundle in half and tie tightly around the fold with a separate 35 cm strand, leaving both ends long enough to form the hanging cord.
- Measure approximately 2 cm below the folded top. Wrap another strand firmly around the bundle 8-10 times, knot securely, and hide the ends inside the tassel.
- Trim the bottom evenly so the finished tassel measures approximately 10-11 cm from the wrapped neck to the tips.
- Thread 4 wooden beads in alternating sizes onto the hanging cord. Tie a secure knot above the final bead.
- Attach the tassel to the front-right wooden handle with a discreet lark’s-head style loop or secure double knot, allowing the beads and tassel to hang freely against the bag.
Optional Fabric Lining
- Lay the finished bag flat on doubled lining fabric and trace around the body, stopping below the handle attachments. Add a 1.5 cm seam allowance around the sides and bottom and a 2 cm allowance along the top.
- Cut 2 lining pieces. Place them right sides together and sew the side and bottom seams with a 1.5 cm seam allowance, leaving the top open.
- Clip excess fabric at the lower corners without cutting through the stitching. Turn the top allowance to the wrong side and press.
- Insert the lining into the crochet bag with wrong sides together. Align the lining edge approximately 5 mm below the crocheted top edging.
- Hand sew the lining to the inside of the bag using small invisible stitches. Do not sew through the outermost visible loops of the crochet.
- If using a magnetic snap, install it at the center of the lining before completing the final few centimeters of hand stitching.
Finishing
Weave in every remaining yarn end on the inside of the bag, changing direction at least once so the ends cannot pull loose with use. Check the joins around the center flower squares and reinforce any corner that feels less firm than the others. Pay particular attention to the four wooden-handle tabs because these points carry most of the bag’s weight.
Lightly block the completed bag without soaking the wooden handles or beads. Shape the lower corners, straighten the central flower diamonds, and allow the crochet to dry completely. Comb the tassel with your fingers and trim only the longest strands. The finished handbag should hold its triangular silhouette while the flower motifs remain centered and clearly defined.
Tips for Success
- Block every granny square to exactly the same dimensions before joining. Even a 5-8 mm difference becomes noticeable in the diagonal motif arrangement.
- Use a firm crochet tension. A loose fabric can stretch significantly once wooden handles and everyday contents add weight.
- When making the raised flower motifs, keep the back-loop foundations behind the previous petal layer so the petals sit forward instead of becoming trapped in the next round.
- Lay the entire front panel out before sewing. The central flower must remain squarely positioned on the diagonal or the finished V-shaped top will look uneven.
- Reinforce the handle tabs with matching sewing thread after attaching them with yarn. This adds strength without changing the visible crochet finish.
Common Mistakes to Avoid
- Do not join unblocked motifs. Squares that look only slightly different in size can pull the finished front panel noticeably out of alignment. Block and measure first.
- Avoid overtightening mattress-stitch seams. If the joins become shorter than the square edges, the bag will buckle. Undo the tight section and resew it with relaxed tension.
- Do not attach the wooden handles through only one or two crochet loops. Spread the attachment across the full width of each tab and reinforce it to prevent tearing.
- Do not accidentally crochet the second flower layer into the front petals. Work behind the first petal layer when creating the ch-5 loops so both layers remain dimensional.
- Avoid making the tassel too heavy. Oversized beads or excessive yarn can pull the upper corner downward; keep the decorative strand light enough to hang without distorting the handle area.
Ways to Customize This Pattern
- Make a warm neutral version in cream, oatmeal, or caramel yarn and pair it with dark walnut handles for a more natural look.
- Use a contrasting shade for the raised flower petals while keeping the outer granny-square rounds blue to emphasize the central floral diamonds.
- Replace the wooden-bead tassel with a removable crochet flower charm or a shorter two-color tassel.
- Add an interior zip pocket to the optional fabric lining for keys, cards, or other small items.
- For a larger tote, add one extra granny-style round to every motif before the final sc border, making sure all motifs receive exactly the same additional round.
Frequently asked questions
The raised petals use stitches for texture rather than width, so the flower center may initially appear smaller. Measure only after completing the squaring rounds and blocking. If it is still too small, add one evenly worked sc round before the final border while preserving four identical corners.
Use cotton or a cotton-rich yarn at a firm tension, reinforce all handle attachments, and add the fabric lining. The lining carries much of the internal load and prevents the granny-square body from lengthening under weight.
You can, but the finished structure will change. Bamboo tends to drape and stretch, while soft acrylic may produce less defined flowers. If using either, work at a firm gauge and add a non-stretch cotton lining for support.
Block all motifs first, mark the midpoint of each edge, and match those midpoints before sewing. Join from one corner to the next without stretching either motif. After assembling the panel, lightly block it again before joining the front and back.
Yes. Make two dense straps using several rows of sc and reinforce them with cotton tape or fabric inside. The original wooden handles contribute significantly to the structured appearance, so crocheted straps will create a softer, more casual version of the bag.
The finished Blue Granny Square Crochet Flower Bag Pattern