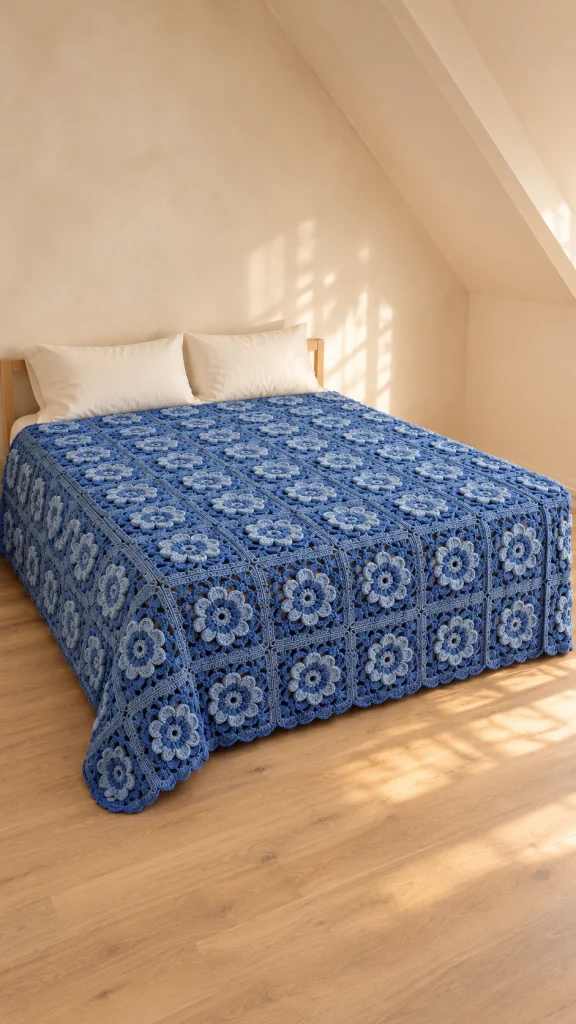
Blue Heirloom Flower Crochet Bedspread
Advanced
For experienced crocheters who enjoy complex shaping, fine detail, and ambitious construction
Weekend Project
A satisfying weekend make — start Friday, finish Sunday, enjoy forever.
Handmade Gift
A beautiful keepsake — free forever. Read online or print at home.
About This Blue Heirloom Flower Crochet Bedspread
This blue flower crochet bedspread pattern combines raised, two-layer flowers with airy square frames and a softly scalloped edge. Denim blue, pale blue and a deeper blue center give each flower definition, while the joined squares create the generous drape of a traditional bedspread.
The flowers are worked directly onto a structural foundation, leaving separate loops available for the openwork frame. A twelve-by-fourteen layout provides substantial coverage, and individually blocked motifs help keep the seams straight. Allow approximately 160–220 hours for crocheting, joining and finishing this large project.
This advanced design suits crocheters who enjoy layered stitch placement, careful counting and patient finishing. The instructions below are an original interpretation of the floral bedspread concept; the dimensions and yarn quantities are planning estimates governed by your blocked sample.
Materials
- Light worsted/category 4 yarn in denim blue, color A: approximately 4,800 m.
- Matching yarn in pale blue, color B: approximately 1,900 m.
- Matching yarn in deep blue, color C: approximately 800 m.
- Total yarn allowance: approximately 7,500 m, or 3,750 g at 200 m per 100 g; purchase the same dye lot for each color.
- 4.5 mm crochet hook, or size needed to achieve the blocked motif measurement.
- Tapestry needle for seams and ends.
- Locking stitch markers for corners and layout labels.
- Scissors and measuring tape.
- Blocking mats and rustproof pins.
Abbreviations
chchainsl stslip stitchscsingle crochetdcdouble crochetBLOback loop onlyFLOfront loop onlyRSright sideUS crochet terminology is used throughout. A beginning ch 1 does not count as a stitch. Where a beginning ch 3 replaces a dc, it counts as one dc. Instructions in parentheses are worked into the same stitch or space unless stated otherwise.
Flower foundation — make 168
- Foundation: With B, ch 6 and sl st into the first ch to form a ring. Leave the center open.
- Round 1: Ch 1, work 16 sc into the ring; sl st to the first sc. Fasten off B. Mark the first sc and number the stitches 1–16 clockwise on the RS. Count: 16 sc.
- Round 2: Join C in the BLO of stitch 1. Ch 1, sc in that same back loop, ch 3, skip stitch 2; repeat [sc in the BLO of the next stitch, ch 3, skip the next stitch] seven times. Sl st to the first sc and fasten off. Count: 8 sc and 8 ch-3 spaces. The front loops of Round 1 remain free.
- Small flower layer: Join C in the unused front loop of Round 1 stitch 1. In that loop work (sl st, ch 2, 3 dc, ch 2, sl st). Repeat this petal in the unused front loops of stitches 3, 5, 7, 9, 11, 13 and 15. Move directly between petals without adding chains. Fasten off. Count: 8 petals, each containing 3 dc and two ch-2 lengths.
- Large flower layer: Join B in any Round 2 ch-3 space. Around that space work (sl st, ch 2, 5 dc, ch 2, sl st). Repeat in each of the other seven ch-3 spaces, moving directly between spaces. Fasten off. Count: 8 petals, each containing 5 dc and two ch-2 lengths. Arrange these petals outside the smaller C petals.
Openwork square frame
- Frame Round 3: Fold the B petals forward. Join A around the post of any Round 2 sc, passing the hook behind the flower rather than through a petal. Ch 1, sc around that post, ch 5; repeat [sc around the next Round 2 sc post, ch 5] seven times. Sl st to the first sc. Count: 8 sc and 8 ch-5 spaces.
- Round 4: Sl st into the first ch-5 space. Ch 3, then work (2 dc, ch 2, 3 dc) in that space to make the first corner. Ch 1, work 3 dc in the next ch-5 space, ch 1. Repeat [(3 dc, ch 2, 3 dc) in the next ch-5 space, ch 1, 3 dc in the next ch-5 space, ch 1] three times. Sl st to the top of the beginning ch 3. Count: 36 dc, 8 ch-1 spaces and 4 corner ch-2 spaces; each side has 9 dc and two ch-1 spaces.
- Round 5: Sl st across to the first corner space. Ch 3, then work (dc, ch 2, 2 dc) in that corner. Work dc in each dc and one dc in each ch-1 space up to the next corner; work (2 dc, ch 2, 2 dc) in that corner. Continue around all four sides, omitting a second corner group in the starting corner. Sl st to the beginning ch 3. Count: 15 dc per side, 60 dc total and 4 corner ch-2 spaces.
- Round 6: Sl st to the first corner space. Ch 1, work (sc, ch 2, sc) in that corner. Sc in each of the next 15 dc; work (sc, ch 2, sc) in the next corner. Repeat around, omitting a second group in the starting corner. Sl st to the first sc. Count: 17 sc per side, 68 sc total and 4 corner ch-2 spaces.
- Round 7: Sl st into the first corner space. Ch 3, then work (dc, ch 2, 2 dc) in that corner. Dc in each of the next 17 sc; work (2 dc, ch 2, 2 dc) in the next corner. Repeat around, omitting a second group in the starting corner. Sl st to the beginning ch 3. Count: 21 dc per side, 84 dc total and 4 corner ch-2 spaces.
- Round 8: Sl st to the first corner space. Ch 3, then work (dc, ch 2, 2 dc) in that corner. Dc in each of the next 21 dc; work (2 dc, ch 2, 2 dc) in the next corner. Repeat around, omitting a second group in the starting corner. Sl st to the beginning ch 3. Count: 25 dc per side, 100 dc total and 4 corner ch-2 spaces.
- Round 9: Sl st to the first corner space. Ch 1, work (sc, ch 2, sc) in that corner. Sc in each of the next 25 dc; work (sc, ch 2, sc) in the next corner. Repeat around, omitting a second group in the starting corner. Sl st to the first sc and fasten off. Count: 27 sc per side, 108 sc total and 4 corner ch-2 spaces.
- Blocking: Wet-block each square to 18 × 18 cm, measuring from the outside of one frame edge to the opposite edge. Pin the four corners square, ease the sides straight and shape the petals without stretching them flat. Let dry completely.
Layout and flat joining
- Layout: Arrange 168 squares RS up in 14 rows of 12 squares. The unbordered bedspread measures approximately 216 cm across and 252 cm long. Rotate squares consistently so their corner structure lines up.
- Horizontal joins: Place two neighboring squares side by side, RS up. With A and a tapestry needle, whipstitch through the outer loop of each corresponding edge stitch. Match all 27 sc pairs along the shared side, keeping the thread relaxed enough that the edges lie flat.
- Corner joins: At each end of a seam, make one securing stitch through the two corresponding corner spaces. Do not gather the spaces closed. Continue joining across each row until all 12 squares are connected.
- Vertical joins: Join the 14 completed rows using the same method, matching all 27 sc pairs for each square edge. At each four-square intersection, pass once through the four meeting corner spaces to close the small opening, then continue along the next pair of edges.
- Size adjustment: For another size, use a rectangular layout of W squares across and L squares long. Make W × L motifs. Approximate finished measurements are (18W + 6) cm by (18L + 6) cm with this border; seam tension and blocking can alter the result slightly.
Border and scalloped edge
- Pickup Round 1: With RS facing, join A in an outer corner space. Ch 1, work (sc, ch 2, sc) in that corner. Along each exposed motif edge, sc in all 27 edge stitches. At each internal seam on the perimeter, work one sc into the corner space before the seam and one sc into the corner space after it; do not add a stitch into the seam itself. At each of the other three outer corners, work (sc, ch 2, sc). Sl st to the first sc. Count: 348 sc along each short side and 406 sc along each long side, measured between corner spaces; 1,508 sc total and 4 corner ch-2 spaces.
- Border Round 2: Sl st into the first corner space. Ch 1, work (sc, ch 2, sc) in that corner. Sc in every stitch along each side and work (sc, ch 2, sc) in each remaining corner space. Sl st to the first sc and fasten off. Count: 350 sc per short side and 408 sc per long side; 1,516 sc total and 4 corner ch-2 spaces.
- Border Round 3: Join B in a corner space. Ch 3, then work (dc, ch 2, 2 dc) in that corner. Dc in every sc along each side and work (2 dc, ch 2, 2 dc) in each remaining corner. Sl st to the beginning ch 3 and fasten off. Count: 354 dc per short side and 412 dc per long side; 1,532 dc total and 4 corner ch-2 spaces.
- Border Round 4: Join A in a corner space. Ch 1, work (sc, ch 2, sc) in that corner. Sc in every dc along each side and work (sc, ch 2, sc) in each remaining corner. Sl st to the first sc. Count: 356 sc per short side and 414 sc per long side; 1,540 sc total and 4 corner ch-2 spaces.
- Scallop Round 5: Sl st into the first corner space and work 7 dc in that space. On the following side, skip the first sc, sl st in the second sc; repeat [skip one sc, 5 dc in the next sc, skip one sc, sl st in the next sc] until two side stitches remain, then skip those two stitches. Work 7 dc in the next corner space and repeat the side sequence around. After the last side, sl st to the first dc of the starting corner shell and fasten off. Count: 88 side shells on each short side, 103 side shells on each long side, and 4 corner shells. The round contains 1,938 dc and 386 anchoring sl st, excluding the final joining sl st.
Finishing
- Secure the ends: Weave each tail through the backs of several stitches, reverse direction and weave again. Keep tails away from the open center rings and lace spaces.
- Set the shape: Support the entire bedspread while washing according to the yarn label. Press out excess water in towels and lay it flat; do not lift the wet fabric by a corner.
- Final blocking: Ease the bedspread toward approximately 222 × 258 cm. Straighten the seams, open the scallops and lift the flower petals gently with your fingers. Allow it to dry completely before placing it on the bed.
The joined frame should rest smoothly around the flowers while the petals retain their raised shape. Take your time with this last adjustment: even seams and softly opened scallops give the bedspread its finished character.
Tips for Success
- Mark the odd-numbered foundation stitches before starting the small petals so all eight land in the correct loops.
- Insert the hook around Round 2 sc posts from behind the flower when starting the frame; catching a petal can pull the flower out of shape.
- Check the side count after every frame round: 9 dc plus two chain spaces, then 15, 17, 21, 25 and 27 stitches.
- Block squares in small batches with one reusable 18 cm template to keep the final layout consistent.
- Check each perimeter side count before starting the scallops; their placement depends on the stated even stitch totals.
Common Mistakes to Avoid
- Working Round 2 through both loops uses the loops needed for the small petals. Undo that round and work BLO.
- Using the B petals as frame anchors distorts the flower. Anchor Frame Round 3 around the C foundation posts instead.
- Missing the first or last stitch beside a corner reduces the square size. Mark both stitches and count between corner spaces.
- Pulling seam stitches tight creates raised ridges and shortens the bedspread. Relax each seam before securing its tail.
- Adding a border pickup stitch into every seam makes the perimeter flare. Work only the two neighboring corner-space stitches at each perimeter join.
Ways to Customize This Pattern
- Make a smaller throw with 7 × 9 squares: 63 motifs and an approximate bordered size of 132 × 168 cm. Recalculate the scallop placement for its new side counts.
- Reverse A and B for pale frames around denim petals while keeping the same stitch sequence.
- Use a single shade throughout to emphasize the layered texture; keep the separate attachments and loop placements unchanged.
- For a straighter edge, finish after Border Round 4 and omit the scallops; the finished dimensions will be slightly smaller.
Frequently asked questions
Yes, but make and block a complete motif first. Multiply its measured width by the number of squares across and its height by the number of rows, then add your measured border depth twice. Yarn quantity and drape will change.
No. Both petal layers are crocheted onto the foundation. The frame is then attached behind them around the Round 2 sc posts, so there are no separate flowers to sew on.
For a side containing n motifs, Border Round 4 has 29n + 8 stitches between corner spaces. The stated scallop sequence requires that count to be divisible by four or leave a remainder of two. For another count, distribute one or two additional sc evenly along that side in Round 4 to reach either condition. After the initial skip-one, slip-stitch anchor, work four-stitch shell repeats; leave either zero or two stitches before the corner shell.
First check that the frame was anchored behind the petals and that every side has the correct count. If the counts are correct but the frame still cups after washing, try a slightly larger hook for the frame and sample again before making the full set.
The finished Blue Heirloom Flower Crochet Bedspread

