Advanced
For experienced crocheters who enjoy complex shaping, fine detail, and ambitious construction
Weekend Project
A satisfying weekend make — start Friday, finish Sunday, enjoy forever.
Handmade Gift
A beautiful keepsake — free forever. Read online or print at home.
About This Blue Lattice Lace Crochet Bedspread
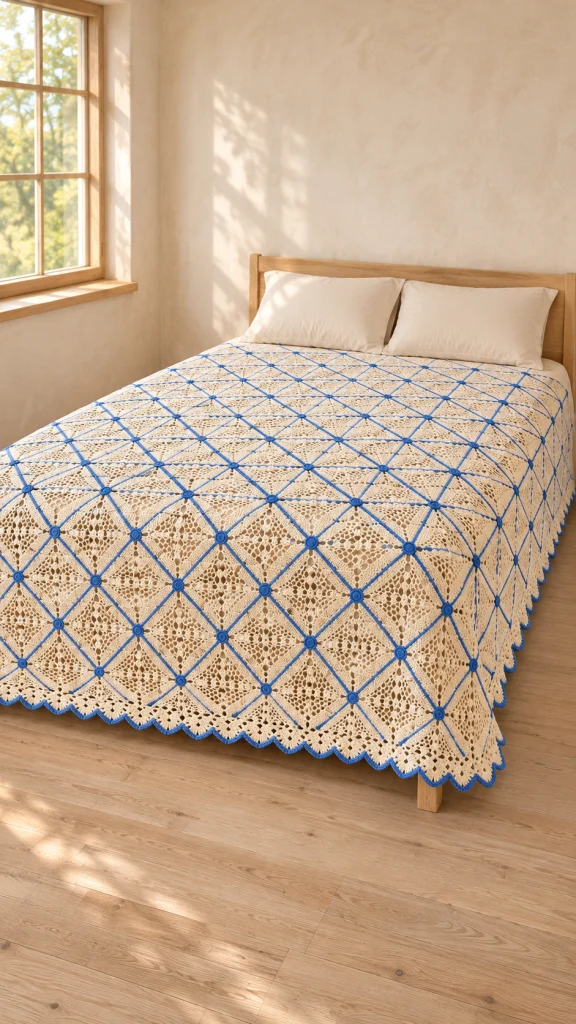
This blue lattice crochet bedspread pattern combines cream openwork squares with clear blue seams, small blue rosettes and a scalloped edging. The repeated squares create a light, geometric cover with the traditional character of a lace bedspread.
Each motif alternates solid crochet with open mesh, building four balanced sectors around a small central opening. Blue edging outlines each square, while separately worked rosettes cover the internal seam intersections. The result is a substantial bedspread with an airy surface and a neatly finished edge.
Allow approximately 160–220 hours for the 120 motifs, joining, rosettes and border. This advanced project suits crocheters who enjoy maintaining precise counts, blocking lace and assembling a large textile. The instructions use US crochet terminology and are an original interpretation of the pictured design.
Materials
- Sport-weight cotton yarn in cream: approximately 6,000–7,000 m; purchase the same dye lot throughout.
- Matching sport-weight cotton yarn in medium cornflower blue: approximately 1,000–1,300 m.
- 3.0 mm crochet hook, or size required for motif gauge.
- Tapestry needle for sewing seams, attaching rosettes and weaving ends.
- Removable stitch markers for corners, side centers and layout labels.
- Blocking mats, rustproof pins and a measuring tape.
- Scissors.
- Optional kitchen scale for estimating yarn requirements from the first completed motif.
Abbreviations
chchainscsingle crochetdcdouble crochetsl stslip stitchststitchspspaceMRmagic ringRSright sideCream Lace Squares — Make 120
- Round 1: With cream, ch 4 and sl st in the first ch to form a ring. Ch 3, work 2 dc into the ring, ch 2; work (3 dc into the ring, ch 2) three times. Join to the top of beginning ch 3. There are 12 dc and four ch-2 corners; each side contains 3 dc.
- Round 2: Sl st across to the next corner sp. Ch 3, work (dc, ch 2, 2 dc) in that same sp. Dc in each of the next 3 dc; work (2 dc, ch 2, 2 dc) in the next corner sp. Repeat the last side-and-corner sequence twice more, then dc in the final 3 dc and join. There are 7 dc per side, 28 dc total and four ch-2 corners.
- Round 3: Sl st to the next corner sp. Begin its corner with ch 3, then (dc, ch 2, 2 dc). Across the next side, dc in the first dc, then (ch 1, skip 1 dc, dc in the next dc) three times. Work (2 dc, ch 2, 2 dc) in the next corner. Repeat the side-and-corner sequence twice more, work the final mesh side and join. Each side has 8 dc and three ch-1 spaces, equivalent to 11 positions.
- Round 4: Sl st to the next corner. Begin the corner as in Round 3. Across each side, dc in every dc and work 1 dc in every ch-1 sp; work (2 dc, ch 2, 2 dc) in each remaining corner. Join. There are 15 dc per side, 60 dc total and four ch-2 corners.
- Round 5: Sl st to the next corner and begin the corner as before. Across each previous side, dc in the first dc, then (ch 1, skip 1 dc, dc in the next dc) seven times. Work the established corner in each remaining corner sp. Join. Each side has 12 dc and seven ch-1 spaces, equivalent to 19 positions.
- Round 6: Sl st to the next corner and begin the established corner. Dc in every dc and work 1 dc in every ch-1 sp along each side, working the established corner in each remaining corner sp. Join. There are 23 dc per side, 92 dc total and four ch-2 corners.
- Round 7: Sl st to the next corner and begin the established corner. Across each previous side, dc in the first dc, then (ch 1, skip 1 dc, dc in the next dc) eleven times. Work the established corner in each remaining corner sp. Join. Each side has 16 dc and eleven ch-1 spaces, equivalent to 27 positions.
- Round 8: Sl st to the next corner and begin the established corner. Dc in every dc and work 1 dc in every ch-1 sp along each side, working the established corner in each remaining corner sp. Join. There are 31 dc per side, 124 dc total and four ch-2 corners.
- Round 9: Sl st to the next corner and begin the established corner. Across each previous side, dc in the first dc, then (ch 1, skip 1 dc, dc in the next dc) fifteen times. Work the established corner in each remaining corner sp. Join. Each side has 20 dc and fifteen ch-1 spaces, equivalent to 35 positions.
- Round 10: Sl st to the next corner and begin the established corner. Dc in every dc and work 1 dc in every ch-1 sp along each side, working the established corner in each remaining corner sp. Join and fasten off cream. There are 39 dc per side, 156 dc total and four ch-2 corners.
Blue Motif Edging and Blocking
- Round 11: Join blue in any cream corner sp. Ch 1, work (sc, ch 2, sc) in that sp. Sc in each of the next 39 dc. Work (sc, ch 2, sc) in the next corner sp. Repeat the side-and-corner sequence twice more, sc in the final 39 dc and join to the first sc. Fasten off. Each side contains 41 sc between corner spaces; there are 164 sc and four ch-2 corners.
- Weave in the cream ends and the blue starting end. Leave the blue finishing tail available for securing a corner if useful during assembly.
- Wet-block each motif to exactly 20 × 20 cm, measured from corner to corner along an edge. Pin the four corners square and keep all sides straight. Allow the motifs to dry completely.
Layout and Blue Lattice Joining
- Arrange 120 motifs in 12 horizontal rows of 10 squares, all with the RS facing upward. The unbordered body measures approximately 200 cm wide by 240 cm long. Keep the motif orientation consistent.
- Join neighboring squares within each row using blue yarn and a flat mattress seam. Place them edge to edge with RS facing up. Pass the needle under the two top loops of one edge sc, then under the two top loops of its matching sc on the other motif. Match all 41 sc one for one. Draw the yarn snug enough to close the gap without overlapping the edges.
- At each seam endpoint, sew through the corresponding corner ch-2 spaces twice. Keep the spaces accessible for the crossing seam or outer border. Secure the joining yarn. Complete all nine seams in each of the 12 rows.
- Join the completed rows with the same seam, matching 41 sc along every paired motif edge. At each four-square intersection, take a small securing stitch through all four corner spaces. Complete all 11 row joins. Keep the bedspread flat on a table as you work so its weight does not stretch the seams.
- Check the finished grid: 10 motifs across, 12 motifs down, 99 internal four-square intersections and four outer body corners. For a different size, use 20 cm multiplied by the number of motifs across or down, then add approximately 12 cm to each dimension for the border.
Blue Intersection Rosettes — Make 99
- Round 1: With blue, make an MR, ch 1 and work 6 sc into the ring. Pull the ring closed and join to the first sc. There are 6 sc.
- Round 2: Ch 1, work 2 sc in each sc around and join to the first sc. There are 12 sc. Fasten off, leaving a 25 cm sewing tail.
- Place one rosette over each internal four-square intersection. Sew its outer round to the blue corner edging beneath it with six evenly spaced small stitches. Keep the stitches within the blue fabric and secure the tail on the wrong side. Do not attach rosettes to the outer perimeter.
Cream Border and Blue Scallops
- Round 1, cream foundation: Join cream in an outer body corner sp. Ch 1 and work (sc, ch 2, sc) in that sp. Along every motif edge, sc in each of its 41 blue sc. At each junction between motifs, work 1 additional sc through the two secured corner spaces together. At each of the three remaining outer body corners, work (sc, ch 2, sc). Join to the first sc. Including the two corner sc bounding each side, each short side has 421 sc and each long side has 505 sc. There are 1,852 sc total and four ch-2 corners.
- Round 2, cream solid band: Sl st to the next corner sp. Ch 3, work (dc, ch 2, 2 dc) in that sp. Dc in every sc along each side, working (2 dc, ch 2, 2 dc) in each remaining corner sp. Join. Each short side has 425 dc and each long side has 509 dc; there are 1,868 dc total.
- Round 3, cream mesh: Sl st to the next corner sp and begin the established dc corner. Along each short side, dc in the first dc, then (ch 1, skip 1 dc, dc in the next dc) 212 times. Along each long side, dc in the first dc, then (ch 1, skip 1 dc, dc in the next dc) 254 times. Work the established dc corner in each remaining corner sp and join. Each short side has 217 dc and 212 ch-1 spaces, equivalent to 429 positions. Each long side has 259 dc and 254 ch-1 spaces, equivalent to 513 positions.
- Round 4, cream scallop foundation: Sl st to the next corner sp and begin the established dc corner. Dc in every dc and work 1 dc in every ch-1 sp along each side. Work the established dc corner in each remaining corner sp. Join. Each short side has 433 dc and each long side has 517 dc; there are 1,900 dc total and four ch-2 corners.
- Round 5, cream scallops: Sl st to the next corner sp, ch 1 and work 7 dc in that sp. On each short side, sc in the first dc, then repeat (skip 2 dc, work 5 dc in the next dc, skip 2 dc, sc in the next dc) 72 times. On each long side, sc in the first dc, then work that same repeat 86 times. Work 7 dc in each remaining corner sp. Join to the first dc of the first corner shell and fasten off cream. There are 316 side shells of 5 dc and four corner shells of 7 dc; every side ends with an sc.
- Round 6, blue outline: Join blue in any sc. Ch 1 and sc in every sc and dc around, keeping the stitches relaxed over the shells. Join to the first sc and fasten off. There are 1,928 sc total. The completed border should add approximately 6 cm on each edge after blocking.
Finishing
- Inspect every seam and rosette attachment from both sides. Secure any loose junction with matching blue yarn, then weave each remaining tail through several stitches in two directions.
- Wash or soak according to the yarn label. Support the wet bedspread with both hands when lifting it, and gently press out water without twisting. Roll it in towels before laying it flat.
- Block the bedspread to approximately 212 × 252 cm. Straighten the motif grid first, then open the cream mesh and shape the scallops. Keep the blue seams relaxed and let the fabric dry completely before moving it.
Your finished bedspread is ready to settle over a made bed, with the scalloped border hanging freely at the sides and foot. Fold it loosely for storage so the lace and blue seams keep their shape.
Tips for Success
- Measure several dry motifs together before joining; a 5 mm difference repeated across ten squares changes the width by 5 cm.
- Mark the first and last stitch of each motif side. Corner spaces are excluded from side counts throughout the pattern.
- Weigh your first completed motif and rosette to refine the yarn estimate, then allow extra yarn for seams, border and swatching.
- Keep the bedspread supported during joining and edging. Its hanging weight can lengthen the cotton and tighten your working tension.
- Count all four border sides before starting the scallops; the short sides require 433 foundation stitches and the long sides require 517.
Common Mistakes to Avoid
- Missing the final dc on a mesh side: complete every mesh repeat through the last stitch before the corner, then check the stated position count.
- Working two dc into a ch-1 mesh space on a solid round: use exactly one dc per ch-1 space to preserve the square’s proportions.
- Pulling mattress seams tight: loosen the seam until both motif edges lie flat without cupping or overlapping.
- Skipping the border stitch at a motif junction: work one sc through the paired corner spaces together at each junction in Border Round 1.
- Starting scallops with an incorrect foundation count: correct Round 4 before proceeding so every side begins and ends with an sc.
Ways to Customize This Pattern
- Make an 8-by-10-motif cover for an approximate finished size of 172 × 212 cm, including the same border depth.
- For any rectangular layout, let n be the number of motifs along a side. Border Round 1 has 42n + 1 stitches on that side; Rounds 2 and 4 have 42n + 5 and 42n + 13 respectively. In Round 3, work 21n + 2 mesh repeats after the first dc; Round 5 takes 7n + 2 side scallops.
- Replace cornflower blue with indigo or soft sage, using the same yarn construction and weight for edging, joining and rosettes.
- Omit the rosettes for a flatter surface, securing each internal corner intersection firmly during assembly.
- Use matching cream throughout for a monochrome lace bedspread while retaining the outlined square construction.
Frequently asked questions
The planned finished size is approximately 212 × 252 cm. Measure your mattress and add the desired drop on each side and at the foot. For example, centered across a 152 cm mattress, this width gives approximately 30 cm of drop on each side.
No. They form a straight rectangular grid. The open mesh and repeated corner shaping create the geometric lace effect, while perspective makes the grid appear more diamond-like when the bedspread hangs over a bed.
Yes, but the bedspread will become larger and heavier. Block a complete motif with its blue edging, multiply its measured width by the chosen motif count and then add your measured border depth twice. Recalculate yarn from the sample.
The challenge is maintaining identical lace squares, matching 41-stitch seams, managing four-way intersections and preserving exact border counts across a large piece. Accurate blocking and controlled joining tension are essential.
The finished Blue Lattice Lace Crochet Bedspread

