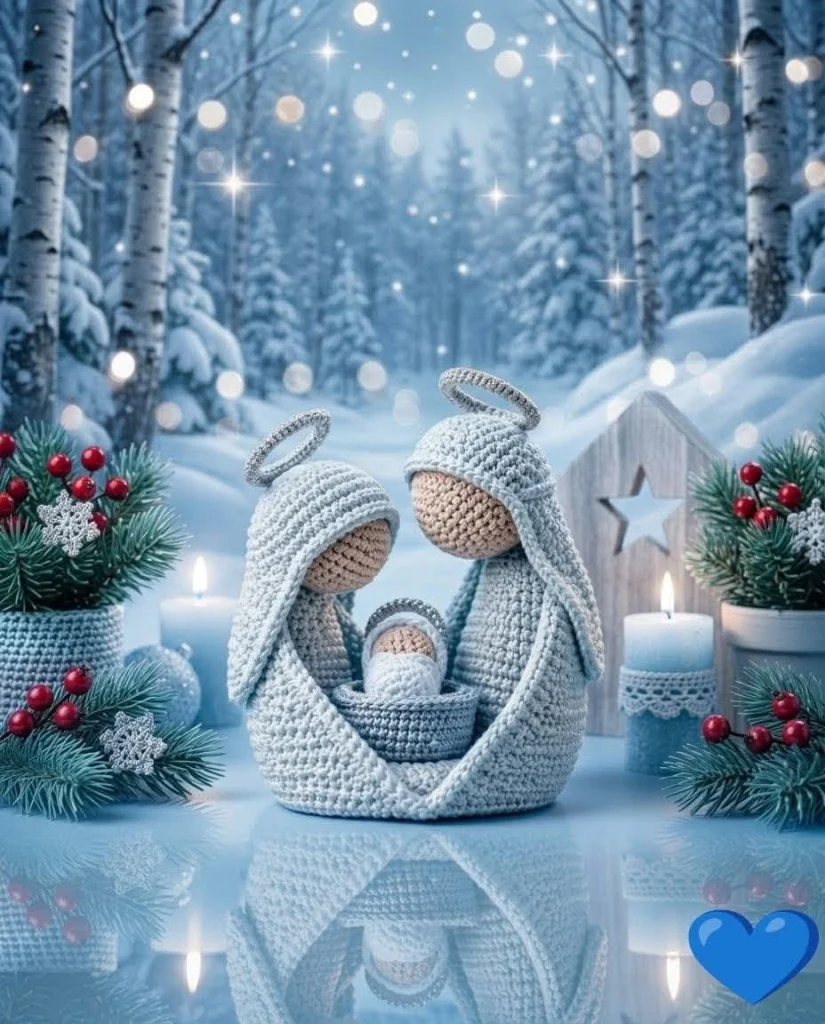
Blue Winter Nativity Amigurumi – Free Advanced Crochet Pattern
Create a peaceful handmade Christmas decoration with this beautiful Blue Winter Nativity Amigurumi crochet pattern. Featuring Mary, Joseph, and Baby Jesus in a miniature manger, this elegant nativity scene combines soft icy blue yarn, delicate cream-colored faces, silver halos, and flowing crochet robes.
Inspired by the quiet beauty of a snowy winter evening, this advanced crochet project features sculpted figures, layered head coverings, a tiny swaddled baby, a textured manger, and a shared decorative base. The finished display makes a meaningful addition to Christmas decorations and a thoughtful handmade holiday gift.
This original, image-inspired pattern recreates the distinctive faceless minimalist figures, curved blue robes, silver halos, and compact family arrangement shown in the reference photograph.
Pattern Details
- Skill Level: Advanced
- Finished Height: Approximately 19–22 cm, including halos
- Finished Width: Approximately 21–24 cm
- Construction: Separate figures, heads, veils, halos, baby, manger, and decorative base
- Yarn Weight: Sport or DK cotton yarn
- Hook Sizes: 2.5 mm and 3 mm
- Terminology: US crochet terms
- Colors: Ice blue, powder blue, cream, and metallic silver
- Estimated Time: 12–18 hours
Materials Needed
- 100–150 g ice blue cotton yarn
- 50–75 g powder blue cotton yarn
- 20 g cream or light beige cotton yarn
- Small amount of metallic silver yarn
- 2.5 mm crochet hook
- 3 mm crochet hook
- Polyester fiberfill stuffing
- Tapestry needle
- Stitch markers
- Scissors
- Optional thin craft wire for halos
- Optional plastic canvas for the display base
- Optional fabric stiffener
Safety Note: This nativity scene is intended as a decorative display, not a toy. If using craft wire, secure and completely conceal the ends. Keep away from small children.
Crochet Abbreviations
- MR: Magic ring
- ch: Chain
- sc: Single crochet
- hdc: Half double crochet
- dc: Double crochet
- sl st: Slip stitch
- inc: 2 sc in the same stitch
- dec: Invisible decrease
- BLO: Back loop only
- FLO: Front loop only
- FO: Fasten off
- st: Stitch
- rnd: Round
Work in continuous spiral rounds unless otherwise stated. Use a stitch marker to identify the beginning of each round.
1. Crochet Mary’s Body
Mary’s figure has a gently tapered body with a wide lower section. The soft blue robe forms a stable base while allowing the head and veil to sit naturally above the shoulders.
Using ice blue yarn and a 2.5 mm hook:
Rnd 1: 6 sc in MR. (6)
Rnd 2: Inc around. (12)
Rnd 3: (1 sc, inc) x 6. (18)
Rnd 4: (2 sc, inc) x 6. (24)
Rnd 5: (3 sc, inc) x 6. (30)
Rnd 6: (4 sc, inc) x 6. (36)
Rnd 7: (5 sc, inc) x 6. (42)
Rnd 8: (6 sc, inc) x 6. (48)
Rnd 9: BLO sc around. (48)
Rnds 10–13: Sc around. (48)
Rnd 14: (6 sc, dec) x 6. (42)
Rnds 15–17: Sc around. (42)
Rnd 18: (5 sc, dec) x 6. (36)
Rnds 19–21: Sc around. (36)
Rnd 22: (4 sc, dec) x 6. (30)
Rnds 23–25: Sc around. (30)
Rnd 26: (3 sc, dec) x 6. (24)
Rnds 27–29: Sc around. (24)
Rnd 30: (2 sc, dec) x 6. (18)
Rnds 31–33: Sc around. (18)
Stuff firmly at the bottom and lightly toward the upper body. Fasten off, leaving a long sewing tail.
2. Crochet Mary’s Head
Using cream yarn:
Rnd 1: 6 sc in MR. (6)
Rnd 2: Inc around. (12)
Rnd 3: (1 sc, inc) x 6. (18)
Rnd 4: (2 sc, inc) x 6. (24)
Rnd 5: (3 sc, inc) x 6. (30)
Rnd 6: (4 sc, inc) x 6. (36)
Rnds 7–12: Sc around. (36)
Rnd 13: (4 sc, dec) x 6. (30)
Rnd 14: (3 sc, dec) x 6. (24)
Rnd 15: (2 sc, dec) x 6. (18)
Stuff the head firmly.
Rnd 16: (1 sc, dec) x 6. (12)
Rnd 17: Dec around. (6)
Fasten off and close the opening.
Do not embroider facial features. The simple faceless design is essential to the peaceful appearance of the finished nativity scene.
3. Crochet Mary’s Flowing Veil
The veil is one of the most important decorative elements. It should frame the face and extend down both sides of the body.
Using ice blue yarn and a 3 mm hook:
Row 1: Ch 21. Sc in the second chain from the hook and across. (20)
Rows 2–4: Ch 1, turn, sc across. (20)
Row 5: Ch 1, turn, inc, sc 18, inc. (22)
Rows 6–8: Sc across. (22)
Row 9: Inc, sc 20, inc. (24)
Rows 10–12: Sc across. (24)
Row 13: Inc, sc 22, inc. (26)
Rows 14–16: Sc across. (26)
Row 17: Inc, sc 24, inc. (28)
Rows 18–20: Sc across. (28)
Row 21: Inc, sc 26, inc. (30)
Rows 22–24: Sc across. (30)
Continue for another 8–12 rows if a longer veil is desired.
Work one round of sc around the entire rectangle, placing 3 sc in each corner.
Fasten off and weave in the ends.
Shape the Veil
- Fold the upper edge gently over the head.
- Allow the two sides to fall toward the front of the body.
- Pin the veil around the head.
- Sew discreetly along the upper back of the head.
- Leave the lower sections loose to create flowing folds.
4. Crochet Joseph’s Body
Joseph is slightly taller than Mary and features a more upright silhouette.
Using powder blue yarn:
Rnd 1: 6 sc in MR. (6)
Rnd 2: Inc around. (12)
Rnd 3: (1 sc, inc) x 6. (18)
Rnd 4: (2 sc, inc) x 6. (24)
Rnd 5: (3 sc, inc) x 6. (30)
Rnd 6: (4 sc, inc) x 6. (36)
Rnd 7: (5 sc, inc) x 6. (42)
Rnd 8: (6 sc, inc) x 6. (48)
Rnd 9: BLO sc around. (48)
Rnds 10–15: Sc around. (48)
Rnd 16: (6 sc, dec) x 6. (42)
Rnds 17–20: Sc around. (42)
Rnd 21: (5 sc, dec) x 6. (36)
Rnds 22–25: Sc around. (36)
Rnd 26: (4 sc, dec) x 6. (30)
Rnds 27–30: Sc around. (30)
Rnd 31: (3 sc, dec) x 6. (24)
Rnds 32–35: Sc around. (24)
Rnd 36: (2 sc, dec) x 6. (18)
Rnds 37–39: Sc around. (18)
Stuff the body firmly enough to stand upright.
Fasten off, leaving a sewing tail.
5. Crochet Joseph’s Head
Using cream yarn, follow the same head pattern used for Mary.
Make the head slightly taller by adding two additional rounds of 36 sc before beginning the decreases.
Stuff firmly and close the opening.
Keep the face plain, without eyes, nose, or mouth.
6. Crochet Joseph’s Head Covering
Joseph’s head covering has a rounded upper section and two long flowing sides.
Using powder blue yarn:
Rnd 1: 6 sc in MR. (6)
Rnd 2: Inc around. (12)
Rnd 3: (1 sc, inc) x 6. (18)
Rnd 4: (2 sc, inc) x 6. (24)
Rnd 5: (3 sc, inc) x 6. (30)
Rnd 6: (4 sc, inc) x 6. (36)
Rnds 7–10: Sc around. (36)
Fasten off.
Side Panels – Make 2
Ch 9.
Row 1: Sc in the second chain from the hook and across. (8)
Rows 2–28: Ch 1, turn, sc across. (8)
Fasten off, leaving a long tail.
Attach one panel to each side of the head covering. Position the panels so they fall along Joseph’s shoulders and toward the lower body.
Sew the cap to the back of the head, leaving the cream-colored face visible.
7. Crochet Baby Jesus
Baby Jesus is much smaller than the adult figures and rests inside a miniature blue manger.
Baby’s Head
Using cream yarn and a 2.5 mm hook:
Rnd 1: 6 sc in MR. (6)
Rnd 2: Inc around. (12)
Rnd 3: (1 sc, inc) x 6. (18)
Rnds 4–6: Sc around. (18)
Rnd 7: (1 sc, dec) x 6. (12)
Stuff lightly.
Rnd 8: Dec around. (6)
Fasten off and close the opening.
Baby’s Swaddled Body
Using ice blue yarn:
Rnd 1: 6 sc in MR. (6)
Rnd 2: Inc around. (12)
Rnds 3–7: Sc around. (12)
Rnd 8: (2 sc, dec) x 3. (9)
Rnds 9–10: Sc around. (9)
Stuff lightly and fasten off.
Sew the cream head to the narrow end of the swaddled body.
Baby’s Hood
Using powder blue yarn:
Rnd 1: 6 sc in MR. (6)
Rnd 2: Inc around. (12)
Rnd 3: (1 sc, inc) x 6. (18)
Rnds 4–5: Sc around. (18)
Fasten off.
Position the hood around the upper back of the baby’s head, leaving the face exposed.
Sew into place with small hidden stitches.
8. Crochet the Baby’s Manger
The manger is a small oval-shaped basket in powder blue yarn.
Using a 2.5 mm hook:
Rnd 1: Ch 13. Starting in the second chain from the hook, sc 11, work 3 sc in the last chain. Continue along the opposite side of the foundation chain, sc 10, work 2 sc in the final chain. (26)
Rnd 2: Inc, sc 10, inc in each of the next 3 stitches, sc 10, inc in each of the next 2 stitches. (32)
Rnd 3: Sc around. (32)
Rnd 4: BLO sc around. (32)
Rnds 5–8: Sc around. (32)
Rnd 9: Reverse sc around to create a decorative rim. (32)
Fasten off and weave in the ends.
Gently shape the basket into an oval.
Place a small amount of stuffing or folded crochet fabric inside the manger to support the baby.
9. Crochet the Manger Blanket
Using ice blue yarn:
Row 1: Ch 13. Sc in the second chain from the hook and across. (12)
Rows 2–15: Ch 1, turn, sc across. (12)
Fasten off.
Wrap the blanket around the baby’s lower body.
Position Baby Jesus inside the manger and secure with a few hidden stitches.
10. Crochet the Silver Halos
The delicate silver halos are an important feature of the winter nativity design.
Using metallic silver yarn and a 2.5 mm crochet hook:
Mary’s Halo
Ch 38 and join with a sl st to form a ring, taking care not to twist the chain.
Rnd 1: Sc in each chain around. (38)
Rnd 2: Sl st in each stitch around. (38)
Fasten off.
Joseph’s Halo
Repeat the same instructions, using a foundation chain of 40 stitches.
For extra stability, crochet around a thin circular wire frame, ensuring the ends are completely enclosed.
Alternatively, apply fabric stiffener and allow the halos to dry in a circular shape.
Attach each halo to the back of the corresponding head covering using matching thread.
Position the halos slightly above the heads so they appear to float gently over the figures.
11. Crochet the Shared Nativity Base
The base supports Mary, Joseph, and the manger while creating the smooth, unified silhouette shown in the reference image.
Using powder blue yarn and a 3 mm hook:
Rnd 1: Ch 31. Sc in the second chain from the hook and in the next 28 chains. Work 3 sc in the last chain. Continue on the opposite side, sc 28, then 2 sc in the final chain. (62)
Rnd 2: Inc, sc 28, inc in each of the next 3 stitches, sc 28, inc in each of the next 2 stitches. (68)
Rnd 3: Sc around. (68)
Rnd 4: BLO sc around. (68)
Rnds 5–8: Sc around. (68)
Fasten off.
Cut a piece of plastic canvas slightly smaller than the bottom of the base and insert it to provide stability.
Stuff lightly around the edges if necessary.
12. Create the Draped Front Robes
To reproduce the graceful overlapping fabric effect, add two separate crochet panels that extend from the figures toward the front of the shared base.
Mary’s Front Panel
Using ice blue yarn:
Row 1: Ch 13, sc across starting in the second chain. (12)
Rows 2–20: Ch 1, turn, sc across. (12)
Fasten off.
Joseph’s Front Panel
Using powder blue yarn:
Row 1: Ch 13, sc across starting in the second chain. (12)
Rows 2–24: Ch 1, turn, sc across. (12)
Fasten off.
Attach the upper edges of these panels beneath the figures’ heads.
Arrange the panels so they curve inward toward the manger.
Overlap the lower ends near the center of the base, creating a soft V-shaped cradle effect.
Secure with hidden stitches.
13. Assemble the Complete Nativity Scene
Before sewing the pieces together, arrange all components on a flat surface.
- Position Mary on the left side of the base.
- Position Joseph on the right side.
- Place the miniature manger in the center.
- Check that both adult figures face gently inward.
- Adjust the veils and head coverings.
- Attach the figures securely to the base.
- Sew the manger between Mary and Joseph.
- Arrange the front robe panels around the manger.
- Secure the overlapping sections with hidden stitches.
- Attach the silver halos behind the heads.
- Check the balance and symmetry of the finished display.
The completed nativity should form a compact, harmonious composition with Baby Jesus positioned between the two taller figures.
14. Add Advanced Finishing Details
For a polished, professional appearance, consider the following finishing techniques:
- Use invisible decreases to maintain smooth shaping.
- Keep all facial surfaces free from embroidery.
- Use consistent yarn tension throughout the project.
- Block the veils before assembly.
- Shape the lower robes with gentle folds.
- Use hidden mattress stitches for joining.
- Reinforce the base with plastic canvas.
- Use fabric stiffener on the halos if needed.
- Hide all yarn tails inside the figures.
- Check that the completed nativity stands securely.
15. Optional Winter-Themed Decorations
To create a coordinated winter display, surround the finished nativity with additional handmade decorations.
- Small crochet snowflakes in white or silver yarn
- Miniature icy blue crochet stars
- Soft blue crochet candle sleeves
- White crochet pine branches
- Miniature crochet winter baskets
- Silver and blue Christmas ornaments
Keep the additional decorations subtle so the nativity remains the focal point.
Use battery-operated LED candles rather than open flames near yarn decorations.
16. Color Variations
Classic Winter Blue
- Mary: Ice blue
- Joseph: Powder blue
- Baby: Pale blue
- Faces: Cream
- Halos: Silver
Traditional Christmas Nativity
- Mary: Deep blue
- Joseph: Warm brown
- Baby: Ivory
- Faces: Light beige
- Halos: Gold
Elegant Neutral Nativity
- Mary: Warm ivory
- Joseph: Soft taupe
- Baby: Cream
- Faces: Light beige
- Halos: Champagne gold
17. Care Instructions
- Dust gently using a soft brush.
- Spot-clean with cool water when necessary.
- Avoid machine washing assembled figures.
- Do not soak stiffened halos.
- Allow damp crochet pieces to air-dry completely.
- Store in a dry decorative box.
- Protect the halos from bending during storage.
- Keep away from direct heat and open flames.
Frequently Asked Questions
Is this crochet nativity pattern suitable for beginners?
This pattern is designed for advanced crocheters because it includes multiple shaped components, three-dimensional construction, detailed assembly, and delicate decorative elements.
How tall is the finished nativity scene?
The completed display measures approximately 19–22 cm tall, including the silver halos, depending on yarn weight and crochet tension.
Can I make the figures larger?
Yes. Use thicker yarn and a larger crochet hook while maintaining the same stitch counts.
Can I make the nativity without halos?
Absolutely. The figures can be displayed without halos for a simpler, minimalist appearance.
Why are the faces left blank?
The faceless design gives the figures a peaceful, timeless appearance and keeps the focus on the gentle shapes and flowing robes.
Can I make the nativity in traditional Christmas colors?
Yes. Deep blue, burgundy, brown, ivory, and gold are beautiful alternatives to the icy blue palette.
Can I use acrylic yarn?
Yes, although cotton yarn is recommended for sharper stitch definition and firmer structural shaping.
How can I make the figures stand more securely?
Use firm stuffing in the lower bodies, reinforce the shared base with plastic canvas, and attach the figures with several secure stitches.
Can I sell finished items made from this pattern?
Yes. You may sell handmade finished items created from this original pattern. Credit to Cozy Crochet Patterns is appreciated.
Final Thoughts
This Blue Winter Nativity Amigurumi is a beautiful way to celebrate Christmas through the art of crochet. With its soft icy blue palette, elegant flowing robes, delicate silver halos, and tiny swaddled baby, the finished scene brings a peaceful handmade touch to winter decorating.
Whether displayed on a mantel, shelf, holiday table, or beside a Christmas tree, this crochet nativity makes a meaningful seasonal decoration that can be enjoyed year after year.
Create your own handmade nativity scene, experiment with beautiful winter colors, and enjoy the intricate details of this advanced crochet project.
Save this free crochet nativity pattern to Pinterest and share it with your crochet-loving friends!
Pattern note: This is an original image-inspired design, not an exact reconstruction of a published pattern. The instructions have not been sample-tested. Test the components and adjust the shaping, stitch counts, and assembly as needed.

