Boho Crochet Drawstring Backpack Pattern
Beginner Friendly
Perfect for those just starting their crochet journey, with clear instructions and simple techniques
Single-Day Project
A satisfying project you can complete in a single afternoon or evening.
Handmade Gift
A beautiful keepsake — free forever. Read online or print at home.
About This Boho Crochet Drawstring Backpack Pattern
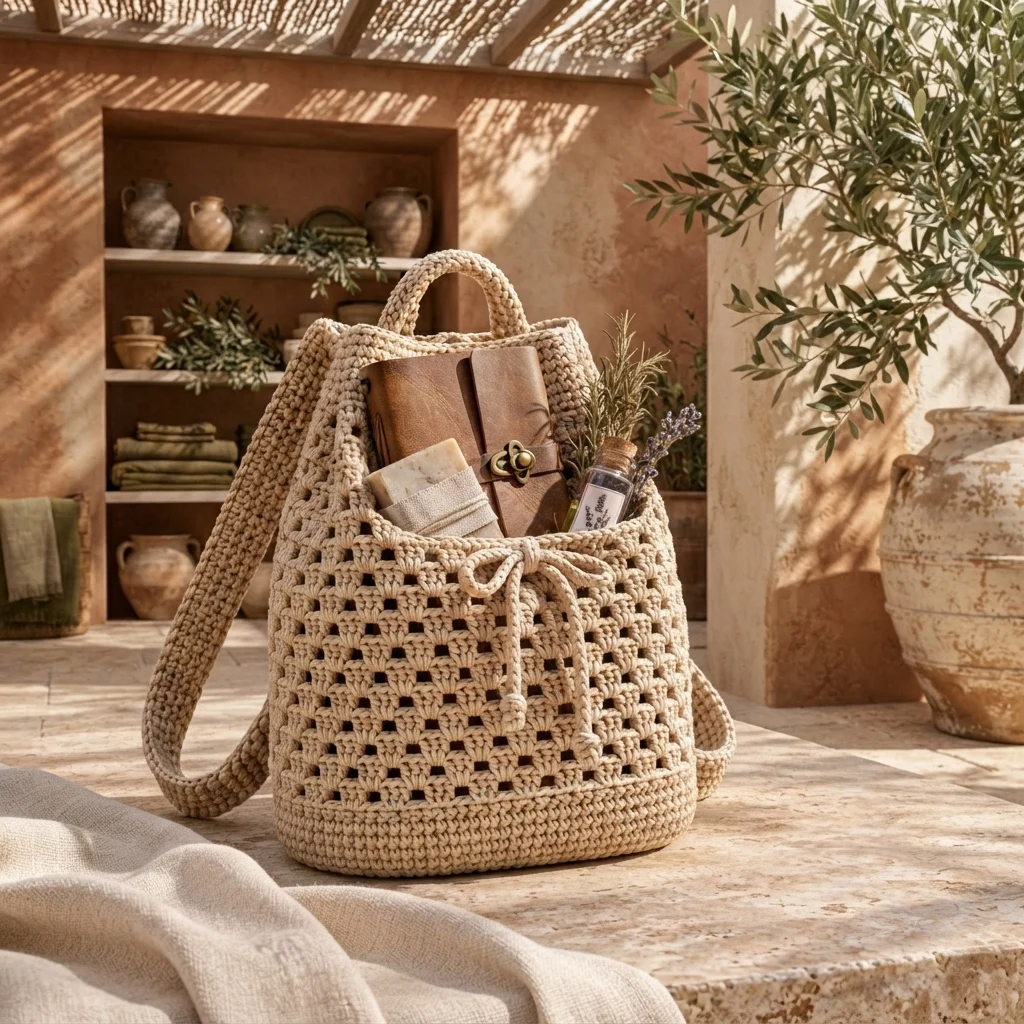
This crochet drawstring backpack pattern creates a structured cream backpack with a dense oval base, open textured body, reinforced upper band, braided-look drawstring, sturdy shoulder straps, and a compact top handle. The neutral cotton color and geometric stitch texture give it the clean boho appearance of the reference bag while keeping the construction practical enough for regular use.
The backpack combines several different crochet structures. A firm oval base supports the contents, the body changes into an open cluster mesh for flexibility, and solid side columns help stabilize the bag. The upper section returns to dense crochet so the drawstring can gather the opening without stretching the decorative mesh. Separately crocheted straps and a reinforced handle complete the design.
This is an advanced project requiring approximately 14-18 hours. It is best suited to crocheters comfortable with oval shaping, working in joined rounds, maintaining repeating mesh patterns, crocheting structural bands, making long reinforced straps, constructing cords, sewing load-bearing components, and controlling tension with firm cotton yarn or cord.
Materials
- Aran / medium cotton or cotton-polyester cord in natural cream approximately 650-750 m
- 4.0 mm crochet hook main body
- 3.5 mm crochet hook optional for firmer straps and drawstring
- Yarn needle heavy-duty blunt needle recommended
- Stitch markers 6-8 recommended
- Scissors 1 pair
- Cotton webbing optional, approximately 2 m for hidden strap reinforcement
- Cotton lining fabric optional, approximately 50 × 80 cm
- Plastic canvas or firm bag-base insert optional, approximately 27 × 9 cm
- Matching sewing thread for optional reinforcement and lining
Abbreviations
chchainsl stslip stitchscsingle crochethdchalf double crochetdcdouble crochetsc2togsingle crochet 2 stitches togetherinc2 single crochet in the same stitchststitchstsstitchesspspaceskskipBLOback loop onlyRSright sideWSwrong sideOval Backpack Base
- Round 1: Ch 37. Work 2 sc in second ch from hook, sc in next 34 ch, 4 sc in final ch. Working along the opposite side of the foundation chain, sc in next 34 ch, then 2 sc in the same chain that held the first 2 sc. Join with sl st. (76 sts)
- Round 2: Ch 1. 2 sc in each of next 2 sts, sc in next 34 sts, 2 sc in each of next 4 sts, sc in next 34 sts, 2 sc in each of final 2 sts. Join. (84 sts)
- Round 3: Ch 1. (Sc in next st, 2 sc in next st) twice, sc in next 34 sts, (sc in next st, 2 sc in next st) 4 times, sc in next 34 sts, (sc in next st, 2 sc in next st) twice. Join. (92 sts)
- Round 4: Ch 1. (Sc in next 2 sts, 2 sc in next st) twice, sc in next 34 sts, (sc in next 2 sts, 2 sc in next st) 4 times, sc in next 34 sts, (sc in next 2 sts, 2 sc in next st) twice. Join. (100 sts)
- Round 5: Ch 1. (Sc in next 3 sts, 2 sc in next st) twice, sc in next 34 sts, (sc in next 3 sts, 2 sc in next st) 4 times, sc in next 34 sts, (sc in next 3 sts, 2 sc in next st) twice. Join. (108 sts)
- Round 6: Ch 1, sc in each st around. Join. (108 sts)
- Round 7: Working in BLO, sc in each st around. Join. (108 sts)
- Round 8: Sc in each st around. Join. (108 sts)
- Round 9: Sc in each st around. Join. (108 sts)
Solid Lower Body
- Round 1: Ch 1, sc in each st around. Join. (108 sts)
- Rounds 2-5: Repeat Round 1. (108 sts per round)
- Round 6: Ch 1, hdc in each st around. Join. (108 sts)
- Round 7: Ch 1, sc in each st around. Join. (108 sts)
- The solid lower section should measure approximately 5-6 cm above the base and remain firm enough to stand when empty.
Textured Mesh Body
- Round 1: Ch 3, dc in same st, ch 1, sk next 2 sts, 2 dc in next st; repeat (ch 1, sk next 2 sts, 2 dc in next st) around. Join with sl st to top of beginning ch-3. You have 36 two-dc groups separated by 36 ch-1 spaces.
- Round 2: Sl st into the space between the first pair of dc. Ch 3, dc in same sp, ch 1, then work 2 dc into the space between the next pair of dc; repeat around. Join.
- Rounds 3-5: Repeat Round 2, keeping 36 cluster groups in every round.
- Round 6: Ch 1, sc in each dc and 1 sc in every ch-1 sp around. Join. (108 sts)
- Round 7: Ch 3, dc in same st, ch 1, sk next 2 sts, 2 dc in next st; repeat around. Join.
- Rounds 8-11: Repeat the cluster placement from Round 2.
- Round 12: Ch 1, sc in each dc and each ch-1 sp around. Join. (108 sts)
- Rounds 13-17: Repeat the mesh sequence once more, maintaining exactly 36 cluster groups.
- Round 18: Convert the mesh back to solid fabric by working 1 sc in each dc and 1 sc in each ch-1 sp. Join. (108 sts)
Decorative Vertical Side Columns – Make 2
- Lay the backpack flat and mark the center point of each side.
- Join yarn at the bottom of one marked side approximately 1 round above the solid base.
- Working upward on the surface, make a line of evenly spaced sl sts through the mesh intersections until reaching the upper solid section.
- Turn and work back down the surface ridge using sc around each surface sl st.
- At every mesh opening, keep the sc snug enough to create a raised column without gathering the bag.
- Fasten off at the lower edge and hide the tails inside the bag.
- Repeat on the opposite side, checking that both columns begin and end at matching heights.
Upper Solid Band
- Round 1: Ch 1, sc in each of the 108 sts around. Join. (108 sts)
- Round 2: Ch 1, sc in each st around. Join. (108 sts)
- Round 3: Ch 1, hdc in each st around. Join. (108 sts)
- Round 4: Ch 1, sc in each st around. Join. (108 sts)
- Round 5: Ch 1, sc in each st around. Join. (108 sts)
- Round 6: Ch 1, hdc in each st around. Join. (108 sts)
Drawstring Eyelet Round
- Round 1: Ch 1, sc in next 3 sts, ch 2, sk next 2 sts; repeat (sc in next 4 sts, ch 2, sk next 2 sts) around, adjusting the final solid section if necessary so the openings remain evenly distributed. Join.
- Round 2: Ch 1. Sc in each sc and work 2 sc in every ch-2 sp around. Join. Restore the round to 108 sts.
- Round 3: Sc in each st around. Join. (108 sts)
- Round 4: Hdc in each st around. Join. (108 sts)
- Round 5: Sc in each st around. Join and fasten off.
Top Rim Reinforcement
- Join yarn at the back center of the upper edge.
- Round 1: Ch 1 and work sc in every st around. Join. (108 sts)
- Round 2: Working in BLO, sc in every st around. Join. (108 sts)
- Round 3: Sc in every st around. Join. (108 sts)
- Fasten off and weave the end into the inside of the solid band.
Drawstring Cord – Make 1
- With the 3.5 mm hook, ch 190 or enough chains to make a cord approximately 115-120 cm long.
- Beginning in second ch from hook, sl st in every ch back to the beginning. Keep the stitches relaxed enough that the cord does not twist.
- Turn the cord and surface sl st along the opposite side of the original foundation chain for additional thickness.
- Fasten off and weave the tails securely through the cord.
- Starting at the center front, weave the cord alternately in and out through every eyelet around the upper band.
- Bring both ends back to the front and adjust until they are equal in length.
Drawstring End Knots – Make 2
- Measure approximately 3 cm upward from one end of the finished drawstring.
- Form a compact overhand knot and pull it firmly into place.
- Shape the knot with your fingers so it appears rounded rather than flat.
- Repeat on the second end at exactly the same distance from the tip.
- Trim or hide any remaining yarn tails inside the cord.
Shoulder Straps – Make 2
- Row 1: With 3.5 mm hook, ch 9. Sc in second ch from hook and in each remaining ch. Ch 1, turn. (8 sc)
- Rows 2-115: Sc in each st across. Ch 1, turn. (8 sc)
- Continue until the strap measures approximately 68-72 cm or your preferred finished length.
- Final Row: Sc in each st across. Do not fasten off.
- Edging Round: Ch 1 and work sc evenly down the first long side, 3 sc across the short end, sc evenly up the opposite long side, and 3 sc across the starting edge. Join.
- Second Edging Round: Sc around the complete strap again, placing 2 sc in each outer corner so the edges remain flat.
- Fasten off leaving approximately 50 cm of yarn at both ends for attachment.
Optional Hidden Strap Reinforcement – Make 2
- Cut two lengths of cotton webbing approximately 2 cm shorter than the finished crochet straps.
- Center one piece of webbing along the WS of each strap.
- Fold the crocheted side edges slightly around the webbing without narrowing the visible front of the strap.
- Using matching sewing thread, stitch the webbing securely to the WS along both long edges.
- Stop the webbing approximately 1 cm before each strap end so the reinforcement remains invisible after attachment.
Top Carry Handle
- Row 1: Ch 7. Sc in second ch from hook and across. Ch 1, turn. (6 sc)
- Rows 2-42: Sc in each st across. Ch 1, turn. (6 sc)
- Continue until the strip measures approximately 25-27 cm.
- Fold the strip lengthwise with the long edges meeting.
- Working through corresponding edge stitches, sl st the long edges together to create a thick rounded handle.
- Fasten off leaving a 50 cm sewing tail at each end.
- Curve the finished handle into an arch before attaching it to the backpack.
Lower Strap Anchor Tabs – Make 2
- Row 1: Ch 11. Sc in second ch from hook and across. Ch 1, turn. (10 sc)
- Rows 2-10: Sc in each st across. Ch 1, turn. (10 sc)
- Row 11: Sc in each st across. Fasten off leaving a 40 cm sewing tail.
- Fold the rectangle in half to create a double-thickness anchor tab.
- Sew the open edges together with whip stitch.
- Repeat for the second anchor.
Attaching the Shoulder Straps
- Lay the backpack front-side down so the back panel faces upward.
- Mark two upper strap positions approximately 7-8 cm apart and 2 cm below the top rim.
- Place the upper end of one strap against the first marker with approximately 3 cm overlapping the solid band.
- Sew around the complete overlapping rectangle, then sew an X diagonally through the center for additional strength.
- Repeat with the second strap at the matching upper position.
- Position one lower anchor tab approximately 4 cm from the first lower side corner and sew it firmly across the solid base section.
- Insert the lower end of the corresponding strap beneath or through the anchor tab and sew through all layers.
- Repeat on the opposite side.
- Before weaving in the ends, put light pressure on both straps and confirm that they are equal in length and do not twist.
Attaching the Top Handle
- Find the exact center of the backpack’s back upper edge.
- Position the two ends of the handle approximately 8-9 cm apart.
- Overlap each handle end with the solid upper band by approximately 2.5 cm.
- Sew each end around its perimeter using the long yarn tail.
- Make a second reinforcing pass through the center of each attachment area.
- Check that the handle stands in a smooth arch and is centered between the shoulder straps.
Optional Reinforced Bottom Insert
- Trace the inside dimensions of the completed oval base onto plastic canvas or another lightweight bag-base material.
- Reduce the traced shape by approximately 5 mm around every edge.
- Cut the insert and round any sharp corners.
- Place it inside the bottom of the backpack and check that it lies flat without forcing the sidewalls outward.
- If adding a lining, place the insert beneath the lining so it cannot move during use.
Optional Fabric Lining
- Measure the circumference and height of the backpack body below the drawstring eyelets.
- Cut a fabric rectangle using the body circumference plus 2 cm for seam allowance and the body height plus 3 cm.
- Trace the crocheted oval base onto fabric and add a 1 cm seam allowance around the traced shape.
- Sew the short sides of the body rectangle together with right sides facing.
- Pin the oval fabric base to the lower edge of the fabric tube and sew around the complete circumference.
- Turn the upper edge of the lining approximately 1.5 cm toward the WS and press.
- Insert the lining into the backpack and position its upper edge below the drawstring eyelets.
- Hand sew the lining to the dense upper band using small invisible stitches.
- Do not sew through the decorative mesh or obstruct any drawstring opening.
Finishing
Weave in all remaining yarn ends on the inside of the backpack, paying particular attention to the shoulder-strap anchors, handle attachments, and lower base. Reinforce these load-bearing areas with matching thread if the backpack will carry books, electronics, or other heavier items. Pull the drawstring several times to make sure every eyelet opens smoothly and no stitch catches the cord.
Shape the bag by hand rather than aggressively blocking it. Flatten the oval base, straighten the vertical side columns, and gently open the textured mesh. Curve the top handle into a smooth arch and lay both shoulder straps flat until completely relaxed. When the drawstring is pulled, the upper rim should gather evenly toward the center while the mesh body remains mostly vertical.
Tips for Success
- Use cotton cord with very little elasticity. A soft, stretchy acrylic yarn will make the backpack body and shoulder straps lengthen considerably once the bag is filled.
- Count all 36 mesh clusters at the end of every mesh round. A missing cluster can gradually shift the pattern and make the upper edge noticeably uneven.
- Make the straps at a tighter gauge than the decorative body. Switching to the 3.5 mm hook for the straps helps produce the dense structure visible in the reference design.
- Attach the straps only to solid crochet sections. Never rely on the open mesh to carry the weight of the backpack.
- Test the drawstring before sewing in a lining. It is much easier to correct an undersized eyelet while the inside of the upper band is fully accessible.
Common Mistakes to Avoid
- Do not make the oval base at a loose gauge. If it folds when held horizontally, switch to a smaller hook or add the optional base insert before continuing.
- Avoid pulling the surface-crocheted side columns too tightly. They should reinforce the mesh, not gather it. Undo and remake a column if the side of the backpack curves inward.
- Do not attach the shoulder straps with a single straight seam. Sew around the attachment perimeter and add diagonal reinforcement so the force is distributed across several rows.
- Avoid making the drawstring exactly the circumference of the bag. It needs substantial extra length to gather the opening and form the front bow shown in the finished design.
- Do not place a lining over the eyelets. Keep its upper edge below the drawstring round so the cord can move freely.
Ways to Customize This Pattern
- Make a Mediterranean version in warm ivory cotton and add small wooden beads to the two drawstring ends.
- Create a two-tone backpack with a caramel solid base and straps while keeping the mesh body natural cream.
- Add an interior zip pocket to the optional lining for keys, cards, or other small belongings.
- Turn the backpack into a larger beach bag by adding 6-8 additional mesh rounds and extending each shoulder strap by approximately 10 cm.
- For a more minimalist version, omit the raised side columns and use a plain twisted cord instead of the crocheted drawstring.
Frequently asked questions
Use a firm cotton cord, crochet the straps at a tighter gauge than the body, and add the optional cotton-webbing reinforcement to their backs. Secure each strap over several centimeters of solid crochet rather than attaching it to a single row.
The base may be too loosely crocheted or the contents may be heavier than the fabric can support. Use a smaller hook for the base and add the optional plastic-canvas insert. A fitted fabric lining also helps distribute weight across the entire base.
Yes, but choose a firm cotton or cotton-rich yarn and make a gauge swatch first. Soft worsted yarn produces a more flexible backpack than cotton cord, so a lining and reinforced straps are strongly recommended if you want to preserve the structured appearance.
The pattern uses approximately 68-72 cm straps, but the best length depends on how you prefer the backpack to sit. Before permanently attaching the lower ends, pin the straps in place and try the empty backpack on. Add or remove rows as necessary, then make both straps exactly the same length.
Begin threading the cord at the exact center-front eyelet and weave both directions evenly around the rim. When both ends return to the front, pull them simultaneously and adjust the gathers with your fingers before tying the bow.
The finished Boho Crochet Drawstring Backpack Pattern