Boho Floral Granny Square Crochet Tote Bag: Free Crochet Pattern
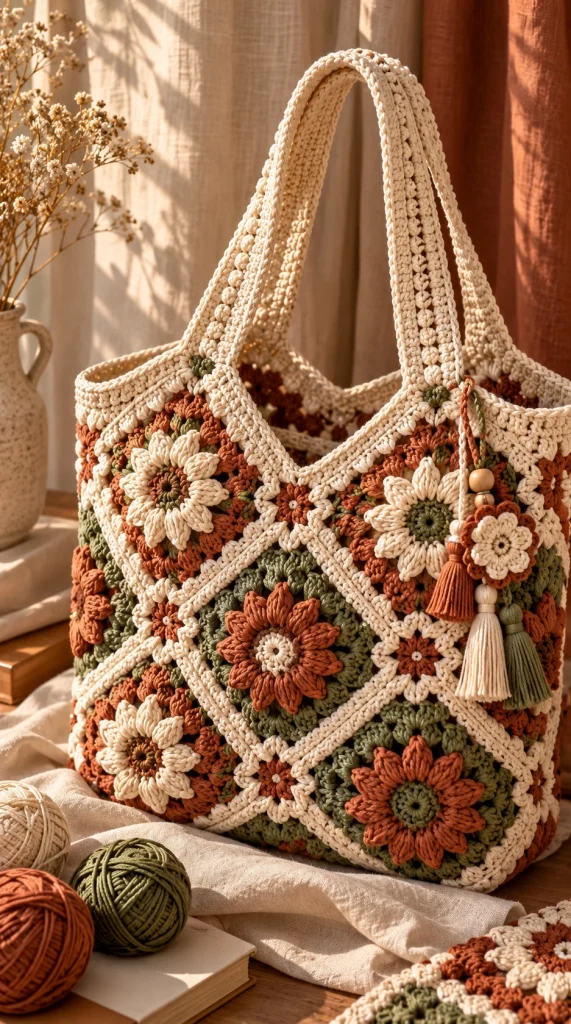
Create a charming handmade accessory with this boho floral granny square crochet tote bag. Featuring dimensional crochet flowers, warm terracotta petals, soft ivory accents, muted sage-green backgrounds, and sturdy cream-colored handles, this beautiful tote combines vintage-inspired craftsmanship with modern bohemian style.
The design features a patchwork of floral granny squares arranged in a decorative diamond-like pattern. Raised flower petals add rich texture, while the earthy color palette gives the bag a cozy, natural appearance.
Long crochet shoulder straps provide comfortable carrying, and a cluster of handmade tassels with wooden beads adds a playful finishing detail. The finished bag is ideal for everyday accessories, light shopping, creative outings, or thoughtful handmade gifts.
In this tutorial, you will learn how to crochet dimensional flower centers, transform them into granny squares, create contrasting color variations, join the motifs into a structured tote, crochet reinforced handles, and make decorative tassel charms.
Pattern at a Glance
Finished measurements exclude the handles. Dimensions depend on yarn weight, hook size, gauge, and the number of motifs used.
Materials and Supplies
- Approximately 300–400 g of worsted-weight cotton yarn in warm ivory or natural cream.
- Approximately 150–200 g of cotton yarn in terracotta or burnt orange.
- Approximately 150–200 g of cotton yarn in muted sage or olive green.
- Small amounts of darker brown or olive yarn for flower centers.
- 4 mm crochet hook for the main motifs.
- 3.5 mm crochet hook for smaller decorative flowers.
- Yarn needle for joining motifs and weaving in ends.
- Stitch markers and sharp scissors.
- Measuring tape.
- Two or three smooth wooden beads for the tassel charm.
- Optional cotton fabric for lining.
- Optional magnetic snap or button closure.
- Blocking mats and rustproof pins.
Yarn estimate: Plan for approximately 600–800 g of yarn in total for a medium-sized tote. The exact amount depends on motif dimensions, handle length, and the density of the floral decoration.
Gauge and Preparation
For a sturdy everyday tote, aim for approximately 16 single crochet stitches and 18 rows per 10 cm using the main hook.
A finished floral granny square should measure approximately 12–14 cm across after gentle blocking.
Make one complete sample square before beginning the full project. Measure the square and adjust your hook size if necessary.
Abbreviations
All instructions use US crochet terminology. Unless otherwise stated, join each round with a slip stitch. Turning chains do not count as stitches unless specifically indicated.
Part 1: Crochet the Dimensional Flower Center
The raised floral center is the focal point of every granny square. Its layered petals create the rich handmade texture seen throughout the reference design.
Make the flower foundation
Using dark olive or brown yarn, create a magic ring.
Round 1: Ch 1 and work 12 sc into the magic ring. Pull the ring closed and join with a sl st. 12 sc.
Round 2: Ch 1, work 2 sc into each stitch around, and join. 24 sc.
Create the first petal layer
Change to ivory or terracotta yarn.
Round 3: Repeat around: sl st in the next stitch, ch 3, work 3 dc in the following stitch, ch 3, and sl st in the next stitch.
Continue until the flower has approximately eight evenly distributed petals.
Add raised texture
Round 4: Working behind the petals, create ch-4 loops anchored between the petal bases.
Round 5: Into each ch-4 loop, work 1 sc, 1 hdc, 4 dc, 1 hdc, and 1 sc.
Repeat around to create a fuller second layer of petals.
The completed flower should have a rounded center and dimensional petals that sit slightly above the background fabric.
Part 2: Transform the Flower into a Granny Square
The floral center is surrounded by contrasting stitches that create the square shape. Use sage green or terracotta for the background, depending on your preferred color arrangement.
Establish four corners
Round 6: Join the background yarn behind the flower petals. Create eight evenly spaced ch-3 loops around the flower, anchoring them with slip stitches between the petal bases.
Round 7: Work (3 dc, ch 2, 3 dc) into every second loop to form four corners. Work 3 dc into the remaining loops, separated by ch-1 spaces.
Expand the square
Round 8: Work 3 dc, ch 2, 3 dc into each corner space. Along the sides, work 3-dc groups into the available chain spaces, separated by ch 1.
Rounds 9–10: Continue the granny square pattern, adding additional 3-dc groups along each side while maintaining four ch-2 corner spaces.
Finish with an ivory border
Round 11: Change to ivory yarn. Work sc evenly around the square, placing 3 sc into each corner space.
Round 12: Work hdc around the square, maintaining the corner increases.
FO and weave in the yarn ends.
Block the finished square gently and measure it before making the remaining motifs.
Part 3: Create the Floral Color Variations
The reference-inspired bag combines several floral color arrangements. Alternating these combinations creates a rich patchwork appearance.
Variation A: Ivory daisy
- Flower center: Dark olive.
- Petals: Warm ivory.
- Background: Terracotta.
- Outer border: Ivory.
Variation B: Terracotta flower
- Flower center: Warm ivory.
- Petals: Terracotta.
- Background: Sage green.
- Outer border: Ivory.
Variation C: Small botanical flower
- Flower center: Terracotta.
- Petals: Ivory.
- Background: Sage and terracotta.
- Outer border: Ivory.
For a balanced design, alternate the flower colors rather than placing identical motifs directly beside one another.
Part 4: Crochet the Remaining Granny Squares
Repeat the floral granny square pattern until you have enough motifs for the front, back, sides, and base of the bag.
Suggested motif quantity
For a medium-sized tote, begin with approximately 12–16 granny squares.
- Make four to six ivory daisy squares.
- Make four to six terracotta flower squares.
- Make four smaller botanical variations if desired.
- Block all motifs to matching dimensions.
- Arrange the motifs on a flat surface.
- Adjust the quantity to achieve the desired bag proportions.
For a larger tote, add more motifs or crochet additional border rounds around each square.
Part 5: Arrange the Diamond-Style Panels
The diagonal appearance of the granny squares is one of the most distinctive features of this design.
Front panel layout
- Place one floral granny square with a corner pointing upward.
- Arrange additional squares diagonally beside it.
- Alternate terracotta and sage backgrounds.
- Fill the spaces between diamond-shaped motifs with smaller crochet triangles or half-square motifs.
- Check that the outer edges form a practical rectangular bag panel.
- Pin the arrangement before joining.
Back panel layout
Repeat the same arrangement for the back panel, using a similar distribution of flower colors.
Part 6: Join the Floral Granny Squares
Use ivory yarn to create the raised seams that frame each floral motif.
Slip-stitch joining method
- Place two granny squares with their right sides facing outward.
- Align the corresponding edge stitches.
- Insert the hook through both motifs.
- Join with slip stitches along the entire edge.
- Keep the tension even to avoid puckering.
- Repeat until the complete panel is assembled.
Optional raised seam
For a more prominent decorative outline, work one additional row of surface slip stitches along the joined seams using ivory yarn.
The ivory joining lines should form a clean geometric framework around the floral motifs.
Part 7: Crochet the Bag Base
A sturdy base helps the tote maintain its shape and provides support for everyday use.
Foundation chain
Using ivory yarn, ch 41.
Row 1: Sc in the second chain from the hook and across. 40 sc.
Rows 2–12: Ch 1, turn, and sc in every stitch across.
Continue until the base reaches approximately 10–12 cm in depth, or the width needed to match the lower edge of the bag panels.
FO, leaving a long tail for sewing.
For additional strength, crochet the base with two strands of yarn held together or add a fabric reinforcement inside the finished bag.
Part 8: Assemble the Tote Bag Body
Once the front panel, back panel, and base are complete, assemble them into the finished bag shape.
Assembly instructions
- Lay the front panel flat with the right side facing outward.
- Position the base along the lower edge.
- Join the base to the front panel using slip stitches or mattress stitch.
- Attach the opposite edge of the base to the back panel.
- Fold the panels upward to form the bag body.
- Join the side edges securely.
- Check that the bag stands evenly.
- Weave in the yarn ends.
For a wider tote, crochet separate side gussets and attach them between the front and back panels.
Part 9: Crochet the Solid Upper Band
The solid upper band creates a clean opening and provides a strong foundation for the shoulder handles.
Upper band instructions
Round 1: Join ivory yarn at the top opening. Work sc evenly around the entire edge, adjusting stitch placement to maintain a level opening.
Rounds 2–5: Ch 1 and sc in every stitch around. Join after each round.
Round 6: Work one final round of hdc for a slightly raised finish.
FO and weave in the yarn end.
The upper band should feel firm and lie flat without pulling inward.
Part 10: Crochet the Reinforced Shoulder Handles
Long cream-colored crochet straps complement the floral motifs and make the bag comfortable to carry over the shoulder.
Make two identical handles.
Handle foundation
Using ivory yarn, ch 11.
Row 1: Sc in the second chain from the hook and across. 10 sc.
Rows 2 onward: Ch 1, turn, and sc in every stitch across.
Continue until the handle measures approximately 55–65 cm.
Reinforce the handle
- Fold the completed strip lengthwise.
- Align the long edges.
- Join the edges using slip stitches.
- Work an additional row of sc along the outer edge if desired.
- FO, leaving long tails for attachment.
Attach the handles
Position each handle symmetrically on the front and back of the bag. A practical starting point is approximately 7–9 cm from each side edge.
Sew the handle ends securely to the inside of the upper band, reinforcing each attachment with several passes of stitching.
Part 11: Crochet the Decorative Flower Charm
A small floral charm adds a beautiful handmade accent near one of the handles.
Small daisy flower
Using terracotta yarn, make a magic ring.
Round 1: Work 10 sc into the ring and join.
Round 2: Repeat around: sl st in the next stitch, ch 3, work 2 dc in the following stitch, ch 3, and sl st in the next stitch.
Continue to form five petals.
Change to ivory yarn and add a small center using a magic ring with 6 sc.
Sew the ivory center onto the terracotta flower.
FO, leaving a tail for attachment.
Part 12: Make the Boho Tassels
The tassel charm combines terracotta, ivory, and sage-green yarn for a coordinated bohemian finish.
Prepare the tassels
- Cut approximately 20–25 strands of yarn, each measuring 18–22 cm.
- Fold the strands in half.
- Tie a strong piece of yarn around the folded top.
- Wrap another strand around the tassel approximately 2 cm below the top.
- Secure the wrapping yarn with a knot.
- Trim the ends evenly.
- Repeat to create three tassels in different colors.
Add wooden beads
- Thread the tassel hanging cords through smooth wooden beads.
- Arrange the beads above the tassels.
- Secure the beads with small knots.
- Combine the tassel cords into one hanging loop.
Attach the completed tassel charm near the upper side of the bag, allowing it to hang freely beside the floral motifs.
Part 13: Add an Optional Fabric Lining
A fabric lining improves the structure of the tote and prevents small items from slipping through the granny square openings.
Lining instructions
- Measure the interior width, height, and depth of the finished bag.
- Cut cotton fabric panels with approximately 1.5 cm seam allowance.
- Sew the fabric panels together to create a matching bag shape.
- Fold the upper raw edge inward.
- Insert the lining into the crochet bag.
- Align the lining with the upper band.
- Hand-sew the lining securely around the opening.
Optional interior pocket
Before installing the lining, sew a small rectangular fabric pocket onto one interior panel for keys, cards, or other small accessories.
Finishing and Blocking
- Weave in all loose yarn ends securely.
- Inspect the granny square joins for gaps.
- Check that the bag base is firmly attached.
- Ensure both handles are equal in length.
- Reinforce the handle attachment points.
- Adjust the flower petals to emphasize their dimensional texture.
- Trim the tassel ends evenly.
- Lightly shape the bag by hand.
- Allow the bag to dry completely if damp-blocked.
Customization Ideas
1. Create a romantic pastel version
Replace terracotta with dusty rose and sage green with pale mint for a softer floral handbag.
2. Make a bold sunflower tote
Use golden-yellow petals, dark brown centers, and olive-green backgrounds for a cheerful sunflower-inspired design.
3. Try a minimalist neutral palette
Use ivory, oatmeal, beige, and warm brown for an elegant everyday tote.
4. Add more floral texture
Make additional small crochet flowers and sew them onto selected granny squares for a richer botanical appearance.
5. Create a smaller handbag
Reduce the number of granny squares and shorten the shoulder handles for a compact everyday accessory.
6. Add a secure closure
Install a magnetic snap, button loop, or zipper inside the upper band to keep belongings secure.
Care Instructions
- Follow the care instructions for your chosen yarn.
- Hand-wash gently in cool water when permitted.
- Use mild detergent and avoid harsh bleach.
- Do not twist or wring the bag.
- Press out excess moisture using a clean towel.
- Reshape the granny squares while damp.
- Dry flat away from direct sunlight and heat.
- Store the bag empty or lightly stuffed to preserve its shape.
- Avoid carrying excessive weight that could stretch the handles.
Frequently Asked Questions
Is this boho floral granny square crochet tote bag suitable for beginners?
The basic stitches are accessible to confident beginners, but the dimensional flowers, diagonal motif arrangement, joining techniques, and reinforced handles make this project better suited to intermediate or advanced crocheters.
What yarn works best for a crochet tote bag?
Cotton or cotton-blend yarn is recommended because it provides good stitch definition and a relatively sturdy fabric. A firm gauge helps reduce stretching.
How many granny squares do I need for this tote?
Approximately 12–16 floral granny squares is a useful starting estimate for a medium-sized bag. The exact quantity depends on the finished motif dimensions and your chosen construction.
Can I make this tote without a fabric lining?
Yes. The bag can be used without lining, especially for larger items. However, a lining improves structure and prevents small belongings from slipping through the crochet openings.
How do I prevent the crochet handles from stretching?
Use a firm stitch tension, reinforce the handles with additional rows or folded layers, and sew the attachment points securely. Cotton webbing inside the handles can provide extra support.
Can I change the colors of the floral granny squares?
Absolutely. The pattern works beautifully with pastel shades, neutral palettes, sunflower colors, or bold contrasting combinations.
Final Thoughts
This boho floral granny square crochet tote bag combines vintage-inspired floral motifs, earthy colors, and practical handmade construction into a beautiful everyday accessory.
The raised ivory and terracotta flowers create rich texture, while the sage-green backgrounds and cream joining details form an eye-catching patchwork design. Long reinforced handles and playful tassel charms complete the bohemian aesthetic.
Whether you make it for yourself, give it as a thoughtful handmade gift, or customize the colors to suit your personal style, this floral crochet tote is a wonderful project for anyone who enjoys creative accessories and timeless crochet techniques.
Enjoyed this pattern? Save it to your crochet inspiration board and share your finished floral granny square tote with fellow makers.