Christmas Poinsettia Crochet Wreath: Free Crochet Pattern
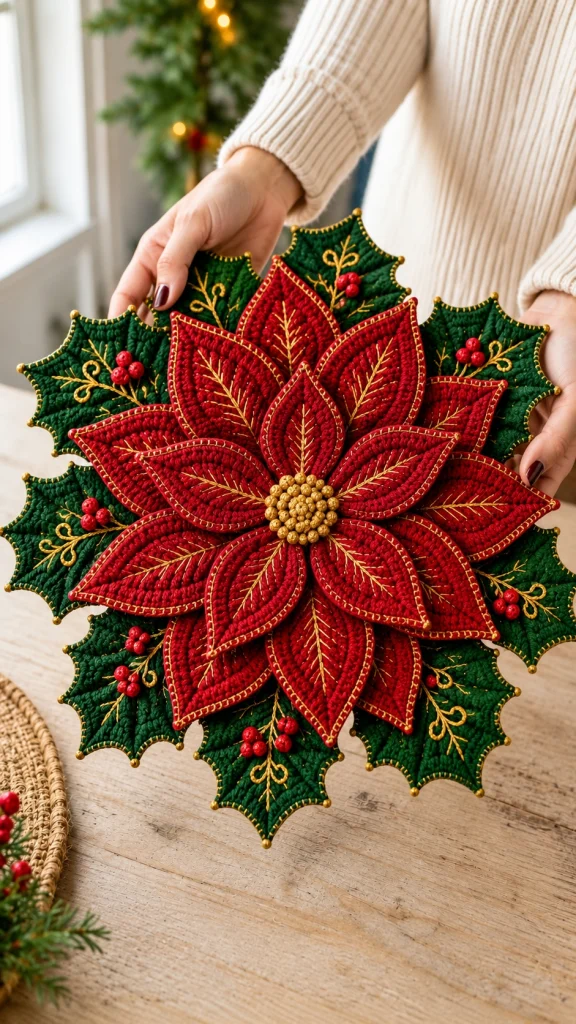
Bring the magic of the holiday season into your home with this magnificent Christmas poinsettia crochet wreath. Featuring richly textured red poinsettia petals, deep forest-green holly leaves, shimmering golden embroidery, and clusters of bright red berries, this festive crochet decoration is designed to become a beautiful centerpiece of your Christmas decor.
Inspired by traditional Christmas botanical arrangements, this handcrafted wreath combines elegant floral shapes with intricate crochet textures. Multiple layers of pointed red petals create a dramatic three-dimensional poinsettia, while surrounding holly leaves add depth, contrast, and a classic holiday appearance.
Golden embroidered veins, decorative edging, and textured flower-center details provide a luxurious finishing touch. Whether displayed on a wall, above a fireplace, or as part of a festive centerpiece, this crochet poinsettia wreath brings warmth and handmade charm to seasonal decorating.
In this tutorial, you will learn how to crochet the pointed poinsettia petals, build a layered flower, create textured holly leaves, make miniature berries, add golden embroidery, and assemble the components into a coordinated Christmas wreath.
Pattern at a Glance
Finished measurements depend on yarn thickness, hook size, blocking, and arrangement of the petals and leaves.
Materials and Supplies
- Approximately 200–250 g of worsted-weight cotton yarn in deep Christmas red.
- Approximately 150–200 g of worsted-weight cotton yarn in dark forest green.
- Small amount of mustard yellow or metallic gold yarn for the flower center.
- Gold embroidery thread for decorative veins and edging.
- Small amount of bright red yarn for holly berries.
- 3.5 mm crochet hook for firm, defined stitches.
- 3 mm crochet hook for smaller decorative elements.
- Yarn needle and embroidery needle.
- Stitch markers and sharp scissors.
- Optional lightweight floral wire or flexible craft wire for shaping.
- Felt backing or a lightweight circular wreath base.
- Optional fabric-safe craft glue for securing small decorations.
- Blocking mat and rustproof pins.
Yarn recommendation: Cotton or a firm cotton-blend yarn is ideal for this project because it provides excellent stitch definition and helps the petals retain their shape. Soft acrylic yarn can also be used, but the finished pieces may require additional support.
Gauge and Preparation
For a structured decorative finish, aim for approximately 18 single crochet stitches and 20 rows per 10 cm using the main hook.
Gauge is not essential for an exact fit, but consistent tension is important when making matching petals. Crochet one large petal first and measure it before continuing.
The large petals should measure approximately 13–15 cm from base to tip, while the smaller petals can measure approximately 9–11 cm.
Make the pieces with a firm but comfortable tension. If the petals curl excessively, increase your hook size slightly. If the fabric feels loose or floppy, use a smaller hook.
Abbreviations
All instructions use US crochet terminology. Turning chains do not count as stitches unless otherwise specified.
Part 1: Crochet the Large Poinsettia Petals
The largest red petals form the foundation of the poinsettia flower. Their elongated pointed shape creates the dramatic star-like silhouette visible in the reference design.
Make approximately eight large petals using deep red yarn.
Large pointed petal
Using the 3.5 mm hook and red yarn, ch 24.
Round 1: Starting in the second chain from the hook, work 1 sc, 1 hdc, 18 dc, 2 hdc, and 1 sc along the foundation chain. Ch 2 at the tip, then work along the opposite side of the chain using 1 sc, 2 hdc, 18 dc, 1 hdc, and 1 sc. Join with a sl st.
Round 2: Ch 1. Work sc evenly along the first side of the petal. At the pointed end, work (1 sc, ch 2, 1 sc) into the tip space. Continue sc along the opposite side and join.
Round 3: Ch 1. Work hdc evenly around the petal, placing 2 hdc, ch 2, and 2 hdc at the tip. Join.
Round 4: Work one round of sc around the petal, maintaining the pointed shape with a small ch-2 space at the tip.
FO, leaving a long tail for sewing.
The large petals should have a broad lower section and a sharply defined upper tip. Gently stretch the edges with your fingers to refine the shape.
- Keep the central foundation chain straight.
- Maintain even tension along both sides.
- Use stitch markers to identify the pointed tip.
- Block each petal lightly before assembly.
- Make all eight petals the same size for a balanced flower.
Part 2: Crochet the Medium Poinsettia Petals
The second layer adds volume and creates the overlapping arrangement characteristic of a full poinsettia flower.
Make approximately seven medium petals.
Medium petal instructions
With red yarn, ch 19.
Round 1: Starting in the second chain, work 1 sc, 1 hdc, 13 dc, 2 hdc, and 1 sc. Ch 2 at the tip. Continue along the opposite side with matching stitches. Join.
Round 2: Ch 1 and work sc evenly around the petal, placing (1 sc, ch 2, 1 sc) into the pointed tip.
Round 3: Work hdc around the petal, increasing gently near the pointed end to preserve the elongated shape.
FO, leaving a long sewing tail.
Arrange the medium petals slightly offset from the larger petals. This staggered placement creates depth and prevents the flower from looking flat.
Part 3: Make the Small Inner Petals
The innermost layer creates a compact central flower and gives the decoration its beautiful dimensional appearance.
Make approximately five small petals.
Small petal instructions
Ch 14 using red yarn.
Round 1: Starting in the second chain, work 1 sc, 1 hdc, 8 dc, 2 hdc, and 1 sc. Ch 2 at the tip and work back along the opposite side using matching stitches.
Round 2: Work sc evenly around the petal, adding a small increase at the pointed end.
Round 3: Work a final round of hdc for extra texture.
FO and leave a sewing tail.
The small petals can be curved slightly inward during assembly to create a natural flower-center effect.
Part 4: Add the Golden Petal Embroidery
Golden embroidery is one of the most distinctive details in this Christmas poinsettia design. Fine stitched veins emphasize the elongated petal shapes and add a luxurious festive finish.
Embroider the central vein
- Thread an embroidery needle with gold embroidery thread.
- Begin at the lower center of a red petal.
- Work a line of small straight stitches toward the pointed tip.
- Keep the stitches centered along the foundation chain.
- Secure the thread on the back of the petal.
Add branching veins
- Work short diagonal stitches extending outward from the central vein.
- Alternate the direction of the stitches on both sides.
- Space the branches evenly.
- Stop the embroidery approximately 1 cm before the petal edge.
- Repeat on every red petal.
Decorative gold edging
Using gold thread, work a loose blanket stitch or small surface slip stitches around the outer edge of each petal.
Use the embroidery sparingly enough to allow the rich red crochet texture to remain visible.
Part 5: Crochet the Dark Green Holly Leaves
Deep forest-green holly leaves create a striking contrast against the red poinsettia petals. Their pointed lobes form the outer botanical wreath.
Make approximately eight to ten large holly leaves.
Holly leaf foundation
With forest-green yarn, ch 21.
Round 1: Starting in the second chain, work 1 sc, 2 hdc, 14 dc, 2 hdc, and 1 sc. Ch 2 at the tip. Continue along the opposite side with matching stitches. Join.
Create the pointed holly edges
Round 2: Work sc around the leaf, creating decorative points at regular intervals.
To form each point, work 1 sc, ch 3, sl st into the second chain from the hook, sc into the next chain, and continue along the leaf edge.
Repeat this point sequence approximately three times along each side.
Round 3: Work a final round of sc around the leaf, following the pointed outline and reinforcing the decorative lobes.
FO, leaving a long tail for sewing.
Shape the holly leaves gently so the pointed lobes curve outward. The leaves should extend beyond the red flower to create a full circular wreath.
Part 6: Embroider the Holly Leaf Details
Golden leaf veins and small decorative flourishes give the green holly leaves their festive appearance.
Central leaf vein
- Thread the embroidery needle with gold thread.
- Begin near the base of the leaf.
- Work a line of small stitches toward the tip.
- Add short branching stitches toward the pointed lobes.
- Secure the thread neatly on the reverse side.
Decorative flourishes
Use small curved embroidery stitches to create elegant botanical swirls near the leaf base.
Gold edging
Work a fine line of blanket stitches along the holly leaf edges, following each point carefully.
The gold embroidery should complement the green crochet rather than cover it completely.
Part 7: Crochet the Red Holly Berries
Small red berries add bright festive accents to the surrounding holly leaves.
Make approximately 20–30 miniature berries, depending on your preferred arrangement.
Mini crochet berry
Using bright red yarn and a 3 mm hook, make a magic ring.
Round 1: Work 6 sc into the magic ring. 6 sc.
Round 2: Work 2 sc in each stitch around. 12 sc.
Round 3: Sc in each stitch around. 12 sc.
Round 4: Work sc2tog six times. 6 sc.
Add a tiny amount of stuffing if desired.
FO, close the opening, and leave a tail for sewing.
Arrange the berries in clusters of three or four on selected holly leaves.
Part 8: Create the Golden Poinsettia Center
The center of the poinsettia features a dense cluster of small golden buds. These textured details add dimension and provide a bright focal point.
Mini golden bud
Using gold or mustard-yellow yarn, make a magic ring.
Round 1: Work 6 sc into the ring. Join.
Round 2: Work 2 sc in each stitch around. 12 sc.
Round 3: Sc in each stitch around.
Round 4: Sc2tog six times. Close the opening and FO.
Make approximately 15–20 miniature golden buds.
Arrange the center
Sew the buds closely together in a circular cluster, positioning them at the center of the smallest red petals.
Part 9: Prepare the Wreath Backing
A stable backing helps the decoration maintain its circular shape and supports the weight of the layered petals and leaves.
Option 1: Felt backing
- Cut a circular piece of sturdy felt approximately 25–30 cm in diameter.
- Choose a dark green or neutral color.
- Mark the center of the circle.
- Use the felt as a foundation for arranging the holly leaves and poinsettia petals.
Option 2: Crochet backing
Make a flat circular panel using single crochet rounds with six evenly distributed increases per round, beginning with 6 sc in a magic ring. Continue until the backing reaches the desired diameter.
For a larger decoration, a felt or lightweight rigid backing may provide more reliable support.
Part 10: Assemble the Holly Wreath
Begin assembly with the green holly leaves. These form the outer layer and establish the overall shape of the decoration.
Arrange the green leaves
- Place the backing on a flat surface.
- Position the holly leaves around the outer edge.
- Angle the pointed tips outward.
- Overlap the bases slightly to hide gaps.
- Check the arrangement from above.
- Pin the leaves in place.
- Sew each leaf securely to the backing.
Try to maintain a balanced circular outline while allowing the holly points to extend naturally beyond the backing.
Part 11: Assemble the Layered Poinsettia
The poinsettia is assembled in three overlapping layers to create the dramatic dimensional effect.
Layer 1: Large petals
- Arrange the eight large red petals around the center of the backing.
- Position the pointed tips outward.
- Overlap the lower sections slightly.
- Pin each petal into place.
- Sew the petal bases securely to the backing.
Layer 2: Medium petals
- Position the seven medium petals above the first layer.
- Offset them so they sit between the larger petals.
- Allow the pointed tips to remain visible.
- Sew the petal bases firmly in place.
Layer 3: Small petals
- Arrange the five small petals near the flower center.
- Curve the petals slightly upward for additional depth.
- Sew their bases together securely.
- Leave the outer portions free to create a layered appearance.
Part 12: Attach the Golden Center and Holly Berries
Golden flower center
Position the cluster of golden buds over the center of the smallest petals. Sew the buds securely so they conceal the petal attachment points.
Holly berry clusters
- Arrange groups of three or four berries on selected holly leaves.
- Position them near the base or middle of each leaf.
- Keep the clusters evenly distributed around the wreath.
- Sew each berry securely using matching yarn.
- Hide the yarn ends behind the backing.
The completed decoration should feature a prominent red poinsettia surrounded by dark green holly leaves and bright berry accents.
Part 13: Add a Hanging Loop
If you plan to display the wreath on a wall or door, add a sturdy hanging loop to the back.
- Using green yarn, ch approximately 25–30.
- Work sl st back along the chain for additional strength.
- FO, leaving long tails at both ends.
- Fold the cord into a loop.
- Sew both ends securely to the upper back of the wreath.
- Reinforce the attachment with several stitches.
- Test the loop before hanging the decoration.
For a heavier wreath, use a strong fabric ribbon or attach the hanging loop directly to a rigid backing.
Finishing and Blocking
- Weave in all loose yarn ends.
- Inspect the attachment points of every petal and leaf.
- Check that the flower center is securely attached.
- Adjust the holly leaves to create a balanced circular shape.
- Gently shape the pointed red petals.
- Block individual pieces if necessary.
- Ensure all gold embroidery threads are secured.
- Check that the wreath hangs evenly.
- Keep the decoration away from moisture and direct heat.
Customization Ideas
1. Classic red and green Christmas wreath
Keep the traditional deep red poinsettia, forest-green holly leaves, and gold accents for a timeless holiday look.
2. White Christmas poinsettia
Replace the red petals with ivory or snow-white yarn and use champagne-gold embroidery for an elegant winter-inspired design.
3. Burgundy and antique gold version
Choose deep burgundy petals and muted antique-gold details for a luxurious vintage Christmas aesthetic.
4. Mini poinsettia ornament
Use thinner yarn and a smaller hook to create a miniature version suitable for hanging on a Christmas tree.
5. Festive table centerpiece
Omit the hanging loop and place the wreath flat on a decorative tray. Keep candles and other heat sources separate from the crochet decoration.
6. Add decorative ribbon
Attach a velvet ribbon bow in deep red, forest green, or gold to complement the handmade flower.
Care Instructions
- Dust the decoration gently with a soft brush.
- Spot-clean small stains using a damp cloth when appropriate for the yarn.
- Avoid machine washing if the wreath contains wire, glue, or rigid backing.
- Do not wring or twist the petals.
- Allow damp sections to dry completely.
- Store flat in a protective box between holiday seasons.
- Avoid placing heavy objects on top of the petals.
- Keep away from direct sunlight to reduce fading.
Frequently Asked Questions
Is this Christmas poinsettia crochet wreath suitable for beginners?
This pattern is best suited to advanced crocheters or confident intermediate makers. The layered petals, pointed holly leaves, embroidery, and assembly require patience and attention to detail.
What yarn is best for crochet poinsettia flowers?
Cotton and cotton-blend yarns work particularly well because they provide defined stitches and help the petals maintain their shape. A firm gauge is recommended.
How can I make the petals hold their shape?
Use firm crochet tension, block the petals carefully, and add lightweight structural support if needed. A sturdy backing also helps maintain the overall wreath shape.
Can I make this wreath without metallic thread?
Yes. Mustard-yellow, golden-beige, or warm cream cotton embroidery thread can replace metallic gold while maintaining a beautiful decorative contrast.
Can I use this poinsettia as a table decoration?
Absolutely. The finished piece can be displayed flat as a decorative centerpiece. Avoid placing candles or hot objects directly on the crochet fabric.
How long does it take to crochet a poinsettia wreath?
Depending on your experience and the level of embroidery detail, this project may take several crafting sessions. Making the petals and leaves in batches can help keep the process organized.
Final Thoughts
This Christmas poinsettia crochet wreath combines rich festive colors, dimensional crochet flowers, delicate golden embroidery, and classic botanical details into a beautiful handmade holiday decoration.
The overlapping red petals create a dramatic centerpiece, while the forest-green holly leaves and bright berry clusters add depth and traditional Christmas charm. Golden accents bring everything together with an elegant finishing touch.
Whether you display it above your fireplace, hang it on a wall, or use it as a seasonal centerpiece, this crochet poinsettia wreath is a wonderful way to celebrate the beauty of handmade Christmas decor.
Enjoyed this pattern? Save it to your Christmas crochet inspiration board and share your finished poinsettia wreath with fellow crochet lovers.