Christmas Crochet Door Swag: Free Festive Crochet Pattern
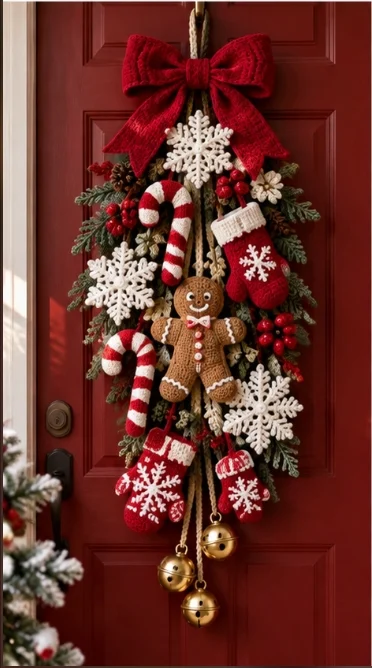
Welcome the holiday season with this charming Christmas crochet door swag, a beautiful handmade decoration filled with festive colors, cozy textures, and traditional Christmas motifs. Featuring an adorable gingerbread man, red-and-white candy canes, delicate white snowflakes, miniature Christmas stockings, evergreen foliage, and golden bells, this decorative hanging brings the magic of Christmas to your front door.
The design combines multiple crochet elements into one coordinated holiday arrangement. A large burgundy bow crowns the decoration, while natural hanging cords create a cascading display of handmade ornaments. Dark green evergreen branches and bright red berries provide a traditional Christmas backdrop.
The central gingerbread character adds a playful touch, complete with a smiling embroidered face, white icing details, tiny buttons, and a festive bow tie. Striped candy canes, snowflake ornaments, and miniature stockings complete the nostalgic holiday aesthetic.
In this tutorial, you will learn how to crochet each decorative component, create textured evergreen branches, make a dimensional gingerbread ornament, crochet candy canes and snowflakes, assemble miniature stockings, and arrange everything into a beautiful Christmas door hanging.
Pattern at a Glance
Measurements are approximate and depend on yarn thickness, hook size, ornament dimensions, and the final hanging arrangement.
Materials and Supplies
- Approximately 150–200 g of worsted-weight yarn in dark forest green for the evergreen branches.
- Approximately 100–150 g of worsted-weight yarn in deep Christmas red or burgundy.
- Approximately 100 g of white or warm ivory yarn for snowflakes, candy cane stripes, and stocking cuffs.
- Approximately 75–100 g of gingerbread-brown yarn for the central ornament.
- Small amounts of cream yarn for gingerbread icing details.
- Small amounts of black, white, and pink embroidery thread for facial details.
- 3.5 mm crochet hook for most ornaments.
- 3 mm crochet hook for smaller decorative details.
- Polyester fiberfill for stuffing the gingerbread ornament and other dimensional pieces.
- Yarn needle and embroidery needle.
- Stitch markers and sharp scissors.
- Measuring tape.
- Natural jute cord or strong cotton cord for hanging.
- Three small decorative golden bells.
- Optional burgundy velvet ribbon for the large bow.
- Optional flexible craft wire for shaping candy canes and evergreen branches.
- Optional wooden dowel or lightweight support ring.
- Small amounts of red yarn for decorative berries.
Yarn recommendation: Cotton or cotton-blend yarn is ideal for ornaments that need clear stitch definition. Acrylic yarn can also be used, particularly for softer decorative pieces.
Gauge and Preparation
Gauge is flexible for this decorative project, but consistent tension is important when making matching ornaments.
For the gingerbread figure, aim for approximately 18 single crochet stitches and 20 rounds per 10 cm using the main hook.
The finished gingerbread ornament should measure approximately 18–22 cm tall, depending on your yarn and stuffing.
Before beginning, decide how long you want the finished decoration to hang. Arrange the main ornaments on a table to visualize the final composition.
Abbreviations
All instructions use US crochet terminology. Unless otherwise stated, work amigurumi pieces in continuous rounds using a stitch marker to identify the beginning of each round.
Part 1: Crochet the Gingerbread Man Head
The smiling gingerbread character is the centerpiece of this festive door decoration. Begin with the head, working in continuous rounds to create a softly rounded shape.
Head instructions
Using gingerbread-brown yarn and a 3.5 mm hook, make a magic ring.
Round 1: Work 6 sc into the magic ring. 6 sc.
Round 2: Inc in every stitch around. 12 sc.
Round 3: (Sc 1, inc) repeat six times. 18 sc.
Round 4: (Sc 2, inc) repeat six times. 24 sc.
Round 5: (Sc 3, inc) repeat six times. 30 sc.
Rounds 6–10: Sc in every stitch around. 30 sc.
Round 11: (Sc 3, dec) repeat six times. 24 sc.
Round 12: (Sc 2, dec) repeat six times. 18 sc.
Begin stuffing the head firmly but evenly.
Round 13: (Sc 1, dec) repeat six times. 12 sc.
Round 14: Dec six times. 6 sc.
FO, close the opening, and leave a long tail for attaching the head to the body.
Part 2: Crochet the Gingerbread Body
The body is worked as a small stuffed oval with a rounded lower section.
Body instructions
Using brown yarn, make a magic ring.
Round 1: 6 sc into the ring. 6 sc.
Round 2: Inc around. 12 sc.
Round 3: (Sc 1, inc) repeat six times. 18 sc.
Round 4: (Sc 2, inc) repeat six times. 24 sc.
Rounds 5–10: Sc in every stitch around. 24 sc.
Round 11: (Sc 2, dec) repeat six times. 18 sc.
Round 12: Sc around. 18 sc.
Round 13: (Sc 1, dec) repeat six times. 12 sc.
Stuff the body lightly.
Round 14: Sc around. 12 sc.
FO, leaving a long tail for sewing.
Attach the head securely to the narrow upper section of the body using the long yarn tails.
Part 3: Crochet the Gingerbread Arms and Legs
Make two arms and two legs using gingerbread-brown yarn.
Arms — make two
Round 1: 6 sc into a magic ring.
Round 2: (Sc 1, inc) repeat three times. 9 sc.
Rounds 3–7: Sc around. 9 sc.
Stuff lightly, flatten the open end, and FO with a long sewing tail.
Legs — make two
Round 1: 6 sc into a magic ring.
Round 2: Inc around. 12 sc.
Rounds 3–6: Sc around. 12 sc.
Round 7: (Sc 2, dec) repeat three times. 9 sc.
Rounds 8–9: Sc around. 9 sc.
Stuff lightly and FO, leaving a long tail.
Attach the limbs
Sew the arms to the upper sides of the body and the legs to the lower edge. Position the limbs slightly outward to create the cheerful gingerbread silhouette.
Part 4: Add the Gingerbread Face and Icing Details
Small embroidered details give the gingerbread character its adorable Christmas personality.
Embroider the face
- Using white embroidery thread, stitch two small rounded eyes.
- Add tiny black pupils if desired.
- Embroider a curved smiling mouth using white yarn.
- Add two small pink or red cheek accents.
- Secure all thread ends inside the head.
Add decorative icing
- Thread a yarn needle with cream-colored yarn.
- Embroider small zigzag lines around the wrists.
- Repeat the icing details around the ankles.
- Add decorative lines near the shoulders if desired.
Make the buttons
Use small white French knots or tiny crochet circles to create three decorative buttons down the center of the body.
Mini bow tie
Using red yarn, ch 10. Work 3 rows of sc, fold the strip into a bow shape, and wrap the center tightly with yarn. Sew the bow below the gingerbread head.
Part 5: Crochet the Red and White Candy Canes
Striped candy canes bring classic Christmas charm to the hanging arrangement. Make two matching candy cane ornaments.
Candy cane foundation
Using red yarn, make a magic ring.
Round 1: Work 6 sc into the ring. 6 sc.
Round 2: Inc around. 12 sc.
Rounds 3–5: Sc around using red yarn.
Rounds 6–8: Change to white yarn and sc around.
Continue alternating three red rounds and three white rounds until the tube measures approximately 20–25 cm.
Stuff the tube lightly as you work.
Shape the candy cane
- Insert a covered flexible craft wire if using structural support.
- Gently bend the upper section into a candy cane hook.
- Adjust the stuffing to maintain an even shape.
- Close the remaining opening securely.
- FO and weave in the yarn ends.
For a wire-free version, bend the upper section into a hook and secure the curve with several discreet stitches on the inside.
Part 6: Crochet the White Snowflake Ornaments
Delicate white crochet snowflakes add a beautiful winter-inspired touch to the Christmas door swag.
Make approximately three snowflakes using ivory or white yarn.
Snowflake center
Make a magic ring using white yarn.
Round 1: Ch 3, work 2 dc into the ring, ch 3. Repeat the 3-dc cluster and ch-3 sequence until six clusters are formed. Join with a sl st.
Create the snowflake arms
Round 2: Sl st into the first ch-3 space. Work (sc, ch 5, sc) into the space. Repeat in each of the six spaces.
Add decorative branches
Round 3: Into each ch-5 loop, work sc, ch 3, sl st into the first chain, sc, ch 5, sl st into the first chain, sc, ch 3, sl st into the first chain, and sc.
Repeat for all six arms.
FO and weave in the ends.
Block the snowflakes carefully and pin the six arms into symmetrical positions. Allow them to dry completely before hanging.
Part 7: Crochet the Miniature Christmas Stockings
Small red stockings with white cuffs and snowflake embroidery add playful festive details.
Make one or two stockings using red and white yarn.
Stocking cuff
Using white yarn, ch 19 and join to form a ring without twisting.
Rounds 1–3: Ch 1 and sc around. Join after each round. 18 sc.
Stocking leg
Change to red yarn.
Rounds 4–10: Sc around. 18 sc.
Shape the heel
Work across the first nine stitches in rows.
Heel Row 1: Sc across 9 stitches. Turn.
Heel Rows 2–4: Ch 1, sc across, and turn.
Fold the heel section and join its short edges to create a small heel pocket.
Stocking foot
Resume working around the opening, picking up stitches along the heel edges as needed.
Work approximately five rounds of sc, then decrease evenly over the following rounds to close the toe.
FO and weave in the yarn ends.
Decorate the stocking
Using white yarn, embroider a small six-point snowflake on the front of the stocking. Add a short crochet hanging loop at the upper edge.
Part 8: Crochet the Evergreen Branches
Dark green evergreen foliage forms the background of the decoration and creates the traditional Christmas swag silhouette.
Evergreen branch foundation
Using forest-green yarn, ch 31.
Row 1: Starting in the second chain from the hook, work sl st along the foundation chain to create a firm central stem.
Create the branch needles
Working along the stem, repeat the following sequence:
Ch 7, sl st back along the chain, then sl st into the next available stem stitch.
Repeat along the stem, alternating slightly longer and shorter chains to create natural-looking evergreen branches.
Add fullness
Work a second row of needle branches along the opposite side of the stem.
FO, leaving a long tail for attachment.
Make approximately eight to twelve evergreen branches in different lengths.
- Use different chain lengths for a natural appearance.
- Make the central branches slightly longer.
- Keep the outer branches shorter.
- Overlap branches during assembly to create fullness.
- Use a firm yarn tension to help the foliage hold its shape.
Part 9: Crochet the Red Berry Clusters
Bright red berries create beautiful contrast against the dark green evergreen branches.
Mini berry pattern
Using red yarn, make a magic ring.
Round 1: Work 6 sc into the ring.
Round 2: Inc around. 12 sc.
Round 3: Sc around. 12 sc.
Round 4: Sc2tog six times. 6 sc.
Add a tiny amount of stuffing, close the opening, and FO.
Make approximately 15–20 berries.
Arrange the berries in clusters of three or four and sew them onto selected evergreen branches.
Part 10: Make the Large Burgundy Bow
A dramatic burgundy bow crowns the Christmas door swag and brings the entire arrangement together.
Crochet bow panel
Using burgundy yarn, ch 31.
Row 1: Sc in the second chain from the hook and across. 30 sc.
Rows 2–18: Ch 1, turn, and sc across.
FO and weave in the ends.
Shape the bow
- Fold the rectangular panel into two symmetrical loops.
- Pinch the center tightly.
- Wrap a separate strip of burgundy yarn around the center.
- Sew the center wrap securely.
- Adjust the loops to create a full bow shape.
Bow tails
Make two long strips using burgundy yarn.
Ch 13 and work approximately 30–35 rows of sc.
Shape the lower ends into decorative points or cut a V-shaped finish if using fabric ribbon instead.
Attach the tails behind the bow center.
For a softer luxurious appearance similar to the reference, you may use a wide burgundy velvet ribbon instead of crocheting the bow.
Part 11: Prepare the Hanging Structure
A strong central support keeps the decoration balanced and allows the ornaments to hang at different heights.
Prepare the support
- Cut a sturdy piece of natural cord approximately 90–110 cm long.
- Fold the cord in half to create a hanging loop at the top.
- Secure the loop with a strong knot.
- Attach several shorter cords at different positions along the main hanging structure.
- Use a lightweight support ring or small wooden dowel if additional stability is needed.
Plan the ornament placement
Position the gingerbread character near the center. Arrange the candy canes on opposite sides, place the snowflakes at different heights, and hang the stockings near the lower section.
Part 12: Assemble the Christmas Door Swag
Assembly is the most creative part of this project. Arrange the handmade ornaments into a balanced cascading composition.
Step 1: Attach the evergreen branches
- Lay the hanging structure on a flat surface.
- Position the longest evergreen branches near the center.
- Arrange shorter branches toward the outer edges.
- Overlap the branches to create a full triangular shape.
- Sew or tie the branches securely to the support.
Step 2: Add the gingerbread ornament
Attach the gingerbread man near the middle of the arrangement, allowing it to hang slightly forward from the evergreen background.
Step 3: Position the candy canes
Hang one candy cane on each side of the gingerbread character. Adjust the height so the two ornaments create a balanced composition.
Step 4: Add the snowflakes
Attach three white snowflakes at different heights around the arrangement. Keep them visible against the dark green foliage.
Step 5: Attach the stockings
Hang the miniature red stockings near the lower section of the swag, leaving enough space for the golden bells.
Step 6: Add the berry clusters
Sew the red berries onto the evergreen branches, distributing them evenly around the decoration.
Step 7: Attach the large bow
Position the burgundy bow at the top of the arrangement. Secure it firmly over the hanging structure to conceal the attachment points.
Part 13: Add the Golden Bells
Three golden bells hanging at different lengths create a beautiful finishing detail and add movement to the decoration.
Bell attachment
- Cut three lengths of natural cord.
- Make the cords slightly different lengths.
- Thread one bell onto each cord.
- Secure the bells with strong knots.
- Attach the cords to the lower center of the hanging structure.
- Adjust the spacing so the bells hang freely without tangling.
If you prefer a completely crocheted decoration, replace the metal bells with small crochet bell ornaments made from gold-colored yarn.
Part 14: Final Assembly and Finishing
- Inspect all hanging cords for secure knots.
- Check that the evergreen branches are firmly attached.
- Adjust the position of the gingerbread character.
- Make sure the candy canes hang evenly.
- Arrange the snowflakes so their details remain visible.
- Secure the miniature stockings.
- Check the golden bells for balanced spacing.
- Shape the burgundy bow and tails.
- Weave in all loose yarn ends.
- Test the finished decoration on a secure hanging hook.
Customization Ideas
1. Create a rustic farmhouse Christmas version
Use oatmeal, ivory, muted red, and natural jute cord for a softer country-inspired holiday decoration.
2. Make a candy cane-themed swag
Add more red-and-white candy canes and reduce the number of stockings for a playful striped Christmas design.
3. Try a snowy winter palette
Replace the burgundy bow with white or silver and use frosted green foliage for a winter-inspired appearance.
4. Add miniature Christmas stars
Crochet small golden stars and hang them between the snowflakes and candy canes.
5. Personalize the gingerbread character
Change the bow tie color, add a tiny crochet scarf, or embroider different facial expressions.
6. Create a smaller apartment-friendly version
Use fewer ornaments and shorter hanging cords to make a compact wall decoration.
Care Instructions
- Dust the decoration gently with a soft brush.
- Spot-clean crochet ornaments using a damp cloth when appropriate.
- Avoid machine washing the fully assembled decoration.
- Keep metal bells dry to prevent tarnishing.
- Do not pull or stretch the hanging cords.
- Store the decoration in a protective box after the holidays.
- Place tissue paper around dimensional ornaments to preserve their shape.
- Keep away from direct heat, candles, and prolonged moisture.
Frequently Asked Questions
Is this Christmas crochet door swag suitable for beginners?
The project is best suited to intermediate or advanced crocheters because it combines amigurumi, decorative crochet motifs, embroidery, and multi-piece assembly. Confident beginners can make individual ornaments as smaller projects.
Can I make this Christmas door decoration without craft wire?
Yes. The candy canes can be shaped with discreet stitching, and the evergreen branches can be arranged using firm crochet tension. A lightweight backing can help support the overall decoration.
What yarn is best for Christmas crochet ornaments?
Cotton and cotton-blend yarns provide excellent stitch definition and help decorative pieces maintain their shape. Acrylic yarn is also suitable for softer ornaments.
Can I hang this decoration outdoors?
It is best displayed indoors or on a fully sheltered door. Rain, direct sunlight, and moisture can damage the yarn, stuffing, and decorative components.
How can I make the decoration more lightweight?
Use thinner yarn, reduce the amount of stuffing, replace metal bells with crochet ornaments, and choose a lightweight hanging support.
Can I use the ornaments separately?
Absolutely. The gingerbread man, candy canes, snowflakes, and miniature stockings can also be used as individual Christmas tree ornaments, gift decorations, or festive garland accents.
Final Thoughts
This Christmas crochet door swag is a beautiful way to celebrate the holiday season with handmade creativity. The combination of a cheerful gingerbread character, striped candy canes, delicate snowflakes, miniature stockings, evergreen foliage, and a dramatic burgundy bow creates a festive decoration full of warmth and personality.
Each crochet ornament adds its own special detail, while the natural hanging cords and golden bells bring the entire arrangement together into a charming Christmas display.
Whether you hang it on your front door, display it above a fireplace, or give it as a thoughtful handmade gift, this festive crochet decoration is sure to bring cozy holiday charm to your home.
Enjoyed this pattern? Save it to your Christmas crochet inspiration board and share your finished holiday door swag with fellow crochet lovers.