Boho Floral Triangle Crochet Bedspread: Free Crochet Pattern
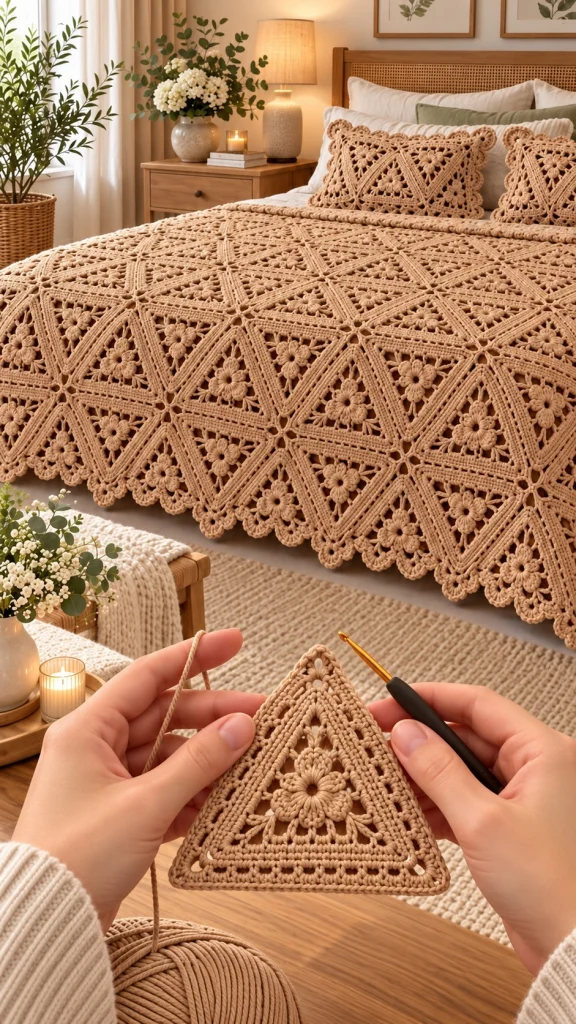
Bring warmth, texture, and timeless handmade beauty into your bedroom with this boho floral triangle crochet bedspread. Featuring raised flower centers, delicate openwork triangles, geometric joining details, and a romantic scalloped border, this elegant blanket creates a luxurious cottage-inspired bedroom aesthetic.
The soft caramel beige color highlights every stitch, from the dimensional floral petals to the decorative borders surrounding each triangle. Matching crochet pillow covers complete the coordinated look.
This tutorial explains how to create floral triangle motifs, connect them into larger geometric panels, assemble a bedspread, crochet a decorative edge, and make coordinating pillow covers.
Pattern at a Glance
Measurements are customizable. Motif counts depend on your gauge and preferred layout.
Materials and Supplies
- Approximately 2500–3500 g of worsted-weight cotton or cotton-blend yarn in caramel beige, subject to your swatch measurements.
- 4 mm or 4.5 mm crochet hook.
- Yarn needle for joining motifs.
- Stitch markers.
- Sharp scissors.
- Measuring tape.
- Blocking mats and rustproof pins.
- Optional fabric backing for extra durability.
- Two pillow inserts for matching covers.
Yarn recommendation: Choose a soft cotton blend with good stitch definition. A consistent yarn thickness is important because the geometric motifs must align neatly.
Gauge and Preparation
Begin by crocheting one complete floral triangle. Block it gently and measure each side. Aim for approximately 20–25 cm per side, depending on your yarn and hook.
The precise size is less important than consistency. Every triangle should match the others before assembly.
Abbreviations
All instructions use US crochet terminology.
Part 1: Crochet the Raised Floral Center
The central flower is the focal point of every triangle. Its dimensional petals give the bedspread its distinctive botanical texture.
Make the flower foundation
Round 1: Make a magic ring. Ch 1 and work 12 sc into the ring. Pull the ring closed and join with a sl st. 12 sc.
Round 2: Ch 1, sc in the first stitch, ch 3, sk the next stitch. Repeat around to create six chain loops. Join with a sl st.
Create the six petals
Round 3: In each ch-3 space work: 1 sc, 1 hdc, 3 dc, 1 hdc, 1 sc. Repeat for all six spaces. Join.
Total: Six rounded petals.
Add dimensional texture
Round 4: Working behind the petals, create six ch-4 loops anchored between the petal bases with slip stitches.
Round 5: Work 1 sc, 1 hdc, 5 dc, 1 hdc, 1 sc into each loop. Repeat around and join.
The second layer creates fuller petals and gives the flower a raised appearance.
Part 2: Create the Triangle Foundation
Turn the floral center into a triangular motif using chain spaces and openwork crochet stitches.
Establish three corners
Round 6: Working behind the outer petals, create six evenly spaced ch-5 loops anchored at the petal bases. Join.
Round 7: Sl st into the first loop. Ch 3, 2 dc, ch 3, 3 dc in that loop to form the first corner. Ch 2. Work 3 dc in the next loop, ch 2. Repeat the corner group in the third loop. Continue in the same pattern around, placing corners in loops 1, 3, and 5. Join.
This produces three prominent corners separated by openwork sections.
Expand the triangle
Round 8: Sl st to the first corner space. Work (3 dc, ch 3, 3 dc) in each corner space. Along each side, work ch 2 and 3 dc into each available ch-2 space, separated by ch 2. Join.
Rounds 9–12: Continue the established pattern, adding one additional 3-dc group along each side per round. Maintain ch-3 corner spaces.
Each round increases the triangle evenly while keeping its three corners clearly defined.
- Keep the corner chain spaces consistent.
- Count the stitch groups on each side.
- Lay the motif flat after every round.
- Adjust hook size if the edges begin to curl.
Part 3: Add the Decorative Triangle Border
The reference design features prominent raised outlines around the triangles. A firm crochet border helps reproduce that structured geometric appearance.
First border round
Work sc evenly along each side, placing 3 sc into every corner space. Maintain equal stitch counts on all three sides.
Raised ridge round
Work one round of back-loop-only sc around the triangle. Place 3 sc into the center corner stitch at each point.
Decorative final round
Work hdc around the motif, maintaining the same increase pattern at each corner.
FO, leaving a long tail if you plan to sew the motifs together.
Block the finished triangle gently before making the remaining motifs. Measure its final dimensions and record the number of stitches along each edge.
Part 4: Crochet the Remaining Floral Triangles
Repeat the complete triangle pattern until you have enough motifs for your desired bedspread dimensions.
Planning the layout
- Measure the width and height of one blocked triangle.
- Arrange sample triangles with alternating upward and downward points.
- Measure the combined width of one complete row.
- Calculate how many rows are needed to cover your bed.
- Add extra motifs if you want the bedspread to hang over the sides.
- Lay out the complete arrangement before joining.
For a large bedspread, you may need several dozen motifs. The exact number depends on the finished triangle size, arrangement, and desired drape.
Part 5: Join the Triangles into Geometric Panels
The geometric layout is what makes this bedspread visually striking. Alternate the orientation of the triangles to form repeating diamond-like sections.
Arrange the motifs
- Place one triangle with its point facing upward.
- Position a second triangle upside down beside it.
- Align their straight edges.
- Continue alternating the orientation to build a horizontal strip.
- Arrange additional strips until the desired bedspread size is reached.
Join using slip stitches
Place two motifs with their right sides together. Insert the hook through corresponding edge stitches and join with slip stitches, working evenly along the seam.
Alternatively, use a yarn needle and mattress stitch for a flatter, less visible seam.
Connect the rows
Join the completed strips one at a time. Carefully match the triangle corners so the geometric pattern remains symmetrical.
Part 6: Crochet the Outer Bedspread Border
A decorative border frames the entire blanket and helps stabilize the joined motifs.
Foundation edging
Round 1: Join yarn at any outer edge. Work sc evenly around the bedspread, adding extra stitches at outward corners and reducing excess stitches at inward points where necessary.
Round 2: Work hdc around the entire edge, keeping the fabric flat.
Round 3: Work one round of dc, adjusting stitch placement at corners to maintain a smooth outline.
Check the bedspread on a flat surface before continuing. The border should lie naturally without gathering or excessive rippling.
Part 7: Make the Romantic Scalloped Edge
The scalloped border adds the soft, decorative finish seen in the inspiration image.
Basic scallop repeat
Join yarn at the edge. Skip 2 stitches, work 7 dc into the next stitch, skip 2 stitches, and sl st into the following stitch.
Repeat the scallop sequence along the straight outer edges.
Shape the corners
At outward corners, work a larger shell of approximately 9 dc to create a fuller curve. Adjust the spacing so the corner does not pull inward.
Finish the border
Work a final round of slip stitches along the base of the scallops if additional structure is desired.
FO and weave in the yarn ends securely.
Part 8: Crochet Matching Floral Pillow Covers
Matching pillow covers give the bedroom a coordinated handmade appearance. Use the same caramel beige yarn and floral motifs.
Front panel
- Make several floral triangle motifs using the main pattern.
- Arrange them into a panel slightly larger than your pillow insert.
- Join the motifs with slip stitches or mattress stitch.
- Add small filler sections if necessary to create straight edges.
- Work a simple sc border around the completed panel.
Back panel
Crochet two rectangular back panels in hdc or dc, allowing them to overlap for an envelope-style closure.
Assembly
Place the front and back panels together with wrong sides facing. Join around the outer edges using sc, leaving the envelope opening accessible.
Add a small scalloped border if you want the pillow cover to match the bedspread more closely.
Part 9: Finishing and Blocking
- Weave in all remaining yarn ends.
- Inspect every motif seam for loose stitches.
- Lay the bedspread on a large, clean surface.
- Gently stretch the motifs into their intended shapes.
- Pin the corners and edges if necessary.
- Lightly damp-block according to the yarn care instructions.
- Allow the entire bedspread to dry completely.
- Check that the scalloped border lies evenly.
Customization Ideas
1. Create a neutral minimalist version
Use ivory, oatmeal, or soft cream yarn for a light, elegant bedroom aesthetic.
2. Make a two-tone floral design
Crochet the flower centers in a darker caramel shade and the surrounding triangles in cream.
3. Add a vintage color palette
Combine muted terracotta, dusty rose, warm beige, and sage green for a romantic cottage-inspired bedspread.
4. Make a smaller throw blanket
Use fewer triangle motifs and finish with the same decorative scalloped border.
5. Add a fabric backing
Attach a lightweight cotton backing to reduce stretching and create a more substantial bedspread.
Care Instructions
- Follow the washing instructions on your yarn label.
- Hand-wash gently in cool water when appropriate.
- Use a mild detergent.
- Avoid twisting or wringing the crochet fabric.
- Support the full weight of the wet bedspread when lifting it.
- Dry flat whenever possible.
- Store folded in a dry, well-ventilated place.
Frequently Asked Questions
Is this floral triangle crochet bedspread suitable for beginners?
This project is best suited to experienced crocheters. The raised flowers, triangular shaping, geometric assembly, and large finished size require patience and consistent stitch tension.
What yarn works best for a crochet bedspread?
Cotton and cotton-blend yarns are excellent choices because they provide stitch definition and a soft, breathable finish. Choose a yarn that is comfortable against bedding.
How many triangle motifs do I need?
The number depends on your bed dimensions, motif size, and layout. Make and block a sample triangle, arrange a test row, and calculate the quantity from its measured coverage.
Can I make this pattern in different colors?
Absolutely. The floral geometry works beautifully in neutral shades, earthy palettes, pastel combinations, or contrasting colors.
How can I prevent the bedspread from stretching?
Use consistent tension, choose a stable yarn, reinforce motif joins, and avoid hanging the finished bedspread while wet. A lightweight fabric backing may provide additional support.
Final Thoughts
This boho floral triangle crochet bedspread is a beautiful way to combine traditional crochet techniques with elegant geometric design. Raised flowers, delicate openwork, structured triangles, and scalloped edging create a richly textured handmade piece.
Whether you choose the warm caramel beige palette shown in the inspiration or customize the design with your favorite colors, the finished bedspread can become a distinctive centerpiece for your bedroom.
Take your time with the motifs, carefully align the seams, and enjoy the process of creating a large handmade project that can be treasured for years.
Love this pattern? Save it to your crochet inspiration board and share your finished floral bedspread with fellow crochet enthusiasts.