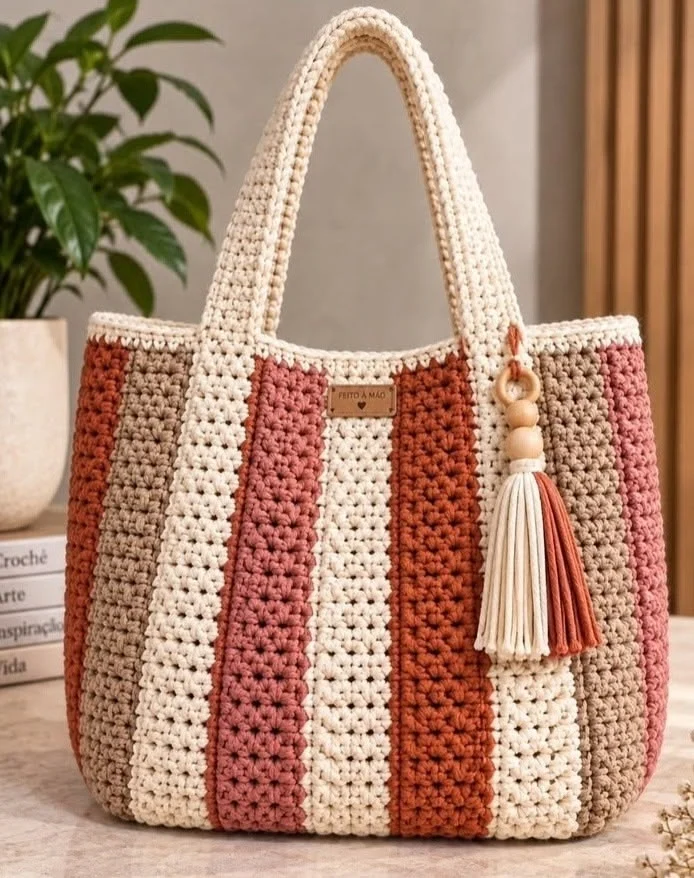
Boho Striped Crochet Tote Bag with Tassel – Free Crochet Pattern
Create a stylish everyday accessory with this beautiful boho striped crochet tote bag. Featuring warm earthy colors, textured vertical stripes, comfortable ivory handles, and a decorative tassel, this handmade bag combines modern bohemian style with practical crochet craftsmanship.
The tote features a spacious rectangular body with softly rounded bottom corners and a firm base that helps it stand upright. The vertical stripes combine cream, terracotta, dusty rose, and warm taupe for a sophisticated neutral color palette.
Two sturdy ivory crochet handles extend from the top of the bag, creating a comfortable shoulder-carry design. A decorative two-tone tassel, finished with wooden beads and a small wooden ring, adds a charming handmade detail.
This tutorial walks you through making the base, crocheting the vertically striped body, shaping the upper edge, creating strong handles, making the decorative tassel, and assembling the finished tote.
Pattern at a Glance
Measurements depend on yarn thickness, hook size, stitch tension, and final blocking.
Materials and Supplies
- Medium-weight cotton or cotton-blend yarn in warm ivory.
- Medium-weight cotton yarn in terracotta.
- Medium-weight cotton yarn in dusty rose.
- Medium-weight cotton yarn in taupe or beige.
- Approximately 900–1,300 meters of yarn in total, depending on finished dimensions and gauge.
- 4 mm crochet hook.
- 3.5 mm crochet hook for handles and edging.
- Yarn needle.
- Stitch markers.
- Measuring tape.
- Sharp scissors.
- Optional cotton fabric for lining.
- Optional magnetic snap closure.
- Two or three natural wooden beads.
- One small wooden ring.
- Matching thread and sewing needle.
Yarn recommendation: Use a sturdy cotton or cotton-blend yarn with minimal stretch. Cotton provides structure, excellent stitch definition, and durability for everyday use.
Color Palette
The alternating warm and neutral stripes create a balanced bohemian look.
Gauge and Finished Size
Using medium-weight cotton yarn and a 4 mm hook, aim for approximately 16 single crochet stitches and 18 rows per 10 cm.
The finished tote should measure approximately 40 cm wide, 34 cm tall, and 11 cm deep.
The handles should measure approximately 55–60 cm long, depending on your preferred shoulder drop.
Abbreviations
All instructions use US crochet terminology.
Part 1: Understanding the Bag Construction
This tote bag is constructed from several crochet components:
- A firm rectangular base.
- Two vertically striped body panels.
- Two narrow side panels.
- A reinforced upper border.
- Two sturdy ivory crochet handles.
- A decorative tassel with wooden beads.
The pieces are joined to create a structured tote with softly rounded lower corners.
Part 2: Crochet the Rectangular Base
The base provides structure and helps the tote maintain its shape.
Base instructions
Using ivory yarn and a 4 mm hook, ch 61.
Row 1: Sc in the second chain from the hook and across. 60 sc.
Rows 2–18: Ch 1, turn, sc in every stitch across. 60 sc.
Continue until the base measures approximately 38–40 cm long and 10–12 cm wide.
FO, leaving a long sewing tail.
The base should feel firm and relatively dense.
Part 3: Plan the Vertical Stripe Layout
The bag features vertical stripes in four earthy colors.
Suggested stripe sequence
- Terracotta stripe.
- Taupe stripe.
- Ivory stripe.
- Dusty rose stripe.
- Ivory stripe.
- Terracotta stripe.
- Ivory stripe.
- Taupe stripe.
- Dusty rose stripe.
Repeat or adjust the sequence to fit the desired bag width.
For consistent results, make each stripe approximately 4–6 cm wide.
Part 4: Crochet the First Vertical Stripe
The vertical stripes are worked as separate textured strips and joined together.
Stripe instructions
Using terracotta yarn, ch 61.
Row 1: Sc in the second chain from the hook and across. 60 sc.
Row 2: Ch 1, turn, sc in every stitch across.
Rows 3–8: Repeat Row 2.
Continue until the strip measures approximately 34 cm long and 5 cm wide.
FO, leaving a long sewing tail.
This strip will form one vertical color block on the front panel.
Part 5: Crochet the Remaining Stripes
Repeat the stripe instructions using the remaining colors.
Additional stripe instructions
Make strips in the following colors:
- Warm taupe.
- Ivory.
- Dusty rose.
- Terracotta.
Each strip should have the same length and approximately the same width.
Make enough strips to create the full width of the front panel.
Part 6: Join the Front Panel Stripes
Arrange the completed strips in the desired color sequence.
Front panel assembly
- Place two strips together with right sides facing.
- Align the long edges.
- Use a yarn needle and matching yarn to sew the edges together.
- Keep the seam flat and even.
- Continue joining the remaining strips.
- Check that the panel remains rectangular.
- Weave in the ends.
The completed front panel should measure approximately 38–40 cm wide and 34 cm tall.
Part 7: Crochet the Back Panel
The back panel uses the same vertical stripe construction.
Back panel instructions
Repeat Parts 4–6 to make a second panel.
Use the same stripe sequence for a symmetrical appearance.
Make sure both panels have identical dimensions.
Part 8: Crochet the Side Panels
The side panels give the tote its depth.
Side panel instructions
Using taupe or ivory yarn, ch 19.
Row 1: Sc in the second chain from the hook and across. 18 sc.
Rows 2 onward: Ch 1, turn, sc across.
Continue until the panel measures approximately 34 cm tall.
FO, leaving a long sewing tail.
Make two identical side panels.
Part 9: Assemble the Bag Body
Join the front, back, side panels, and base to form the tote.
Bag assembly instructions
- Place the front panel and one side panel together.
- Join the edges using slip stitches or mattress stitch.
- Attach the second side panel to the opposite edge.
- Join the back panel to both side panels.
- Align the lower edges of all panels.
- Attach the rectangular base.
- Reinforce the bottom corners.
- Turn the bag right side out.
The bag should now have a structured rectangular silhouette.
Part 10: Crochet the Upper Border
The ivory upper border creates a clean, polished finish.
Upper border instructions
Join ivory yarn at the top edge of the bag.
Round 1: Work sc evenly around the entire opening.
Rounds 2–4: Sc in every stitch around.
Join with a sl st and FO.
Keep the tension firm to prevent the top edge from stretching.
Part 11: Crochet the First Handle
The bag features long ivory handles designed for comfortable shoulder carrying.
Handle instructions
Using ivory yarn and a 3.5 mm hook, ch 9.
Row 1: Sc in the second chain from the hook and across. 8 sc.
Rows 2 onward: Ch 1, turn, sc in all 8 stitches.
Continue until the handle measures approximately 55–60 cm.
FO, leaving a long tail for sewing.
For extra strength, fold the handle lengthwise and sew the long edges together, or make a second matching layer and join both layers.
Part 12: Crochet the Second Handle
Second handle instructions
Repeat Part 11 to create a second identical handle.
Make sure both handles have the same length and width.
Part 13: Attach the Handles
Correct handle placement is important for comfort and durability.
Handle attachment instructions
- Lay the bag flat with the front facing upward.
- Mark two handle attachment points approximately 10–12 cm from the side edges.
- Position the first handle ends on the inside of the front panel.
- Sew each end securely over an area approximately 4–5 cm long.
- Reinforce the attachment with several rows of stitching.
- Repeat for the second handle on the back panel.
- Check that both handles are symmetrical.
Part 14: Make the Decorative Tassel
The decorative tassel combines ivory and terracotta yarn.
Tassel instructions
- Cut approximately 30–40 strands of ivory yarn, each about 20 cm long.
- Cut approximately 15–20 strands of terracotta yarn to the same length.
- Arrange the strands together.
- Fold the bundle in half.
- Wrap a short piece of yarn around the upper section to form the tassel head.
- Secure the wrapping with a firm knot.
- Trim the lower ends evenly.
Part 15: Add the Wooden Beads and Ring
Natural wooden beads give the tassel a rustic bohemian finish.
Tassel decoration instructions
- Cut a length of terracotta yarn approximately 25 cm long.
- Thread the yarn through the top of the tassel.
- Add two or three wooden beads.
- Attach a small wooden ring above the beads.
- Secure the cord with a strong knot.
- Attach the tassel to one handle base or upper side of the bag.
Part 16: Add an Optional Fabric Lining
A fabric lining helps prevent smaller items from slipping through the crochet stitches and gives the bag a more finished interior.
Lining instructions
- Measure the interior dimensions of the bag.
- Cut matching cotton fabric panels.
- Add seam allowances.
- Sew the fabric panels into a bag-shaped lining.
- Fold the upper edge inward.
- Insert the lining into the crochet bag.
- Hand-sew the lining to the upper border.
Part 17: Add an Optional Closure
A magnetic snap or button closure can help keep the bag contents secure.
Closure instructions
- Mark the center of the upper front and back edges.
- Position the closure components.
- Attach the closure to the lining or reinforced crochet fabric.
- Check that both sides align.
- Test the closure before finishing.
Part 18: Final Shaping and Finishing
- Check the front and back panel seams.
- Reinforce the bottom corners.
- Inspect the handle attachment points.
- Adjust the ivory upper border.
- Secure the tassel.
- Weave in all loose yarn ends.
- Lightly block the bag if needed.
- Allow the bag to dry completely.
- Shape the base and sides.
Customization Ideas
1. Neutral minimalist version
Use ivory, beige, taupe, and warm brown for a sophisticated everyday bag.
2. Coastal summer version
Replace the earthy colors with white, sand, sky blue, and navy.
3. Autumn-inspired version
Use rust, mustard, olive green, and cream.
4. Romantic pastel version
Try blush pink, lavender, soft peach, and ivory.
5. Oversized market tote
Increase the panel width and height for a larger shopping bag.
6. Matching crochet accessories
Use leftover yarn to create a matching pouch, keychain, or small wallet.
Care Instructions
- Follow the care instructions on the yarn label.
- Hand wash gently in cool water.
- Use a mild detergent.
- Avoid twisting or wringing the bag.
- Reshape while damp.
- Dry flat away from direct sunlight.
- Do not hang the bag while wet.
- Store in a dry place.
Frequently Asked Questions
Is this striped crochet tote bag beginner-friendly?
The pattern is best suited to intermediate crocheters because it involves multiple panels, vertical stripe construction, strong handle attachment, and bag assembly.
What yarn is best for a crochet tote bag?
Cotton or cotton-blend yarn is ideal because it is durable, provides clear stitch definition, and helps the bag maintain its shape.
Can I make the bag larger?
Yes. Increase the width and height of the body panels and adjust the base and side panels accordingly.
Can I change the stripe colors?
Absolutely. You can use any combination of colors, including neutrals, pastels, bright summer shades, or rich autumn tones.
How do I make the handles stronger?
Use a smaller hook, create double-layer handles, and reinforce the attachment points with strong stitching.
Do I need to add a lining?
A lining is optional, but it is recommended if you plan to carry smaller items or use the bag frequently.
Final Thoughts
This boho striped crochet tote bag is a beautiful combination of practical design, warm earthy colors, and handmade charm.
The vertical terracotta, dusty rose, ivory, and taupe stripes create a sophisticated bohemian look, while the sturdy ivory handles and decorative tassel add both comfort and personality.
Whether you use it for everyday errands, shopping, travel, or as a thoughtful handmade gift, this crochet tote is a stylish project that can be customized to suit your personal taste.
Love this crochet pattern? Save it to your favorite crochet inspiration board and share your finished tote bag with fellow crochet enthusiasts.

