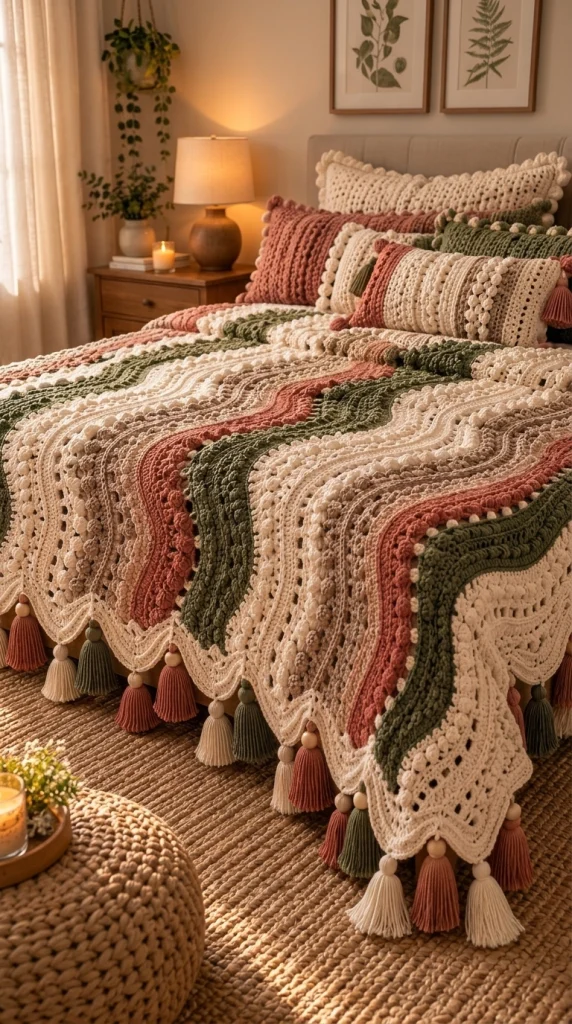
Boho Wavy Crochet Bedspread with Tassels – Free Advanced Crochet Pattern
Transform your bedroom into a cozy bohemian retreat with this stunning Boho Wavy Crochet Bedspread! Featuring flowing textured waves in warm ivory, dusty rose, sage green, and soft taupe, this handmade blanket combines elegant raised stitches, delicate bobbles, intricate lacework, and beautiful tassel edging.
Inspired by natural earthy colors and vintage crochet craftsmanship, this luxurious bedspread creates a soft, romantic atmosphere while adding rich texture and dimension to any bedroom.
This advanced crochet pattern includes detailed instructions for creating the wave panels, textured stitch combinations, decorative borders, matching pillow covers, and handmade tassels.
Pattern Details
- Skill Level: Advanced
- Finished Size: Approximately 220 × 240 cm (queen-size bedspread)
- Style: Bohemian, vintage, cottagecore, romantic
- Construction: Continuous ripple rows with textured stitch sections
- Techniques: Ripple crochet, bobble stitches, post stitches, lacework, scalloped borders, and tassels
- Colors: Ivory, dusty rose, sage green, and taupe
- Terminology: US crochet terms
Materials Needed
- Approximately 2,500 g ivory worsted-weight cotton-blend yarn
- Approximately 900 g dusty rose yarn
- Approximately 800 g sage green yarn
- Approximately 700 g warm taupe yarn
- 5 mm crochet hook
- 4.5 mm crochet hook for decorative edging
- Tapestry needle
- Stitch markers
- Scissors
- Measuring tape
- Blocking mats and rustproof pins
- Optional wooden beads for tassels
- Optional matching yarn for pillow covers
Gauge: Approximately 14 stitches and 9 rows = 10 cm in double crochet, before blocking. Make a swatch using the actual ripple pattern before calculating your final width.
Crochet Abbreviations
- ch: Chain
- sc: Single crochet
- hdc: Half double crochet
- dc: Double crochet
- tr: Treble crochet
- sl st: Slip stitch
- st: Stitch
- sk: Skip
- sp: Space
- FPdc: Front post double crochet
- BPdc: Back post double crochet
- dc2tog: Double crochet two together
- dc3tog: Double crochet three together
- BO: Bobble stitch
- RS: Right side
- WS: Wrong side
- FO: Fasten off
1. Understanding the Wavy Bedspread Design
The blanket is constructed using repeating ripple sections. Each wave is formed by increasing stitches at the peaks and decreasing stitches at the valleys.
The textured surface is created by alternating:
- Classic double crochet ripple rows
- Raised front-post stitch ridges
- Decorative bobble stitch rows
- Openwork lace sections
- Soft half-double crochet transition rows
- Contrasting color bands
The finished blanket features continuous waves running across the bed, with a decorative scalloped border and individually attached tassels.
2. Foundation Chain
Using ivory yarn and a 5 mm crochet hook:
Chain a multiple of 14 plus 3.
For a large queen-size bedspread, begin with approximately 311 chains, then adjust after measuring your gauge swatch.
Work the foundation loosely to prevent the bottom edge from pulling inward.
3. Basic Ripple Stitch Pattern
Row 1: Dc in the fourth chain from the hook. Work 1 dc in each of the next 4 chains.
*Work 3 dc in the next chain to form a peak. Dc in each of the next 5 chains. Skip 2 chains to form a valley. Dc in each of the next 5 chains.*
Repeat the wave sequence across the row, adjusting the final stitches to maintain symmetrical edges.
Row 2: Ch 3 and turn. Work dc stitches across, placing 3 dc into each wave peak and working a dc3tog decrease at each valley.
Rows 3–6: Repeat Row 2.
Maintain the peaks and valleys in the same positions throughout the blanket.
4. Raised Texture Ridge Rows
These rows create the dimensional corded effect visible throughout the bedspread.
Row 7: Ch 3, turn. Work FPdc around each dc post, maintaining the established ripple increases and decreases.
Row 8: Ch 3, turn. Work BPdc around each stitch, maintaining the ripple shaping.
Row 9: Ch 3, turn. Work dc across using the established wave pattern.
These three rows form a raised textured ridge.
Repeat the ridge section whenever you want to emphasize a color transition.
5. Decorative Bobble Stitch Rows
The raised bobbles add a soft, luxurious texture to the wavy design.
How to Make a Bobble Stitch
Yarn over, insert the hook into the stitch, yarn over and pull up a loop.
Yarn over and pull through two loops.
Repeat this partial double crochet process five times in the same stitch.
Yarn over and pull through all remaining loops.
Chain 1 to secure the bobble.
Bobble Row
Row 10: Ch 1, turn. Work sc across while maintaining the established ripple outline. Place a bobble approximately every fifth stitch.
Row 11: Ch 3, turn. Work a regular dc ripple row.
Row 12: Repeat the bobble row, staggering the bobbles between those from the previous decorative row.
Row 13: Work a dc ripple row.
Repeat this section for additional raised texture.
6. Openwork Lace Wave Section
The lace sections add visual lightness and help balance the heavier bobble and ridge textures.
Row 14: Ch 3, turn. Work *dc, ch 1, skip 1 stitch* across, maintaining the ripple peaks and valleys.
Row 15: Ch 3, turn. Work dc into each chain space, preserving the established wave shaping.
Row 16: Repeat Row 14.
Row 17: Work a regular dc ripple row.
These openwork sections create delicate eyelet details throughout the blanket.
7. Color Sequence
To reproduce the earthy bohemian palette shown in the reference image, alternate the colors in wide textured bands.
| Section | Color | Texture |
|---|---|---|
| 1 | Ivory | Classic ripple |
| 2 | Warm Taupe | Raised ridge |
| 3 | Dusty Rose | Bobble waves |
| 4 | Sage Green | Textured ripple |
| 5 | Ivory | Openwork lace |
| 6 | Taupe | Bobble texture |
| 7 | Dusty Rose | Raised ridge |
| 8 | Sage Green | Classic ripple |
| 9 | Ivory | Lace and bobbles |
Repeat this sequence until the blanket reaches approximately 235 cm in length before adding the final border.
Change colors at the end of a row for clean transitions.
8. Creating the Flowing Wave Effect
The soft movement of the blanket comes from carefully maintaining the ripple shaping while varying the stitch textures.
For the best results:
- Keep each ripple peak aligned vertically.
- Maintain consistent stitch counts across the blanket.
- Place bobbles in evenly spaced groups.
- Use raised stitches to outline the colored waves.
- Keep lace sections symmetrical.
- Avoid pulling yarn too tightly when changing colors.
The finished waves should flow naturally across the blanket without puckering or twisting.
9. Crochet the Decorative Side Border
Once the main blanket is complete, attach ivory yarn to one corner.
Round 1: Work sc evenly around all four sides, placing additional stitches at corners.
Round 2: Work hdc around, placing 3 hdc into each corner stitch.
Round 3: Work *dc, ch 2, skip 2 stitches* around to create decorative eyelets.
Round 4: Work 3 dc into each ch-2 space.
Round 5: Work sc around.
Fasten off and weave in ends.
10. Scalloped Lace Edging
Using ivory yarn and a 4.5 mm hook:
Round 1: Attach yarn and work sc evenly around the blanket.
Round 2: *Skip 2 stitches, work 7 dc in the next stitch, skip 2 stitches, sc in the next stitch.*
Repeat around the blanket, adjusting the final repeat at corners.
Round 3: Work a decorative picot edging along each scallop.
To make a picot:
Ch 3, sl st into the first chain.
Repeat at the center of each scallop.
Fasten off and weave in all remaining ends.
11. Handmade Decorative Tassels
The long tassels are one of the most distinctive features of this bohemian bedspread.
Materials for Tassels
- Ivory yarn
- Dusty rose yarn
- Sage green yarn
- Warm taupe yarn
- Optional wooden beads
- Cardboard template approximately 15 cm long
- Scissors
Tassel Instructions
- Wrap yarn around the cardboard approximately 45–55 times.
- Slide a separate strand of yarn underneath the wrapped loops.
- Tie securely at the top.
- Remove the yarn bundle from the cardboard.
- Wrap another strand around the bundle approximately 2 cm below the top.
- Tie tightly to create the rounded tassel head.
- Cut the bottom loops evenly.
- Trim the tassel to approximately 12–14 cm.
- Thread a wooden bead onto the hanging cord if desired.
- Attach securely to the crochet border.
Alternate ivory, dusty rose, sage green, and taupe tassels around the bottom and side edges.
Space the tassels approximately 12–15 cm apart.
12. Matching Textured Crochet Pillow Covers
The matching pillows complete the elegant bohemian bedroom look.
Make pillow covers using the same yarn palette and textured stitches as the bedspread.
Square Pillow Cover
For a 45 × 45 cm pillow:
- Chain enough stitches to create a panel approximately 45 cm wide.
- Work alternating rows of hdc, FPdc, and bobble stitches.
- Continue until the panel measures 45 cm tall.
- Make a second panel.
- Join three sides using sc.
- Insert the pillow form.
- Close the remaining side with an invisible seam.
Add decorative bobbles along the outer edges for a soft, textured finish.
Rectangular Accent Pillow
For a 30 × 50 cm pillow:
Use alternating bands of ivory, dusty rose, sage green, and taupe.
Include textured ridge rows and bobble accents.
Finish with a scalloped border or small tassels at the corners.
13. Blocking and Finishing
Blocking is especially important for a large textured crochet bedspread.
- Weave in all loose yarn ends securely.
- Lay the blanket flat on a clean surface.
- Lightly mist with water.
- Shape the ripple peaks and valleys evenly.
- Pin the scalloped edges into position.
- Allow the blanket to dry completely.
- Attach the decorative tassels after blocking.
Avoid stretching the bobble sections excessively, as this may flatten their texture.
14. Advanced Crochet Tips
- Make a full ripple repeat swatch before beginning the blanket.
- Count stitches regularly to prevent uneven wave alignment.
- Use stitch markers at each ripple peak and valley.
- Maintain consistent tension during color changes.
- Use a slightly larger hook for the lace sections if needed.
- Keep bobble stitches evenly spaced.
- Work post stitches loosely enough to avoid puckering.
- Block the finished blanket carefully to emphasize the wave pattern.
- Use washable yarn if the bedspread will be used frequently.
- Secure decorative beads carefully and avoid them on bedding intended for infants or young children.
15. Size Adjustments
| Bed Size | Approximate Blanket Size |
|---|---|
| Throw | 130 × 160 cm |
| Twin | 170 × 220 cm |
| Full | 200 × 230 cm |
| Queen | 220 × 240 cm |
| King | 260 × 260 cm |
Adjust the foundation chain using complete ripple repeats and continue working until the desired length is reached.
16. Alternative Color Combinations
- Modern Neutral: Ivory, beige, caramel, and warm gray.
- Romantic Cottage: Cream, dusty pink, sage green, and lavender.
- Autumn Boho: Rust, mustard, olive green, and oatmeal.
- Coastal Calm: White, sand, seafoam, and dusty blue.
- Vintage Rose: Antique cream, mauve, burgundy, and taupe.
- Earthy Minimalist: Natural cotton, clay, moss green, and chocolate brown.
Frequently Asked Questions
Is this crochet bedspread suitable for beginners?
This project is designed for advanced crocheters because it combines ripple shaping, raised post stitches, bobbles, lacework, decorative borders, and large-scale construction.
How long does it take to crochet this bedspread?
A queen-size version may take approximately 80–120 hours, depending on your crochet speed, yarn choice, and the amount of decorative detail.
Can I make the blanket without tassels?
Yes! The scalloped lace border looks beautiful on its own and creates a more minimalist finish.
Can I use acrylic yarn instead of cotton?
Yes. Soft premium acrylic or an acrylic-cotton blend works well, although the finished texture and drape may differ.
How do I keep the ripple pattern even?
Use stitch markers to identify each peak and valley. Count your stitches after every few rows and maintain the same increase and decrease positions.
Can I make matching pillow covers?
Absolutely! Use the same color sequence and stitch textures to create coordinated square or rectangular pillow covers.
How should I wash the finished bedspread?
Follow the yarn manufacturer’s washing instructions. For delicate cotton blends, gentle hand-washing or a cool delicate machine cycle may be suitable. Lay flat to dry whenever possible.
Can I sell finished blankets made from this pattern?
You may sell handmade finished items in small quantities. Please credit Cozy Crochet Patterns as the pattern source when possible.
Final Thoughts
This Boho Wavy Crochet Bedspread with Tassels is a statement piece that combines intricate crochet craftsmanship with timeless earthy colors.
The flowing waves, raised bobble textures, delicate lace sections, and beautiful handmade tassels create a luxurious handmade blanket that brings warmth and personality to any bedroom.
Whether you crochet it for your own home, as a wedding gift, or as a treasured handmade heirloom, this bedspread is a rewarding project for experienced crochet enthusiasts.
Save this free Boho Wavy Crochet Bedspread Pattern to Pinterest and share it with your crochet-loving friends!
Designer note: This is an original pattern concept inspired by the reference image, not an exact reproduction or fully tested pattern. The ripple instructions are a design outline; swatch and verify stitch counts, shaping, and border repeats before making a full-size bedspread.

