Burgundy & Blush Granny Square Crochet Hobo Bag
Beginner Friendly
Perfect for those just starting their crochet journey, with clear instructions and simple techniques
Single-Day Project
A satisfying project you can complete in a single afternoon or evening.
Handmade Gift
A beautiful keepsake — free forever. Read online or print at home.
About This Burgundy & Blush Granny Square Crochet Hobo Bag
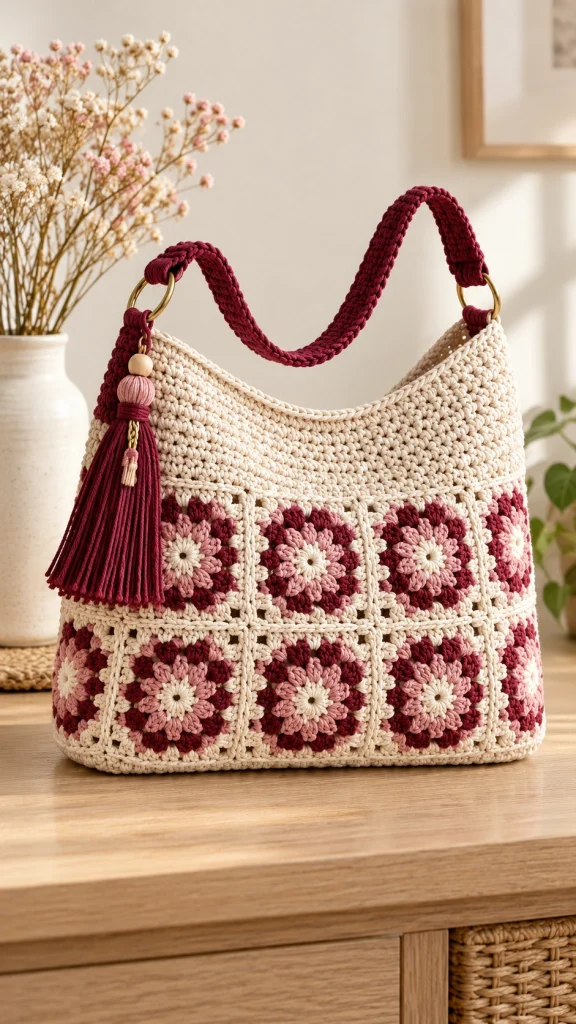
This floral granny square crochet bag combines romantic vintage colors with a roomy everyday hobo shape. The lower section is built from dimensional flower granny squares in cream, blush pink and deep burgundy, while the upper section is worked in a simple textured cream stitch.
A curved opening gives the bag its relaxed silhouette, while a thick burgundy crochet handle attached with gold rings adds contrast and structure. The oversized handmade tassel finishes the design beautifully.
Materials
- Worsted / Medium #4 cotton yarn – cream 400-450 g
- Deep burgundy cotton yarn 180-220 g
- Blush pink cotton yarn 120-150 g
- 4.0 mm crochet hook 1
- 3.5 mm crochet hook for tighter details 1
- Large gold-tone rings, approximately 30-35 mm 2
- Small gold-tone ring or clasp for tassel 1
- Large wooden bead 1
- Decorative wrapped bead or yarn bead 1
- Yarn needle 1
- Stitch markers 4
- Scissors 1 pair
- Optional cotton lining fabric approximately 60 × 90 cm
Abbreviations
MRmagic ringchchainsl stslip stitchscsingle crochethdchalf double crochetdcdouble crochettrtreble crochetincincreasedecdecreaseststitchstsstitchesFOfasten offFinished Measurements
- Width: approximately 38 cm / 15 in
- Height: approximately 34-36 cm / 13.5-14 in
- Depth: approximately 10-12 cm / 4-4.75 in
- Handle length: approximately 60-65 cm / 24-25.5 in
- Granny square: approximately 10 × 10 cm / 4 × 4 in
Part 1 – Crochet the Floral Center
Each square begins with the small cream flower visible at its center.
Using cream yarn:
Round 1
Make MR.
Ch 1, work 12 sc into ring.
Join with sl st.
12 sts.
Round 2 – Cream Petals
*Ch 2, 2 dc in same st, ch 2, sl st in next st.*
Repeat around to form 6 small petals.
FO cream.
Part 2 – Add the Blush Flower Layer
Join blush pink yarn behind one cream petal.
Round 3
*Ch 3, work behind the next cream petal, sl st between petals.*
Repeat around to create 6 chain spaces.
Round 4
Into each ch-3 space work:
(sc, hdc, 3 dc, hdc, sc)
Repeat around.
You should now have a dimensional blush flower surrounding the cream center.
Part 3 – Add the Burgundy Flower Layer
Join burgundy yarn behind the blush petals.
Round 5
*Ch 4, sl st between the next two blush petals.*
Repeat around.
Round 6
Into each ch-4 space work:
(sc, hdc, 4 dc, hdc, sc)
Repeat around.
The flower should now show three distinct tones: cream center, blush inner petals and burgundy outer petals.
Part 4 – Turn the Flower Into a Square
Change to cream yarn.
Round 7
Work around the flower while creating four corners.
In each corner position work:
(3 dc, ch 2, 3 dc)
Between corners, work groups of 3 dc into the available spaces.
Round 8
Sl st to the first corner.
Work:
(3 dc, ch 2, 3 dc) into every corner.
Work 3 dc into each space along the sides.
Round 9 – Firm Border
Ch 1.
Sc in every stitch around.
Work 3 sc into each corner space.
Join and FO.
Part 5 – Make the Granny Squares
For a medium bag similar to the inspiration, make approximately:
- Front: 8 floral squares
- Back: 8 floral squares
- Sides: 4 floral squares
- Bottom: 4 cream or floral squares
Total: approximately 24 squares.
The visible front is arranged in two rows of four squares.
If you prefer a slightly narrower bag, use two rows of three squares for the front and back.
Part 6 – Block the Squares
- Pin each square to approximately 10 × 10 cm.
- Make sure all four corners form 90-degree angles.
- Lightly mist or steam-block.
- Allow the squares to dry completely before joining.
Part 7 – Join the Front Panel
Arrange 8 squares in a rectangle:
4 squares across × 2 squares high.
Place squares with right sides facing upward.
Using cream yarn, join neighboring squares with your preferred method.
For the raised cream seams shown in the inspiration, use single crochet joining:
Insert hook through both corresponding edge stitches, yarn over and work sc.
Continue evenly along the entire seam.
Repeat horizontally and vertically.
Part 8 – Make the Back Panel
Repeat the same arrangement using another 8 squares.
Join them exactly as you did for the front.
Check that both panels have identical measurements before continuing.
Part 9 – Create the Side Panels
Join 2 squares vertically for the left side.
Repeat with another 2 squares for the right side.
For a deeper bag, use wider squares or add a narrow cream crochet strip between the side panels and front/back.
Part 10 – Crochet the Bottom
You can create the base using either floral squares or a solid cream rectangle.
Recommended Solid Base
Using cream yarn:
Ch until the foundation measures approximately the width of the bag’s side panel.
Work sc rows until the rectangle matches the length of the front panel.
FO.
A dense solid base makes the finished bag stronger than an open granny-square bottom.
Part 11 – Assemble the Lower Bag
- Join one side panel to the front.
- Join the second side panel to the opposite front edge.
- Attach the back panel to both sides.
- Attach the rectangular bottom around all four lower edges.
- Turn the bag right side out.
The lower floral section should now form a structured rectangular bucket shape.
Part 12 – Crochet the Cream Upper Section
Join cream yarn anywhere along the upper edge of the assembled granny-square body.
Round 1
Ch 1.
Sc evenly around the entire opening.
Adjust the stitch count slightly if necessary so the fabric lies flat.
Rounds 2-5
Sc in every stitch around.
Round 6
*Sc in next st, dc in next st.*
Repeat around.
Round 7
Dc into every sc and sc into every dc.
Rounds 8-14
Continue alternating the textured stitch pattern.
The cream upper section should measure approximately 12-14 cm.
Part 13 – Shape the Hobo Opening
The center front and back are lower than the sides.
Place markers at:
- center front
- center back
- left side
- right side
Begin working in rows rather than continuous rounds.
Gradually shorten each row near the center front and center back while maintaining height at both sides.
Work approximately 8-10 shaping rows.
The side attachment points should finish approximately 6-8 cm higher than the center opening.
Part 14 – Finish the Top Edge
Join cream yarn at one side.
Work one round of sc evenly around the entire shaped opening.
Work a second round of sl sts for a clean, firm edge.
FO and weave in the ends.
Part 15 – Side Tabs for the Gold Rings
Using burgundy yarn, make 2 tabs.
Row 1
Ch 9.
Row 2
Starting in second ch from hook, sc across.
8 sts.
Rows 3-12
Ch 1, turn, sc across.
FO leaving a long sewing tail.
Thread each tab through a gold ring.
Fold the tab in half.
Sew the two ends securely to the upper side of the bag.
Repeat on the opposite side.
Part 16 – Crochet the Burgundy Handle
Using burgundy yarn:
Step 1
Ch approximately 115-125, or until the chain measures about 60-65 cm.
Row 1
Starting in second ch from hook, sc across.
Rows 2-5
Ch 1, turn.
Sc across.
The finished handle should be approximately 3-4 cm wide.
Edging
Work sc evenly around all four sides of the strap.
FO.
Part 17 – Attach the Handle
Pass one end of the burgundy handle through the first gold ring.
Fold approximately 5 cm of the strap back onto itself.
Sew firmly using matching burgundy yarn.
Repeat on the opposite side.
Reinforce each attachment with several passes of yarn.
Part 18 – Make the Burgundy Tassel
Cut approximately 45-55 strands of burgundy yarn, each about 30 cm long.
- Lay all strands together evenly.
- Fold the bundle in half.
- Tie firmly approximately 2 cm below the fold.
- Wrap burgundy yarn around the neck several times.
- Knot securely.
- Trim the bottom evenly.
The finished tassel should measure approximately 15-18 cm.
Part 19 – Decorative Tassel Top
Thread the tassel attachment cord through:
- A small gold ring or clasp
- One natural wooden bead
- One blush-pink wrapped bead
- The top loop of the burgundy tassel
Secure everything firmly.
Attach the tassel charm to the left gold handle ring so it hangs along the floral squares.
Part 20 – Mini Tassel Detail
For the tiny accent hanging beside the main tassel:
Wrap cream or blush yarn around two fingers approximately 12 times.
Tie the top.
Cut the lower loops.
Wrap the neck with matching yarn.
Trim to approximately 3-4 cm.
Attach beside the larger tassel.
Part 21 – Optional Fabric Lining
A lining is strongly recommended for this design because granny squares naturally contain small openings.
- Measure the finished interior width, height and depth.
- Cut two fabric panels slightly larger than the bag.
- Add side or bottom gussets if needed.
- Sew the lining together with approximately 1 cm seam allowance.
- Fold the top raw edge inward.
- Insert the lining into the bag.
- Hand-sew it just below the cream upper edge.
Add an interior pocket before inserting the lining if desired.
Part 22 – Optional Magnetic Closure
For a more practical everyday bag, install a magnetic snap in the lining at the center front and back.
Position the closure approximately 2-3 cm below the upper edge.
Reinforce the fabric behind each half of the snap with a small square of interfacing.
Part 23 – Final Blocking & Shaping
- Lay the bag on a clean towel.
- Gently shape the granny-square section into an even rectangle.
- Shape the cream upper section into a smooth curved opening.
- Lightly steam-block without pressing directly onto the yarn.
- Allow the bag to dry completely.
- Shape the handle into a natural arch.
- Comb the tassel strands with your fingers.
- Trim any uneven tassel ends.
Color Variations
- Romantic: cream + burgundy + blush pink
- Autumn: oatmeal + rust + chocolate brown
- Vintage garden: cream + sage + dusty rose
- Coastal: ivory + navy + dusty blue
- Spring: cream + lavender + soft pink
- Neutral: beige + mocha + ivory
Size Adjustments
Mini handbag: Use squares approximately 7-8 cm wide and arrange 3 across × 2 high.
Larger tote: Use 5 squares across × 3 squares high on the front and back.
Deeper bag: Increase the side panels from one square wide to approximately 1.5 square widths.
Longer shoulder bag: Extend the burgundy strap to 75-85 cm.
Crossbody: Make a narrower reinforced strap approximately 105-120 cm long.
Finishing Checklist
- Block every granny square to the same dimensions.
- Check that the front and back panels match.
- Reinforce every lower corner.
- Make sure the upper cream section lies flat.
- Check that both side ring tabs are symmetrical.
- Reinforce the handle ends.
- Weave in all yarn tails securely.
- Add the lining before attaching delicate decorations.
- Attach the tassel.
- Steam and shape the finished bag gently.
Frequently Asked Questions
Medium-weight cotton or a firm cotton blend is ideal. It gives the flower motifs good definition and creates a bag that feels structured rather than overly stretchy.
The exact number depends on your square size and desired bag dimensions. For the medium version described here, approximately 20-24 squares creates a roomy hobo-style bag.
Yes. You can use one flower color throughout or alternate several combinations. Keeping the outer square rounds cream creates the clean joined-grid appearance.
A lining is optional, but highly recommended. It protects the crochet, prevents small belongings from slipping through the granny-square openings and reduces stretching.
Yes. You can make reinforced crochet loops at both sides, although metal rings create a more structured handle attachment and match the look shown here.
Use cotton yarn, a slightly smaller hook and tight stitches. You can also sew cotton webbing or a narrow fabric strip to the underside of the crochet handle for extra reinforcement.
Yes. Attach it to a small lobster clasp or removable ring instead of sewing it permanently to the bag.
The finished Burgundy & Blush Granny Square Crochet Hobo Bag