Burgundy Cherry Crochet Hobo Bag
Beginner Friendly
Perfect for those just starting their crochet journey, with clear instructions and simple techniques
Single-Day Project
A satisfying project you can complete in a single afternoon or evening.
Handmade Gift
A beautiful keepsake — free forever. Read online or print at home.
About This Burgundy Cherry Crochet Hobo Bag
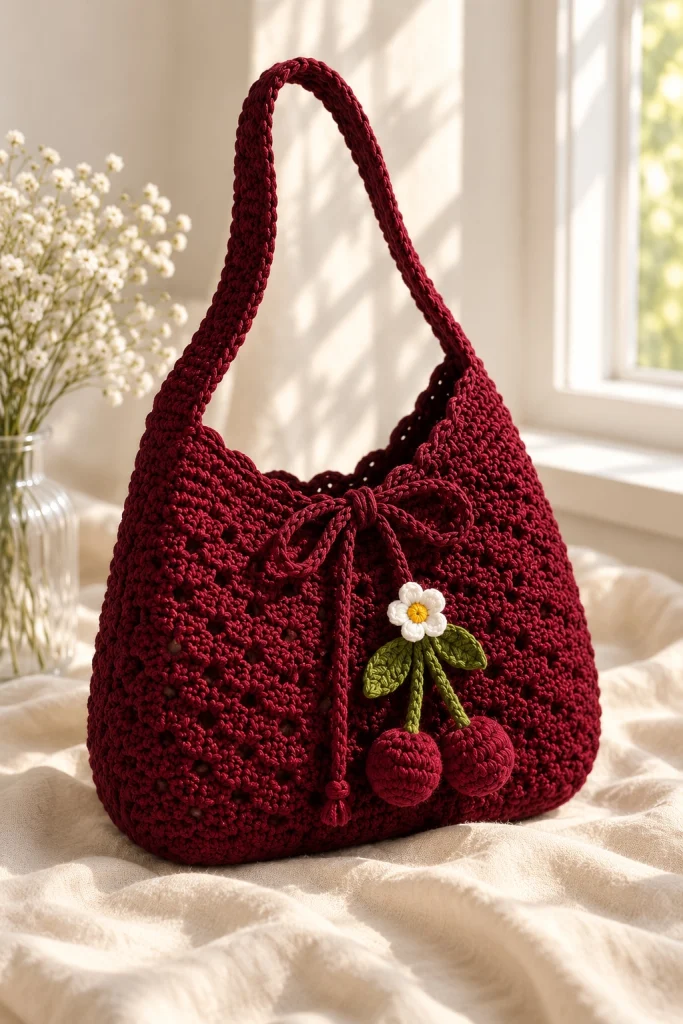
This crochet cherry hobo bag combines a rich burgundy color, a relaxed everyday shape and the sweetest little handmade cherry detail. The body is worked with a dense textured stitch so the finished bag feels sturdy while still keeping that soft handmade look.
The long integrated shoulder strap, gently gathered opening and crochet drawstring give the bag its relaxed hobo silhouette. The finishing touch is a tiny white flower with green leaves and two dimensional crochet cherries hanging from the front.
Materials
- Worsted / Medium #4 cotton yarn – burgundy 450-550 g
- Green cotton yarn 15-20 g
- White cotton yarn small amount
- Yellow cotton yarn small amount
- Polyester stuffing for cherries small amount
- 4.0 mm crochet hook 1
- 3.0-3.5 mm hook for charm 1
- Yarn needle 1
- Stitch markers 4
- Scissors 1 pair
- Optional cotton lining fabric approximately 50 × 80 cm
Abbreviations
MRmagic ringchchainsl stslip stitchscsingle crochethdchalf double crochetdcdouble crochetincincreasedecdecreaseBLOback loop onlyststitchstsstitchesFOfasten offFinished Measurements
- Bag width: approximately 34 cm / 13.5 in
- Bag height: approximately 30 cm / 12 in
- Depth: approximately 10-12 cm / 4-4.75 in
- Strap drop: approximately 32-35 cm / 12.5-14 in
- Strap width: approximately 4 cm / 1.5 in
Part 1 – Crochet the Oval Base
Using burgundy yarn and the 4.0 mm hook:
Round 1
Ch 31.
Starting in the second ch from hook, sc in the next 29 ch.
Work 3 sc into the final ch.
Continue along the opposite side of the foundation chain.
Sc in next 28 ch.
Work 2 sc in the final ch.
Join with sl st.
62 sts.
Round 2
Ch 1.
Sc in next 29 sts.
Work 2 sc in each of the next 3 sts.
Sc in next 28 sts.
Work 2 sc in each of the final 2 sts.
Join.
Round 3
Continue increasing evenly around both curved ends of the oval.
Keep the long sides straight.
Round 4
Repeat the increase placement from the previous round, spacing the increases farther apart.
The finished base should measure approximately 30-32 cm long × 9-10 cm wide.
Part 2 – Build the Bag Body
Round 5
Ch 1.
Work 1 sc in BLO of every stitch around.
This creates a subtle ridge between the bottom and sides.
Rounds 6-8
Sc evenly around.
Round 9 – Begin Textured Stitch
*Sc in next st, dc in next st.*
Repeat around.
Round 10
Work the opposite stitch into each stitch:
Dc into every sc and sc into every dc.
This creates the small pebbled texture visible across the bag.
Rounds 11-34
Continue alternating these two textured rounds.
Do not increase during this section.
The body should gradually form a roomy pouch approximately 26-28 cm high.
Part 3 – Shape the Upper Bag
Place one stitch marker at each side of the bag.
Round 35
Work in established texture while making one decrease approximately 5 stitches before and 5 stitches after each side marker.
4 decreases total.
Round 36
Work evenly without decreasing.
Round 37
Repeat the 4 decreases.
Round 38
Work evenly.
Round 39
Repeat the decreases once more.
This slight shaping pulls the upper sides inward and creates the relaxed hobo silhouette.
Part 4 – Create the Front Dip
The inspiration bag has a soft curved opening rather than a completely straight top.
Mark the center front and center back.
Work approximately 8-10 short rows around the sides and back, leaving the central front section unworked.
Each short row should end 1-2 stitches earlier than the previous row.
This gently lowers the center front opening while keeping the sides higher for the strap attachment.
Part 5 – Crochet the Wide Shoulder Strap
Do not cut the yarn.
At one upper side of the bag, mark approximately 7-8 stitches for the strap.
Row 1
Sc across the marked stitches.
Rows 2 onward
Ch 1, turn.
Sc across.
Continue until the strap measures approximately 65-70 cm, or your preferred length.
For a slightly textured strap, alternate:
Row A: sc across.
Row B: sc in BLO across.
Repeat until the desired length is reached.
Attach the free end securely to the opposite upper side of the bag using sl sts or mattress stitch.
Part 6 – Strengthen the Strap
Join burgundy yarn at one side of the strap.
Work sc evenly along the entire outer edge of the strap, around the bag opening and along the opposite strap edge.
Join and FO.
This finishing round gives the handle a clean edge and reduces stretching.
Part 7 – Drawstring
Using burgundy yarn:
Step 1
Ch approximately 120-130, or until the cord measures about 90 cm.
Step 2
Starting in second ch from hook, sl st in every chain.
This creates a firm rounded crochet cord.
FO.
Thread the cord horizontally through stitches around the upper front section of the bag.
Bring both ends to the center front.
Tie into a relaxed bow.
Part 8 – Crochet the Cherries
Make 2 cherries using burgundy yarn and the smaller hook.
Round 1
MR, 6 sc.
6 sts.
Round 2
Inc in each st around.
12 sts.
Round 3
*Sc, inc.* around.
18 sts.
Rounds 4-6
Sc around.
18 sts.
Round 7
*Sc, dec.* around.
12 sts.
Begin stuffing firmly.
Round 8
Dec around.
6 sts.
Add a little more stuffing if needed.
FO, close the opening and weave in the tail.
Part 9 – Cherry Stems
Using green yarn:
Join yarn to the top of one cherry.
Ch 16.
Sl st back down the chain.
FO leaving a sewing tail.
Repeat for the second cherry.
Bring the two stems together near the top so the cherries hang side by side.
Part 10 – Crochet the Leaves
Make 2 leaves using green yarn.
Leaf
Ch 10.
Starting in second ch from hook:
Sl st, sc, hdc, dc, 2 dc, dc, hdc, sc.
Work 3 sc into the final chain.
Continue along the opposite side:
Sc, hdc, dc, 2 dc, dc, hdc, sc, sl st.
FO leaving a long sewing tail.
Pinch the base slightly before sewing to give the leaf a natural curved shape.
Part 11 – Tiny White Flower
Using yellow yarn:
Center
MR, 6 sc.
Join and change to white.
Petals
In each stitch around work:
(ch 2, 2 dc, ch 2, sl st)
Repeat to create 6 small petals.
FO leaving a sewing tail.
Part 12 – Assemble the Cherry Charm
- Position the two cherries approximately 3-4 cm apart.
- Bring their green stems together at the top.
- Sew one green leaf to each side of the joined stems.
- Position the white flower over the stem junction.
- Sew the flower securely in place.
- Attach the completed charm beneath the center bow.
Allow the cherries to hang freely so they move slightly when the bag is carried.
Part 13 – Optional Decorative Tassels
To recreate the small details at the ends of the drawstring:
Wrap burgundy yarn approximately 12-15 times around two fingers.
Tie tightly near one end.
Cut through the opposite loops.
Trim evenly.
Attach one miniature tassel to each end of the drawstring.
Part 14 – Optional Fabric Lining
A lining is recommended if you plan to use the bag regularly.
- Lay the finished bag flat on folded cotton fabric.
- Trace around the body, adding approximately 1.5 cm seam allowance.
- Cut two identical pieces.
- Sew the sides and bottom together.
- Fold the upper raw edge inward.
- Insert the lining into the crochet bag.
- Hand-sew the lining just below the upper crochet edge.
You can also add a small interior pocket before inserting the lining.
Part 15 – Final Shaping
- Gently steam-block the body without flattening the texture.
- Shape the base into a soft oval.
- Stretch the strap gently so both sides sit evenly.
- Arrange the center bow.
- Position the flower directly below the knot.
- Shape the leaves outward.
- Allow both cherries to hang naturally.
Color Ideas
- Cherry: burgundy bag + burgundy cherries + olive leaves
- Strawberry: cream bag + red charm + sage leaves
- Vintage: chocolate brown + dusty pink flowers
- Spring: sage green + cream flower + pink cherries
- Romantic: dusty rose + wine-red cherries
- Neutral: oatmeal + mocha + cream flower
Size Adjustments
Smaller bag: Begin with 25 chains instead of 31 and make the body approximately 22-24 cm high.
Larger bag: Begin with 37 chains and add additional increase rounds to the oval base.
Longer shoulder strap: Continue the strap rows until it reaches your preferred drop before attaching it to the opposite side.
Crossbody version: Make a narrower 4-5 stitch strap approximately 105-115 cm long.
Finishing Checklist
- Check that the base lies flat.
- Make sure both sides of the bag are the same height.
- Reinforce both strap attachment points.
- Weave in every yarn end securely.
- Check that the drawstring moves smoothly.
- Secure the cherry charm firmly.
- Shape the cherries and leaves by hand.
- Add the optional lining before final blocking.
Frequently Asked Questions
A firm cotton or cotton-blend yarn works especially well because it gives the stitches definition while helping the bag maintain its shape.
Yes. The cherry decoration is completely optional. You can leave the front simple or replace it with a crochet flower, bow, strawberry or other small charm.
Use a firm stitch, crochet tightly and add a reinforcing edge. For a bag that will carry heavier items, sew fabric or cotton webbing to the underside of the strap.
A lining is optional, but it helps the bag keep its shape, prevents small objects from slipping through the stitches and protects the crochet fabric.
Absolutely. The design also works beautifully in cream, sage, chocolate brown, dusty pink, black or warm caramel.
Yes. Instead of sewing the charm directly onto the bag, attach it to a small lobster clasp or keyring so it can be removed or moved to another bag.
The finished Burgundy Cherry Crochet Hobo Bag