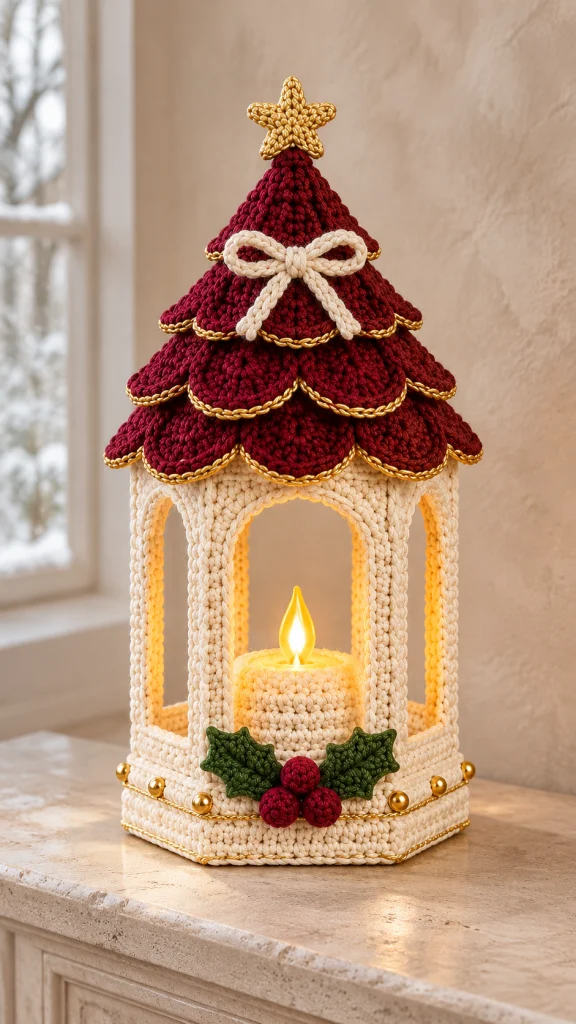
Burgundy Christmas Tree Crochet Lantern Pattern
Advanced
For experienced crocheters who enjoy complex shaping, fine detail, and ambitious construction
Single-Day Project
A satisfying project you can complete in a single afternoon or evening.
Handmade Gift
A beautiful keepsake — free forever. Read online or print at home.
About This Burgundy Christmas Tree Crochet Lantern Pattern
This Christmas tree crochet lantern pattern brings together an ivory hexagonal frame, a burgundy tree-shaped roof, and delicate gold edging. Six curved window trims surround a removable LED candle, while a small star, cream bow, and holly cluster give the lantern its festive character.
This is an advanced home decor project built around a lightweight internal frame. You will crochet fitted covers, a shaped cone, four scalloped roof tiers, and small decorative pieces, then assemble them with careful alignment. Allow approximately 22–30 hours of working time, with extra time for blocking and drying.
The finished lantern measures approximately 40 cm tall and 21 cm across the widest roof scallops. Its roof lifts off so you can reach the candle switch and battery compartment. The instructions make one lantern; the different sizes pictured are styling inspiration rather than additional graded sizes.
Materials
- DK cotton yarn: approximately 240 m ivory.
- DK cotton yarn: approximately 220 m deep burgundy.
- DK cotton yarn: approximately 25 m dark holly green.
- Gold cotton yarn of similar thickness: approximately 15 m for the star.
- Fine, flexible metallic gold yarn: approximately 55 m for roof and base edging.
- 3.0 mm crochet hook, or size needed for gauge.
- 2.5 mm crochet hook for metallic slip-stitch edging.
- Firm plastic canvas, approximately 2 mm thick: enough for one hexagonal base insert and one hexagonal upper ring.
- Six smooth wooden dowels, each 20 cm long and 6 mm in diameter, with rounded, sanded ends.
- Six pieces of 1 mm aluminum craft wire, each approximately 16 cm long, for the window arches.
- One small piece of firm plastic canvas for a star insert.
- Strong ivory sewing thread and a sewing needle for securing the structural frame.
- Tapestry needle, stitch markers, scissors, ruler, wire cutters, and pliers.
- A small amount of polyester filling for the roof tip and berries.
- Twelve gold beads, approximately 8 mm across, with holes large enough for secure sewing.
- One battery-operated LED candle, approximately 5–6 cm wide and no more than 8 cm tall.
- Optional water-based fabric stiffener for the roof and star, used according to its label.
- Blocking mat, rustproof pins, and a washable cone-shaped blocking form.
Abbreviations
chchainscsingle crochethdchalf double crochetdcdouble crochettrtreble crochetsl stslip stitchincwork 2 single crochets in one stitchdecsingle crochet 2 stitches togetherMRmagic ringBLOback loop onlyFLOfront loop onlyststitchHexagonal Base: Make Two
- With ivory and the main hook, work 6 sc in an MR. Tighten the ring and mark the first stitch. Round 1: 6 stitches.
- Round 2: Inc in each stitch around. 12 stitches.
- Round 3: Repeat (sc in next stitch, inc) 6 times. 18 stitches.
- Round 4: Repeat (sc in next 2 stitches, inc) 6 times. 24 stitches.
- Round 5: Repeat (sc in next 3 stitches, inc) 6 times. 30 stitches.
- Round 6: Repeat (sc in next 4 stitches, inc) 6 times. 36 stitches.
- Round 7: Repeat (sc in next 5 stitches, inc) 6 times. 42 stitches.
- Round 8: Repeat (sc in next 6 stitches, inc) 6 times. 48 stitches.
- Round 9: Repeat (sc in next 7 stitches, inc) 6 times. 54 stitches.
- Round 10: Repeat (sc in next 8 stitches, inc) 6 times. 60 stitches.
- Round 11: Repeat (sc in next 9 stitches, inc) 6 times. 66 stitches.
- Round 12: Repeat (sc in next 10 stitches, inc) 6 times. 72 stitches.
- Round 13: Repeat (sc in next 11 stitches, inc) 6 times. 78 stitches.
- Round 14: Repeat (sc in next 12 stitches, inc) 6 times. 84 stitches.
- Round 15: Repeat (sc in next 13 stitches, inc) 6 times. 90 stitches.
- Round 16: Repeat (sc in next 14 stitches, inc) 6 times. 96 stitches.
- Round 17: Repeat (sc in next 15 stitches, inc) 6 times. 102 stitches.
- Round 18: Repeat (sc in next 16 stitches, inc) 6 times. 108 stitches. Sl st in the next stitch and fasten off. Keep the six increase columns aligned when blocking to establish the corners.
- Repeat Rounds 1–18 for the second hexagon. Block both pieces to the same size, approximately 16–17 cm from corner to opposite corner.
Base Wall and Insert
- Place the first hexagon with its right side facing down. Join ivory in a corner stitch. Wall Round 1: Working in BLO, sc in all 108 stitches. Mark the first stitch.
- Wall Round 2: Sc in each stitch around. 108 stitches.
- Wall Round 3: Sc in each stitch around. 108 stitches.
- Wall Round 4: Sc in each stitch around. 108 stitches. Sl st in the next stitch and fasten off with a long sewing tail.
- Cut one plastic-canvas hexagon to sit flat inside the base without stretching the wall. Round its points and smooth all cut edges. It should be slightly smaller than the crocheted hexagon.
- Place the insert in the base. Set the second crocheted hexagon over it with its right side facing up. Align all six corners and sew its 108 edge stitches to the 108 stitches of Wall Round 4. The insert is now enclosed.
- With metallic gold yarn, surface sl st around the crease at the bottom of the wall. Work one surface stitch per base stitch, for 108 stitches; join and fasten off.
- Work a second metallic surface line around the upper wall, again using 108 evenly spaced surface slip stitches. Keep both lines relaxed so the base stays flat.
Six Post Covers and Structural Frame
- For each post cover, ch 5 in ivory. Row 1: Sc in the second chain from the hook and in the next 3 chains. 4 stitches.
- Rows 2–48: Ch 1, turn, and sc in all 4 stitches. Work each row separately, maintaining 4 stitches. The strip should measure approximately 20 cm long.
- Make six strips total. Wrap one around each dowel and mattress-stitch the long edges together, enclosing the wood. If needed, ease the seam slightly; do not leave exposed wooden edges at the ends.
- Mark six points on the base directly above the six corners. Stand one covered post at each point. Using strong thread, make repeated stitches through the base insert and around the lower 1 cm of the post cover. Secure each post upright.
- Cut a plastic-canvas hexagonal upper ring whose outer dimensions match the base insert. Remove its center, leaving a border approximately 10–12 mm wide. Round and smooth every cut edge.
- Set the upper ring on the six post tops, with each post directly under a ring corner. Sew through the canvas and around each post cover repeatedly. Check that the ring is level and the posts are parallel before securing the thread.
Upper Ring Cover
- With ivory, ch 108 loosely and join with a sl st without twisting. Round 1: Ch 1 and sc in every chain. Join to the first sc. 108 stitches.
- Round 2: Ch 1 and sc in every stitch. Join to the first sc. 108 stitches.
- Round 3: Ch 1 and sc in every stitch. Join to the first sc. 108 stitches.
- Round 4: Ch 1 and sc in every stitch. Join to the first sc. 108 stitches. Fasten off with a long sewing tail.
- Place the band around the outer edge of the upper ring, centering one 18-stitch section on each side. Fold its lower and upper edges inward around the canvas and sew them together on the inside. At each post, sew the edges separately to the post cover. Cover all canvas edges.
Six Curved Window Trims
- For each trim, ch 31 in ivory. Row 1: Sc in the second chain from the hook and in each remaining chain. 30 stitches.
- Row 2: Ch 1, turn, and sc in all 30 stitches. Fasten off with a long sewing tail.
- Make six strips. Fold both ends of each wire back on themselves by approximately 1 cm, pressing the folds closed with pliers. The folded wire must be shorter than its crochet strip and have no exposed sharp ends.
- Lay one wire along the center of each strip. Fold the long crochet edges together and sew them closed around the wire. Close both ends securely.
- Bend each covered wire into an arch approximately 8 cm wide and 4–5 cm high. Set its crown against the underside of the upper ring at the midpoint of one side. Set the ends against the two neighboring posts, approximately 4–5 cm below the ring.
- Sew the crown to the ring cover and each end firmly to its post cover. Repeat on all six sides. Adjust the curves so neighboring arches meet their posts at the same height.
Burgundy Cone Roof
- With burgundy, work 6 sc in an MR. Round 1: 6 stitches. Mark the beginning and keep the right side outside.
- Round 2: Sc in each stitch. 6 stitches.
- Round 3: Inc in each stitch. 12 stitches.
- Round 4: Sc in each stitch. 12 stitches.
- Round 5: Repeat (sc in next stitch, inc) 6 times. 18 stitches.
- Round 6: Sc in each stitch. 18 stitches.
- Round 7: Repeat (sc in next 2 stitches, inc) 6 times. 24 stitches.
- Round 8: Sc in each stitch. 24 stitches.
- Round 9: Repeat (sc in next 3 stitches, inc) 6 times. 30 stitches.
- Round 10: Sc in each stitch. 30 stitches.
- Round 11: Repeat (sc in next 4 stitches, inc) 6 times. 36 stitches.
- Round 12: Working in BLO, sc in each stitch. 36 stitches. Leave the front loops of Round 11 free for the upper tier.
- Round 13: Repeat (sc in next 5 stitches, inc) 6 times. 42 stitches.
- Round 14: Sc in each stitch. 42 stitches.
- Round 15: Repeat (sc in next 6 stitches, inc) 6 times. 48 stitches.
- Round 16: Sc in each stitch. 48 stitches.
- Round 17: Repeat (sc in next 7 stitches, inc) 6 times. 54 stitches.
- Round 18: Sc in each stitch. 54 stitches.
- Round 19: Repeat (sc in next 8 stitches, inc) 6 times. 60 stitches.
- Round 20: Working in BLO, sc in each stitch. 60 stitches. Leave the front loops of Round 19 free.
- Round 21: Repeat (sc in next 9 stitches, inc) 6 times. 66 stitches.
- Round 22: Sc in each stitch. 66 stitches.
- Round 23: Repeat (sc in next 10 stitches, inc) 6 times. 72 stitches.
- Round 24: Sc in each stitch. 72 stitches.
- Round 25: Repeat (sc in next 11 stitches, inc) 6 times. 78 stitches.
- Round 26: Sc in each stitch. 78 stitches.
- Round 27: Repeat (sc in next 12 stitches, inc) 6 times. 84 stitches.
- Round 28: Working in BLO, sc in each stitch. 84 stitches. Leave the front loops of Round 27 free.
- Round 29: Repeat (sc in next 13 stitches, inc) 6 times. 90 stitches.
- Round 30: Sc in each stitch. 90 stitches.
- Round 31: Repeat (sc in next 14 stitches, inc) 6 times. 96 stitches.
- Round 32: Sc in each stitch. 96 stitches.
- Round 33: Repeat (sc in next 15 stitches, inc) 6 times. 102 stitches.
- Round 34: Sc in each stitch. 102 stitches.
- Round 35: Repeat (sc in next 16 stitches, inc) 6 times. 108 stitches. Sl st in the next stitch and fasten off.
- Lightly fill only the upper 3 cm of the cone to support the star. Tack a small circle of matching fabric or a firmly sewn yarn web inside the cone below this filling to hold it in place. Leave the rest of the roof hollow.
Four Scalloped Roof Tiers
- Upper tier, foundation round: Hold the roof upright with its tip pointing away from you. Join burgundy to a free front loop of Round 11. Working in those 36 free loops, repeat (sc in next 5 loops, inc in next loop) 6 times. Join to the first sc. 42 stitches.
- Upper tier, depth round: Ch 1 and sc in each stitch. Join. 42 stitches.
- Upper tier, scallop round: Repeat (skip 2 stitches, work 7 dc in next stitch, skip 2 stitches, sl st in next stitch) 7 times. The repeat consumes 6 stitches. Join if needed and fasten off. 7 scallops, comprising 49 dc and 7 anchoring slip stitches.
- Second tier, foundation round: Join burgundy to a free front loop of Round 19. Repeat (sc in next 9 loops, inc in next loop) 6 times. Join. 66 stitches.
- Second tier, depth round: Ch 1 and sc in each stitch. Join. 66 stitches.
- Second tier, scallop round: Repeat (skip 2 stitches, 7 dc in next stitch, skip 2 stitches, sl st in next stitch) 11 times. Fasten off. 11 scallops, comprising 77 dc and 11 anchoring slip stitches.
- Third tier, foundation round: Join burgundy to a free front loop of Round 27. Repeat (sc in next 13 loops, inc in next loop) 6 times. Join. 90 stitches.
- Third tier, depth round: Ch 1 and sc in each stitch. Join. 90 stitches.
- Third tier, scallop round: Repeat (skip 2 stitches, 7 dc in next stitch, skip 2 stitches, sl st in next stitch) 15 times. Fasten off. 15 scallops, comprising 105 dc and 15 anchoring slip stitches.
- Bottom tier, foundation round: Join burgundy to Round 35 of the cone, working through both loops. Repeat (sc in next 17 stitches, inc in next stitch) 6 times. Join. 114 stitches.
- Bottom tier, depth round: Ch 1 and sc in each stitch. Join. 114 stitches.
- Bottom tier, scallop round: Repeat (skip 2 stitches, 7 dc in next stitch, skip 2 stitches, sl st in next stitch) 19 times. Fasten off. 19 scallops, comprising 133 dc and 19 anchoring slip stitches.
- Gold edging: With the smaller hook and metallic yarn, sl st loosely through both loops of every dc and every anchoring slip stitch around each tier. Work 56 stitches on the upper tier, 88 on the second, 120 on the third, and 152 on the bottom tier. Join and weave in ends.
- Block the roof over a cone form, opening each scallop with your fingers. Keep the gold edging relaxed. If using stiffener, apply it sparingly to the roof only, keep the tiers separate while drying, and let the roof dry completely before removing the form.
Gold Star: Make Two Faces
- With gold cotton and the main hook, work 5 sc in an MR. Round 1: 5 stitches.
- Round 2: Inc in every stitch. 10 stitches. Join with a sl st to the first sc.
- Round 3: Repeat the following 5 times: ch 4; sl st in the second chain from the hook, sc in the next chain, hdc in the last chain; skip the next center stitch and sl st in the following center stitch. Each repeat uses 2 center stitches and creates one point. Fasten off. 5 points.
- Make a second face. Block both to the same outline, approximately 4–5 cm across.
- Cut a five-point plastic-canvas insert slightly smaller than the blocked star. Place it between the two faces with right sides outward. Whipstitch the complete outline together, matching each point and valley. Enclose every cut edge.
- Sew the lowest star valley and the lower portions of its two adjacent points to the roof tip with several firm stitches. Keep the star upright and centered.
Ivory Bow
- Bow loop cord: Ch 65 in ivory. Sl st in the second chain from the hook and in each remaining chain. 64 slip stitches. Fasten off with a long tail.
- Bring the cord ends together and sew them securely. Flatten the resulting ring with the join at the center back, creating two equal loops.
- Bow tails: Ch 41 in ivory. Sl st in the second chain from the hook and in each remaining chain. 40 slip stitches. Fasten off.
- Place the midpoint of the tail cord behind the center of the loops. Wrap ivory yarn around all layers 8–10 times, then secure the wraps at the back. Arrange the two tails diagonally downward.
- Sew the bow to the front of the cone immediately above the second roof tier. Catch the cone fabric only, leaving the scallop edges free.
Holly Leaves: Make Two
- With green, ch 11. Foundation round, first side: Sc in the second chain from the hook, hdc in the next chain, dc in the next 6 chains, hdc in the next chain, and 3 sc in the final chain.
- Foundation round, second side: Working along the unused underside of the chain, hdc in the next chain, dc in the next 6 chains, hdc in the next chain, and 2 sc in the final chain. Join to the first sc. 24 stitches total.
- Pointed edge round: Repeat (sc in next stitch; in next stitch work sc, ch 3, sl st in the third chain from the hook, and sc; sc in next 2 stitches) 6 times. Join and fasten off with a sewing tail. There are 30 sc and 6 small chain points.
- Fold the leaf slightly along its foundation chain and sew a loose line down the center to emphasize the vein. Make a second leaf and block both with their points open.
Three Burgundy Berries
- With burgundy, work 6 sc in an MR. Round 1: 6 stitches.
- Round 2: Inc in each stitch. 12 stitches.
- Round 3: Sc in every stitch. 12 stitches.
- Round 4: Sc in every stitch. 12 stitches. Add a small pinch of filling.
- Round 5: Dec 6 times. 6 stitches. Fasten off, thread the tail through the remaining front loops, and draw closed.
- Make three berries. Sew them together in a triangular cluster with one berry above the other two, leaving tails for attachment.
Final Assembly and Finishing
- Set the dry roof on the upper frame ring. Its lower cone opening should sit around the ring, with the bottom scallops hanging outside it. Adjust the ring covering and gently reshape the roof until it sits level.
- Make six removable roof ties: cut six 25 cm lengths of burgundy yarn and securely attach one at each sixth of the roof opening, just above the bottom tier. Pass each tie around the covered upper ring and tie a small bow on the inside. These ties prevent slipping while allowing the roof to lift off.
- Choose the front window. Sew the two holly leaves to the base beneath it, pointing outward and slightly upward. Sew the berry cluster over their inner ends. Keep the embellishment below the open window.
- Sew two gold beads to each base side, approximately one-third and two-thirds of the way along the side. Use repeated passes of strong thread through the crochet and secure the ends inside the fabric. There are 12 beads total.
- Weave in all remaining ends. Check every post attachment, arch end, bead, star seam, and roof tie. The lantern should stand flat without leaning.
- Untie and lift off the roof, place the LED candle in the center of the base, and replace the roof. Leave clear space around the candle and keep the flame-shaped light fully exposed.
Take a moment to straighten the bow and ease the scallops into soft, even curves. The ivory arches should frame the light clearly, with the burgundy roof resting level above them.
Display the lantern on a stable indoor surface. Lift it from beneath the base, remove the candle before storing it, and protect the roof from pressure so the scallops keep their shape.
Tips for Success
- Measure the blocked base before cutting either canvas piece. Matching the upper ring to the base keeps all six posts vertical.
- Place a marker in each cone increase column. Every increase round adds exactly 6 stitches, making counting errors easier to locate.
- Use a noticeably relaxed tension for metallic slip stitches; tight gold edging draws the scallops into cups.
- Shape the six wire arches together on a paper template before sewing them in place.
- Fit and block the roof before adding the star and bow, so those decorations do not distort during shaping.
Common Mistakes to Avoid
- Working through both loops on cone Rounds 12, 20, or 28 removes the tier attachment loops. Undo that round and work in BLO as written.
- Counting the turning chain as a post-cover stitch widens the strips. Keep every row at exactly 4 sc.
- Skipping an anchoring slip stitch during gold edging changes the scallop outline. Edge every dc and every valley stitch.
- Forcing an oversized insert into the base makes the wall bulge. Trim the canvas gradually until it sits flat.
- Attaching the roof permanently makes the candle difficult to reach. Use the six interior ties and check that they untie freely.
Ways to Customize This Pattern
- Replace burgundy with forest green while keeping ivory arches and gold trim for a traditional evergreen version.
- Use silver metallic edging and a silver cotton star with a navy roof for a cooler winter palette.
- Omit the sewn beads and add small embroidered gold crosses at the same twelve positions.
- Make a larger lantern by using thicker yarn and a matching hook, then resize the inserts, posts, and arch wires to the blocked crochet. Keep all stitch counts unchanged.
- Replace the holly cluster with three small crocheted flowers, sewing them to the base without obstructing the front opening.
Frequently asked questions
No. Yarn, filling, and the internal frame must be kept away from flame and heat. Use only a cool battery-operated LED candle that fits comfortably inside the opening.
No. The enclosed base insert, six dowels, upper ring, and covered arch wires provide the structure. Stiffener helps the roof hold its shape but does not replace the frame.
Its opening may be too tight because of gauge or blocking. Measure the 108-stitch cone opening before adding the bottom tier. Reblock it to fit the covered ring; if it remains too small, remake the cone with a slightly larger hook.
Remove the LED candle and detachable roof. Dust gently with a soft brush and spot-clean the crochet with a barely damp cloth. Do not immerse the assembled lantern, since the internal materials and any stiffener may respond differently to water.
The finished Burgundy Christmas Tree Crochet Lantern Pattern

