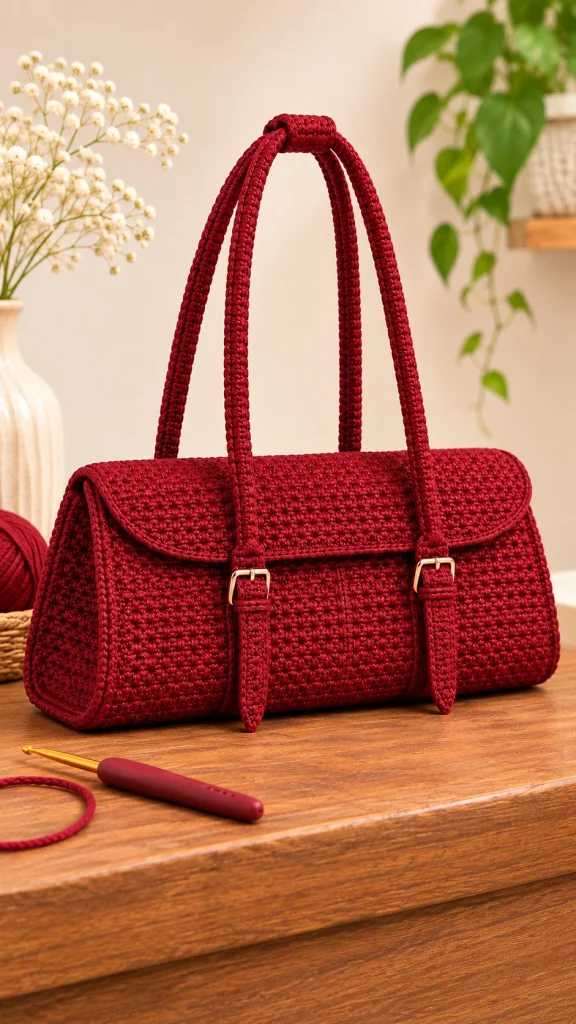
Burgundy Crochet Handbag – Free Advanced Crochet Pattern
Create a timeless handmade accessory with this elegant Burgundy Crochet Handbag! Featuring a structured rectangular body, beautifully textured crochet stitches, a rounded flap closure, two long reinforced handles, and decorative gold-tone buckles, this sophisticated handbag combines classic fashion with the beauty of handmade crochet.
Inspired by luxury satchel-style handbags, this design features a rich burgundy red color, a firm structured silhouette, and carefully finished edges. The decorative front straps and metallic buckles add a polished, professional appearance, making this bag perfect for everyday outfits, special occasions, and thoughtful handmade gifts.
This free advanced crochet pattern walks you through creating the reinforced base, structured front and back panels, shaped side gussets, rounded flap, long handles, decorative buckle straps, and optional fabric lining.
Whether you are making a stylish accessory for yourself or a unique handmade gift, this crochet handbag is a beautiful project for experienced crocheters who enjoy detailed construction and elegant finishing techniques.
Pattern Details
- Skill Level: Advanced
- Finished Width: Approximately 32–35 cm
- Finished Height: Approximately 20–23 cm, excluding handles
- Finished Depth: Approximately 10–12 cm
- Handle Drop: Approximately 24–28 cm
- Yarn: Firm cotton cord or polyester macrame cord, approximately 2–3 mm thick
- Hook Size: 3.5 mm–4.0 mm, adjusted to obtain a dense fabric
- Main Color: Deep burgundy red
- Hardware: Two gold-tone rectangular buckles
- Construction: Separate panels, shaped gussets, rounded flap, reinforced handles, and decorative straps
- Terminology: US crochet terms
Designer Note: This is an original, untested crochet pattern inspired by the supplied reference photograph. The instructions aim to reproduce the handbag’s overall appearance, including its proportions, color, stitching, and hardware. Stitch counts and dimensions may require adjustment based on yarn thickness and individual tension.
Materials Needed
- Approximately 700–900 g burgundy cotton or polyester cord
- 3.5 mm or 4.0 mm crochet hook
- Two rectangular gold-tone buckles, approximately 20–25 mm wide
- Firm plastic canvas or bag-bottom stabilizer
- Flexible bag interfacing or structured stabilizer
- Matching burgundy fabric for lining
- One magnetic snap closure
- Optional internal zipper pocket
- Matching sewing thread
- Stitch markers
- Tapestry needle
- Fabric scissors
- Measuring tape
- Clips or sewing pins
- Optional nylon reinforcement cord for the handles
Crochet Abbreviations
- ch: Chain
- sc: Single crochet
- hdc: Half double crochet
- dc: Double crochet
- sl st: Slip stitch
- st: Stitch
- inc: Increase
- dec: Decrease
- BLO: Back loop only
- FLO: Front loop only
- FO: Fasten off
- RS: Right side
- WS: Wrong side
1. Understanding the Handbag Construction
This elegant crochet handbag is constructed from several separate components that are carefully joined to create a structured satchel-style design.
The main pieces include:
- One rectangular reinforced bottom panel
- One structured front panel
- One structured back panel
- Two shaped side gussets
- One rounded flap closure
- Two long reinforced handles
- Two decorative front buckle straps
- Two gold-tone rectangular buckles
- One optional fabric lining
- One magnetic snap closure
The handbag uses a dense crochet texture to create a firm, durable surface that closely resembles the original reference design.
Each component should be crocheted with consistent tension to maintain the clean, professional shape.
2. Gauge and Stitch Texture
The recommended stitch for the main handbag panels is the waistcoat stitch, also known as the center single crochet stitch.
This technique creates a dense, woven-looking fabric that is especially suitable for structured crochet bags.
To work a waistcoat stitch, insert the hook into the center of the V-shaped stitch from the previous row rather than beneath the usual top loops.
Yarn over, pull up a loop, yarn over again, and pull through both loops.
Keep the tension firm but not excessively tight.
For a simpler alternative, use regular single crochet stitches worked with a smaller hook.
Suggested Gauge: Approximately 16 stitches and 18 rows = 10 cm in dense single crochet using the selected cord and hook.
Always make a gauge swatch before beginning the main handbag.
Because cord thickness varies significantly, the finished dimensions are more important than matching the exact stitch count.
3. Crochet the Rectangular Bottom Panel
Using burgundy cord and a 4.0 mm crochet hook, ch 53.
Row 1
Sc into the second chain from the hook and into each remaining chain. (52)
Rows 2–18
Ch 1, turn, sc into each stitch across. (52)
Continue until the panel measures approximately 32 cm wide and 11 cm deep.
Fasten off, leaving a long sewing tail.
The finished bottom panel should be a firm rectangle.
For additional structure, cut a piece of plastic canvas slightly smaller than the crocheted panel.
Place the plastic canvas between the crochet base and the fabric lining during final assembly.
This reinforcement helps the handbag maintain its rectangular shape when placed on a flat surface.
4. Crochet the Front Panel
Using burgundy cord, ch 53.
Row 1
Sc into the second chain from the hook and into each remaining chain. (52)
Rows 2–5
Ch 1, turn, sc across. (52)
Rows 6–38
Ch 1, turn, work one waistcoat stitch into each stitch across. (52)
If using regular single crochet instead, continue working sc across each row.
Maintain firm, even tension throughout.
Continue until the front panel measures approximately 21–22 cm tall.
Fasten off, leaving a long sewing tail.
The front panel should be rectangular, with a smooth upper edge and clearly defined corners.
5. Crochet the Back Panel
Repeat the instructions for the front panel.
Make sure both panels have identical dimensions.
The back panel will support the rounded flap and the rear handle attachments.
For extra stability, crochet one additional row of single crochet along the upper edge.
Fasten off, leaving a long sewing tail.
Lay the front and back panels flat and compare their dimensions before continuing.
6. Crochet the Side Gussets
The side gussets create the handbag’s depth and slightly rounded side profile.
Make two identical pieces.
Using burgundy cord, ch 19.
Row 1
Sc into the second chain from the hook and into each remaining chain. (18)
Rows 2–30
Ch 1, turn, sc across. (18)
Row 31
Ch 1, turn, sc2tog, sc across until two stitches remain, sc2tog. (16)
Row 32
Ch 1, turn, sc across. (16)
Row 33
Ch 1, turn, sc2tog, sc across until two stitches remain, sc2tog. (14)
Row 34
Ch 1, turn, sc across. (14)
Continue shaping only if necessary to match the desired side profile.
Fasten off, leaving a long sewing tail.
The gussets should be approximately 10–11 cm wide at the base and slightly narrower toward the top.
This gentle shaping helps create the sophisticated rounded sides seen in the reference handbag.
7. Assemble the Main Handbag Body
Place the front panel and bottom panel together with the right sides facing outward.
Using a tapestry needle and matching burgundy cord, sew the lower edge of the front panel to one long edge of the bottom panel.
Use a firm mattress stitch or slip stitch seam.
Repeat with the back panel on the opposite side of the bottom panel.
Attach the first side gusset to the front, back, and bottom edges.
Repeat with the second side gusset.
Make sure the seams remain straight and the corners align correctly.
Turn the handbag upright and check its shape.
The bag should now resemble a structured rectangular tote with a wide opening.
8. Reinforce the Upper Opening
Attach burgundy cord to the upper edge of the assembled handbag.
Round 1
Work sc evenly around the entire opening.
Round 2
Work sc in BLO around.
Round 3
Work sc around without increasing.
Join with sl st.
Fasten off and weave in the ends.
This reinforced upper rim helps prevent stretching and provides a clean attachment point for the flap and handles.
9. Crochet the Rounded Flap Closure
The wide rounded flap is one of the handbag’s most important design features.
It extends from the upper back edge and folds over the front opening.
Using burgundy cord, ch 53.
Row 1
Sc into the second chain from the hook and into each remaining chain. (52)
Rows 2–18
Ch 1, turn, sc across. (52)
The flap should measure approximately 32 cm wide.
Begin shaping the rounded corners.
Row 19
Ch 1, turn, sc2tog, sc across until two stitches remain, sc2tog. (50)
Row 20
Ch 1, turn, sc across. (50)
Row 21
Ch 1, turn, sc2tog, sc across until two stitches remain, sc2tog. (48)
Row 22
Ch 1, turn, sc across. (48)
Row 23
Ch 1, turn, sc2tog, sc across until two stitches remain, sc2tog. (46)
Row 24
Ch 1, turn, sc across. (46)
Continue shaping gently until the flap measures approximately 13–15 cm from the upper attachment edge to the lower curved edge.
Fasten off.
The finished flap should have a broad rectangular upper section and softly rounded lower corners.
10. Add the Decorative Flap Border
Attach burgundy cord to one corner of the flap.
Work one round of sc evenly around the entire flap.
At curved corners, add increases as needed to keep the edging flat.
Work a second round of slip stitches for a neat reinforced finish.
Fasten off and weave in the ends.
The border should create a clean, slightly raised outline around the flap.
Avoid excessive increases that could cause the edge to ripple.
11. Attach the Flap to the Back Panel
Position the straight upper edge of the flap along the reinforced upper edge of the back panel.
Center the flap carefully.
Sew the flap securely to the back panel using a firm mattress stitch.
Reinforce both corners.
Fold the flap forward over the handbag opening.
Check that it covers the upper front panel evenly.
The lower edge should curve gently across the front of the handbag.
12. Crochet the Long Handbag Handles
The handbag features two long, structured handles designed to be carried comfortably over the shoulder.
Each handle is made separately.
Using burgundy cord and a 3.5 mm hook, ch 111.
Row 1
Sc into the second chain from the hook and into each remaining chain. (110)
Rows 2–5
Ch 1, turn, sc across. (110)
Continue until the strap measures approximately 3 cm wide.
Fasten off, leaving a long sewing tail.
Repeat for the second handle.
The finished straps should be approximately 65–70 cm long, depending on tension.
13. Reinforce the Handles
For stronger handles, fold each strap lengthwise.
Insert a thin nylon reinforcement cord inside the fold.
Sew the long edges together using matching burgundy yarn.
Keep the seam straight and consistent.
The finished handle should have a rounded, firm appearance.
Repeat with the second handle.
Check that both handles have the same length and thickness.
For a professional finish, work a row of surface slip stitches along the outer edge of each handle.
14. Attach the Handles to the Handbag
Position the first handle on the front panel.
Mark two attachment points approximately 10–12 cm apart, centered on the bag.
Attach the handle ends securely near the reinforced upper rim.
Use several rows of tight stitching to distribute the weight evenly.
Repeat with the second handle on the back panel.
Make sure the handles are symmetrical.
Check that the bag hangs evenly when lifted.
For extra strength, sew the handle ends through the fabric lining or reinforced interior tabs during final assembly.
15. Crochet the Decorative Front Buckle Straps
The handbag features two narrow burgundy straps with gold-tone buckles positioned on the front.
These decorative straps give the bag its elegant satchel-inspired appearance.
Make two identical straps.
Using burgundy cord, ch 35.
Row 1
Sc into the second chain from the hook and into each remaining chain. (34)
Rows 2–4
Ch 1, turn, sc across. (34)
Fasten off, leaving a sewing tail.
Each strap should measure approximately 2–2.5 cm wide.
Adjust the length so the straps extend neatly from the upper front area toward the lower portion of the handbag.
16. Shape the Strap Tips
To create pointed strap ends, work decreases across the final rows.
Row 1
Ch 1, turn, sc2tog, sc across until two stitches remain, sc2tog.
Row 2
Ch 1, turn, sc across.
Row 3
Ch 1, turn, sc2tog, sc across until two stitches remain, sc2tog.
Continue until only two stitches remain.
Fasten off and weave in the ends.
Repeat for the second strap.
The pointed ends should look clean and symmetrical.
17. Attach the Gold-Tone Buckles
Thread each decorative strap through a rectangular gold-tone buckle.
Fold the upper portion around the buckle bar.
Sew the folded section securely using matching burgundy cord.
Repeat with the second strap.
Position the two buckles symmetrically across the front panel.
The buckles should sit just below the rounded flap edge.
Attach the straps to the front panel using strong hidden stitches.
For a more functional design, add small buckle holes and use the straps as adjustable closures.
For an easier everyday handbag, keep the buckles decorative and use a hidden magnetic snap closure beneath the flap.
18. Install the Magnetic Snap Closure
Position one half of the magnetic snap on the underside of the rounded flap.
Position the matching half on the upper front panel.
Check that both halves align when the flap is closed.
Install the snap according to the hardware manufacturer’s instructions.
Reinforce the attachment points with a small piece of interfacing or fabric.
The closure should hold the flap securely without pulling or distorting the crochet stitches.
19. Add the Internal Structure
To achieve the firm, luxury-inspired shape shown in the reference image, reinforce the handbag interior.
Cut a piece of plastic canvas slightly smaller than the bottom panel.
Place it against the interior bottom.
Cut two pieces of flexible bag stabilizer to match the front and back panels.
Cut two smaller pieces for the side gussets.
Position the stabilizer inside the handbag.
Secure the pieces discreetly with a few stitches or fabric-safe adhesive.
Keep the structure flexible enough to open and close comfortably.
Avoid using overly rigid materials that could create visible sharp edges beneath the crochet fabric.
20. Sew the Fabric Lining
Choose a burgundy, beige, or neutral cotton fabric for the interior lining.
Cut the following pieces, allowing approximately 1 cm seam allowance:
- One front lining panel
- One back lining panel
- Two side lining panels
- One rectangular bottom lining panel
Sew the front and back panels to the bottom lining piece.
Attach the side panels.
Press the seams flat.
Place the lining inside the crochet handbag with the wrong sides facing each other.
Fold the upper fabric edge inward.
Hand-sew the lining to the inside of the reinforced crochet rim using small, invisible stitches.
Keep the lining smooth and evenly positioned.
21. Add an Optional Interior Pocket
For additional functionality, add a small interior pocket before attaching the lining.
Cut a rectangle of matching fabric approximately 18 cm wide and 14 cm tall.
Fold the upper edge inward and stitch it neatly.
Fold the remaining edges inward.
Position the pocket on the inside of the back lining panel.
Sew along the sides and bottom.
Leave the top open.
For extra organization, divide the pocket into two compartments using a vertical line of stitching.
This creates a convenient space for small personal items.
22. Reinforce the Handbag Seams
Inspect all seams carefully.
Pay particular attention to the corners, gusset attachments, and handle connection points.
Use matching burgundy cord to reinforce any weak areas.
Make sure the bottom panel is firmly attached.
Check that the side gussets remain symmetrical.
Reinforce the upper rim if necessary.
Test the handles with a light load before using the bag regularly.
Do not overload the handbag until you are confident that all structural seams are secure.
23. Final Assembly and Finishing
- Lay the handbag on a flat surface and check its shape.
- Make sure the front and back panels are aligned.
- Check that both side gussets have matching dimensions.
- Inspect the reinforced bottom panel.
- Confirm that the rounded flap closes evenly.
- Check the magnetic snap alignment.
- Adjust the two decorative buckle straps.
- Make sure the gold-tone buckles are positioned symmetrically.
- Check both handles for equal length and strength.
- Smooth the fabric lining.
- Weave in all remaining yarn ends.
- Gently shape the handbag by hand.
- Allow the bag to rest upright so the structure settles naturally.
Your elegant Burgundy Crochet Handbag is now complete!
24. Advanced Crochet Tips for a Professional Finish
- Use firm cotton or polyester cord to achieve a structured silhouette.
- Choose a hook slightly smaller than the yarn manufacturer’s recommendation for denser stitches.
- Maintain consistent tension throughout all panels.
- Use stitch markers to keep edges straight.
- Measure each panel before assembly.
- Reinforce the base to prevent sagging.
- Use flexible stabilizer to maintain the handbag’s rectangular shape.
- Reinforce the handles with strong nylon cord.
- Attach metal hardware carefully to avoid damaging the crochet fabric.
- Use a matching fabric lining for a clean interior finish.
- Keep the decorative straps symmetrical.
- Test the finished handbag with a light load before regular use.
25. Color Variations
Classic Burgundy Red
Deep burgundy cord with gold-tone buckles creates a sophisticated handbag that pairs beautifully with neutral and autumn-inspired outfits.
Chocolate Brown
Rich chocolate brown creates a timeless, vintage-inspired accessory with an elegant leather-like appearance.
Black Elegance
Black crochet cord with gold hardware gives the handbag a polished, modern look suitable for everyday wear.
Warm Beige
Soft beige cord with champagne-gold buckles creates a delicate, minimalist handbag perfect for spring and summer.
Forest Green
Deep forest green adds a luxurious, earthy appearance that works beautifully with classic outfits.
26. Styling Your Crochet Handbag
This elegant crochet handbag is versatile enough to complement a wide range of outfits.
Pair the burgundy version with a cream sweater, tailored trousers, and ankle boots for a sophisticated autumn look.
For a casual outfit, style it with denim jeans, a white blouse, and neutral flats.
The structured silhouette also works beautifully with long dresses, knitted cardigans, and classic coats.
Its rich color and gold-tone hardware make it a statement accessory without being overly decorative.
27. Caring for Your Crochet Handbag
- Spot clean gently with a damp cloth.
- Avoid machine washing if the handbag contains metal hardware or structural inserts.
- Do not soak the bag for extended periods.
- Allow it to air dry naturally.
- Keep the handbag away from direct heat.
- Store it upright when possible.
- Place tissue paper inside to maintain its shape.
- Avoid hanging heavy objects from the handles.
- Clean the gold-tone buckles with a soft dry cloth.
- Check the seams and handle attachments periodically.
Frequently Asked Questions
Is this crochet handbag suitable for beginners?
This pattern is recommended for advanced crocheters because it involves separate panels, shaped gussets, structural reinforcement, handle construction, hardware installation, and fabric lining.
What yarn is best for a structured crochet handbag?
Firm cotton cord or polyester macrame cord approximately 2–3 mm thick is recommended because it produces a dense, durable fabric.
How much yarn do I need?
Approximately 700–900 g of cord is suggested, depending on the finished dimensions, stitch tension, and yarn thickness.
Can I make this handbag without a sewing machine?
Yes. The crochet components can be joined by hand, and the fabric lining can be sewn using a needle and thread.
Are the front buckles functional?
The buckles can be decorative or functional. For convenient everyday use, a hidden magnetic snap closure is recommended.
How do I keep the handbag from losing its shape?
Use dense crochet stitches, a reinforced base, flexible stabilizer, and strong seams to maintain the structured silhouette.
Can I make the handbag larger?
Yes. Increase the width of the front and back panels, adjust the base dimensions, and modify the gussets and flap proportionally.
Can I use regular cotton yarn instead of macrame cord?
Yes, but multiple strands may be necessary to create a fabric firm enough for a structured handbag.
Can I add a zipper?
Yes. A zipper can be installed along the upper opening beneath the decorative flap for additional security.
Is this handbag suitable for everyday use?
Yes, provided the handles, seams, base, and hardware are properly reinforced and the bag is not overloaded.
Final Thoughts
This Burgundy Crochet Handbag combines elegant design, beautiful handmade texture, and practical everyday functionality.
With its structured rectangular body, rounded flap, reinforced shoulder handles, decorative gold-tone buckles, and rich burgundy color, this handbag offers a timeless style that never goes out of fashion.
Every detail, from the dense crochet stitches to the carefully finished edges, contributes to its sophisticated handmade appearance.
Whether you make it for yourself, as a thoughtful gift, or as part of a handmade accessories collection, this crochet handbag is a rewarding project for experienced crocheters.
Save this free burgundy crochet handbag pattern to Pinterest and share it with your crochet-loving friends!
Pattern disclaimer: This original design is inspired by the supplied reference image and has not been physically tested. Measurements, stitch counts, shaping, and assembly details may require adjustment depending on your materials and crochet tension.

