Burgundy Crochet Rose Shoulder Bag Pattern
Beginner Friendly
Perfect for those just starting their crochet journey, with clear instructions and simple techniques
Single-Day Project
A satisfying project you can complete in a single afternoon or evening.
Handmade Gift
A beautiful keepsake — free forever. Read online or print at home.
About This Burgundy Crochet Rose Shoulder Bag Pattern
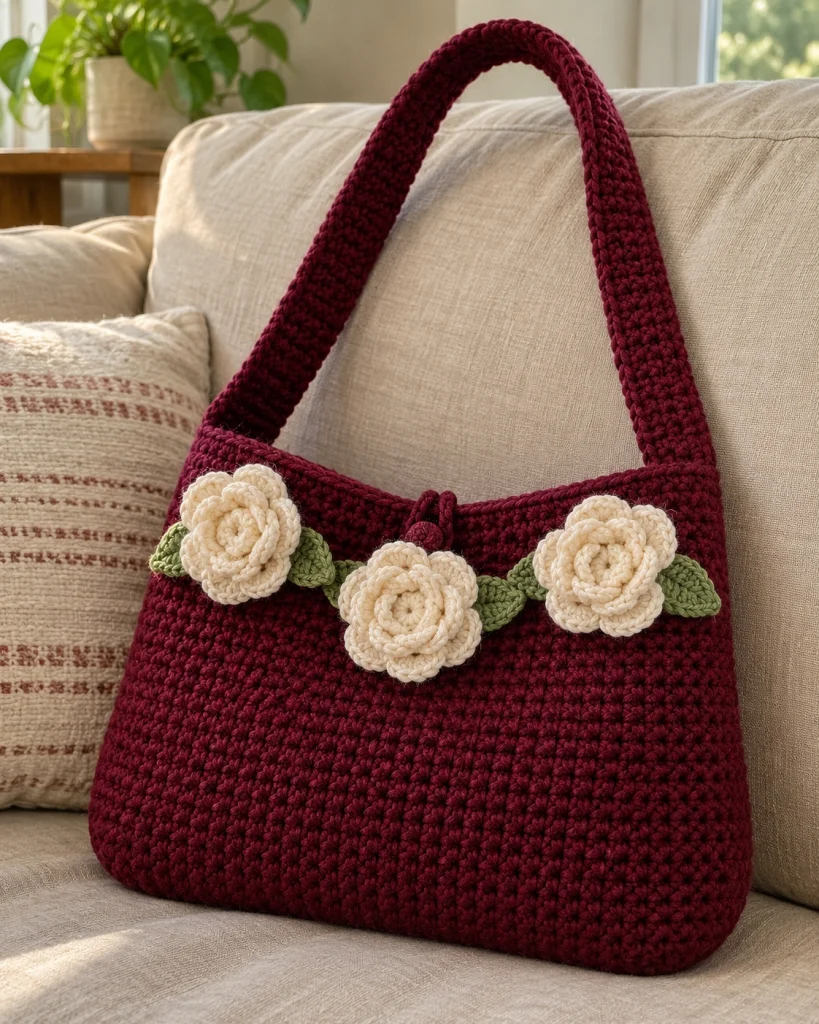
This beautiful crochet rose bag pattern combines a rich burgundy handbag with three soft ivory crochet roses and delicate sage-green leaves. The result is a romantic, elegant shoulder bag with a timeless handmade appearance.
The bag features a gently rounded trapezoid silhouette, a sturdy crocheted shoulder strap, a subtle center closure, and three dimensional roses arranged across the upper front. Its deep wine-red color makes the creamy flowers stand out beautifully.
Perfect for everyday outfits, handmade gifts, or a special accessory, this floral crochet shoulder bag is a lovely project for crocheters who enjoy creating practical pieces with decorative details.
Materials
- Burgundy worsted-weight cotton yarn 450–550 g
- Ivory cotton yarn 80–120 g
- Sage-green cotton yarn 30–40 g
- 4.5 mm crochet hook bag body
- 4 mm crochet hook strap
- 3.5 mm crochet hook flowers and leaves
- Yarn needle 1
- Scissors 1 pair
- Stitch markers 4
- Measuring tape 1
- Magnetic snap optional
- Fabric lining optional
- Sewing needle and thread for lining
Abbreviations – US Terms
chchainsl stslip stitchscsingle crochethdchalf double crochetdcdouble crochettrtreble crochetinc2 sc in one stitchdecsc2tog decreaseBLOback loop onlyMRmagic ringststitchFOfasten offPart 1 – Check Your Gauge
Using burgundy yarn and a 4.5 mm hook, crochet a small test square in single crochet.
A suggested gauge is approximately 15 sc × 17 rows = 10 × 10 cm / 4 × 4 inches.
Adjust your hook size if necessary.
A firm stitch tension helps the bag maintain its shape without becoming excessively stiff.
The dimensions below are approximate and depend on your yarn and gauge.
Part 2 – Crochet the Oval Foundation
Using burgundy yarn, ch 39.
Round 1: Starting in the second chain from the hook, work 37 sc. Work 3 sc into the last chain.
Continue along the opposite side of the foundation chain.
Work 36 sc, then 2 sc into the final chain. Join with sl st. (78 sts)
This creates the beginning of the oval bag base.
Place markers at both rounded ends to help identify the increase sections.
Part 3 – Expand the Oval Base
Round 2: Ch 1, work 37 sc, inc in each of the next 3 stitches, 36 sc, inc in each of the next 2 stitches. Join. (83 sts)
Round 3: Continue working sc around the base, distributing approximately 6 increases evenly across the two curved ends.
Rounds 4–6: Repeat the gradual increases around the curved ends only.
The straight sections should remain even while the rounded ends expand.
Continue until the oval base measures approximately 32–34 cm long and 9–11 cm wide.
Adjust the number of increase rounds as needed to achieve the desired width.
Part 4 – Create the Turning Edge
Once the oval base reaches the desired size, stop increasing.
Work one complete round of sc in BLO.
This creates a defined turning edge between the base and the bag body.
Continue working sc in both loops for the following rounds.
Keep the tension even to prevent the sides from becoming wavy.
Part 5 – Build the Lower Bag Body
Work approximately 10–12 rounds of sc without increases.
The sides will begin rising from the oval foundation.
Keep the bag upright occasionally to check the shape.
The lower section should remain softly rounded, with enough structure to stand when lightly filled.
Part 6 – Create the Full Rounded Silhouette
To achieve the gentle fullness shown in the reference, add a small number of increases near the side edges.
Place one stitch marker at each side of the bag.
On an increase round, work one additional sc immediately before and after each side marker.
Repeat this shaping round every third round for approximately three repetitions.
Work plain rounds between increases.
This gives the body a softly curved profile without creating an exaggerated balloon shape.
Part 7 – Crochet the Main Body
Continue working sc evenly around the bag.
Work until the body measures approximately 22–24 cm from the bottom.
The stitches should form a dense, consistent texture.
Check that the front and back remain the same height.
Do not fasten off yet.
Part 8 – Shape the Upper Sides
The upper portion of the bag should taper gently toward the opening.
Mark four shaping points, two near the front side transitions and two near the back.
Decrease Round: Work sc around, making one sc2tog at each marked shaping point.
Work one plain round between decrease rounds.
Repeat the shaping sequence approximately 3–4 times.
The upper opening should become slightly narrower than the widest part of the body.
Keep the decreases symmetrical.
Part 9 – Strengthen the Upper Opening
Work one complete round of firm sc around the top edge.
For additional strength, work a second round.
Finish with a round of sl sts for a neat appearance.
FO and weave in the yarn end.
The upper edge should remain smooth and slightly curved.
Part 10 – Crochet the Shoulder Strap
Using burgundy yarn and a 4 mm hook, ch 11.
Row 1: Starting in the second chain from the hook, work 10 sc. (10)
Row 2: Ch 1, turn, work 10 sc. (10)
Repeat Row 2 until the strap measures approximately 65–75 cm.
For a textured strap, work every second row in BLO.
The finished strap should be approximately 5–6 cm wide, depending on gauge.
Part 11 – Reinforce the Strap
Work one row of sl sts along each long edge of the strap.
This helps prevent excessive stretching.
For additional durability, crochet a second identical strap layer and sew both pieces together.
Keep the edges aligned carefully.
FO, leaving long tails for attachment.
Part 12 – Attach the Shoulder Strap
Position the strap ends on opposite sides of the bag.
Insert each end approximately 5–6 cm below the upper edge.
Sew through several rows of the bag body using strong matching yarn.
Use a rectangular attachment area with diagonal reinforcement stitches.
Repeat on the opposite side.
Check that the strap forms a smooth arch when the bag is lifted.
Part 13 – Crochet the Rose Foundation
The three ivory roses are the signature decorative feature of this handbag.
Using ivory yarn and a 3.5 mm hook, ch 52.
Row 1: Starting in the fourth chain from the hook, work 1 dc into each chain across.
Ch 3 and turn.
This long foundation strip will be transformed into a layered rose.
Part 14 – Crochet the Rose Petals
Work along the foundation strip to create a series of rounded petals.
Petal sequence: Skip 1 stitch, work 5 dc into the next stitch, skip 1 stitch, and sl st into the following stitch.
Repeat this sequence across the strip.
The repeated shells form rounded petal shapes.
For larger outer petals, replace selected groups of 5 dc with 7 dc.
FO, leaving a long sewing tail.
Gently curve the petal strip with your fingers.
Part 15 – Roll the Crochet Rose
Begin at one end of the petal strip.
Roll the first few petals tightly to form the center bud.
Continue wrapping the remaining strip around the center, gradually loosening the tension.
Allow the outer petals to open naturally.
Use a yarn needle to sew through the bottom layers of the rose.
Make several secure stitches to hold the shape.
Adjust the outer petals until the flower resembles a full, layered rose.
Part 16 – Make Three Ivory Roses
Repeat the rose pattern to create three matching flowers.
The suggested finished diameter is approximately 7–9 cm per rose.
Make the center rose slightly larger if desired by using a longer foundation chain.
The left and right roses should be approximately equal in size.
Leave long yarn tails for attaching the flowers to the bag.
Part 17 – Crochet the Sage-Green Leaves
Using sage-green yarn and a 3.5 mm hook, ch 13.
Round 1: Starting in the second chain, work 1 sc, 1 hdc, 8 dc, 1 hdc, and 1 sc.
Work 3 sc into the final chain to turn around the tip.
Continue along the opposite side of the foundation chain with 1 sc, 1 hdc, 8 dc, 1 hdc, and 1 sc.
Join with sl st.
FO, leaving a long tail.
Make approximately 6–8 leaves.
Part 18 – Add Raised Leaf Veins
For a more detailed finish, use matching sage-green yarn.
Work a line of surface slip stitches down the center of each leaf.
Alternatively, embroider a simple central vein using a yarn needle.
Gently pinch the base of each leaf to create a slightly pointed shape.
Keep the leaves flexible so they sit naturally against the bag.
Part 19 – Arrange the Floral Decoration
Lay the finished bag flat with the front facing upward.
Position the three roses across the upper front, just below the opening.
Place one rose near the left side, one in the center, and one near the right side.
Arrange the sage-green leaves between and behind the flowers.
Allow the leaves to extend slightly outward from the rose arrangement.
Check that the flowers do not obstruct the bag opening.
Part 20 – Sew the Roses Securely
Using the long ivory yarn tails, sew each rose to the front of the bag.
Stitch through the base of the flower rather than the outer petals.
Make several passes through the crochet bag fabric.
Keep the stitches hidden beneath the flower.
Repeat for all three roses.
Gently lift each flower to confirm that it is securely attached.
Part 21 – Attach the Green Leaves
Position the sage-green leaves behind and between the roses.
Sew each leaf at its base and along part of the central vein.
Leave the outer edges slightly free for a natural dimensional effect.
Arrange two or three leaves around each rose.
Keep the overall composition balanced and symmetrical.
Part 22 – Crochet the Center Closure Loop
Using burgundy yarn and a 3.5 mm hook, ch 18.
Starting in the second chain, work sl sts across.
FO, leaving long tails.
Fold the cord into a small loop.
Attach it to the center of the upper back edge of the bag.
On the front edge, sew a small matching crochet button or decorative knot.
Make sure the loop can slip comfortably over the button.
Part 23 – Optional Magnetic Closure
For a cleaner interior, use a magnetic snap instead of the crochet loop.
Position the two snap pieces at the center of the front and back upper edges.
Reinforce the attachment points with small pieces of fabric or felt.
Follow the hardware manufacturer’s installation instructions.
Keep the closure hidden behind the floral decoration.
Part 24 – Optional Fabric Lining
Place the bag flat on a piece of folded fabric.
Trace the body shape, allowing approximately 1.5 cm for seam allowances.
Cut two matching lining pieces.
Sew the side seams and bottom edge.
Fold the upper raw edge inward.
Insert the lining into the crochet bag.
Hand-sew the lining along the inside upper edge using small invisible stitches.
Part 25 – Optional Interior Pocket
Cut a fabric rectangle measuring approximately 18 × 15 cm.
Fold and sew the raw edges.
Attach the pocket to the lining before inserting it into the bag.
Position it near the upper back interior.
The pocket is useful for storing small accessories such as keys, cards, or a phone.
Part 26 – Shape the Finished Bag
Place a folded towel inside the bag to support its shape.
Gently round the lower corners.
Smooth the upper opening.
Adjust the strap so it curves naturally above the bag.
Allow the bag to rest overnight.
Remove the towel and check the final silhouette.
Part 27 – Final Finishing
Weave in all remaining yarn ends.
Inspect the shoulder strap attachment points.
Check that all three roses are securely sewn.
Arrange the ivory petals so they appear full and dimensional.
Smooth the sage-green leaves.
Check the closure and lining if added.
Lightly steam-block the bag if appropriate for the yarn.
Do not flatten the roses while blocking.
Suggested Color Variations
Romantic Classic: Deep burgundy bag, ivory roses, and sage-green leaves.
Soft Vintage: Dusty pink bag with cream roses and olive leaves.
Elegant Neutral: Warm beige bag with white roses and eucalyptus-green leaves.
Autumn Floral: Chocolate brown bag with caramel roses and muted green leaves.
Spring Garden: Sage-green bag with blush-pink roses and cream accents.
Evening Elegance: Black bag with champagne roses and dark-green foliage.
Care Instructions
Hand wash gently in cool water using a mild detergent.
Avoid scrubbing the crochet roses.
Do not twist or wring the bag.
Press excess moisture between clean towels.
Stuff the bag lightly with dry towels to maintain its shape.
Allow it to air-dry flat.
Do not hang the bag while wet, as the strap may stretch.
Store the bag in a breathable cotton dust bag when not in use.
Frequently Asked Questions
This pattern is best for confident beginners or intermediate crocheters. The bag body uses basic single crochet stitches, while the shaping, dimensional roses, and assembly require a little more experience.
Firm cotton or a cotton-blend yarn works best. It gives the handbag structure and helps the stitches remain defined. Very soft acrylic yarn may create a looser, more flexible bag.
Yes. Start with a longer foundation chain and expand the oval base to your preferred size. Add extra rounds to increase the height.
Yes. Continue repeating the strap rows until it reaches your desired length. Remember that cotton crochet straps may stretch slightly with use.
Three ivory roses create the balanced floral arrangement shown in the reference. You can also use one large center rose or five smaller flowers for a different look.
Use a firm cotton yarn, sew through several layers at the base of each rose, and avoid flattening the petals during storage or washing.
A lining is optional but recommended if you plan to carry small or heavy items. It helps protect the crochet stitches and reduces stretching.
Absolutely. You can replace the roses with crochet daisies, sunflowers, peonies, or small blossoms to create a different floral style.
Yes! The burgundy color and ivory roses make it a thoughtful handmade gift for birthdays, Mother’s Day, anniversaries, or special occasions.
Finished handmade bags can generally be sold, subject to any applicable pattern licensing terms and local regulations. Use your own product photographs and descriptions when listing finished items.
Final Thoughts
This crochet rose bag pattern brings together practical handmade design and romantic floral details.
The deep burgundy body creates a rich background for the three ivory roses, while the soft sage-green leaves add a beautiful natural contrast.
With its comfortable shoulder strap, gently rounded silhouette, and dimensional crochet flowers, this bag is a lovely accessory to make for yourself or someone special.
Choose your favorite colors, enjoy the creative process, and make a floral handbag that feels truly personal.
Happy crocheting! 🧶🌹
The finished Burgundy Crochet Rose Shoulder Bag Pattern

