Burgundy Fern Crochet Tote Bag Pattern
Advanced
For experienced crocheters who enjoy complex shaping, fine detail, and ambitious construction
Single-Day Project
A satisfying project you can complete in a single afternoon or evening.
Handmade Gift
A beautiful keepsake — free forever. Read online or print at home.
About This Burgundy Fern Crochet Tote Bag Pattern
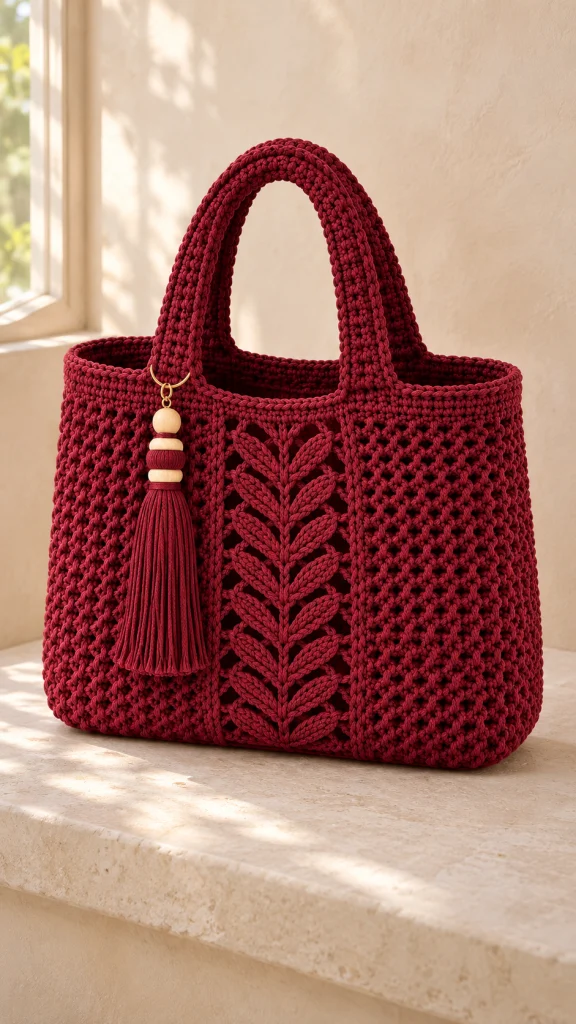
This fern crochet tote bag pattern combines deep burgundy mesh, a raised leafy centerpiece, and broad handles for a practical bag with a decorative front. A matching tassel with pale wooden beads brings out the rich color and gives the finished tote the character of the photographed design.
The bag uses separately worked panels, a firm rectangular base, applied crochet leaves, and reinforced handles. A full fabric lining supports the openwork and keeps small belongings inside. Allow approximately 25–35 hours for the crochet, assembly, and sewing.
This advanced project suits crocheters comfortable with measured panel construction, surface crochet, accurate seaming, and fabric finishing. The fern is built as an original appliqué over a mesh center panel; its placement can be adjusted slightly during blocking to create a balanced spray.
Materials
- Approximately 1,000–1,200 m of burgundy bulky cotton cord, approximately 3 mm thick; buy the full quantity in one dye lot.
- 5 mm crochet hook, or size needed for gauge.
- 4.5 mm crochet hook for the top edging.
- Approximately 70 × 110 cm of firmly woven cotton lining fabric.
- Two lengths of 25 mm cotton webbing, each 68 cm long, for handle reinforcement.
- One removable bag-base insert approximately 39 × 7 cm, with rounded corners.
- Matching sewing thread and sewing needle or sewing machine.
- Large tapestry needle, scissors, tape measure, stitch markers, and blocking pins.
- One approximately 30 mm split ring and one small connector ring.
- Three wooden beads with holes large enough for the tassel suspension cord; suggested diameters 20 mm, 15 mm, and 15 mm.
- A piece of card approximately 18 cm tall for winding the tassel.
Abbreviations
chchainscsingle crochethdchalf double crochetdcdouble crochetsl stslip stitchststitchRSright sideWSwrong sideFront Mesh Panels — Make Two
- Foundation: With the main hook, ch 22.
- Row 1: Sc in the second ch from the hook and each remaining ch. Turn. 21 sc.
- Row 2: Ch 1, sc in the first st; repeat (ch 1, skip the next st, sc in the next st) 10 times. Turn. 11 sc and 10 chain spaces; 21 positions.
- Row 3: Ch 1, sc in every sc and once into every chain space. Turn. 21 sc.
- Rows 4–63: Repeat Rows 2–3 thirty times. Each mesh row has 11 sc and 10 spaces; each solid row has 21 sc.
- Row 64: Ch 1, sc in every st. 21 sc. Fasten off. Block each panel to approximately 13.1 × 32 cm.
Center Fern Foundation Panel — Make One
- Foundation: Ch 24.
- Row 1: Sc in the second ch from the hook and every remaining ch. Turn. 23 sc.
- Row 2: Ch 1, sc in the first st; repeat (ch 1, skip the next st, sc in the next st) 11 times. Turn. 12 sc and 11 chain spaces; 23 positions.
- Row 3: Ch 1, sc in each sc and once into each chain space. Turn. 23 sc.
- Rows 4–63: Repeat Rows 2–3 thirty times, maintaining 23 positions.
- Row 64: Ch 1, sc in every st. 23 sc. Fasten off. Block to approximately 14.4 × 32 cm.
Back Mesh Panel — Make One
- Foundation: Ch 66.
- Row 1: Sc in the second ch from the hook and every remaining ch. Turn. 65 sc.
- Row 2: Ch 1, sc in the first st; repeat (ch 1, skip the next st, sc in the next st) 32 times. Turn. 33 sc and 32 chain spaces; 65 positions.
- Row 3: Ch 1, sc in every sc and once into each chain space. Turn. 65 sc.
- Rows 4–63: Repeat Rows 2–3 thirty times, maintaining 65 positions.
- Row 64: Ch 1, sc in every st. 65 sc. Fasten off. Block to approximately 40.6 × 32 cm.
Solid Base — Make One
- Foundation: Ch 66.
- Row 1: Sc in the second ch from the hook and each remaining ch. Turn. 65 sc.
- Rows 2–16: Ch 1, sc in every st; turn after each row except the last. 65 sc per row.
- Fasten off and block to approximately 40.6 × 8 cm. Mark all four corners. Each long edge has 65 stitch positions, and each short edge has 16 row ends.
Side Gussets — Make Two
- Foundation: Ch 14.
- Row 1: Sc in the second ch from the hook and each remaining ch. Turn. 13 sc.
- Rows 2–64: Ch 1, sc in every st; turn after each row except the last. 13 sc per row.
- Fasten off. Block each gusset to approximately 8 × 32 cm. Mark the bottom edge into four equal sections for distributing it along the 16 row ends of a base short edge.
Fern Leaves and Raised Stem
- Make 16 leaves. For each leaf, ch 11. Working into one side of the foundation chain, sl st in the second ch from the hook, sc in the next ch, hdc in the next ch, dc in the next 4 ch, hdc in the next ch, sc in the next ch, and sl st in the last ch. 10 stitches.
- Rotate the leaf to work along the unused side of the foundation chain. Beginning in the same end chain just used, work sl st, sc, hdc, dc in each of the next 4 chains, hdc, sc, and sl st across the 10 available foundation chains. 10 stitches on this side; 20 stitches total. Fasten off with a 30 cm sewing tail.
- Block the leaves flat to approximately 6 × 2 cm. Keep all 16 leaves the same size.
- Lay the center panel RS up. Mark its vertical center through stitch position 12. With yarn held behind the fabric, surface sl st along this center line from Row 2 to Row 61, making approximately one surface stitch per row. Keep the line loose enough that the panel stays flat.
- Mark eight paired leaf junctions on the stem at Rows 5, 12, 19, 26, 33, 40, 47, and 54. Place one leaf on each side of every junction, with one narrow tip touching the stem and its opposite tip pointing diagonally upward and outward.
- Pin all leaves before sewing. Keep the outer tips within the panel edges and leave some mesh visible around each pair. Sew each leaf through its foundation-chain center and secure both tips; leave its outer edges slightly raised. Secure tails on the WS.
Panel Joining and Bag Assembly
- Arrange the front pieces RS up: one 21-position mesh panel, the 23-position fern panel, and the second 21-position mesh panel. Align all 64 rows.
- With edges meeting flat, mattress stitch each vertical join through corresponding row ends. Make 64 paired seam stitches per join without overlapping the panels. The complete front has 65 positions across its top and bottom.
- Join the front bottom to one 65-position long edge of the base with 65 paired seam stitches. Join the back bottom to the opposite long edge in the same way.
- Center a gusset bottom on each short base edge. Sew its 13 stitches evenly across the 16 base row ends, matching the quarter marks and distributing the extra row ends across the seam. Repeat for the other gusset.
- Join both vertical edges of each gusset to the adjacent front and back edges, matching all 64 row ends. There are four vertical seams, each with 64 paired seam stitches.
- Turn the bag RS out. Check that the base sits flat and all four top corners meet at the same height before adding the rim.
Firm Top Rim
- Round 1: With the main hook, join yarn at a back corner. Ch 1, work 65 sc across the back, 13 sc across the first gusset, 65 sc across the front, and 13 sc across the second gusset. Join with sl st to the first sc. 156 sc. Do not add corner stitches.
- Rounds 2–4: Ch 1, sc in every st around; join with sl st to the first sc. 156 sc per round.
- Round 5: Change to the smaller hook and sl st loosely in every st around. 156 sl sts. Fasten off. If the edge draws inward, use the main hook for this round.
Reinforced Handles — Make Two
- Foundation: With the main hook, ch 9.
- Row 1: Sc in the second ch from the hook and every remaining ch. Turn. 8 sc.
- Rows 2–136: Ch 1, sc in every st; turn after each row except the last. 8 sc per row. The strip should measure approximately 5 × 68 cm.
- Place a 68 cm webbing strip down the center of the WS. Fold the crochet strip lengthwise around it, bringing the long edges together. Whipstitch corresponding row ends along the full length, making 136 paired seam stitches. Stitch through the webbing periodically to prevent it shifting.
- Flatten each enclosed handle so its seam sits against the bag. Mark an 8 cm attachment section at both ends, leaving approximately 52 cm free between the marks.
- On the front, center the handle ends over positions 18 and 48 of the 65-position front width. Keep the end nearest the fern slightly overlapping its adjoining side panel. Place the upper attachment mark just below the rim and the lower end 8 cm below it.
- Sew each attachment section firmly to the bag with matching thread, passing through the crochet and enclosed webbing. Use a rectangle with a diagonal cross. Repeat on the back at matching positions. The free handle length gives an approximate 19 cm drop.
Wooden-Bead Tassel
- Wind cord around the 18 cm card 35 times. Slide the loops off carefully and tie their top fold securely with a separate 50 cm length of cord.
- Wrap another length of cord tightly around the bundle approximately 2 cm below the fold. Tie securely and bury the ends inside the tassel.
- Cut the bottom loops and trim the fringe to approximately 16 cm below the neck.
- Thread both suspension ends through the three wooden beads, arranging the largest bead at the top. Tie them securely to the connector ring and hide the knot beneath the upper bead.
- Attach the connector ring to the split ring. Clip the split ring around the front handle near its left attachment point, keeping the tassel clear of the open center panel.
Fabric Lining and Base Support
- Measure the assembled bag inside. For the nominal size, cut two lining rectangles 42.6 × 35 cm, two gusset rectangles 10 × 35 cm, and one base rectangle 42.6 × 10 cm. These include 1 cm seam allowances and a 2 cm top turning allowance. Adjust the cuts to the actual interior measurements if needed.
- Using 1 cm seams, join the lining front and back to the long edges of the lining base. Join each lining gusset to a short base edge, then sew the four vertical seams. Backstitch at all seam ends.
- Press the lining top 2 cm toward its wrong side. Place the lining inside the tote with wrong sides together. Its folded edge should sit approximately 5 mm below the crochet rim.
- Hand stitch the folded lining edge to the inside of the rim with small stitches, catching the inner crochet loops. Keep the lining relaxed so it does not pull the mesh inward.
- Place the rounded base insert inside the lined bag. If desired, sew a close-fitting fabric sleeve for the insert before fitting it.
Finishing
- Weave crochet ends securely through several stitches on the WS, changing direction before trimming. Check the leaf tips and stem ends for loose tails.
- Shape the tote around folded towels and allow it to settle fully dry. Smooth the fern leaves with your fingers, keeping their edges gently raised.
- Check every handle attachment with a light, gradually increased load. Reinforce any movement before regular use.
Your finished tote should stand with a soft rectangular shape, a clear fern down the front, and a relaxed opening between the handles. Brush the tassel into place by hand and enjoy the contrast between the burgundy cord and pale wooden beads.
Tips for Success
- Block the three front panels before joining; matching their row heights keeps the fern straight.
- Make surface stitches with a relaxed working loop so the center panel does not shorten.
- Pin all eight leaf pairs together before sewing to check spacing and symmetry.
- Keep the handle webbing flat inside its crochet casing and stitch through it at the attachments.
- Fit the lining to the actual bag rather than forcing the crochet to match the nominal measurements.
Common Mistakes to Avoid
- Adding an extra sc after the final mesh repeat changes the panel width. End each mesh row with the final sc of the repeat.
- Working two sc into a chain space widens the solid return row. Work exactly one sc per space.
- Pulling mattress stitches tightly narrows the front. Tighten only enough to bring the edges together.
- Adding stitches at the rim corners makes the opening flare. Maintain 156 sc around.
- Attaching handles only to the top rim concentrates strain. Secure each full 8 cm attachment section through its webbing.
Ways to Customize This Pattern
- Use olive or forest green for the leaves while keeping the burgundy bag panels.
- Omit the beads and attach a plain matching tassel with a knotted suspension loop.
- Add a fabric pocket to the lining before assembling it; keep the pocket clear of the lining seam allowances.
- For a longer handle drop, add 20 rows to each handle and use webbing 10 cm longer. Keep the 8 cm attachment sections unchanged.
Frequently asked questions
The stem is surface crocheted onto the center panel, and the 16 leaves are made separately and sewn on. This creates raised detail while keeping the panel construction predictable.
Yes. The mesh openings need a fabric lining to retain small belongings. The lining and base insert also help the tote hold its rectangular shape.
Use a firm, low-stretch yarn only after checking both gauges and the handle fabric. Soft or elastic yarn will produce a less structured bag and may need additional fabric support.
Follow the cord and lining care labels. Remove the tassel and base insert first, spot clean where possible, and reshape the bag while drying. Avoid soaking wooden beads.
The finished Burgundy Fern Crochet Tote Bag Pattern

