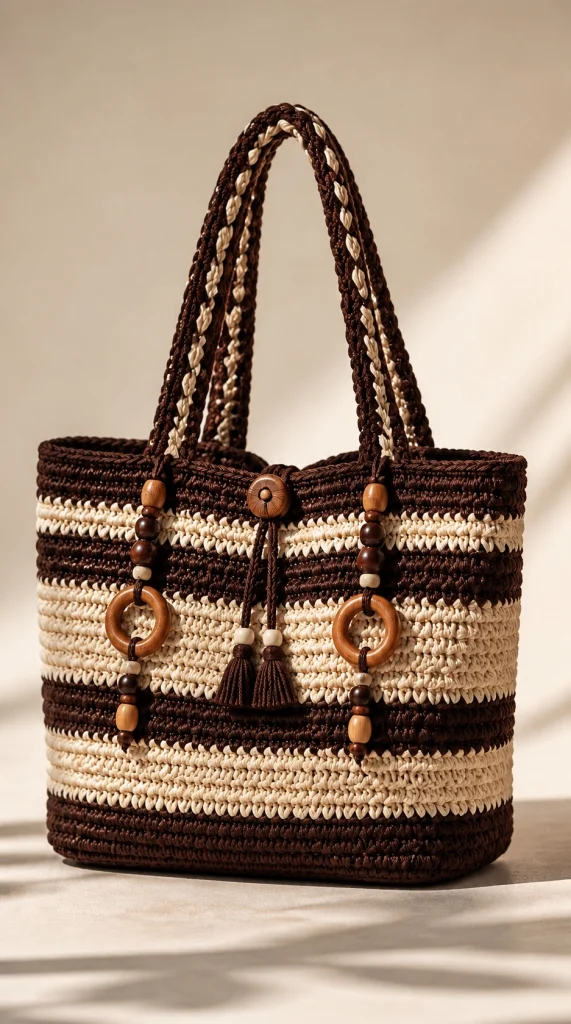
Chocolate Brown & Cream Crochet Tote Bag Pattern – Elegant Handmade Striped Bag
There’s something timeless about the combination of rich chocolate brown and soft creamy ivory. This beautiful striped crochet tote bag brings those two classic shades together in an elegant handmade design that’s perfect for everyday use.
Featuring a structured rectangular body, horizontal crochet stripes, sturdy double handles, decorative wooden beads, wooden rings, and delicate tassels, this bag combines traditional crochet craftsmanship with modern bohemian style.
Whether you’re looking for a stylish handmade accessory, a thoughtful gift, or a rewarding crochet project, this chocolate brown and cream tote is a lovely addition to your collection.
Project Overview
- Skill Level: Intermediate
- Project Type: Structured crochet tote bag
- Style: Elegant, bohemian, minimalist
- Finished Width: Approximately 34 cm
- Finished Height: Approximately 30 cm
- Base Depth: Approximately 12 cm
- Handle Drop: Approximately 23 cm
- Hook Size: 4 mm
- Yarn: Sturdy cotton cord or firm cotton yarn
- Terminology: US crochet terms
Materials You’ll Need
- 350–450 g chocolate brown cotton cord or yarn
- 250–350 g cream cotton cord or yarn
- 4 mm crochet hook, or size suitable for your cord
- Stitch markers
- Yarn needle
- Scissors
- Wooden beads in different sizes
- Two wooden decorative rings
- One wooden button
- Optional cotton fabric lining
- Optional plastic canvas or bag base insert
- Measuring tape
Crochet Abbreviations
- ch: Chain
- sc: Single crochet
- hdc: Half double crochet
- dc: Double crochet
- sl st: Slip stitch
- st: Stitch
- inc: Increase (2 sc in one stitch)
- BLO: Back loop only
- FO: Fasten off
Step 1 – Crochet the Rectangular Base
The base creates the foundation for the structured tote bag.
Using chocolate brown yarn, make a foundation chain measuring approximately 22 cm.
Row 1
Work sc in the second chain from the hook and in each chain across.
Ch 1 and turn.
Rows 2–10
Sc in each stitch across.
Ch 1 and turn after each row.
Continue until the base measures approximately 34 cm wide by 12 cm deep, adjusting the number of stitches and rows according to your gauge.
Do not fasten off.
Step 2 – Build the Bag Walls
Work one round of sc evenly around the entire rectangular base.
Place a stitch marker at each corner.
For the first wall round, work through the back loops only to create a defined edge between the base and the sides.
Continue crocheting in rounds without increasing.
This will gradually create the upright body of the bag.
Keep your tension firm and even to maintain the structured shape.
Step 3 – Create the Chocolate and Cream Stripes
The horizontal stripes give this tote its distinctive appearance.
Work the following color sequence around the bag body.
Stripe Sequence
- Rounds 1–5: Chocolate brown
- Rounds 6–10: Cream
- Rounds 11–14: Chocolate brown
- Rounds 15–18: Cream
- Rounds 19–23: Chocolate brown
- Rounds 24–28: Cream
- Rounds 29–32: Chocolate brown
- Rounds 33–35: Cream
- Rounds 36–40: Chocolate brown
Adjust the number of rounds depending on your yarn thickness and desired bag height.
For a cleaner finish, change colors during the final yarn-over of the last stitch before beginning the next stripe.
Carry unused yarn neatly along the inside or cut and weave in the ends at each color change.
Step 4 – Reinforce the Upper Edge
Using chocolate brown yarn, work three additional rounds of sc around the upper opening.
For a more defined border, finish with one round of reverse single crochet, also called crab stitch.
This creates a sturdy, decorative edge and helps prevent the opening from stretching.
FO and weave in the yarn ends.
Step 5 – Crochet the Two Handles
The double handles are an important feature of this design.
They should be sturdy, comfortable, and securely attached to the bag.
Handle Foundation
Using chocolate brown yarn, ch 7.
Row 1
Sc in the second chain from the hook and in each remaining chain.
Ch 1 and turn.
Stitch count: 6 sc.
Rows 2 Onward
Sc in each stitch across.
Ch 1 and turn.
Continue until the handle reaches the desired length, approximately 55–60 cm.
Repeat to create a second identical handle.
Decorative Cream Accent
Using cream yarn, crochet a long chain or surface-slip-stitch detail along the center of each handle.
This creates the attractive two-tone braided appearance.
Attach the Handles
Position the handles symmetrically on the front and back upper edges.
Secure the ends with strong stitches and reinforce the attachment points.
Check that both handles have the same length and that the bag hangs evenly.
Step 6 – Add Wooden Bead Decorations
Wooden beads bring warmth and natural texture to the design.
Choose beads in light oak, honey brown, and dark chocolate shades.
Thread several beads onto a strong cotton cord.
Arrange them in alternating sizes for visual interest.
Attach the bead strands near the upper handle attachment points.
Allow the decorations to hang naturally along the front of the bag.
For a balanced appearance, repeat the same bead arrangement on both sides.
Step 7 – Attach the Decorative Wooden Rings
Use two medium-sized wooden rings to recreate the bohemian decorative accents.
- Prepare two short pieces of chocolate brown crochet cord.
- Loop each cord through a wooden ring.
- Secure the cord ends with strong knots or stitches.
- Attach one ring beneath each front handle attachment.
- Position the rings at approximately the same height.
These rings are decorative rather than load-bearing components.
Step 8 – Make the Matching Chocolate Tassels
The two small tassels at the front give this bag a delicate handmade finishing touch.
Materials
- Chocolate brown yarn
- Two small cream beads
- Scissors
- Yarn needle
Instructions
- Cut approximately 20 strands of brown yarn, each 15 cm long.
- Fold the strands in half.
- Secure the top with a separate piece of yarn.
- Wrap yarn around the upper section to form the tassel neck.
- Trim the lower ends evenly.
- Thread a cream bead onto the hanging cord.
- Repeat for the second tassel.
- Attach both tassels near the front center of the bag.
Keep the tassels short and symmetrical for an elegant finish.
Step 9 – Add the Wooden Button Closure
Attach a wooden button at the center front of the upper edge.
Using chocolate brown yarn, create a small chain loop on the opposite side of the opening.
Make the loop large enough to pass comfortably over the button without being too loose.
Secure the loop and test the closure several times.
This simple closure complements the natural wooden decorations.
Step 10 – Add an Optional Fabric Lining
A lining helps protect the bag’s contents and improves its durability.
- Measure the interior width, height, and depth.
- Cut suitable fabric pieces, allowing for seams.
- Sew the pieces together to match the interior shape.
- Fold the upper fabric edge inward.
- Insert the lining into the crochet bag.
- Hand-stitch the lining securely beneath the top border.
Choose cream, beige, or chocolate-colored cotton fabric for a coordinated appearance.
Step 11 – Shape and Finish the Tote Bag
Weave in all remaining yarn ends.
Inspect the handle attachments and reinforce them if necessary.
Check the decorative wooden rings and bead strands to ensure they are securely attached.
Gently shape the bag with your hands.
If your yarn permits blocking, lightly dampen the bag and stuff it with towels to help maintain its rectangular shape.
Allow the bag to dry completely.
For additional structure, place a removable base insert inside the bottom.
Helpful Tips for a Professional Finish
- Use sturdy cotton cord for better structure.
- Keep your stitch tension consistent throughout.
- Use stitch markers at the corners of the rectangular base.
- Count stitches regularly to maintain straight sides.
- Change colors neatly for crisp horizontal stripes.
- Reinforce both handle attachment points.
- Use matching wooden accessories for a coordinated design.
- Keep decorative bead strands away from areas that experience heavy tension.
- Add a lining if you plan to use the bag frequently.
- Choose a firm stitch pattern to reduce stretching.
Beautiful Color Variations
Classic Chocolate & Cream
Deep chocolate brown, ivory, and natural wooden accents.
Caramel Latte
Warm caramel, oatmeal, and soft beige.
Modern Monochrome
Black, ivory, and natural wood.
Autumn Forest
Olive green, cream, and dark brown.
Coastal Neutral
Sand beige, soft white, and muted navy.
Frequently Asked Questions
Is this crochet tote bag beginner-friendly?
The basic body uses beginner-friendly stitches, but the structured base, handles, and decorative finishing make it better suited to intermediate crocheters.
What yarn is best for this bag?
Firm cotton yarn or cotton cord is recommended because it provides better structure and durability.
Can I make the bag larger?
Yes. Increase the base dimensions and continue crocheting additional rounds for a taller body.
How do I keep the bag from stretching?
Use firm stitches, reinforce the handles, and consider adding a fabric lining.
Are the wooden rings necessary?
No. They are decorative and can be omitted for a simpler design.
Can I replace the wooden button?
Yes. A magnetic snap, zipper, or crochet tie closure can also work.
Can I use recycled cotton yarn?
Yes, provided the yarn has enough strength and structure for a tote bag.
How should I clean my crochet tote?
Follow the yarn manufacturer’s washing instructions. Spot cleaning is especially helpful when the bag includes wooden decorations.
Can I make this bag without a lining?
Yes, especially when using a dense crochet stitch and sturdy cotton cord.
Is this a good handmade gift?
Absolutely. Its neutral colors and elegant details make it a thoughtful gift for birthdays, holidays, or Mother’s Day.
Final Thoughts
This Chocolate Brown & Cream Striped Crochet Tote Bag is a beautiful example of how simple crochet stitches can become a sophisticated handmade accessory.
The rich chocolate stripes, creamy ivory details, braided handles, natural wooden beads, and matching tassels create a timeless bohemian design.
Whether you make it for yourself or as a special handmade gift, this crochet tote is a wonderful project for anyone who loves stylish, practical accessories.
Happy crocheting! May every stitch bring you joy and every handmade creation become something truly special. 🧶🤎

