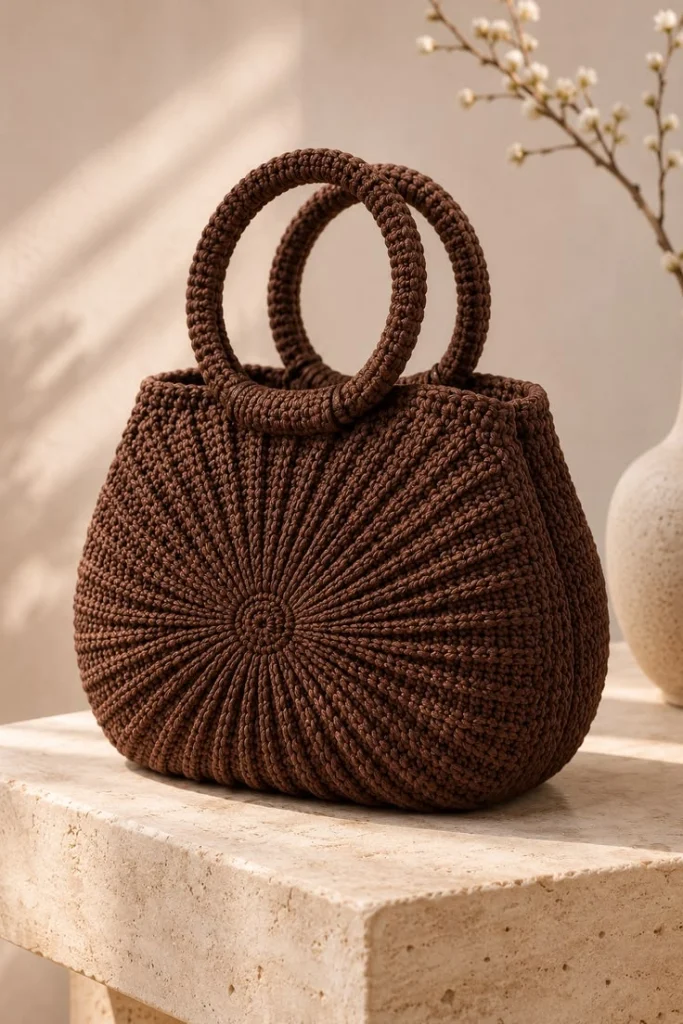
Chocolate Brown Crochet Sunburst Handbag – Free Advanced Pattern
Discover the beauty of modern handmade accessories with this stunning Chocolate Brown Crochet Sunburst Handbag! Featuring a beautifully rounded silhouette, dramatic radial crochet texture, and two elegant circular handles, this sophisticated handbag combines timeless craftsmanship with contemporary minimalist fashion.
The rich chocolate brown color gives this design a luxurious, earthy appearance, while the intricate sunburst stitch pattern creates a striking three-dimensional texture that radiates from the center of the bag.
Perfect for everyday elegance, special occasions, or thoughtful handmade gifts, this advanced crochet handbag is a statement accessory that looks beautiful with neutral outfits, autumn wardrobes, and minimalist fashion styles.
In this free crochet pattern, you will learn how to create the structured rounded body, raised radial texture, reinforced sides, and sturdy crochet-covered circular handles.
Pattern Details
- Skill Level: Advanced
- Finished Width: Approximately 32–35 cm
- Finished Height: Approximately 26–29 cm, excluding handles
- Finished Depth: Approximately 10–12 cm
- Handle Diameter: Approximately 12–14 cm
- Yarn Weight: Bulky cotton cord, approximately 3 mm thick
- Hook Size: 4.0 mm or 4.5 mm
- Main Color: Chocolate brown
- Construction: Two textured circular panels, shaped side gusset, reinforced upper edge, and two circular handles
- Terminology: US crochet terms
Design Note: This is an original pattern inspired by the photographed handbag. The stitch construction is designed to approximate its rounded shape and radiating texture; it is not a verified reproduction of the exact pictured stitches.
Materials Needed
- 500–650 g chocolate brown cotton cord, approximately 3 mm thick
- 4.0 mm crochet hook
- 4.5 mm crochet hook, optional
- Two sturdy circular bag handles, approximately 12–14 cm in diameter
- Matching brown sewing thread
- Strong tapestry needle
- Stitch markers
- Scissors
- Measuring tape
- Optional cotton fabric for lining
- Optional magnetic snap closure
- Optional plastic canvas or bag stabilizer
- Optional removable cardboard template for shaping
Crochet Abbreviations
- MR: Magic ring
- ch: Chain
- sc: Single crochet
- hdc: Half double crochet
- dc: Double crochet
- sl st: Slip stitch
- st: Stitch
- inc: Increase
- dec: Decrease
- BLO: Back loop only
- FLO: Front loop only
- FPdc: Front post double crochet
- BPdc: Back post double crochet
- FO: Fasten off
- RS: Right side
- WS: Wrong side
1. Understanding the Handbag Construction
This handbag is built around two matching textured circular panels that form the front and back of the bag.
The panels feature raised radial ridges extending outward from a small central spiral, creating the distinctive sunburst appearance.
The main components include:
- One large circular front panel
- One matching circular back panel
- One shaped bottom and side gusset
- Two reinforced upper edge sections
- Two circular crochet-covered handles
- Optional fabric lining and magnetic closure
The circular panels are joined along the lower and side edges while leaving the upper section open.
The finished bag should have a softly structured, rounded shape with a wide body and gently tapered upper corners.
2. Crochet the Central Sunburst Circle
Using chocolate brown cotton cord and a 4.0 mm crochet hook, begin with a magic ring.
Round 1
Work 12 dc into MR. Join with sl st. (12)
Round 2
Ch 2, work 2 dc into each stitch around. Join. (24)
Round 3
Ch 2, work (1 dc, inc) around. Join. (36)
Round 4
Ch 2, work (2 dc, inc) around. Join. (48)
Round 5
Ch 2, work (3 dc, inc) around. Join. (60)
Keep the stitches firm and even.
The central circle should remain flat, with no curling or excessive rippling.
Use a stitch marker to identify the beginning of each round.
3. Create the Raised Radial Texture
The signature detail of this handbag is its dramatic raised sunburst texture.
To create the effect, combine regular double crochet stitches with front post double crochet stitches.
The front post stitches form raised lines that radiate outward from the center.
Round 6
Ch 2, work (4 dc, inc) around. Join. (72)
Round 7
Ch 2, work (5 dc, inc) around. Join. (84)
Round 8
Ch 2, work (6 dc, inc) around. Join. (96)
Round 9
Ch 2, work (7 dc, inc) around. Join. (108)
Round 10
Ch 2, work (8 dc, inc) around. Join. (120)
After establishing the circular foundation, create the raised radial lines using surface crochet.
Attach a new strand of chocolate brown yarn near the central circle.
Work surface slip stitches outward along one selected stitch column.
Continue toward the outer edge of the panel.
Repeat around the circle, spacing the raised lines evenly.
For a dramatic sunburst effect, create approximately 24–36 raised radial lines.
Each raised line should begin close to the center and extend toward the outer edge.
Keep the surface stitches firm but not overly tight.
This technique creates pronounced dimensional ridges similar to the texture visible in the reference handbag.
4. Expand the Circular Panel
Continue increasing the circular panel until it reaches approximately 30–32 cm in diameter.
Maintain the established increase pattern, adding 12 stitches per round.
For example:
Round 11
Work (9 dc, inc) around. (132)
Round 12
Work (10 dc, inc) around. (144)
Round 13
Work (11 dc, inc) around. (156)
Round 14
Work (12 dc, inc) around. (168)
Round 15
Work (13 dc, inc) around. (180)
Continue until the desired diameter is reached.
Adjust the number of rounds according to your yarn thickness and tension.
Once the panel reaches the desired size, work one final round of sc around the outer edge.
Fasten off, leaving a long sewing tail.
Block the panel gently so it lies flat.
5. Crochet the Back Panel
Repeat the same instructions used for the front panel.
Begin with the central circle and continue through all increase rounds.
Create the same number of raised radial lines.
Ensure the front and back panels have identical diameters.
Both panels should have the same stitch count around their outer edges.
Block the panels together to maintain matching dimensions.
Do not join them yet.
6. Shape the Rounded Handbag Silhouette
To achieve the softly rounded handbag shape, gently fold the upper portion of each circular panel inward.
Mark the upper opening using stitch markers.
The opening should measure approximately 22–25 cm across.
The remaining outer edges will be joined to the gusset.
Position the panels so the raised sunburst texture faces outward.
Make sure the central circles are aligned.
Check that the upper edges are symmetrical.
The finished silhouette should resemble a rounded crescent-like handbag with a broad lower body.
7. Crochet the Side and Bottom Gusset
Using chocolate brown cotton cord and a 4.0 mm crochet hook, ch 17.
Row 1
Sc into the second chain from the hook and into each remaining chain. (16)
Row 2
Ch 1, turn, sc across. (16)
Rows 3–60
Repeat Row 2.
Continue until the gusset is long enough to follow the lower and side edges of the circular panels.
The gusset should measure approximately 10–12 cm wide.
Adjust the length according to the perimeter of your panels.
Fasten off, leaving a long sewing tail.
The gusset creates the depth needed to give the handbag its spacious, three-dimensional shape.
8. Join the Front Panel to the Gusset
Place the front circular panel with the right side facing outward.
Align one long edge of the gusset with the lower outer edge of the panel.
Use stitch markers to secure the gusset in place.
Begin joining at one upper side corner.
Work evenly along the curved edge using slip stitches or single crochet.
Continue around the bottom and up the opposite side.
Stop at the marked upper opening.
Make sure the gusset follows the rounded shape without pulling or twisting.
Fasten off.
9. Attach the Back Panel
Place the back circular panel against the opposite long edge of the gusset.
Align the central circles and upper openings.
Secure with stitch markers.
Join the back panel to the gusset using the same technique.
Work carefully around the curved lower edge.
Keep the stitches evenly spaced.
Check that the front and back panels remain symmetrical.
Once both panels are attached, turn the bag right side out if necessary.
Gently shape the rounded body by hand.
10. Reinforce the Upper Opening
Join chocolate brown yarn at one upper corner of the handbag.
Round 1
Work sc evenly around the entire upper opening.
Join with sl st.
Round 2
Ch 1, work sc into each stitch around.
Join with sl st.
Round 3
Work one round of reverse single crochet for a firm decorative edge.
Fasten off and weave in the ends.
The reinforced upper edge helps maintain the handbag’s structure and prevents stretching.
11. Prepare the Circular Handles
The handbag features two prominent circular handles covered entirely in matching chocolate brown crochet.
Use two sturdy circular bag handles measuring approximately 12–14 cm in diameter.
Wooden, acrylic, or metal handles can be used as a structural base.
For the closest appearance to the reference design, cover the handles completely with crochet stitches.
12. Crochet Around the Handles
Using chocolate brown cotton cord and a 4.0 mm crochet hook, attach the yarn around the first circular handle.
Work single crochet stitches tightly around the entire ring.
Keep the stitches close together so the underlying handle is completely hidden.
Slide the stitches along the ring as needed to maintain even coverage.
Join the final stitch to the first with a slip stitch.
Fasten off and weave in the ends securely.
Repeat for the second circular handle.
Both handles should have the same thickness and stitch density.
13. Attach the Circular Handles
Position one circular handle at the center of the front upper edge.
Place the second handle at the center of the back upper edge.
Make sure both handles are aligned.
Use matching chocolate brown cotton cord to sew the lower portion of each handle securely to the reinforced upper edge.
Wrap the attachment area several times to create a firm connection.
Use additional hidden stitches to reinforce the connection from the inside.
Check that both handles are securely attached before using the bag.
The finished handles should stand upright and create the elegant double-ring appearance shown in the reference image.
14. Add an Optional Fabric Lining
A fabric lining helps protect the crochet stitches and gives the handbag a polished professional finish.
Choose a cotton fabric in chocolate brown, beige, or a coordinating neutral shade.
Place the handbag flat and trace the front and back shapes onto paper.
Add approximately 1.5 cm for seam allowance.
Cut two matching fabric panels and one gusset piece.
Sew the fabric pieces together to create the lining.
Turn the lining so the finished side faces inward.
Insert it into the crochet handbag.
Fold the upper fabric edge inward and hand-sew it to the inside of the reinforced crochet opening.
Keep all stitches hidden from the outside.
15. Add an Optional Magnetic Closure
For additional functionality, install a magnetic snap closure at the center of the upper opening.
Position one half of the closure on the inside front lining.
Attach the matching half to the inside back lining.
Make sure the two pieces align correctly.
Reinforce the attachment points with small pieces of interfacing.
Close the snap and check that the handbag maintains its rounded shape.
16. Strengthen the Bag Structure
For a firmer silhouette, insert flexible plastic canvas or a lightweight bag stabilizer between the crochet body and fabric lining.
Cut the stabilizer slightly smaller than the crochet panels.
Round the edges to prevent sharp corners.
Position the stabilizer evenly inside the bag.
Secure it to the lining where necessary.
Avoid using excessively rigid materials that could distort the sunburst texture.
The finished handbag should remain structured while retaining a natural handmade appearance.
17. Final Shaping and Finishing
- Check that both circular panels are symmetrical.
- Inspect the raised sunburst lines and adjust any uneven stitches.
- Make sure the gusset is attached securely.
- Reinforce the upper opening if necessary.
- Check that both circular handles are firmly attached.
- Insert the optional lining.
- Install the optional magnetic closure.
- Weave in all remaining yarn ends.
- Gently shape the rounded lower body.
- Allow the handbag to rest in its final shape before use.
Your Chocolate Brown Crochet Sunburst Handbag is now ready to become a beautiful handmade addition to your wardrobe!
18. Advanced Crochet Tips
- Use firm cotton cord to maintain a structured handbag shape.
- Keep your tension consistent throughout both circular panels.
- Use stitch markers to maintain symmetrical radial lines.
- Block both panels to identical dimensions before assembly.
- Use surface crochet to emphasize the raised sunburst texture.
- Keep the upper opening reinforced to prevent stretching.
- Choose sturdy circular handles suitable for the weight of the finished bag.
- Reinforce all handle attachment points carefully.
- Add a lining for improved durability.
- Avoid overstuffing the bag, which may distort the rounded silhouette.
19. Beautiful Color Variations
Chocolate Brown Elegance
Use rich chocolate brown cotton cord for a timeless, sophisticated handbag that pairs beautifully with neutral outfits.
Classic Black
Create the entire handbag in deep black for a sleek, modern accessory suitable for evening outfits.
Warm Caramel
Choose caramel or cognac-colored yarn for a warm, luxurious autumn-inspired handbag.
Soft Beige
Use natural beige cotton cord for a minimalist summer handbag with beautiful stitch definition.
Olive Green
Try deep olive green for an earthy, elegant accessory that complements casual and bohemian wardrobes.
Ivory Cream
Create a soft ivory version for weddings, spring outfits, and special occasions.
20. Styling Ideas
- Pair the chocolate brown handbag with cream trousers and a beige blouse.
- Style it with a long neutral dress for a minimalist look.
- Carry it with autumn knitwear and brown leather boots.
- Use it as a statement accessory with an all-black outfit.
- Pair it with linen clothing for an elegant handmade summer style.
- Create matching crochet accessories using the same chocolate brown yarn.
21. Caring for Your Crochet Handbag
- Spot clean gently with a damp cloth.
- Avoid machine washing if the bag contains rigid handles or stabilizers.
- Do not wring or twist the crochet fabric.
- Allow the handbag to air dry completely.
- Store it upright or lightly stuffed to preserve its shape.
- Avoid prolonged exposure to direct sunlight.
- Check the handle attachments regularly.
- Keep the bag away from rough surfaces that may snag the stitches.
Frequently Asked Questions
Is this crochet handbag suitable for beginners?
This project is recommended for advanced crocheters because it requires circular shaping, dimensional texture, gusset construction, and reinforced handle attachments.
What yarn is best for this handbag?
Bulky cotton cord, approximately 3 mm thick, is recommended for a firm structure and clearly defined texture.
Can I use regular cotton yarn?
Yes, but you may need to hold multiple strands together to achieve the desired thickness and structure.
How large is the finished handbag?
The finished handbag measures approximately 32–35 cm wide, 26–29 cm high, and 10–12 cm deep.
How do I create the sunburst texture?
The raised radial lines can be created using surface crochet slip stitches worked outward from the central circle.
Can I make the handbag larger?
Yes. Continue increasing the circular panels and adjust the gusset length to match the larger perimeter.
Do I need to add a lining?
A lining is optional, but it improves durability and prevents smaller belongings from slipping through the crochet fabric.
Can I use wooden circular handles?
Yes. Wooden circular handles work well when completely covered with matching crochet stitches.
How can I prevent the bag from losing its shape?
Use firm cotton cord, maintain consistent tension, reinforce the upper opening, and consider adding lightweight internal stabilizers.
Is this handbag suitable for everyday use?
Yes. With secure handles, reinforced seams, and a sturdy lining, it can be used as an elegant everyday accessory for lightweight personal items.
Final Thoughts
This Chocolate Brown Crochet Sunburst Handbag is a beautiful example of how traditional crochet techniques can be transformed into a sophisticated modern accessory.
Its dramatic radial texture, rounded silhouette, rich chocolate brown color, and elegant circular handles create a timeless handmade design that feels both luxurious and practical.
Whether you make it for yourself, give it as a thoughtful handmade gift, or add it to your collection of advanced crochet projects, this stunning handbag is sure to attract attention.
Save this free crochet handbag pattern to Pinterest and share it with your crochet-loving friends!
Pattern note: This is an original, untested design inspired by the reference photograph. Stitch counts, sizing, and structural details may require adjustments based on your yarn, tension, and chosen handles.

