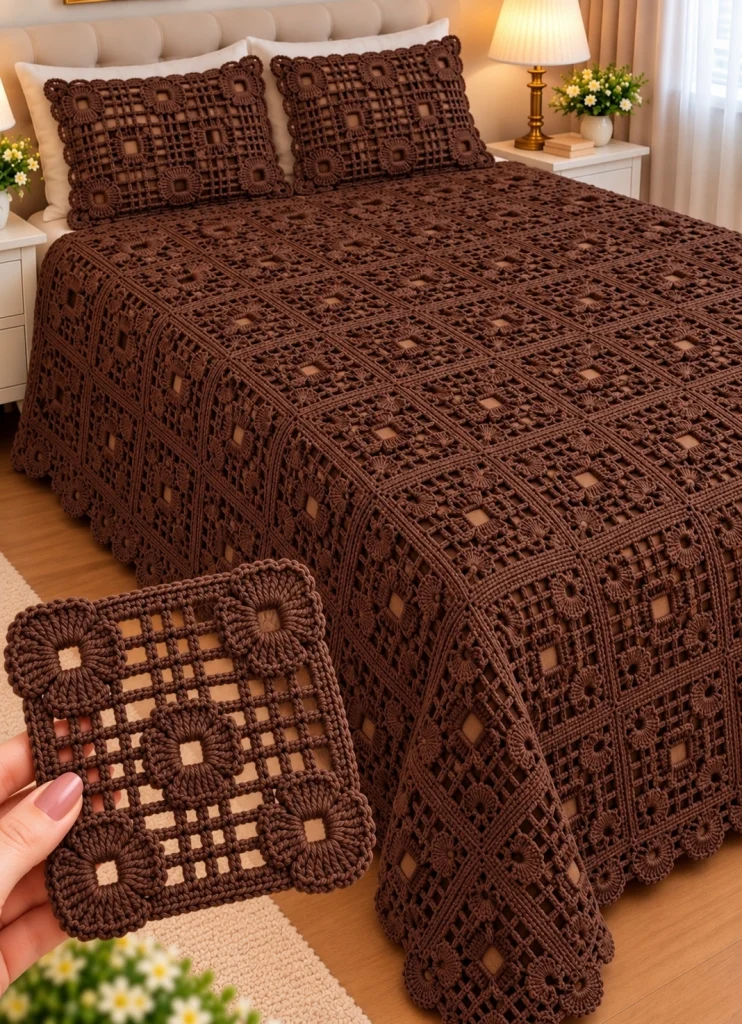
Chocolate Brown Floral Mesh Crochet Bedspread and Matching Pillow Covers – Free Crochet Pattern
Transform your bedroom into a warm, elegant retreat with this beautiful chocolate brown floral mesh crochet bedspread. Featuring intricate openwork squares, decorative flower motifs, a delicate mesh structure, and matching pillow covers, this handmade bedding set combines vintage crochet craftsmanship with timeless modern style.
The bedspread is constructed from repeating square crochet motifs. Each motif features a delicate open-grid background decorated with raised floral details. The squares are joined together to create a richly textured bed covering with a sophisticated lace-like appearance.
The matching pillow covers repeat the same chocolate brown floral mesh pattern, creating a coordinated bedding collection that looks especially beautiful against cream, ivory, beige, or neutral bedroom decor.
The finished bedspread features a decorative edging that softens the straight lines of the square motifs and adds a romantic handmade finish.
This tutorial explains how to crochet the floral mesh squares, assemble the bedspread, make matching pillow covers, add decorative edging, and adjust the finished dimensions to fit your bed.
Pattern at a Glance
Measurements are approximate and depend on yarn weight, hook size, tension, blocking, and motif count.
Materials and Supplies
- DK-weight cotton or cotton-blend yarn in deep chocolate brown.
- Approximately 4,000–5,500 meters of yarn for a large bedspread, depending on final dimensions and gauge.
- Additional yarn for two matching pillow covers.
- 3.5 mm crochet hook, or the size required to achieve the desired motif dimensions.
- Yarn needle for joining and finishing.
- Stitch markers.
- Measuring tape.
- Sharp scissors.
- Blocking mats.
- Rust-resistant blocking pins.
- Two pillow inserts.
- Optional matching fabric for pillow lining.
- Optional buttons or zipper closures for pillow backs.
Yarn recommendation: Cotton or cotton-blend yarn is ideal for this project because it provides excellent stitch definition and helps the floral mesh pattern maintain its shape.
Gauge and Sizing
The sample square should measure approximately 15 × 15 cm after blocking.
For a bedspread measuring approximately 210 × 240 cm, you may need about 14 squares across and 16 squares down if each finished joined square measures 15 cm.
This gives approximately 224 squares before adding the outer border.
The exact number of squares will depend on your gauge and the dimensions of your bed.
Abbreviations
All instructions use US crochet terminology.
Part 1: Understanding the Floral Mesh Square
The bedspread is made from individual square motifs with an openwork mesh structure.
Each square includes:
- A central openwork foundation.
- A decorative raised flower.
- Four corner flower motifs.
- A repeating mesh grid.
- A reinforced outer border.
The raised floral details create the rich texture visible throughout the bedspread.
Part 2: Crochet the Central Flower
Begin with the small raised flower that decorates the center of each square.
Central flower instructions
Using chocolate brown yarn and a 3.5 mm hook, make a magic ring.
Round 1: Work 8 sc into the ring. Join with a sl st. 8 sc.
Round 2: Ch 1, sc in each stitch around. Join. 8 sc.
Round 3: In each stitch, work (sl st, ch 3, 2 dc, ch 3, sl st) to form a petal.
Repeat around to create eight petals.
FO and weave in the ends.
The finished flower should have a slightly raised appearance.
Part 3: Crochet the Mesh Foundation
The open-grid foundation creates the delicate lace effect that surrounds the floral motifs.
Mesh foundation instructions
Using chocolate brown yarn, ch 29.
Row 1: Dc in the fourth chain from the hook, ch 2, skip 2 chains, dc in the next chain. Repeat across.
Row 2: Ch 3, turn, ch 2, skip the next ch-2 space, dc into the next dc. Repeat across.
Rows 3–12: Repeat Row 2 to create a consistent open-grid mesh.
FO and weave in the ends.
Block the mesh foundation gently to keep the square edges straight.
Part 4: Attach the Central Flower
Central flower placement
- Lay the mesh foundation flat with the right side facing upward.
- Find the center of the square.
- Position the raised crochet flower over the central mesh section.
- Thread a yarn needle with matching chocolate brown yarn.
- Sew the flower securely through the center and selected petal bases.
- Keep the petals slightly raised for a dimensional finish.
- Weave in the yarn ends on the wrong side.
Part 5: Crochet the Corner Flowers
Each square features four decorative flowers positioned near the corners.
Corner flower instructions
Using chocolate brown yarn, make a magic ring.
Round 1: Work 8 sc into the ring. Join.
Round 2: Work 2 dc into each stitch around. Join.
Round 3: Repeat (sl st, ch 2, 3 dc, ch 2, sl st) around to create rounded petals.
FO, leaving a long sewing tail.
Make four corner flowers for each mesh square.
Part 6: Attach the Corner Flowers
Corner flower placement
- Place the mesh foundation on a flat surface.
- Position one flower near each corner.
- Align the flowers evenly.
- Pin the flowers temporarily.
- Sew each flower securely to the mesh foundation.
- Keep the petals slightly raised.
- Weave in all yarn ends.
The four corner flowers should frame the central flower symmetrically.
Part 7: Crochet the Outer Square Border
A reinforced border helps the motifs maintain their shape and provides a neat joining edge.
Square border instructions
Join chocolate brown yarn at any corner.
Round 1: Work sc evenly along each side, placing 3 sc into each corner.
Round 2: Work dc in each stitch around, placing 3 dc into the center corner stitch.
Round 3: Work sc in each stitch around, placing 3 sc into each corner.
Join with a sl st and FO.
Block the completed motif to approximately 15 × 15 cm.
Part 8: Make the Required Number of Squares
Once the sample motif is complete, measure it carefully after blocking.
Motif planning
For a bedspread approximately 210 cm wide and 240 cm long:
- 14 motifs across.
- 16 motifs down.
- Approximately 224 motifs total.
Make additional motifs if you want a larger bedspread or a longer decorative drape.
Part 9: Arrange the Crochet Squares
Before joining, arrange all motifs on a large flat surface.
Layout instructions
- Place the motifs with the right sides facing upward.
- Arrange them into evenly spaced rows.
- Check that the flowers face the same direction.
- Align the mesh openings.
- Check the overall width and length.
- Adjust the number of motifs if necessary.
Part 10: Join the Squares into Rows
Use a neat joining method to preserve the openwork appearance.
Slip stitch joining method
- Place two squares with right sides together.
- Align the outer border stitches.
- Insert the hook through the corresponding stitches of both squares.
- Work a slip stitch through both layers.
- Continue along the entire edge.
- FO and weave in the ends.
- Repeat until the first row is complete.
Join the remaining squares into matching rows.
Part 11: Join the Rows Together
Row joining instructions
- Place two completed rows together with right sides facing.
- Align the square seams.
- Join the rows using slip stitches.
- Keep the tension even.
- Repeat until all rows are joined.
- Lay the bedspread flat and inspect the seams.
The finished bedspread should form one large rectangular panel.
Part 12: Crochet the Bedspread Foundation Border
A continuous border gives the bedspread a polished finish.
Foundation border instructions
Join chocolate brown yarn at one corner.
Round 1: Work sc evenly around the entire bedspread, placing 3 sc into each corner.
Round 2: Work dc in each stitch around, placing 3 dc into each corner.
Round 3: Work sc in each stitch around, placing 3 sc into each corner.
Join and FO.
Part 13: Crochet the Decorative Scalloped Border
The decorative border adds softness and elegance to the bedspread.
Scalloped border instructions
Join chocolate brown yarn along one edge.
Repeat the following sequence:
Skip 2 stitches, work 5 dc into the next stitch, skip 2 stitches, sl st into the following stitch.
Continue around the bedspread, adjusting the spacing near corners as needed.
Join with a sl st and FO.
The finished border should form a gentle repeating scallop pattern.
Part 14: Crochet the Matching Pillow Cover Fronts
The matching pillow covers use the same floral mesh squares as the bedspread.
Pillow front instructions
For a pillow cover approximately 45 × 65 cm, make enough squares to cover the desired dimensions.
Using 15 cm squares, begin with a layout of 3 squares across and 4 squares down.
Join the squares using the same slip stitch method.
Measure the completed panel and adjust the border to fit the pillow insert.
Make two matching pillow fronts.
Part 15: Crochet the Pillow Cover Backs
The pillow backs may be made using a simple solid crochet fabric.
Solid pillow back instructions
Using chocolate brown yarn, make a foundation chain matching the desired pillow width.
Row 1: Sc in the second chain from the hook and across.
Rows 2 onward: Ch 1, turn, sc across.
Continue until the panel reaches the required height.
FO and weave in the ends.
Make two pillow backs.
Part 16: Assemble the Pillow Covers
Pillow assembly instructions
- Place the floral front panel and solid back panel together.
- Align the edges carefully.
- Join three sides using single crochet stitches.
- Leave one side open for inserting the pillow.
- Add a zipper, buttons, or an overlapping closure.
- Turn the cover right side out.
- Insert the pillow.
- Adjust the corners.
Part 17: Add Decorative Pillow Edging
Use the same edging style as the bedspread for a coordinated look.
Pillow edging instructions
Join chocolate brown yarn at one corner.
Work one round of sc around the pillow cover.
For the decorative round, repeat:
Skip 2 stitches, 5 dc into the next stitch, skip 2 stitches, sl st into the next stitch.
Continue around the cover.
FO and weave in the ends.
Part 18: Block the Finished Bedspread
Blocking helps the floral mesh squares open evenly and creates a smooth finished appearance.
Blocking instructions
- Lay the bedspread on a clean flat surface.
- Lightly dampen the fabric if the yarn allows wet blocking.
- Gently stretch the squares into even shapes.
- Align the seams.
- Pin the outer edges if necessary.
- Allow the bedspread to dry completely.
- Remove the pins carefully.
Part 19: Final Finishing
- Inspect all square motifs.
- Check the joining seams.
- Weave in any remaining yarn ends.
- Adjust the raised flowers.
- Check the scalloped border.
- Block the pillow covers.
- Inspect the pillow closures.
- Lay the bedspread evenly over the bed.
Customization Ideas
1. Classic ivory version
Use warm ivory yarn for a timeless vintage-inspired bedspread.
2. Elegant charcoal version
Use charcoal-gray cotton yarn for a modern bedroom.
3. Two-tone floral bedspread
Make the mesh squares in chocolate brown and the raised flowers in cream.
4. Rustic farmhouse style
Use natural beige or taupe yarn for a soft neutral look.
5. Luxury king-size version
Add additional rows and columns of motifs for a larger bedspread.
6. Matching decorative cushions
Use leftover squares to create smaller coordinating cushion covers.
Care Instructions
- Follow the washing instructions on the yarn label.
- Use a gentle washing cycle if the yarn permits machine washing.
- Place the bedspread in a large laundry bag when possible.
- Avoid harsh detergents.
- Do not wring or twist the crochet fabric.
- Dry flat to preserve the shape.
- Reshape the floral motifs while damp.
- Store folded in a cool, dry place.
Frequently Asked Questions
Is this crochet bedspread suitable for beginners?
This project is best suited to intermediate and advanced crocheters because it involves repeated openwork motifs, decorative flowers, joining techniques, and a large amount of assembly.
What yarn works best for a floral mesh bedspread?
DK-weight cotton or cotton-blend yarn is recommended because it offers good stitch definition and creates a breathable decorative fabric.
How many crochet squares do I need?
The number depends on the size of your bed and the finished measurements of each square. A bedspread measuring approximately 210 × 240 cm may require around 224 squares if each square measures 15 cm.
Can I make this bedspread in another color?
Yes. The pattern looks beautiful in ivory, beige, taupe, charcoal, burgundy, sage green, and many other colors.
Can I make matching pillow covers?
Absolutely. The matching pillow covers use the same floral mesh motifs and decorative edging as the bedspread.
How do I keep the bedspread flat?
Block the motifs before joining, maintain consistent stitch tension, and block the completed bedspread after assembly.
Final Thoughts
This chocolate brown floral mesh crochet bedspread is a beautiful way to bring warmth, texture, and handmade elegance into your bedroom.
The intricate open-grid squares, raised floral details, coordinated pillow covers, and decorative scalloped border create a sophisticated bedding set inspired by traditional crochet craftsmanship.
Whether you make it for your own home, as a wedding gift, or as a special handmade keepsake, this crochet bedspread is a timeless project that can be enjoyed for years.
Love this crochet pattern? Save it to your favorite crochet inspiration board and share your finished bedspread with fellow crochet enthusiasts.

