Christmas Angel and Poinsettia Crochet Centerpiece
Advanced
For experienced crocheters who enjoy complex shaping, fine detail, and ambitious construction
Single-Day Project
A satisfying project you can complete in a single afternoon or evening.
Handmade Gift
A beautiful keepsake — free forever. Read online or print at home.
About This Christmas Angel and Poinsettia Crochet Centerpiece
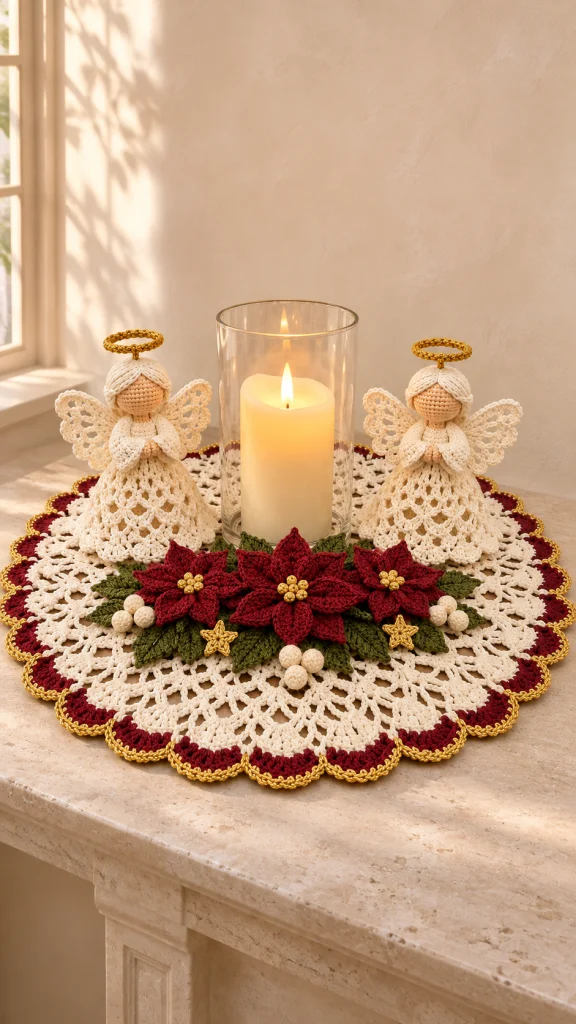
This Christmas crochet centerpiece pattern brings together two ivory lace angels, three burgundy poinsettias, and a scalloped doily edged in gold. Arranged around a glass hurricane holding an LED candle, the separate pieces create a festive display with an open, airy silhouette.
The angels have smooth, featureless faces, swept ivory hair, praying hands, and stiffened lace wings. Their bell-shaped skirts echo the open mesh of the doily, while layered pointed petals, olive leaves, cream berries, and small gold stars fill the foreground.
Allow approximately 30–40 hours of crochet and assembly, plus drying time. This advanced project suits crocheters comfortable with fine cotton, shaped motifs, precise stitch placement, and careful blocking. The directions are an original interpretation of the pictured centerpiece; finished measurements depend on yarn, tension, and stiffening.
Materials
- Fine / sport-weight mercerized cotton: ivory, approximately 650 m.
- Matching cotton: burgundy, approximately 140 m.
- Matching cotton: olive green, approximately 100 m.
- Matching cotton: light beige, approximately 35 m, for heads and hands.
- Fine metallic gold crochet thread, approximately 80 m; use doubled for halos if needed.
- 2.5 mm crochet hook for lace, flowers, leaves, and bodies.
- 2 mm crochet hook for heads, hands, and berries.
- 1.75 mm crochet hook for gold details.
- Small quantity of polyester stuffing.
- Two 25 mm diameter craft rings for halos.
- Washable fabric stiffener suitable for cotton.
- Rustproof blocking pins, blocking mat, plastic wrap, and two cone-shaped blocking forms.
- Tapestry needle, scissors, stitch markers, and sewing thread matching the crochet.
- Two felt circles approximately 6 cm in diameter for optional angel bases.
- Glass hurricane approximately 10 cm in outside diameter and a battery-operated LED pillar candle.
Abbreviations
chchainsl stslip stitchscsingle crochethdchalf double crochetdcdouble crochettrtreble crochetststitchspspaceMRmagic ringsc2togsingle crochet two stitches togetherRSright sideIvory Doily Center
- Round 1: With ivory and the 2.5 mm hook, work 12 dc in MR. Tighten and join. 12 dc.
- Round 2: Ch 2, work 2 dc in every st; join. 24 dc.
- Round 3: Ch 2, repeat (dc in next st, 2 dc in next st) 12 times; join. 36 dc.
- Round 4: Ch 2, repeat (dc in next 2 sts, 2 dc in next st) 12 times; join. 48 dc.
- Round 5: Ch 2, repeat (dc in next 3 sts, 2 dc in next st) 12 times; join. 60 dc.
- Round 6: Ch 2, repeat (dc in next 4 sts, 2 dc in next st) 12 times; join. 72 dc. The center should lie flat and measure approximately 10–11 cm across.
Doily Lace and Scalloped Border
- Round 7: Ch 1, sc in first st, ch 3, skip 2 sts; repeat (sc in next st, ch 3, skip 2 sts) 23 times. Join to first sc. 24 sc and 24 ch-3 spaces.
- Round 8: Sl st into first space. Ch 1, sc in that space, ch 4; repeat (sc in next space, ch 4) 23 times. Join. 24 sc and 24 ch-4 spaces.
- Round 9: Sl st into first space. Ch 1, sc in that space, ch 5; repeat (sc in next space, ch 5) 23 times. Join. 24 sc and 24 ch-5 spaces.
- Round 10: Sl st into first space. Ch 1, sc in that space, ch 6; repeat (sc in next space, ch 6) 23 times. Join. 24 sc and 24 ch-6 spaces.
- Round 11: Sl st into first space. Ch 1, sc in that space, ch 7; repeat (sc in next space, ch 7) 23 times. Join. 24 sc and 24 ch-7 spaces.
- Round 12: Sl st into first space. Ch 1, sc in that space, ch 8; repeat (sc in next space, ch 8) 23 times. Join. 24 sc and 24 ch-8 spaces.
- Round 13: Sl st into first space. Ch 1, sc in that space, ch 9; repeat (sc in next space, ch 9) 23 times. Join. 24 sc and 24 ch-9 spaces.
- Round 14: Sl st into first space. Ch 1, sc in that space, ch 10; repeat (sc in next space, ch 10) 23 times. Join. 24 sc and 24 ch-10 spaces.
- Round 15: Sl st into first space. Ch 1, sc in that space, ch 11; repeat (sc in next space, ch 11) 23 times. Join. 24 sc and 24 ch-11 spaces.
- Round 16: Ch 1, sc in first sc, work 11 dc in next space; repeat (sc in next sc, 11 dc in next space) 23 times. Join. 24 scallops, 264 dc, and 24 sc. Fasten off ivory.
- Round 17: Join burgundy in any valley sc. Ch 1, sc in that st; across the next scallop work sc in its first 5 dc, 3 sc in its sixth dc, and sc in its last 5 dc. Repeat this valley-and-scallop sequence around. Join. 336 sc: 14 per repeat.
- Round 18: Join gold in a valley stitch. Ch 1, sc in every st around, working a picot after the central stitch of each three-stitch tip increase. For each picot, ch 3 and sl st into the first chain. Join and fasten off. 336 sc and 24 picots.
- Block: Pin the center flat, then spread all 24 scallops evenly to approximately 42 cm overall diameter. Adjust pin placement until the mesh opens without straining. Let dry completely.
Angel Heads and Necks — Make Two
- Round 1: With beige and the 2 mm hook, work 6 sc in MR. Work in a continuous spiral, marking the first stitch. 6 sc.
- Round 2: Work 2 sc in every st. 12 sc.
- Round 3: Repeat (sc in next st, 2 sc in next st) 6 times. 18 sc.
- Round 4: Repeat (sc in next 2 sts, 2 sc in next st) 6 times. 24 sc.
- Round 5: Repeat (sc in next 3 sts, 2 sc in next st) 6 times. 30 sc.
- Round 6: Sc in every st. 30 sc.
- Round 7: Sc in every st. 30 sc.
- Round 8: Sc in every st. 30 sc.
- Round 9: Sc in every st. 30 sc.
- Round 10: Repeat (sc in next 3 sts, sc2tog) 6 times. 24 sc.
- Round 11: Repeat (sc in next 2 sts, sc2tog) 6 times. 18 sc. Stuff the head firmly enough to hold a smooth shape.
- Round 12: Repeat (sc in next st, sc2tog) 6 times. 12 sc.
- Round 13: Sc2tog 6 times. 6 sc.
- Round 14: Sc in every st. 6 sc. Add a tiny amount of stuffing to the neck, fasten off, and leave a sewing tail. Keep the face plain to match the serene decorative figures.
Angel Bodices and Lace Skirts — Make Two
- Round 1: With ivory and the 2.5 mm hook, ch 12 and join without twisting. Ch 1, sc in each chain. Join. 12 sc; the opening is the neckline.
- Round 2: Ch 1, repeat (sc in next st, 2 sc in next st) 6 times. Join. 18 sc.
- Round 3: Ch 1, sc in every st. Join. 18 sc.
- Round 4: Ch 1, sc in every st. Join. 18 sc.
- Round 5: Ch 1, repeat (sc in next 2 sts, 2 sc in next st) 6 times. Join. 24 sc.
- Round 6: Ch 1, sc in every st. Join. 24 sc.
- Round 7: Ch 1, repeat (sc in next 3 sts, 2 sc in next st) 6 times. Join. 30 sc.
- Round 8: Ch 1, repeat (sc in next 4 sts, 2 sc in next st) 6 times. Join. 36 sc.
- Round 9: Ch 1, sc in first st, ch 2, skip 2 sts; repeat (sc in next st, ch 2, skip 2 sts) 11 times. Join. 12 sc and 12 spaces.
- Round 10: Sl st into first space. Ch 2, work (2 dc, ch 1, 2 dc) in that space and in each remaining space. Join to first dc. 12 shells, 48 dc, and 12 ch-1 spaces.
- Round 11: Sl st to first ch-1 space. Ch 2, work (2 dc, ch 2, 2 dc) in that space; ch 1. Repeat ((2 dc, ch 2, 2 dc) in next shell center, ch 1) 11 times. Join. 48 dc, 12 ch-2 centers, and 12 ch-1 gaps.
- Round 12: Sl st to first shell center. Ch 2, work (2 dc, ch 2, 2 dc) in that center; ch 2. Repeat ((2 dc, ch 2, 2 dc) in next shell center, ch 2) 11 times. Join. 48 dc and 24 ch-2 spaces.
- Round 13: Sl st to first shell center. Ch 2, work (3 dc, ch 2, 3 dc) in that center; ch 2. Repeat ((3 dc, ch 2, 3 dc) in next shell center, ch 2) 11 times. Join. 72 dc, 12 center spaces, and 12 gap spaces.
- Round 14: Sl st to first shell center. Ch 2, work (3 dc, ch 2, 3 dc) in that center; ch 3. Repeat ((3 dc, ch 2, 3 dc) in next shell center, ch 3) 11 times. Join. 72 dc, 12 ch-2 centers, and 12 ch-3 gaps.
- Round 15: Sl st to first shell center. Ch 2, work 9 dc in that center, then sc in the following ch-3 gap. Repeat (9 dc in next shell center, sc in next gap) 11 times. Join and fasten off. 108 dc and 12 sc.
- Shape: Apply stiffener to the skirt and bodice, keeping the neckline open. Dry over a plastic-covered cone with a hem approximately 9–10 cm across and a body height approximately 9 cm. Spread the 12 hem scallops evenly.
Angel Sleeves and Praying Hands
- Sleeve foundation: Make four. With ivory and the 2.5 mm hook, ch 10. Row 1: Sc in second chain and each chain across. 9 sc.
- Row 2: Ch 1, turn, sc in every st. 9 sc.
- Row 3: Ch 2, turn, dc in first st, dc in next 3 sts, 3 dc in next st, dc in last 4 sts. 11 dc.
- Row 4: Ch 2, turn, dc in first st, dc in next 4 sts, 3 dc in next st, dc in last 5 sts. 13 dc.
- Row 5: Ch 1, turn, sc in every st. 13 sc. Fasten off with a long tail. Fold with RS outward and seam the two row-end edges to form a tapered sleeve; leave the 9-stitch upper edge and 13-stitch cuff open.
- Hand round 1: Make four. With beige and the 2 mm hook, work 6 sc in MR. Work in a spiral. 6 sc.
- Hand round 2: Sc in every st. 6 sc.
- Hand round 3: Sc in every st. 6 sc. Flatten without stuffing; work 3 sc through paired front and back stitches to close. Fasten off with a sewing tail.
- Attach: Sew each hand just inside a sleeve cuff. Sew the narrow sleeve ends to opposite sides of the upper bodice, then angle both cuffs toward the center front. Stitch the hands together in a praying pose.
Lace Wings — Make Four
- Row 1: With ivory and the 2.5 mm hook, ch 10. Sc in second chain and each chain across. 9 sc. This foundation forms the inner attachment edge.
- Row 2: Ch 1, turn, sc in first st; repeat (ch 3, skip next st, sc in next st) 4 times. 5 sc and 4 spaces.
- Row 3: Ch 1, turn, sc in first sc; repeat (ch 4, sc in next space) 4 times; ch 4, sc in last sc. 6 sc and 5 spaces.
- Row 4: Ch 1, turn, sc in first sc; repeat (ch 5, sc in next space) 5 times; ch 5, sc in last sc. 7 sc and 6 spaces.
- Row 5: Ch 1, turn, sc in first sc; repeat (7 dc in next space, sc in next sc) 6 times. 42 dc and 7 sc. Fasten off, leaving a sewing tail.
- Block: Stiffen and pin each wing into a broad fan approximately 6 cm wide and 6 cm high. Stretch the upper scallops slightly farther outward than the lower scallops to create the wing outline.
- Pair: Arrange two wings behind each angel, with their foundation edges angled inward toward the spine. Sew their foundation edges to the back bodice, with the upper tips near head height and the lower tips above the skirt midpoint.
Angel Hair and Gold Halos
- Hair cap round 1: Make two. With ivory and the 2 mm hook, work 6 sc in MR. Work in a spiral. 6 sc.
- Round 2: Work 2 sc in every st. 12 sc.
- Round 3: Repeat (sc in next st, 2 sc in next st) 6 times. 18 sc.
- Round 4: Repeat (sc in next 2 sts, 2 sc in next st) 6 times. 24 sc.
- Round 5: Repeat (sc in next 3 sts, 2 sc in next st) 6 times. 30 sc.
- Round 6: Sc in every st. 30 sc. Sl st in next st and fasten off with a sewing tail.
- Fit the cap over the crown and back of the head. Sew around its edge, leaving the lower front of the face visible.
- Cut twenty ivory strands approximately 16 cm long for each angel. Lay ten strands from the crown center toward each side of the face. Couch them at the center part and beside the cheeks, forming swept sections. Trim and secure the ends beneath the cap edge.
- Halo covering: With gold and the 1.75 mm hook, work sc around a craft ring until it is fully covered and the stitches sit closely together. Join and fasten off. The stitch count depends on ring thickness.
- Halo support: Ch 7 in gold; sl st in second chain and each chain across. 6 sl sts. Fasten off. Fold the strip lengthwise, sew its long edges together, and stiffen.
- Attach one end of the support securely at the back crown and the other to the halo. Set the ring horizontally just above the hair and allow the support to dry in position.
Poinsettia Petals and Flower Layers
- Small petal: Make 12 in burgundy with the 2.5 mm hook. Ch 9. Starting in the second chain, work sc, hdc, dc, tr, dc, hdc, sc across the next 7 chains. Work (sc, ch 2, sc) in the last chain.
- Small petal return: Working along the unused foundation loops, work sc, hdc, dc, tr, dc, hdc, sc across the remaining 7 chains. Join to first sc and fasten off with a tail. Each petal has 16 stitches and one ch-2 tip.
- Large petal: Make 24 in burgundy. Ch 12. Starting in the second chain, work sc, hdc, dc, tr in each of next 4 chains, dc, hdc, sc across the next 10 chains. Work (sc, ch 2, sc) in the last chain.
- Large petal return: Along the unused foundation loops, work sc, hdc, dc, tr in each of next 4 chains, dc, hdc, sc across the remaining 10 chains. Join to first sc and fasten off with a tail. Each petal has 22 stitches and one ch-2 tip.
- Shape each petal by folding its lower third along the foundation chain and stitching the two base corners together. Leave the pointed end open and slightly cupped.
- Flower backing: Make three in burgundy. Round 1: Work 6 sc in MR. Round 2: Work 2 sc in every st. Round 3: Repeat (sc in next st, 2 sc in next st) 6 times. Join and fasten off. 18 sc.
- Center flower: Sew 6 large petals evenly around one backing, then add 6 large petals above them with the points staggered. This flower uses 12 large petals.
- Side flowers: For each remaining backing, sew 6 large petals around the edge and 6 small petals above them with staggered points. Each side flower uses 6 large and 6 small petals.
- Gold centers: Make 21 small knots. For each, ch 2 in gold, work 4 sc in second chain, cut the yarn, and draw the tail through all four stitch tops. Pull into a small bead. Sew 7 beads into the center of each flower.
Olive Leaves, Cream Berries, and Gold Stars
- Leaves: Make 14 in olive using the large-petal instructions, including the return side. Each has 22 stitches and one ch-2 tip. Leave the leaves flat, then add a loose line of surface sl sts along each foundation chain for a central vein.
- Berry round 1: Make 9 in ivory with the 2 mm hook. Work 6 sc in MR in a spiral. 6 sc.
- Berry round 2: Work 2 sc in every st. 12 sc.
- Berry round 3: Sc in every st. 12 sc.
- Berry round 4: Sc in every st. 12 sc. Add a small amount of stuffing.
- Berry round 5: Sc2tog 6 times. 6 sc. Fasten off, thread the tail through the remaining stitches, and pull closed. Sew berries into three clusters of three.
- Star center: Make two with gold and the 1.75 mm hook. Work 10 sc in MR and join. 10 sc.
- Star points: Repeat the following 5 times: ch 4; working back down the chain, sl st in second chain, sc in next chain, hdc in last chain; skip next center sc and sl st in following center sc. The final join lands at the base of the first point. Fasten off. 5 points per star.
- Block the stars flat and lightly stiffen. Shape the leaves with a shallow central fold while damp.
Finishing
- Weave in all ends before applying final stiffener. Keep the doily softly blocked; stiffen only the angel structures, wing fans, halo supports, and stars as needed.
- Insert each head’s neck into its bodice neckline and sew securely around the opening. Add a small tuft of stuffing inside the upper bodice only, holding it in place with a few internal stitches. Keep the skirt hollow.
- Check that each angel stands level. If desired, sew a felt circle inside the skirt approximately 1 cm above the hem, using eight evenly spaced attachment points. This helps the bell retain its shape without drawing in the scallops.
- Place the glass hurricane in the center of the doily. Stand the angels on opposite sides, slightly behind its front edge, with their wings clear of the glass.
- Arrange the large poinsettia at the front center and one smaller flower on either side. Tuck five leaves behind the center flower and four behind each side flower; use the remaining leaf between two flower layers. Sew the overlapping leaf and flower bases together into one removable spray approximately 26 cm wide.
- Sew one berry cluster at each outer end of the spray and the third below the center flower. Attach the two stars between the center and side flowers. Set the spray in front of the hurricane, leaving all decorations outside the glass.
Give the finished arrangement time to settle before its final display. Open any compressed petal points with your fingertips and turn the angels slightly inward so their praying hands frame the candle.
Keep the floral spray and figures removable for storage. Lay the doily flat, cushion the wings with tissue, and store the angels upright in a dry box.
Tips for Success
- Mark every sixth doily scallop while blocking to keep all four quarters balanced.
- Use a narrower hook for the beige heads so stuffing stays hidden without making the lace too firm.
- Pin the two wings of each angel together during drying so their height and spread match.
- Sew flower layers through their bases only; free petal tips create the dimensional poinsettia shape.
- Test stiffener on a spare cotton motif before treating the ivory wings and gold details.
Common Mistakes to Avoid
- Confusing skirt shell centers with gaps: mark the 12 center spaces before starting each new skirt round.
- Forcing a rippled doily flat: check for extra spaces or scallops first, then adjust blocking tension gradually.
- Overfilling the heads: reduce stuffing if the stitches separate or the face loses its smooth curve.
- Attaching wet wings: dry them completely before sewing so they retain their fan shape.
- Pulling the hair strands tight: couch them gently so they sweep across the head without flattening it.
Ways to Customize This Pattern
- Replace burgundy with deep red and olive with forest green while keeping the same yarn weight.
- Use silver thread for the halos, stars, and final doily edging for a cooler palette.
- Make the centerpiece without gold stars for a quieter display; the floral construction stays the same.
- Use a single angel and arrange the three flowers in an offset crescent beside the hurricane.
- Change the overall scale by changing cotton weight and hook together; recheck the doily diameter, skirt support, and hurricane clearance before assembly.
Frequently asked questions
Use a battery-operated LED candle for this arrangement. The cotton angels, metallic thread, and stiffened decorations sit close to the glass and should remain away from heat and open flame.
The hands and head can pull an insufficiently stiff skirt off balance. Reblock the skirt over a level cone, let it dry fully, and position the head directly above the center of the hem. An inset felt base can help maintain the circular shape.
Keep the pieces detachable. Hand-wash the doily according to the cotton label and reshape it flat. Spot-clean the figures and flowers where possible; washing stiffened parts may require complete reshaping and another application of stiffener.
Compare the hurricane with the solid center before continuing into the mesh. For a modest size increase, use slightly heavier cotton and a matching hook for the entire doily, then sample-check flatness and the final scallops. Do not rest the glass on raised flowers or uneven lace.
The finished Christmas Angel and Poinsettia Crochet Centerpiece

