Christmas Angel Crochet Lantern Pattern
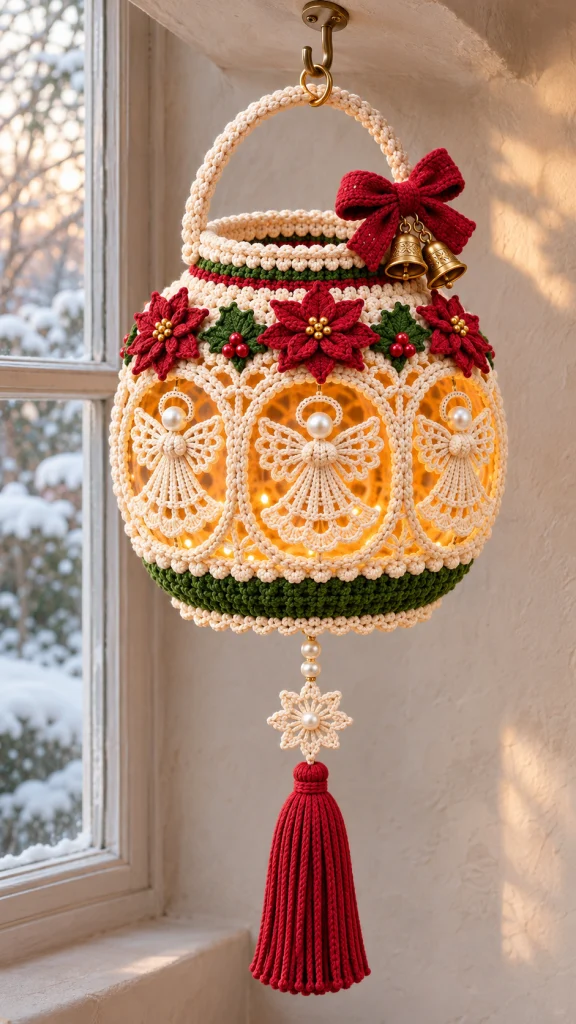
Advanced
For experienced crocheters who enjoy complex shaping, fine detail, and ambitious construction
Single-Day Project
A satisfying project you can complete in a single afternoon or evening.
Handmade Gift
A beautiful keepsake — free forever. Read online or print at home.
About This Christmas Angel Crochet Lantern Pattern
This Christmas angel crochet lantern pattern creates a hanging holiday decoration with an ivory lace framework, a deep green lower band and a crown of red poinsettias. Six pearl-headed angels sit inside tall framed windows, while a red bow, golden bells and a long tassel complete the festive silhouette.
The lantern is built around two rigid hoops, with reinforced crochet ribs supporting the open sides and a shaped collar forming the narrower opening. Fine-thread angels and a small hanging snowflake bring delicate detail to the heavier cotton frame. A removable strand of battery-operated lights supplies the warm glow.
Allow approximately 30–40 hours of crochet and assembly, plus time for blocking. This advanced project suits makers comfortable with thread crochet, counted shaping, working around cord and assembling decorative pieces onto a rigid frame. The instructions use US crochet terminology.
Materials
- DK cotton in ivory: approximately 250 g or 550 m.
- DK cotton in forest green: approximately 75 g or 165 m.
- DK cotton in deep red: approximately 125 g or 275 m, including the tassel.
- Size 10 crochet cotton in ivory: approximately 200 m.
- 3.0 mm crochet hook for DK cotton.
- 1.5 mm crochet hook for size 10 thread.
- Two closed metal craft hoops, each 22 cm in diameter, for the upper and lower body edges.
- One closed metal craft hoop, 18 cm in diameter, for the collar opening.
- Six lengths of 2–3 mm braided polyester cord, each approximately 35 cm long, for the body ribs.
- One approximately 55 cm length of 4 mm braided polyester cord for the handle.
- Strong ivory sewing thread and a sewing needle for securing cord and frame joints.
- Six drilled pearl-effect beads, approximately 12 mm, for angel heads.
- Three pearl-effect beads, approximately 8 mm, for the lower pendant.
- Approximately 30 small gold beads for flower centers and pendant spacers.
- Eighteen red beads, approximately 6 mm, for holly berries.
- Two small gold craft bells and two split rings for attaching them.
- A lightweight battery-operated LED micro-light strand with a cool-running, low-voltage battery pack.
- Locking stitch markers, tapestry needle, scissors and a tape measure.
- Blocking mat, rustproof pins and fabric stiffener suitable for cotton lace.
- A 20 cm piece of firm card for winding the tassel.
- A ceiling hook and hanging ring rated for the completed decoration and suitable for the mounting surface.
Abbreviations
chchainsl stslip stitchscsingle crochethdchalf double crochetdcdouble crochettrtreble crochetsc2togsingle crochet two stitches togetherststitchspspaceRSright sideLower Green Band and Hoop Cover
- Use green DK cotton and the 3.0 mm hook. Ch 120 loosely. Join with a sl st to the first ch without twisting. Round 1: ch 1, sc in each ch around; join to the first sc. There are 120 sc. The starting ch 1 never counts as a stitch.
- Round 2: ch 1, sc in each st around; join. There are 120 sc.
- Round 3: ch 1, repeat sc in the next st, dc in the next st 60 times; join. There are 120 sts. Keep the dc bumps facing outward.
- Round 4: ch 1, sc in each st around; join. There are 120 sc.
- Round 5: ch 1, repeat dc in the next st, sc in the next st 60 times; join. There are 120 sts.
- Round 6: ch 1, sc in each st around; join. There are 120 sc.
- Round 7: ch 1, repeat sc in the next st, dc in the next st 60 times; join. There are 120 sts.
- Round 8: ch 1, sc in each st around; join. There are 120 sc. Fasten off.
- Position the band with Round 8 at its upper edge. Join ivory DK to Round 8. Round 9: hold one 22 cm hoop directly behind this edge; ch 1 and work one sc into each st, passing the hook beneath the hoop for every stitch so that the stitches enclose the metal. Join. There are 120 sc.
- Round 10: ch 1, repeat sc in the next st, ch 3, sl st into the top of that same sc, sc in the next st 60 times; join. There are 120 sc and 60 picots. Fasten off.
- Turn the piece so the foundation edge is accessible. Join ivory to any unused foundation loop. Work one sc in each of the 120 foundation positions; join. Then repeat sc in the next st, ch 3, sl st into the top of that sc, sc in the next st 60 times; join and fasten off. The lower edge has 120 sc and 60 picots.
- Place markers in Round 9 at stitches 1, 21, 41, 61, 81 and 101. These six points mark the lower ends of the window ribs. The band hangs below the hoop; the center remains open for access to the lights.
Upper Shoulder and Narrow Collar
- Use ivory DK and the 3.0 mm hook. Work 120 sc directly around the second 22 cm hoop, sliding them evenly around the metal. Join to the first sc. This is Round 1.
- Round 2: ch 1, sc in each st around; join. There are 120 sc. Mark stitches 1, 21, 41, 61, 81 and 101 of Round 1 as the upper rib positions.
- Round 3: ch 1, repeat sc in the next 8 sts, sc2tog 12 times; join. There are 108 sc.
- Round 4: ch 1, sc in each st around; join. There are 108 sc.
- Round 5: ch 1, repeat sc in the next 7 sts, sc2tog 12 times; join. There are 96 sc.
- Round 6: ch 1, sc in each st around; join. There are 96 sc. Change to red at the join.
- Round 7: ch 1, sc in each st around; join. There are 96 sc. Change to green at the join.
- Round 8: ch 1, sc in each st around; join. There are 96 sc.
- Round 9: ch 1, sc in each st around; join. There are 96 sc. Change to ivory at the join.
- Round 10: ch 1, sc in each st around; join. There are 96 sc.
- Round 11: hold the 18 cm hoop behind the working edge; ch 1 and sc into each st while enclosing the hoop. Join. There are 96 sc.
- Round 12: ch 1, repeat sc in the next st, ch 3, sl st into the top of that sc, sc in the next st 48 times; join. There are 96 sc and 48 picots. Fasten off.
- Add the lower ivory trim by joining yarn to any stitch of Round 1. Working into that round without enclosing the hoop again, repeat sc in the next st, ch 3, sl st into the top of that sc, sc in the next st 60 times; join. There are 120 sc and 60 picots. Fasten off.
Six Reinforced Window Ribs
- Make six identical ribs with ivory DK and the 3.0 mm hook. Leave a 25 cm sewing tail, then ch 41. Row 1: sc in the second ch from the hook and in each remaining ch. There are 40 sc.
- Row 2: ch 1, turn, sc in each st across. There are 40 sc. Fasten off with a 25 cm tail.
- Block each strip to 20 cm long. Lay a body-rib cord along the center of its wrong side, fold the long edges around the cord and whipstitch them together. Keep approximately 6–7 cm of bare cord beyond each end.
- Set the two 22 cm hoops parallel, with 20 cm between their planes. Match their six marked positions. At each pair of markers, wrap the exposed cord ends tightly around the hoops and stitch each end back to itself with strong sewing thread. Trim excess cord only after the joint is secure.
- Sew each crochet sleeve end to the corresponding marked hoop-cover stitch. Arrange the six ribs vertically with their seams inward. The six openings between adjacent ribs are the angel windows.
- Check that the hoops remain parallel and the six ribs have equal tension before concealing the cord joints beneath the crochet edging.
Curved Window Trims
- Make 12 trims with ivory DK and the 3.0 mm hook. For each trim, ch 27. Row 1: sl st in the second ch from the hook and each remaining ch. There are 26 sl sts. Leave a 20 cm tail at each end.
- For each of the six windows, sew the ends of one trim to its two upper rib junctions. Sew its midpoint to the underside of the upper hoop at the center of the window. The center sits high and the ends descend slightly along the ribs, forming an arch above the angel.
- Sew a second trim into each window as a lower curve: attach its ends to the ribs approximately 4 cm above the lower hoop, then sew its midpoint to the lower hoop at the window center.
- Distribute the trim evenly and secure each curve with two additional small stitches where it touches the frame. Do not pull the ribs inward.
Six Lace Angel Skirts
- Use ivory size 10 thread and the 1.5 mm hook. Make six skirts. Ch 6. Row 1: dc in the fourth ch from the hook and each of the next 2 ch. The skipped 3 ch count as the first dc: 4 dc total.
- Row 2: ch 3, turn; dc in the first st, 2 dc in each of the next 3 sts, including the top of the turning ch. There are 8 dc, counting the turning ch.
- Row 3: ch 3, turn; dc in the next st, then repeat ch 1, dc in the next st 6 times. There are 8 dc and 6 ch-1 spaces.
- Row 4: ch 3, turn; dc in the next dc, then repeat ch 2, dc in the next dc 6 times, working the last dc into the turning ch. There are 8 dc and 6 ch-2 spaces.
- Row 5: ch 3, turn; dc in the next dc, then repeat ch 3, dc in the next dc 6 times. There are 8 dc and 6 ch-3 spaces.
- Row 6: ch 3, turn; dc in the next dc, then repeat ch 4, dc in the next dc 6 times. There are 8 dc and 6 ch-4 spaces.
- Row 7: ch 3, turn; dc in the next dc, then repeat ch 5, dc in the next dc 6 times. There are 8 dc and 6 ch-5 spaces.
- Row 8: ch 1, turn; sc in each of the first 2 dc. In each of the six ch-5 spaces work sc, hdc, 3 dc, ch 3, sl st into the top of the last dc, hdc, sc; after each shell, sc in the following dc. After the sixth shell and its following sc, sc in the final turning ch. There are six shells and 50 worked stitches, excluding the six picots. Fasten off.
- Block each skirt with its four-stitch starting edge narrow and its six scallops spread evenly. Keep the skirt approximately 5–6 cm tall; the exact spread depends on thread tension.
Angel Wings, Bodices and Halos
- Make 12 wings in ivory size 10 thread. Ch 9. Row 1: sc in the second ch from the hook, hdc in the next ch, dc in the next 2 ch, tr in the next 2 ch, dc in the next ch, 5 dc in the final ch. There are 12 stitches on this side.
- Continue around the opposite side of the foundation: dc in the next ch, tr in the next 2 ch, dc in the next 2 ch, hdc in the next ch, sc in the final ch. Join to the first sc. There are 19 stitches around the wing.
- Wing edging: ch 1, sc in the first st, then repeat ch 3, skip the next st, sc in the next st 9 times; ch 3 and join to the first sc. There are 10 sc anchors and 10 loops. Fasten off. Block as a narrow leaf shape, with the foundation starting end forming the wing root.
- Make six bodices. Ch 2, then work 6 sc into the second ch from the hook. Join to the first sc. Round 2: ch 1, work 2 sc in each st; join. There are 12 sc. Round 3: ch 1, sc in each st; join. There are 12 sc. Fasten off with a long sewing tail. Leave these small cups unstuffed.
- Make six halos. Ch 24 and join without twisting. Round 1: ch 1, work 30 sc into the ring; join. Round 2: repeat ch 3, skip one sc, sl st in the next sc 15 times. Fasten off. There are 15 loops.
- For each angel, overlap two wing roots behind one bodice, with their rounded tips pointing outward and slightly upward. Sew them in place. Sew the top of a skirt behind the lower half of the bodice.
- Sew a 12 mm pearl bead immediately above the bodice, passing the thread through the bead at least three times. Position a halo behind the head and secure it to the bead thread and the upper wing roots. The angel remains a flat lace ornament.
Six Layered Poinsettias
- Use red DK and the 3.0 mm hook. Each flower needs two separate six-petal layers. For each layer, ch 2, work 6 sc into the second ch from the hook and join. There are 6 sc.
- Petal round: sl st into the first unused center sc, ch 7, sc in the second ch from the hook, hdc in the next ch, dc in the next 2 ch, hdc in the next ch, sc in the final ch; sl st into the same center sc. This makes one six-stitch petal.
- Repeat the complete petal sequence in each of the remaining five center sc. There are six petals. Join to the first anchoring sl st and fasten off.
- Make 12 layers in total. For each flower, rotate one layer so its petals sit between those of the other layer. Sew the centers together and sew five gold beads firmly over the center. There are six finished flowers.
- Lightly shape the petals by hand. Do not heavily stiffen the flowers; they should curve against the shoulder.
Twelve Holly Leaves and Berry Clusters
- Use green DK and the 3.0 mm hook. Make 12 leaves. Ch 9. Work sc in the second ch from the hook, hdc in the next ch, dc in the next 4 ch, hdc in the next ch, and 3 sc in the final ch.
- Continue along the opposite side of the foundation: hdc in the next ch, dc in the next 4 ch, hdc in the next ch, sc in the final ch. Join to the first sc. There are 17 stitches.
- Edging: ch 1, sc in the first st; repeat sc in the next st, ch 3, sl st into the top of that sc, sc in the next st 8 times. Join and fasten off. There are 17 sc and 8 picots.
- Arrange the leaves into six overlapping pairs. Sew three red beads securely at the base of each pair, making six berry clusters.
Reinforced Handle, Bow and Bells
- For the handle sleeve, use ivory DK and the 3.0 mm hook. Ch 81. Row 1: sc in the second ch from the hook and each remaining ch. There are 80 sc.
- Row 2: ch 1, turn, sc in each st across. There are 80 sc. Fasten off with a long sewing tail.
- Block the sleeve to approximately 44 cm long. Fold it around the handle cord and whipstitch the long edges together. Leave approximately 5 cm of exposed cord at each end.
- Attach the cord ends to opposite sides of the 18 cm collar hoop, wrapping each end around the metal and stitching it back to itself with strong sewing thread. Sew the sleeve ends over the joints. The cord must connect directly to the metal hoop.
- For the bow loop strip, use red DK. Ch 13. Row 1: sc in the second ch from the hook and each remaining ch. There are 12 sc.
- Rows 2–36: ch 1, turn, sc in each of the 12 sts. Fasten off. Sew the short ends together, flatten the resulting loop with the seam at the center back, and pinch the middle into two bow loops.
- For each of two tails, ch 9. Row 1: sc in the second ch from the hook and each remaining ch. There are 8 sc. Rows 2–16: ch 1, turn, sc in each st across. Fasten off.
- For the center wrap, ch 5. Row 1: sc in the second ch from the hook and each remaining ch. There are 4 sc. Rows 2–10: ch 1, turn, sc in each st. Fasten off.
- Place the two tails behind the pinched bow. Wrap the center strip around all layers and sew its ends together at the back. Sew the bow beside one handle attachment, catching the hoop cover for support.
- Attach the two bells beneath the bow with split rings passed through firmly sewn thread loops around the hoop. Check that each ring closes completely.
Snowflake Pendant and Red Tassel
- Use ivory size 10 thread and the 1.5 mm hook for the snowflake. Ch 5 and join to form a ring. Round 1: ch 1, work 12 sc into the ring; join.
- Round 2: repeat ch 8, skip the next sc, sl st in the following sc 6 times. There are six ch-8 loops.
- Round 3: in each loop work 3 sc, ch 3, sl st into the top of the last sc, 3 sc, ch 5, sl st into the top of the last sc, 3 sc, ch 3, sl st into the top of the last sc, 3 sc. There are 12 sc and three picots per loop, or 72 sc and 18 picots total. Join and fasten off.
- Block the snowflake to approximately 6–7 cm across and apply a light coat of fabric stiffener. Let it dry completely. Sew one 8 mm pearl bead at its center.
- For the tassel, wrap red DK around the 20 cm card 70 times. Pass a separate doubled strand beneath the wraps at the upper edge and tie securely. Cut the lower wraps and remove the card.
- Wrap red yarn tightly around the bundle approximately 2 cm below the tied top, making 12–15 wraps. Secure the wrapping ends inside the tassel with a needle. Trim the hanging strands to approximately 19 cm below the neck.
- Use strong doubled ivory thread to suspend the two remaining 8 mm pearls and optional gold spacers above the snowflake. Attach the tassel below the opposite snowflake point. Keep this pendant assembly approximately 27–30 cm long.
- Make a lower support bridge from two crossed lengths of doubled ivory DK. Tie and sew their four ends securely around the lower hoop at evenly spaced points. Bind the crossing together at the center and attach the pendant thread there. The green band conceals the bridge from most viewing angles.
Finishing
- Block all six angels flat and lightly stiffen the skirts, wings and halos. Keep stiffener away from the pearl surfaces. Allow every piece to dry before assembly.
- Place one angel in the center of each window. Sew its halo to the center of the upper arch and tack its two outer skirt scallops to the lower curve. Add a small stitch from each wing tip to the nearest rib or arch where they naturally meet. Keep the lace relaxed.
- Sew one poinsettia over each upper rib junction, spanning the ivory shoulder and the top of the rib. Sew one holly cluster between each neighboring pair of flowers. Check the spacing around all six sides before fastening the final sewing tails.
- Place the LED wire loosely inside the frame and secure it at several ribs with removable cotton ties. Keep the battery pack accessible near the lower green band and secure it to the lower hoop with its own tie. Do not leave the pack hanging from a lace motif.
- Weave in all remaining ends and inspect every bead, bell, cord joint and hoop attachment. Hang the lantern from its reinforced handle and adjust the light strand and battery position until the body hangs level.
The finished lantern should feel balanced, with the angels suspended freely and the flowers resting neatly against the shoulder. Give the tassel a final trim while the piece is hanging so its lower edge falls evenly.
Display indoors in a dry place, away from curtains and direct heat. Remove the lights before cleaning; dust gently with a soft brush and spot-clean the cotton as needed.
Tips for Success
- Count and mark the six 20-stitch body divisions before covering the frame joints; equal spacing keeps the windows consistent.
- Pin the hoops 20 cm apart while attaching the ribs so that one tight cord does not tilt the body.
- Block one complete angel against an assembled window before committing to all six sets of lace pieces.
- Use small sewing stitches through several strands of the hoop cover when attaching flowers, rather than pulling on a single crochet loop.
- Position the battery pack near a rib and counterbalance it with the light wire before making the final hanging adjustment.
Common Mistakes to Avoid
- A twisted foundation chain makes the green band spiral. Lay all 120 chains flat and check their orientation before joining.
- Counting the shoulder’s ch 1 as a stitch shifts the decreases. Count only worked sc and sc2tog stitches in those rounds.
- Missing the turning chain at the end of an angel skirt row reduces its eight dc columns. Mark that chain top before turning.
- Attaching the handle only to the crochet fabric stretches the collar. Secure its reinforcing cord directly around the metal hoop.
- Overtightening the window curves pulls the ribs inward. Pin each trim in position and preserve the full hoop diameter as you sew.
Ways to Customize This Pattern
- Use burgundy instead of bright red and antique gold beads for a quieter version with the same construction.
- Replace the pearl heads with drilled wooden beads of the same diameter for a softer finish.
- Omit the bells and sew a small ribbon rosette beneath the bow to create a silent decoration.
- Shorten the tassel by winding it around a 12 cm card; keep the same number of wraps and the same secure top binding.
- For a table display, omit the handle and pendant, then rest the lower hoop on a stable decorative stand with the battery pack accessible.
Frequently asked questions
No. Use battery-operated LED micro-lights only. The cotton, stiffened lace and tassel must stay away from flames, hot bulbs and heating elements.
The two 22 cm hoops keep the window section cylindrical. The 18 cm hoop draws in the collar above the shaped shoulder, creating the narrower opening and supporting the handle.
Change hook size and swatch again while keeping the 120-stitch count. The band should need only gentle stretching. Changing the count would also change the six rib positions and shoulder decreases.
It is intended for dry indoor display. Moisture can soften the lace stiffener, affect the frame and damage lights that are not designed for outdoor use.
No physical sample test is claimed. Make a fit sample for the hoop covering and one complete angel, and check the assembled frame’s balance before preparing a finished display piece.
The finished Christmas Angel Crochet Lantern Pattern

