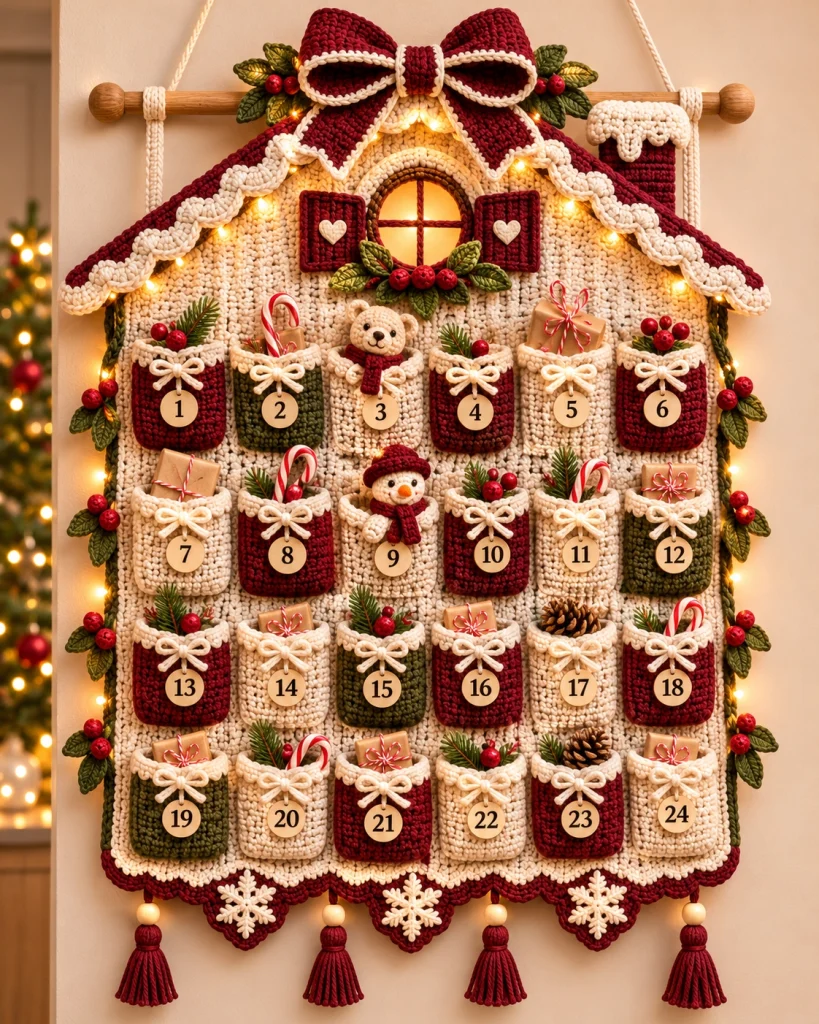
Christmas Crochet Advent Calendar House – Free Advanced Pattern with 24 Pockets
Make the countdown to Christmas extra magical with this beautiful handmade Christmas Crochet Advent Calendar House! Featuring 24 numbered crochet pockets, a charming cottage-shaped design, a luxurious burgundy bow, snowy roof edges, festive holly berries, miniature decorations, and elegant hanging tassels, this advanced crochet project is a wonderful addition to your holiday traditions.
Inspired by cozy Christmas cottages and classic handmade decorations, this crochet advent calendar combines rich burgundy, warm ivory, and forest green yarn with intricate textures and adorable seasonal details.
Each numbered pocket can hold a small treat, handwritten message, miniature ornament, or special surprise, making every day of December a little more exciting.
Unlike disposable advent calendars, this reusable handmade Christmas decoration can become a treasured family keepsake for years to come.
Pattern Details
- Skill Level: Advanced
- Finished Size: Approximately 75 cm tall × 60 cm wide
- Construction: Flat house-shaped crochet panel with individually attached pockets and dimensional decorations
- Number of Pockets: 24
- Pocket Arrangement: 4 rows of 6 pockets
- Style: Traditional Christmas cottage, farmhouse holiday decor
- Terminology: US crochet terms
- Recommended Hook: 3.0 mm, 3.5 mm, and 4.0 mm
- Estimated Time: 35–50 hours
- Main Colors: Burgundy, ivory, forest green, olive green, and brown
Materials Needed
- 350–450 g ivory DK-weight cotton yarn
- 200 g burgundy DK-weight cotton yarn
- 100 g forest green DK-weight cotton yarn
- 50 g olive green DK-weight cotton yarn
- Small amounts of brown, red, white, orange, and black yarn
- 3.0 mm crochet hook for small decorations
- 3.5 mm crochet hook for pockets and edging
- 4.0 mm crochet hook for the main panel
- Wooden dowel, approximately 70 cm long
- Strong cotton cord for hanging
- 24 wooden number tags numbered 1–24
- 24 small wooden or metal rings for attaching tags
- Four wooden beads for the bottom tassels
- Polyester fiberfill
- Tapestry needle
- Scissors
- Stitch markers
- Optional felt or fabric backing
- Optional battery-powered LED fairy lights
- Small treats or decorations for filling the pockets
Important: Choose lightweight decorations and battery-powered LED lights only. Never use candles or lights that become hot near yarn.
Crochet Abbreviations
- MR: Magic ring
- ch: Chain
- sc: Single crochet
- hdc: Half double crochet
- dc: Double crochet
- tr: Treble crochet
- sl st: Slip stitch
- st: Stitch
- inc: Increase
- dec: Decrease
- BLO: Back loop only
- FLO: Front loop only
- FO: Fasten off
1. Crochet the Main House Panel
The main panel forms the foundation of the advent calendar. It should be sturdy enough to support 24 filled pockets without stretching excessively.
Using ivory yarn and a 4.0 mm hook:
Rectangular House Body
Row 1: Ch 121. Starting in the second chain from the hook, work 120 sc. Ch 1, turn.
Rows 2–115: Work 120 sc across. Ch 1, turn.
Row 116: Work 120 sc. Fasten off.
This creates a large rectangular panel.
Block the panel gently to achieve straight edges.
For a more textured appearance, alternate rows of sc with rows of hdc or use a simple linen stitch pattern.
Designer Tip: Measure your panel before proceeding. Adjust the number of rows if necessary to accommodate four evenly spaced rows of pockets.
2. Crochet the Cottage Roof
The roof gives the calendar its distinctive Christmas cottage silhouette.
Using burgundy yarn and a 4.0 mm hook:
Roof Triangle
Row 1: Ch 121. Work 120 sc across. Ch 1, turn.
Row 2: Sc2tog, sc across until two stitches remain, sc2tog. Ch 1, turn. (118)
Rows 3–59: Continue decreasing one stitch at each end of every row.
After 59 decrease rows, approximately two stitches remain.
Fasten off.
Block the triangle gently.
Position the triangular roof above the rectangular house body.
Sew the bottom edge of the roof securely to the top of the panel.
For a fuller cottage appearance, make a second matching roof triangle and join the two layers along the sloping sides.
3. Add the Snowy Roof Edging
The thick ivory crochet trim creates the appearance of soft snow resting along the cottage roof.
Using ivory yarn and a 3.5 mm hook:
Join yarn at one lower corner of the roof.
Work sc evenly along the sloping roof edge.
On the next row, create decorative scallops:
*Skip 2 stitches, work 5 dc into the next stitch, skip 2 stitches, sl st into the next stitch.*
Repeat along the entire roof edge.
Work the same edging along the opposite roof slope.
For a thicker snowy appearance, add a second layer of scallops slightly overlapping the first.
Fasten off and weave in the ends.
4. Crochet the 24 Advent Calendar Pockets
The calendar features 24 small rectangular pockets arranged in four rows of six.
Use burgundy, ivory, and forest green yarn for a festive alternating color arrangement.
Suggested Pocket Color Distribution
- 8 burgundy pockets
- 10 ivory pockets
- 6 forest green pockets
You may adjust the color distribution to match your preferred Christmas palette.
Basic Pocket – Make 24
Using a 3.5 mm hook:
Row 1: Ch 17. Starting in the second chain from the hook, work 16 sc. Ch 1, turn.
Rows 2–15: Work 16 sc across. Ch 1, turn.
Row 16: Work 16 sc. Fasten off, leaving a long sewing tail.
Each pocket should measure approximately 7–8 cm wide, depending on yarn tension.
Make all 24 pockets using the selected colors.
5. Crochet the Ivory Pocket Trim
Each pocket features a decorative ivory upper edge resembling soft Christmas snow.
Using ivory yarn and a 3.0 mm hook:
Join yarn to the upper edge of a pocket.
Row 1: Work 16 sc across.
Row 2: *Sl st, skip 1 stitch, 4 hdc in the next stitch, skip 1 stitch.* Repeat across.
Adjust the final stitches as needed to keep the trim symmetrical.
Fasten off and weave in the ends.
Repeat for all 24 pockets.
6. Crochet the Small Ivory Bows
Every pocket is decorated with a delicate ivory bow beneath its snowy trim.
Bow Loops – Make 24
Using ivory yarn:
Ch 21.
Work 20 sl st along the chain.
Fasten off.
Fold the crocheted cord into two small loops.
Wrap a short piece of matching yarn around the center to form a bow.
Tie securely at the back.
Make 24 identical bows.
Sew one bow to the upper center of each pocket.
Keep the bow tails short so they do not cover the number tags.
7. Attach the Number Tags
Prepare 24 round wooden tags numbered from 1 to 24.
Attach each tag beneath the ivory bow using a small wooden ring, metal ring, or short piece of yarn.
Make sure the numbers are clearly visible.
For a fully crocheted alternative, create 24 small ivory circles and embroider the numbers using dark brown yarn.
Crochet Number Tag Base
Round 1: Make a magic ring with 6 sc.
Round 2: Work 2 sc in each stitch. (12)
Round 3: *Sc, inc.* Repeat around. (18)
Round 4: *2 sc, inc.* Repeat around. (24)
Fasten off.
Embroider the number in the center.
Attach the tag securely to its corresponding pocket.
8. Arrange and Sew the Pockets
Lay the house panel flat on a large surface.
Arrange the 24 pockets in four horizontal rows of six.
Leave equal spacing between the pockets.
Position the first row beneath the cottage window area.
Pin all pockets temporarily before sewing.
Using matching yarn, sew each pocket along its left side, bottom edge, and right side.
Leave the upper opening free.
Reinforce the upper corners with additional stitches to prevent stretching.
Check that each pocket can comfortably hold a small lightweight gift.
Important: Avoid sewing the upper edges closed.
9. Crochet the Cottage Window
The arched window near the roof peak creates a charming illuminated Christmas cottage effect.
Using burgundy yarn and a 3.0 mm hook:
Window Frame
Ch 21.
Work 20 sc across.
Continue working rows until the rectangular section reaches approximately 10 cm high.
To create the arched top, decrease one stitch at each end of the following rows until the upper edge becomes rounded.
Fasten off.
Use brown yarn to embroider a vertical and horizontal window cross.
Attach the frame near the upper center of the house.
For an illuminated effect, place a piece of golden felt or fabric behind the window opening and position battery-powered LED lights behind the panel.
10. Crochet the Burgundy Window Shutters
Make two miniature shutters using burgundy yarn.
Row 1: Ch 11. Work 10 sc across.
Rows 2–12: Work 10 sc across.
Fasten off.
Make two identical shutters.
Attach one on each side of the window.
Using ivory yarn, crochet two small hearts or embroider a heart motif on each shutter.
The ivory hearts provide a sweet decorative contrast against the rich burgundy.
11. Crochet the Large Burgundy Roof Bow
The oversized burgundy bow is the central decorative feature at the roof peak.
Bow Loops – Make 2
Using burgundy yarn and a 3.5 mm hook:
Row 1: Ch 31. Work 30 sc across.
Rows 2–12: Work 30 sc across.
Fasten off, leaving a long tail.
Fold each rectangle into a loop and sew the short ends together.
Bow Tails – Make 2
Ch 36.
Work 35 sc across for 10 rows.
Fasten off.
Shape the ends into pointed ribbon tails by folding and sewing the lower corners inward.
Ivory Bow Border
Using ivory yarn, work one round of sc around the visible edges of each bow piece.
This creates a beautiful contrasting outline.
Bow Center
Ch 11 and work 10 sc across for 5 rows.
Wrap the center strip around the assembled loops and tails.
Sew securely at the back.
Attach the completed bow to the roof peak.
12. Crochet the Holly Leaves and Berries
Holly decorations frame the roof bow, window, and sides of the house.
Holly Leaves
Using forest green yarn:
Ch 15.
Starting in the second chain from the hook, work:
1 sc, 2 hdc, 3 dc, 2 hdc, 2 sc, 2 hdc, 1 sc.
Continue around the opposite side of the chain.
Work small picots along the outer edge to create pointed holly leaves.
Fasten off.
Make approximately 12–16 leaves.
Red Berries
Using red yarn:
Round 1: MR, 6 sc.
Round 2: Inc around. (12)
Rounds 3–4: 12 sc.
Round 5: Dec around. (6)
Lightly stuff and close.
Make approximately 24 berries.
Arrange the berries in clusters of three among the green leaves.
Sew the clusters around the bow, window, and outer edges of the calendar.
13. Crochet the Miniature Christmas Stocking Decorations
Several pockets can be decorated with miniature Christmas stockings in matching colors.
Using burgundy or forest green yarn:
Round 1: MR, 6 sc.
Round 2: Inc around. (12)
Rounds 3–5: 12 sc.
To shape the heel, work short rows across half the stitches.
Continue crocheting around the opening to form the stocking leg.
Finish with two rounds of ivory sc for the cuff.
Fasten off.
Attach the miniature stockings to selected pockets or use them as small surprises inside the calendar.
14. Crochet the Miniature Teddy Bear
A tiny ivory teddy bear adds an adorable handmade detail to one of the upper pockets.
Head
Using ivory yarn:
Round 1: MR, 6 sc. (6)
Round 2: Inc around. (12)
Round 3: *Sc, inc.* Repeat around. (18)
Round 4: *2 sc, inc.* Repeat around. (24)
Rounds 5–8: 24 sc.
Round 9: *2 sc, dec.* Repeat around. (18)
Round 10: *Sc, dec.* Repeat around. (12)
Stuff lightly.
Round 11: Dec around. (6)
Close the opening.
Ears – Make 2
MR, 6 sc.
Work one additional round of 6 sc.
Flatten and sew to the head.
Body
MR, 6 sc.
Increase to 12, then 18 stitches.
Work 5 rounds of 18 sc.
Decrease to 12 stitches.
Stuff and close.
Arms and Legs
Make four small cylindrical pieces using 6 sc rounds.
Sew the limbs securely to the body.
Attach the head.
Embroider the eyes, nose, and mouth using dark brown yarn.
Finish with a miniature burgundy scarf.
Place the teddy bear inside one of the calendar pockets.
15. Crochet the Miniature Snowman
A tiny snowman is another charming decoration for the advent calendar.
Snowman Body
Using ivory yarn:
Round 1: MR, 6 sc.
Round 2: Inc around. (12)
Round 3: *Sc, inc.* Repeat around. (18)
Rounds 4–7: 18 sc.
Round 8: *Sc, dec.* Repeat around. (12)
Stuff lightly.
Round 9: Dec around. (6)
Close.
Make a smaller head using the same method with fewer rounds.
Sew the head to the body.
Snowman Hat
Using burgundy yarn:
MR, 6 sc.
Increase to 12 stitches.
Work 3 rounds of 12 sc.
Add one round of 18 sc for the brim.
Attach to the head.
Embroider black eyes and an orange carrot nose.
Add a burgundy scarf.
Place the snowman inside one of the central pockets.
16. Crochet the Decorative Chimney
The miniature burgundy chimney completes the cottage roof.
Using burgundy yarn:
Ch 15.
Work 14 sc across for 14 rows.
Fasten off.
Fold the rectangle into a small tube and sew the side seam.
Flatten the lower end slightly and attach it near the right roof slope.
Using ivory yarn, work a scalloped border around the top opening to imitate snow.
Secure the chimney carefully to the roof.
17. Crochet the Bottom Scalloped Border
The decorative burgundy border gives the calendar a polished finished appearance.
Using burgundy yarn and a 3.5 mm hook:
Join yarn at the lower left corner.
Work one row of sc along the bottom edge.
For the scallops:
*Skip 2 stitches, work 5 dc in the next stitch, skip 2 stitches, sl st in the next stitch.*
Repeat across the bottom.
Add a narrow ivory border above the burgundy scallops for contrast.
Fasten off.
18. Crochet the Snowflake Decorations
Three ivory snowflakes decorate the pointed sections along the bottom of the calendar.
Using ivory yarn and a 3.0 mm hook:
Round 1: MR, *ch 3, dc, ch 2* six times. Join.
Round 2: In each chain space, work *sc, ch 3, sc, ch 5, sc, ch 3, sc*.
Repeat around.
Fasten off.
Block gently to open the lace details.
Make three snowflakes.
Sew them evenly across the lower decorative border.
19. Make the Burgundy Hanging Tassels
Four burgundy tassels with wooden beads hang along the bottom of the advent calendar.
Tassel Instructions
- Cut approximately 30 strands of burgundy yarn, each 20 cm long.
- Fold the strands in half.
- Tie a separate piece of yarn around the folded top.
- Wrap another strand around the tassel approximately 2 cm below the top.
- Secure the wrapping yarn.
- Trim the lower ends evenly.
- Thread a wooden bead above the tassel.
- Attach the tassel to the lower border.
Repeat to make four matching tassels.
Space them evenly across the bottom edge.
20. Attach the Wooden Hanging Dowel
A wooden dowel provides essential support for the finished calendar.
Place the dowel along the upper back edge of the roof.
Use strong ivory yarn to create several attachment loops.
Sew the loops securely to the roof panel.
Slide the dowel through the loops.
Attach a strong cotton hanging cord to both ends of the dowel.
Adjust the cord so the calendar hangs evenly.
Test the hanging structure before filling the pockets.
For extra stability, sew a lightweight fabric backing to the reverse side of the main panel.
21. Add Optional LED Fairy Lights
Warm white LED fairy lights can make the Christmas cottage look magical.
Use only cool-running, battery-powered LED lights.
Position the lights behind the roof edging and around the outer edges of the house.
Secure the wires discreetly using small yarn loops.
Keep the battery pack accessible behind the calendar.
Do not place batteries inside the crochet pockets.
Never use incandescent string lights or exposed electrical wiring with yarn decorations.
22. Fill the 24 Advent Calendar Pockets
Once the calendar is assembled, fill the pockets with small lightweight surprises.
Advent Calendar Filling Ideas
- Individually wrapped chocolates
- Miniature candy canes
- Handwritten Christmas messages
- Small crochet ornaments
- Miniature gift boxes
- Holiday activity cards
- Christmas stickers
- Small handmade decorations
- Kindness challenge notes
- Family Christmas tradition cards
- Small wrapped treats
- Festive inspirational messages
For children, choose age-appropriate surprises and avoid small detachable items that could present a choking hazard.
23. Final Assembly and Finishing
- Lay the completed house panel flat.
- Check that all 24 pockets are evenly aligned.
- Verify that the number tags run from 1 to 24.
- Secure the snowy roof edging.
- Attach the burgundy roof bow.
- Position the holly leaves and berries.
- Attach the miniature chimney.
- Secure the cottage window and shutters.
- Add the teddy bear and snowman decorations.
- Attach the bottom snowflakes.
- Secure the four burgundy tassels.
- Check the wooden dowel and hanging cord.
- Weave in all remaining yarn ends.
- Test the calendar with lightweight items inside the pockets.
- Adjust the hanging cord until the house sits straight.
Your handmade Christmas Crochet Advent Calendar House is complete!
24. Alternative Christmas Color Combinations
Classic Burgundy and Ivory
Deep burgundy, warm ivory, forest green, and natural wood create a timeless traditional Christmas look.
Rustic Red and Cream
Bright red, cream, olive green, and natural brown create a cozy farmhouse-inspired advent calendar.
Winter White and Silver
White, pale gray, silver, and icy blue create an elegant winter cottage design.
Sage Green and Champagne
Sage green, champagne beige, ivory, and soft gold create a sophisticated neutral holiday decoration.
Traditional Red and Emerald Green
Bright red, emerald green, white, and gold create a cheerful Christmas calendar full of festive color.
25. Advanced Crochet Tips
- Use cotton yarn for improved stitch definition and durability.
- Maintain consistent tension across all 24 pockets.
- Block the main panel before attaching decorations.
- Use stitch markers to maintain even pocket spacing.
- Reinforce the upper corners of every pocket.
- Keep dimensional decorations lightweight.
- Attach the wooden dowel before filling the pockets.
- Use a fabric backing if the calendar begins to stretch.
- Arrange all decorative elements before permanent attachment.
- Test the completed calendar with its intended contents.
26. Care Instructions
To preserve your handmade crochet advent calendar:
- Remove all treats and decorations before cleaning.
- Dust gently using a soft brush.
- Spot-clean with cool water and mild detergent.
- Avoid machine washing the assembled calendar.
- Remove electronic lights before cleaning.
- Allow cleaned areas to dry completely.
- Store flat or loosely rolled after Christmas.
- Protect the wooden tags from moisture.
- Keep the calendar in a dry storage container.
- Avoid crushing the bow and dimensional decorations.
Frequently Asked Questions
Is this crochet advent calendar suitable for beginners?
This project is designed for advanced crocheters because it includes a large shaped panel, 24 individual pockets, decorative edging, miniature amigurumi, and detailed assembly.
How long does it take to make the calendar?
The project may take approximately 35–50 hours, depending on your experience and the number of decorative details.
Can I make the calendar smaller?
Yes. Use thinner yarn, a smaller hook, and reduced pocket dimensions while maintaining enough space for all 24 pockets.
Can I use acrylic yarn?
Yes. Acrylic yarn is suitable, although cotton provides a firmer structure and clearer stitch definition.
How do I prevent the pockets from stretching?
Use tight stitches, reinforce the pocket corners, and avoid filling them with heavy objects.
Can I use embroidered numbers instead of wooden tags?
Absolutely. You can embroider the numbers directly onto the pockets or create small crocheted number labels.
Can I add Christmas lights?
Yes. Use cool-running, battery-powered LED lights and keep the battery pack accessible.
What can I put inside the pockets?
Small chocolates, miniature ornaments, handwritten notes, and lightweight holiday surprises work beautifully.
Can I sell finished calendars made from this pattern?
Yes. You may sell handmade calendars created using this original pattern. Credit to Cozy Crochet Patterns is appreciated.
Can I reuse the calendar every year?
Yes. With proper care and storage, this handmade advent calendar can become a treasured family Christmas tradition.
Final Thoughts
This Christmas Crochet Advent Calendar House with 24 Pockets is a wonderful way to combine festive creativity with meaningful holiday traditions.
From the luxurious burgundy bow and snowy cottage roof to the individually numbered pockets, adorable miniature decorations, holly berries, and elegant hanging tassels, every detail adds warmth and handmade charm.
Whether you make it for your own family, give it as a thoughtful Christmas gift, or display it as a beautiful holiday decoration, this advanced crochet advent calendar is sure to bring joy throughout December.
Save this free Christmas crochet advent calendar pattern to Pinterest and share it with your crochet-loving friends!
Pattern note: This is an original, untested crochet interpretation inspired by the reference image, not an exact stitch-for-stitch reproduction. The dimensions, roof shaping, pocket spacing, and decorative components may require adjustment to achieve the pictured result.

