Christmas Crochet Candle Centerpiece with Poinsettias, Mini Trees & Gingerbread Houses – Free Crochet Pattern
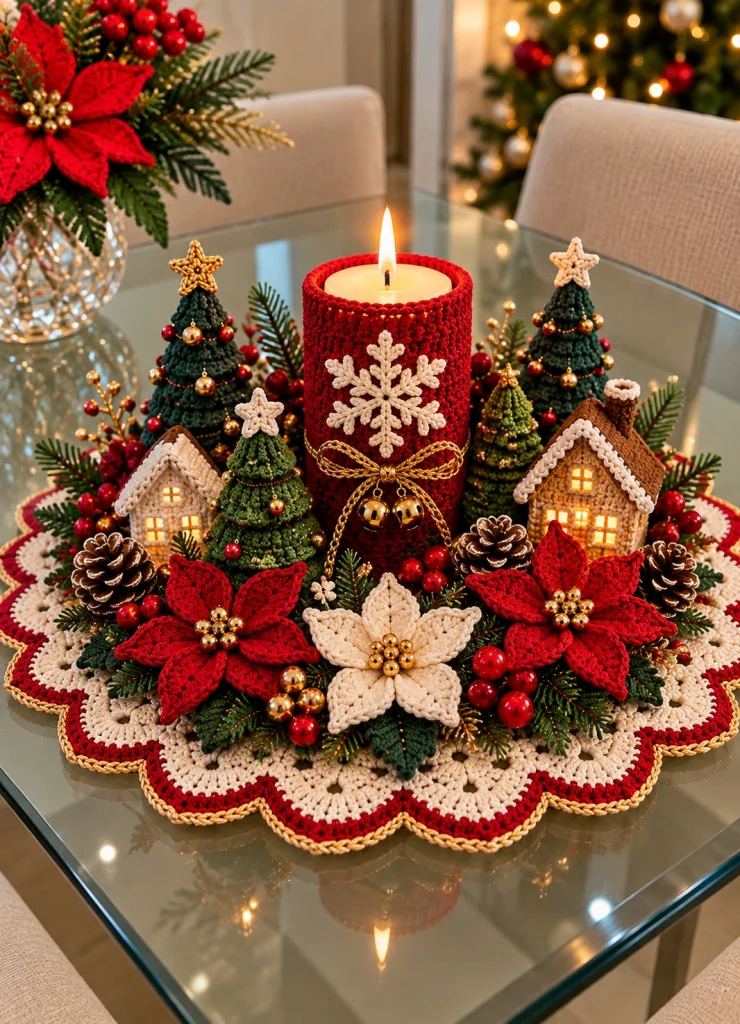
Bring the magic of Christmas to your holiday table with this beautiful Christmas crochet candle centerpiece. Featuring a festive red candle holder, delicate white snowflake, miniature Christmas trees, charming gingerbread houses, vibrant poinsettias, and an elegant scalloped crochet base, this handmade decoration creates a warm and welcoming holiday atmosphere.
The traditional combination of Christmas red, forest green, warm ivory, and sparkling gold makes this centerpiece a timeless seasonal decoration. Each crocheted element adds texture, dimension, and handmade charm, transforming an ordinary table into a festive holiday display.
This free crochet pattern explains how to create the decorative base, candle sleeve, poinsettia flowers, miniature Christmas trees, gingerbread houses, berries, and finishing details.
Safety Note: Use a battery-operated LED candle for this project. Never place a burning candle directly inside or near crochet yarn, decorative foliage, or other flammable materials.
Pattern Information
- Skill Level: Intermediate to Advanced
- Finished Diameter: Approximately 40–45 cm
- Finished Height: Approximately 22–28 cm
- Construction: Separate crocheted elements assembled on a decorative base
- Yarn Weight: DK or worsted-weight cotton yarn
- Hook Sizes: 2.5 mm, 3 mm, and 3.5 mm
- Terminology: US crochet terms
- Estimated Time: 15–25 hours
- Theme: Traditional Christmas
Design Note: This is an original crochet interpretation inspired by the reference image. Exact proportions and decorative placement may vary depending on yarn thickness, tension, and the size of your chosen LED candle.
Materials Needed
- 200 g cream or ivory cotton yarn
- 150 g Christmas red cotton yarn
- 150 g forest-green cotton yarn
- 50 g dark-green cotton yarn
- 50 g brown cotton yarn
- Small amounts of white, gold, and light-green yarn
- 2.5 mm crochet hook for miniature details
- 3 mm crochet hook for flowers and decorations
- 3.5 mm crochet hook for the centerpiece base
- Battery-operated LED pillar candle
- Removable glass or metal LED candle holder
- Polyester fiberfill
- Yarn needle
- Scissors
- Stitch markers
- Gold decorative beads
- Small red decorative beads
- Optional gold embroidery thread
- Optional battery-operated miniature LED lights
- Optional plastic canvas for structural support
Crochet Abbreviations
- ch: Chain
- sc: Single crochet
- hdc: Half double crochet
- dc: Double crochet
- tr: Treble crochet
- sl st: Slip stitch
- st: Stitch
- sts: Stitches
- sp: Space
- sk: Skip
- inc: Increase
- dec: Decrease
- MR: Magic ring
- FLO: Front loop only
- BLO: Back loop only
- FO: Fasten off
Part 1: Crochet the Round Centerpiece Base
The centerpiece begins with a large, flat crochet base worked in ivory yarn. Its scalloped edges create the decorative foundation for the Christmas arrangement.
Use the 3.5 mm crochet hook.
Round 1
Make a magic ring.
Ch 3 (counts as first dc).
Work 11 dc into the ring.
Pull the ring closed and join with a sl st. (12 dc)
Round 2
Ch 3.
Work 1 dc in the same stitch.
Work 2 dc in each stitch around.
Join with a sl st. (24 dc)
Round 3
Ch 3.
Work 2 dc in the next stitch.
*Dc in the next stitch, 2 dc in the following stitch.*
Repeat around.
Join with a sl st. (36 dc)
Round 4
Ch 3.
Dc in the next stitch.
Work 2 dc in the following stitch.
*Dc in the next 2 stitches, 2 dc in the next stitch.*
Repeat around.
Join with a sl st. (48 dc)
Rounds 5–15
Continue increasing evenly by adding 12 stitches per round.
Maintain a flat circular shape.
Use stitch markers to identify increase points.
Continue until the base measures approximately 32–35 cm in diameter.
Part 2: Create the Scalloped Christmas Border
The reference centerpiece features an elegant ivory scalloped border decorated with red and gold accents.
Border Round 1
Attach red yarn to any stitch along the outer edge.
Ch 1.
Work 1 sc in each stitch around.
Join with a sl st.
Border Round 2
Change to ivory yarn.
Ch 1.
*Skip 2 stitches, work 7 dc in the next stitch, skip 2 stitches, sl st in the next stitch.*
Repeat around to create the scalloped edge.
Border Round 3
Attach red yarn.
Work sc evenly around the scalloped border, following each curved edge.
FO and weave in ends.
Gold Finishing
Attach gold embroidery thread along the outer edge.
Work surface slip stitches or small decorative chain stitches around the scallops.
Keep the gold detailing delicate and evenly distributed.
Part 3: Crochet the Red Candle Sleeve
The central candle holder is wrapped in a beautiful red crochet sleeve featuring a white snowflake and gold ribbon detail.
Use red cotton yarn and a 3 mm hook.
Foundation
Measure the circumference of your LED candle holder.
Ch enough stitches to wrap around the holder comfortably.
Join with a sl st, making sure the chain is not twisted.
Round 1
Ch 1.
Work 1 sc in each chain around.
Join with a sl st.
Rounds 2–18
Ch 1.
Work 1 sc in every stitch around.
Join with a sl st.
Continue until the sleeve reaches the desired height.
The sleeve should fit snugly around the LED candle holder without covering its top opening.
Upper Border
Ch 1.
Work 1 round of reverse single crochet for a decorative edge.
FO and weave in ends.
Part 4: Crochet the White Snowflake Appliqué
The white snowflake creates a striking contrast against the bright red candle sleeve.
Use white yarn and a 2.5 mm hook.
Round 1
Make a magic ring.
Ch 3.
Work 11 dc into the ring.
Join with a sl st. (12 dc)
Round 2
*Ch 5, skip 1 stitch, sl st into the next stitch.*
Repeat around to form six loops.
Round 3
Into each chain loop, work:
1 sc, ch 3, 1 dc, ch 3, 1 dc, ch 3, 1 sc.
Repeat in all six loops.
FO, leaving a long sewing tail.
Assembly
Position the snowflake at the center front of the candle sleeve.
Sew it securely using small invisible stitches.
Optional: Add tiny gold beads or embroidery accents.
Part 5: Add the Gold Bow and Bells
The reference design features a delicate gold bow with small hanging bells.
Gold Cord
Using gold yarn or embroidery thread, ch approximately 80.
FO.
Thread the cord through the lower section of the red sleeve.
Tie a decorative bow at the front.
Mini Crochet Bells
Using gold yarn and a 2.5 mm hook:
Round 1: Make a MR and work 6 sc. (6)
Round 2: Work 2 sc in each stitch. (12)
Rounds 3–5: Sc around. (12)
Round 6: *Sc, inc* around. (18)
Round 7: Sc around. (18)
FO and weave in ends.
Make two bells.
Attach them to the gold bow with short lengths of yarn.
Part 6: Crochet the Red Poinsettia Flowers
The centerpiece includes three large poinsettia flowers: two red flowers and one ivory flower.
Each poinsettia is made from individually crocheted petals assembled around a decorative center.
Large Petal
Using red yarn, ch 13.
Row 1: Sc in the second chain from the hook, hdc in the next 2 stitches, dc in the next 6 stitches, hdc in the next 2 stitches, sc in the final stitch.
Continue around the opposite side of the foundation chain using the same stitch sequence.
Join with a sl st.
Petal Border
Ch 1.
Work sc evenly around the entire petal.
At the pointed tip, work 3 sc into the same stitch.
Continue around and join with a sl st.
FO, leaving a sewing tail.
Make the Petals
- 6 large red petals for the first flower
- 6 large red petals for the second flower
- 6 large ivory petals for the third flower
- Optional smaller petals for extra dimension
Flower Center
Using gold yarn:
Make a MR.
Work 6 sc into the ring.
Join with a sl st.
Attach small gold beads around the center.
Assembly
Arrange six petals in a circular flower shape.
Overlap the petal bases slightly.
Sew them together securely.
Attach the gold center over the joined petal bases.
Repeat to create all three poinsettias.
Part 7: Crochet the Dark-Green Leaves
The dark-green leaves provide a rich background for the bright poinsettia flowers.
Use forest-green yarn and a 3 mm hook.
Leaf Foundation
Ch 15.
Leaf Row 1
Sc in the second chain from the hook.
Hdc in the next 2 stitches.
Dc in the next 8 stitches.
Hdc in the next 2 stitches.
Work 3 sc in the final chain.
Continue along the opposite side of the foundation chain.
Repeat the stitch sequence in reverse.
Join with a sl st.
Leaf Border
Work sc around the entire leaf.
At the tip, ch 2 and sl st into the same stitch to create a pointed end.
FO.
Leaf Veins
Using light-green yarn or gold embroidery thread, embroider a central vein.
Add smaller diagonal veins for a realistic botanical appearance.
Make approximately 12–18 leaves in different sizes.
Part 8: Crochet the Miniature Christmas Trees
The centerpiece features miniature green Christmas trees decorated with tiny red and gold ornaments.
Use dark-green yarn and a 2.5 mm hook.
Tree Body
Round 1: Make a MR and work 6 sc. (6)
Round 2: Sc around. (6)
Round 3: *Sc, inc* around. (9)
Round 4: Sc around. (9)
Round 5: *Sc 2, inc* around. (12)
Round 6: Sc around. (12)
Round 7: *Sc 3, inc* around. (15)
Round 8: Sc around. (15)
Round 9: *Sc 4, inc* around. (18)
Round 10: Sc around. (18)
Continue increasing every other round until the tree reaches the desired height and width.
Tree Branch Texture
Attach green yarn to the surface of the cone.
Work small scalloped rows around the tree using groups of hdc and dc stitches.
Repeat in several layers to create a textured evergreen appearance.
Decorations
- Attach tiny red beads as Christmas ornaments.
- Add small gold beads between the branches.
- Embroider a thin gold garland around the tree.
- Crochet a small gold star for the top.
Make three or four trees in different heights.
Part 9: Crochet the Mini Gingerbread Houses
The miniature gingerbread houses add a charming Christmas village effect to the arrangement.
Use warm brown yarn and a 2.5 mm hook.
House Walls
Ch 13.
Row 1: Sc in the second chain from the hook and across. (12 sc)
Rows 2–10: Ch 1, turn, sc across.
FO.
Make four wall panels.
Roof Panels
Ch 15.
Row 1: Sc in the second chain from the hook and across. (14 sc)
Rows 2–8: Ch 1, turn, sc across.
FO.
Make two roof panels.
Assembly
Sew the four wall panels together to form a small box.
Attach the roof panels at an angle to create a peaked roof.
Add triangular gable pieces if needed to close the roof ends.
Lightly stuff the house with polyester fiberfill or insert a small plastic canvas support.
Gingerbread Details
Using white yarn, embroider decorative icing along the roof edges.
Create small windows with yellow or gold yarn.
Add a tiny rectangular door using brown or cream stitches.
Optional: Place a battery-operated miniature LED light inside a properly supported house.
Make two gingerbread houses.
Part 10: Crochet the Red Christmas Berries
Small berry clusters add bright festive accents throughout the centerpiece.
Use red yarn and a 2.5 mm hook.
Berry Pattern
Round 1: Make a MR and work 6 sc. (6)
Round 2: Work 2 sc in each stitch. (12)
Rounds 3–4: Sc around. (12)
Round 5: Sc2tog around. (6)
Stuff lightly.
FO and close the opening.
Make approximately 20–30 berries.
Berry Clusters
Group berries in clusters of three to five.
Sew them together securely.
Attach the clusters between the poinsettias, Christmas trees, and greenery.
Part 11: Crochet the Mini Pinecones
Small pinecones provide a natural woodland accent to the Christmas arrangement.
Use dark-brown yarn and a 2.5 mm hook.
Foundation
Make a MR and work 6 sc.
Rounds 2–4
Increase gradually to 18 stitches.
Rounds 5–8
Work sc around while adding small textured loops.
To create a scale, ch 3, work 2 dc into the same stitch, then sl st into the next stitch.
Repeat the scale pattern around the pinecone.
Finishing
Decrease gradually toward the base.
Stuff lightly if desired.
FO and weave in ends.
Make three or four pinecones.
Optional: Add a small amount of ivory yarn to the scale edges for a snow-dusted appearance.
Part 12: Arrange the Centerpiece
Once all the crochet elements are complete, begin assembling the Christmas arrangement.
Step 1
Lay the scalloped crochet base flat on a clean table.
Step 2
Position the LED candle holder in the center.
Step 3
Arrange the miniature Christmas trees around the candle.
Step 4
Place the two gingerbread houses toward the left and right sides.
Step 5
Position the three large poinsettias across the front.
Step 6
Fill empty spaces with crocheted green leaves.
Step 7
Add red berry clusters between the larger decorations.
Step 8
Place miniature pinecones near the outer edges.
Step 9
Arrange the decorative elements to create a balanced, symmetrical composition.
Step 10
Secure the crochet pieces to the base with yarn and a needle, keeping the LED candle removable.
Important: Do not permanently attach the LED candle to the crochet base. This allows batteries to be replaced and the centerpiece to be cleaned safely.
Part 13: Final Decorative Details
Small finishing touches can make the centerpiece look even more festive.
- Add gold embroidery accents to the poinsettia petals.
- Attach tiny gold beads to the Christmas trees.
- Embroider white icing details on the gingerbread houses.
- Add miniature crochet snowflakes between the decorations.
- Use gold yarn to highlight the scalloped border.
- Arrange red berries in small natural-looking clusters.
- Add small green branches behind the poinsettias.
- Make sure the LED candle remains visible above the decorations.
- Keep the overall arrangement balanced and symmetrical.
- Weave in all loose yarn ends.
Creative Color Variations
Classic Christmas Red and Green
Use vibrant red poinsettias, deep-green trees, ivory lace, and gold accents for a traditional holiday appearance.
Elegant White and Gold
Replace the red flowers with ivory poinsettias and use champagne-gold accents for a luxurious winter centerpiece.
Rustic Woodland Christmas
Choose warm brown, forest green, muted burgundy, and natural cream for a cozy farmhouse-inspired arrangement.
Winter Wonderland
Use white, icy blue, silver, and pale gray for a snowy Christmas village theme.
Vintage Christmas
Combine burgundy, antique gold, olive green, and warm ivory for a nostalgic holiday decoration.
Helpful Crochet Tips
- Use cotton yarn for clear stitch definition.
- Choose smaller hooks for miniature decorations.
- Maintain consistent tension when making matching pieces.
- Use stitch markers for circular patterns.
- Stuff miniature houses and trees lightly.
- Secure beads carefully so they do not become loose.
- Block the scalloped base before assembly.
- Arrange all decorative pieces before sewing them down.
- Keep the LED candle removable.
- Use a rigid support beneath miniature houses if necessary.
- Avoid overcrowding the decorative arrangement.
- Keep the poinsettias evenly spaced.
- Use embroidery thread for delicate gold details.
- Store the centerpiece in a protective box after Christmas.
- Keep small detachable decorations away from young children and pets.
Frequently Asked Questions
Is this Christmas crochet centerpiece suitable for beginners?
This project is best suited to intermediate or advanced crocheters because it combines several techniques, including amigurumi, appliqué flowers, lace borders, and three-dimensional assembly.
Can I use a real candle?
No. A battery-operated LED candle is strongly recommended. Crochet yarn and decorative materials are flammable and must not be placed around an open flame.
How large is the finished centerpiece?
The finished decoration measures approximately 40–45 cm across, depending on the yarn, hook size, and arrangement of the decorative elements.
Can I make a smaller version?
Yes. Reduce the diameter of the base and use fewer Christmas trees, flowers, and miniature houses.
Can I use acrylic yarn?
Yes, acrylic yarn can be used for decorative elements. Cotton yarn is recommended for its stitch definition and firmer structure.
How many poinsettias should I make?
The reference arrangement features three prominent poinsettias: two red and one ivory. You can add more or fewer depending on the size of your centerpiece.
Can I make the gingerbread houses without stuffing?
Yes. Plastic canvas inserts can help the houses maintain their shape without polyester fiberfill.
How should I clean the centerpiece?
Remove the LED candle and detachable decorations before cleaning. Spot-clean the crochet pieces gently and allow them to dry completely.
Can I sell finished centerpieces made from this pattern?
Yes. You may sell handmade decorations created using this original crochet pattern. Credit to the pattern designer is appreciated.
Care and Storage Instructions
- Remove the LED candle before cleaning.
- Spot-clean gently with mild detergent.
- Avoid machine washing assembled decorations.
- Do not use bleach.
- Do not tumble dry.
- Reshape flowers and leaves while slightly damp.
- Allow all pieces to dry completely.
- Store in a clean, dry box.
- Protect delicate petals from crushing.
- Remove batteries from the LED candle before long-term storage.
- Keep away from open flames and excessive heat.
Final Thoughts
This Christmas crochet candle centerpiece combines traditional holiday colors with intricate handmade details to create a truly memorable decoration. From the elegant scalloped base and festive poinsettias to the miniature Christmas trees and charming gingerbread houses, every element adds warmth and personality to your holiday table.
Whether displayed on a dining table, sideboard, coffee table, or holiday console, this crochet centerpiece is a beautiful way to celebrate the Christmas season with handmade creativity.
Love this Christmas crochet idea? Save this free crochet centerpiece pattern to Pinterest and share it with your crochet-loving friends for more festive handmade inspiration!

