Christmas Crochet Candle Centerpiece with Red Bow and Bells – Free Advanced Pattern
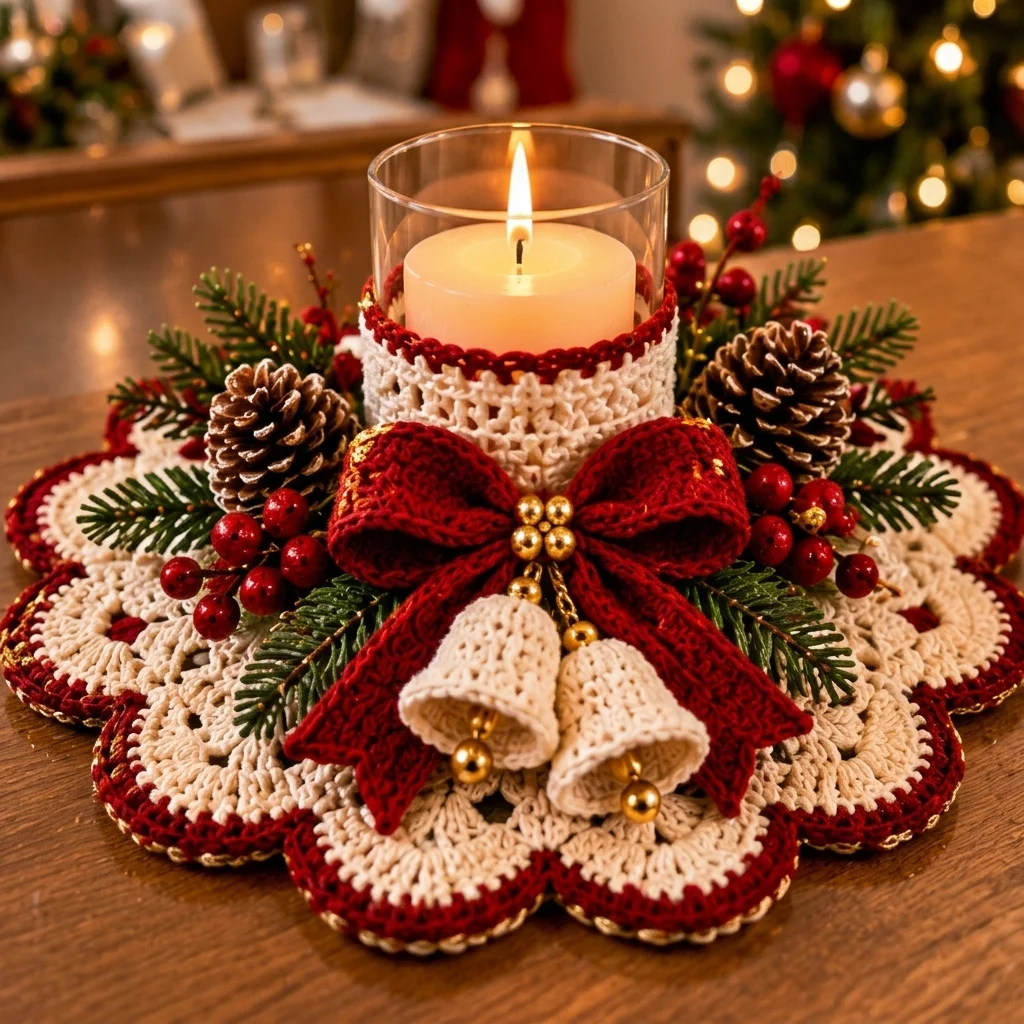
Bring handmade elegance to your holiday table with this beautiful Christmas Crochet Candle Centerpiece. Featuring an intricate ivory scalloped base, rich red crochet bow, delicate hanging bells, decorative pinecones, and evergreen accents, this festive arrangement creates a warm and welcoming Christmas atmosphere.
The centerpiece combines dimensional crochet techniques, textured lacework, layered scalloped petals, and carefully assembled decorative elements. Its traditional red, ivory, green, and gold color palette makes it a timeless addition to Christmas dining tables, mantels, and holiday displays.
Pattern Information
- Skill Level: Advanced
- Finished Diameter: Approximately 38–42 cm
- Finished Height: Approximately 16–20 cm, excluding candle
- Construction: Separate scalloped base, candle sleeve, dimensional bow, bells, and decorative foliage
- Yarn Weight: DK cotton yarn
- Hook Sizes: 2.5 mm, 3 mm, and 3.5 mm
- Colors: Ivory, Christmas red, forest green, and metallic gold
- Terminology: US crochet terms
Materials Needed
- 250–300 g ivory DK cotton yarn
- 100–150 g deep-red DK cotton yarn
- 80–100 g forest-green cotton yarn
- Small amount of metallic gold crochet thread
- 2.5 mm crochet hook
- 3 mm crochet hook
- 3.5 mm crochet hook
- Two small gold decorative bells
- Five small gold beads for the bow center
- Artificial evergreen sprigs and red berries
- Two decorative pinecones
- Clear glass candle hurricane or cylinder
- Battery-operated LED pillar candle
- Stitch markers
- Tapestry needle
- Scissors
- Optional removable fabric stiffener
- Needle and matching sewing thread
Important Safety Note: Use a battery-operated LED candle for this crochet centerpiece. Do not use a burning candle near yarn, ribbons, artificial greenery, or other decorative materials. The photograph shows a flame, but the crochet arrangement should be recreated with a flameless candle.
Crochet Abbreviations
- MR: Magic ring
- ch: Chain
- sl st: Slip stitch
- sc: Single crochet
- hdc: Half double crochet
- dc: Double crochet
- tr: Treble crochet
- dc2tog: Double crochet two together
- picot: Chain 3, slip stitch into first chain
- FO: Fasten off
1. Crochet the Ivory Centerpiece Base
Using ivory yarn and a 3 mm hook, begin with a circular foundation.
Central Foundation
- Round 1: MR, ch 3, work 11 dc into the ring. Join. (12 dc)
- Round 2: Ch 3, work 2 dc in each stitch around. Join. (24 dc)
- Round 3: Ch 3, *1 dc in next stitch, 2 dc in next stitch*. Repeat around. (36 dc)
- Round 4: Ch 3, *1 dc in next 2 stitches, 2 dc in next stitch*. Repeat around. (48 dc)
- Round 5: Ch 3, *1 dc in next 3 stitches, 2 dc in next stitch*. Repeat around. (60 dc)
- Round 6: Ch 3, *1 dc in next 4 stitches, 2 dc in next stitch*. Repeat around. (72 dc)
- Round 7: Ch 3, *1 dc in next 5 stitches, 2 dc in next stitch*. Repeat around. (84 dc)
- Round 8: Ch 3, *1 dc in next 6 stitches, 2 dc in next stitch*. Repeat around. (96 dc)
The foundation should lie flat without curling. Adjust hook size if necessary.
2. Create the Decorative Lace Rounds
The outer lacework gives the centerpiece its delicate, handcrafted appearance.
- Round 9: Ch 4, skip 1 stitch, dc in next stitch. Repeat around to form evenly spaced openwork sections.
- Round 10: Work (2 dc, ch 2, 2 dc) into each ch-1 space.
- Round 11: Work 1 sc between each shell, with ch 5 arches connecting the shells.
- Round 12: Work 7 dc into each ch-5 arch, followed by 1 sc between arches.
- Round 13: Work ch-3 loops between the decorative shell groups.
- Round 14: Work 9 dc into each large arch to create rounded scallops.
Continue adding decorative lace rounds until the base measures approximately 38–42 cm in diameter.
Maintain a flat circular shape by distributing increases evenly.
3. Crochet the Deep-Red Scalloped Border
Join deep-red yarn along the outer edge of the ivory base.
- Round 1: Work sc evenly around the entire perimeter.
- Round 2: Work 1 sc into each stitch, placing additional stitches where necessary to follow the scalloped curves.
- Round 3: Work a decorative picot every 5 stitches.
Fasten off and weave in the ends.
Optional Gold Accent
Using metallic gold thread and a 2.5 mm hook, work slip stitches along the outer red border to create a subtle golden trim.
Keep the metallic thread loose enough to preserve the natural scalloped shape.
4. Crochet the Ivory Candle Sleeve
The candle sleeve wraps around the lower portion of the clear glass cylinder and features decorative lacework with a contrasting red upper edge.
Measure the circumference of your glass cylinder before beginning.
Sleeve Foundation
- Ch a multiple of 6 until the chain fits comfortably around the glass cylinder.
- Join with sl st, taking care not to twist the chain.
- Round 1: Ch 1, sc in each chain around. Join.
- Round 2: Ch 3, dc in each stitch around. Join.
- Round 3: Ch 4, skip 1 stitch, dc in next stitch. Repeat around.
- Round 4: Work (2 dc, ch 2, 2 dc) into each openwork space.
- Round 5: Work sc evenly around.
- Rounds 6–10: Repeat the decorative lace sequence until the sleeve reaches the desired height.
Leave the upper portion of the glass uncovered to maintain the elegant transparent appearance.
Red Upper Trim
- Join red yarn at the upper edge.
- Work 1 round of sc.
- Work a final round of small scallops using (3 dc, sl st) repeated around.
Fasten off and weave in the ends.
5. Crochet the Large Red Decorative Bow
The dimensional red bow is the focal decorative feature on the front of the centerpiece.
Use deep-red yarn and a 3 mm hook.
Bow Loops – Make Two
- Ch 19.
- Row 1: Sc in the second chain from the hook and across. (18 sc)
- Row 2: Ch 3, dc in each stitch across. Turn.
- Rows 3–8: Repeat Row 2.
- Row 9: Ch 1, sc evenly across.
- Fasten off, leaving a long sewing tail.
Fold each rectangular piece into a rounded loop and sew the short edges together.
Bow Tails – Make Two
- Ch 13.
- Row 1: Sc in the second chain from the hook and across. (12 sc)
- Rows 2–20: Ch 1, sc across. Turn.
- Rows 21–24: Decrease one stitch at each edge to create a tapered end.
- Fasten off.
Arrange the bow loops and tails into a symmetrical shape.
Bow Center
Wrap a narrow strip of red crochet around the center of the assembled bow.
Sew five small gold beads securely to the center.
For an elegant finishing touch, add a small amount of metallic gold thread along the outer edges of the bow tails.
6. Crochet the Two Ivory Hanging Bells
Use ivory yarn and a 2.5 mm hook.
Bell Pattern – Make Two
- Round 1: MR, work 6 sc into the ring. (6 sc)
- Round 2: Work 2 sc in each stitch. (12 sc)
- Round 3: *1 sc, 2 sc in next stitch*. Repeat around. (18 sc)
- Rounds 4–7: Sc in each stitch around. (18 sc)
- Round 8: *2 sc, 2 sc in next stitch*. Repeat around. (24 sc)
- Round 9: Work 1 dc in each stitch around. (24 dc)
- Round 10: Work 2 dc in each stitch around to create the flared bell opening. (48 dc)
- Round 11: Work sc evenly around.
Fasten off and weave in the ends.
Add the Gold Bell Clappers
Thread a small gold decorative bell or bead onto a short length of yarn and attach it inside each crocheted bell.
Make sure the gold clapper hangs slightly below the bell opening.
7. Crochet the Evergreen Leaves
Use forest-green yarn and a 2.5 mm hook.
Leaf Pattern – Make Eight to Twelve
- Ch 15.
- Starting in the second chain from the hook, work 1 sc, 1 hdc, 3 dc, 4 tr, 3 dc, 1 hdc, and 1 sc.
- Work 2 sc into the final chain.
- Continue along the opposite side of the foundation chain, mirroring the stitch sequence.
- Join with sl st.
- Work a decorative slip-stitch ridge along the center if desired.
Fasten off, leaving a long sewing tail.
Shape the leaves gently into pointed evergreen-inspired forms.
8. Make the Decorative Red Berries
Using red yarn and a 2.5 mm hook:
- Round 1: MR, 6 sc. (6 sc)
- Round 2: 2 sc in each stitch. (12 sc)
- Round 3: Sc around. (12 sc)
- Round 4: Sc2tog six times. (6 sc)
- Stuff lightly with yarn scraps.
- Close the opening and fasten off.
Make approximately 12–18 berries.
Group the berries in clusters of three or five and arrange them between the greenery and pinecones.
9. Assemble the Christmas Centerpiece
- Place the completed ivory scalloped base flat on a table.
- Position the clear glass cylinder in the center.
- Fit the ivory crochet sleeve around the lower portion of the cylinder.
- Arrange the evergreen leaves around the central candle holder.
- Add decorative pinecones symmetrically on both sides.
- Position the red berry clusters between the leaves.
- Attach the large red crochet bow to the front of the sleeve using removable ties or stitches.
- Secure the two ivory bells beneath the bow.
- Adjust the bow tails so they drape naturally over the scalloped base.
- Place the LED candle inside the glass cylinder.
Keep the decorative pieces removable so the centerpiece can be cleaned and stored easily.
10. Final Shaping and Finishing
- Weave in all remaining yarn ends.
- Block the scalloped base to create smooth, even petals.
- Check that the red border follows the curves neatly.
- Shape the bow loops to create a full, dimensional appearance.
- Adjust the hanging bells so they sit evenly.
- Arrange the greenery and berries for a balanced, festive composition.
- Ensure the glass cylinder is stable and positioned securely in the center.
Advanced Crochet Tips
- Use mercerized cotton for crisp lace stitches and excellent definition.
- Maintain consistent tension throughout the scalloped base.
- Block the lacework before assembling the centerpiece.
- Use a smaller hook for the bells to create a firmer shape.
- Keep the bow loops symmetrical for a professional finish.
- Use removable attachments for decorative greenery and pinecones.
- Choose a flameless candle to protect the crochet materials.
- Store the finished centerpiece flat to preserve its scalloped edges.
Creative Color Variations
- Classic Christmas: Ivory, deep red, forest green, and gold.
- Winter Wonderland: White, silver, and icy blue.
- Rustic Farmhouse: Cream, burgundy, olive green, and bronze.
- Elegant Champagne: Ivory, champagne gold, and sage green.
- Vintage Holiday: Antique cream, cranberry red, and muted evergreen.
Frequently Asked Questions
Is this Christmas crochet centerpiece beginner-friendly?
This is an advanced pattern because it combines lacework, shaped scallops, dimensional crochet elements, decorative bells, and multi-piece assembly.
Can I use acrylic yarn?
Cotton yarn is recommended for stitch definition and blocking. Acrylic may be used for a flameless decorative arrangement, but it can behave differently during shaping.
Can I make the centerpiece larger?
Yes. Add more decorative lace rounds to the circular base while maintaining evenly distributed increases.
Can I use a real candle?
No. For safety, use a battery-operated LED candle. Yarn and decorative materials must not be placed near an open flame.
Can I wash the centerpiece?
The crocheted pieces can be gently hand-washed according to the yarn label. Remove all non-washable decorations before cleaning.
Can I sell finished centerpieces made from this pattern?
Yes. You may sell handmade centerpieces created using these original instructions.
Final Thoughts
This Christmas Crochet Candle Centerpiece with Red Bow and Bells brings together delicate crochet lace, festive colors, and beautiful handmade details.
The scalloped ivory base, dimensional red bow, hanging bells, evergreen foliage, and golden accents create a timeless holiday decoration that looks wonderful on a dining table, mantel, or festive display.
Whether you’re decorating your own home or making a thoughtful handmade gift, this advanced crochet project is a lovely way to celebrate the beauty of traditional holiday craftsmanship.
Save this free Christmas crochet centerpiece pattern to Pinterest and share it with your crochet-loving friends!

