Christmas Crochet Centerpiece with Mini Trees and Candle Holder – Free Advanced Pattern
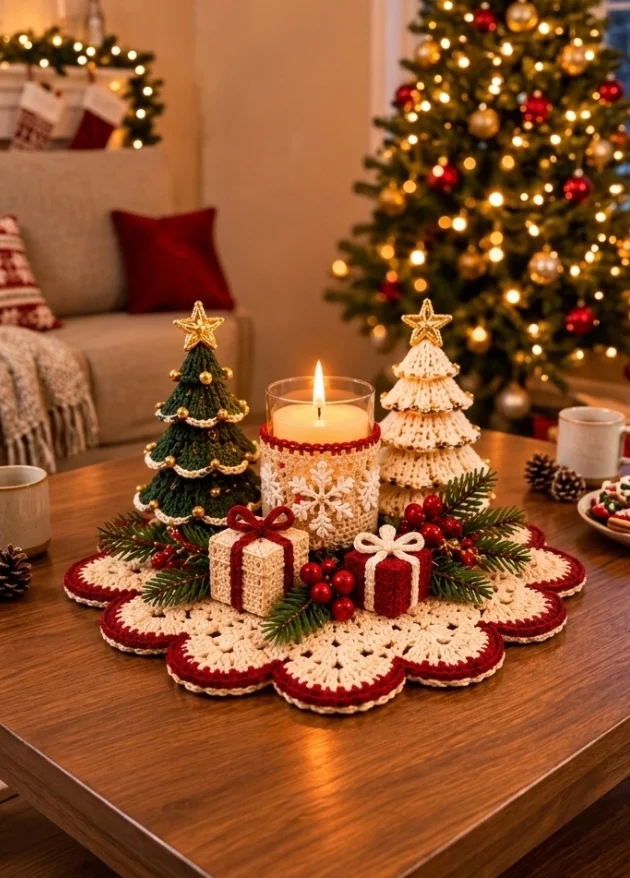
Bring handmade Christmas charm to your holiday table with this beautiful crochet centerpiece featuring two miniature Christmas trees, a decorative candle holder, tiny wrapped presents, festive greenery, and a scalloped lace base.
Inspired by the reference photo, this elegant arrangement combines deep forest green, warm ivory, burgundy red, and delicate gold accents. The layered Christmas trees, textured gift boxes, snowflake candle sleeve, and floral lace mat create a cozy, traditional holiday decoration.
This advanced crochet pattern includes several separately constructed elements, dimensional shaping, decorative stitching, and detailed assembly techniques.
Pattern Information
- Skill Level: Advanced
- Finished Size: Approximately 38–42 cm wide
- Green Tree Height: Approximately 18 cm
- Ivory Tree Height: Approximately 16 cm
- Candle Sleeve Height: Approximately 9 cm
- Gift Box Size: Approximately 5–6 cm
- Construction: Separate crochet components assembled onto a decorative lace mat
- Terminology: US crochet terms
Materials Needed
- DK-weight cotton yarn in ivory, forest green, burgundy red, and gold
- 2.5 mm and 3 mm crochet hooks
- Gold decorative beads
- Small gold star toppers or crocheted stars
- Polyester fiberfill
- Stitch markers
- Tapestry needle
- Scissors
- Rustproof blocking pins
- Small pieces of plastic canvas for gift box structure
- Battery-operated LED pillar candle
- Clear glass candle holder
- Optional artificial greenery and red berries
Safety: Use an LED candle only. Never place a real flame near crochet yarn, decorations, or artificial greenery.
Crochet Abbreviations
- MR: Magic ring
- ch: Chain
- sc: Single crochet
- hdc: Half double crochet
- dc: Double crochet
- tr: Treble crochet
- sl st: Slip stitch
- inc: Increase
- dec: Decrease
- BLO: Back loop only
- FLO: Front loop only
- sp: Space
- rep: Repeat
- FO: Fasten off
1. Crochet the Scalloped Lace Base
Using ivory yarn and a 3 mm crochet hook, begin the decorative circular base.
Round 1: Make a MR. Ch 3, work 11 dc into the ring. Join with sl st. (12 dc)
Round 2: Ch 3, dc in the same stitch, work 2 dc in every stitch around. Join. (24 dc)
Round 3: Ch 3, *2 dc in next stitch, dc in next stitch*; repeat around. Join. (36 dc)
Round 4: Ch 3, dc in next stitch, *2 dc in next stitch, dc in next 2 stitches*; repeat around. Join. (48 dc)
Round 5: Ch 4, skip 1 stitch, dc in next stitch. *Ch 1, skip 1 stitch, dc in next stitch*; repeat around.
Round 6: Work (2 dc, ch 2, 2 dc) into each ch-1 space around.
Round 7: Sl st into the first ch-2 space. Work (3 dc, ch 2, 3 dc) into each ch-2 space around.
Round 8: Work sc along each shell, placing ch-3 spaces between shells.
Round 9: Work 5 dc into each ch-3 space to create a scalloped lace edge.
Round 10: Change to burgundy yarn. Work sc evenly around the scallops.
Round 11: With ivory yarn, work sl st around the outer edge for a delicate finishing detail.
Continue expanding the mat with additional lace rounds if needed until it measures approximately 38–42 cm.
Block the finished base flat before attaching decorations.
2. Crochet the Forest Green Christmas Tree
The first tree features a tall conical shape, layered branches, ivory garlands, gold ornaments, and a star topper.
Tree Body
Using forest green yarn and a 2.5 mm hook:
Round 1: Make a MR and work 6 sc into the ring. (6)
Round 2: Sc around. (6)
Round 3: *Sc 1, inc* repeat around. (9)
Round 4: Sc around. (9)
Round 5: *Sc 2, inc* repeat around. (12)
Round 6: Sc around. (12)
Round 7: *Sc 3, inc* repeat around. (15)
Round 8: Sc around. (15)
Round 9: *Sc 4, inc* repeat around. (18)
Round 10: Sc around. (18)
Continue increasing by 3 stitches every second round until the tree reaches approximately 54 stitches around.
Work one additional round without increases.
Stuff lightly to maintain the conical shape.
Layered Branches
Attach forest green yarn to selected front loops along the tree body.
Work decorative branch rounds using:
*Sc, hdc, 3 dc in next stitch, hdc, sc* repeated around.
Repeat at several heights to create overlapping tiers.
Ivory Garland
Using ivory yarn, crochet a long chain.
Work sl st into each chain to create a narrow cord.
Drape the cord around the tree in gentle scalloped curves and secure with small stitches.
Gold Decorations
Sew small gold beads onto the branch tiers.
Distribute them evenly without overcrowding the design.
3. Crochet the Ivory Christmas Tree
Use ivory yarn and follow the same cone construction as the green tree.
For a smaller tree, stop increasing when the circumference reaches approximately 42 stitches.
Work decorative branch tiers using the same shell stitch pattern.
For fuller branches, work:
(Sc, hdc, 4 dc, hdc, sc) into evenly spaced stitch groups.
Repeat the layered edging from the bottom toward the top.
Lightly stuff the tree and close the bottom with a flat circular crochet piece.
Finish with a gold star topper.
4. Crochet the Gold Star Toppers
Using gold yarn and a 2.5 mm hook:
Round 1: Make a MR, ch 1, work 10 sc into the ring. Join.
Round 2: *Ch 5, sl st in second chain from hook, sc in next chain, hdc in next chain, dc in final chain, skip 1 base stitch, sl st in next base stitch*; repeat five times.
Fasten off.
Make two identical stars.
For a thicker topper, crochet two stars and stitch them together around the edges.
Attach one star to each tree.
5. Crochet the Candle Holder Sleeve
The center of the arrangement features an ivory crochet sleeve decorated with a burgundy border and a white snowflake motif.
Measure the circumference of your glass candle holder before beginning.
Using ivory yarn:
Round 1: Chain enough stitches to fit around the glass holder. Join carefully without twisting.
Rounds 2–4: Ch 1, sc in each stitch around.
Round 5: Ch 3, *skip 1 stitch, dc in next stitch, ch 1*; repeat around.
Round 6: Work dc in each stitch and chain space around.
Rounds 7–9: Repeat the decorative mesh pattern.
Round 10: Work sc around.
Round 11: Change to burgundy yarn and work a decorative sc border.
Fasten off and weave in the ends.
Slide the finished sleeve over the outside of the glass holder.
6. Crochet the Snowflake Decoration
Using ivory yarn:
Round 1: MR, ch 3, work 11 dc into ring. Join. (12 dc)
Round 2: *Ch 5, skip 1 stitch, sc in next stitch*; repeat around to create six loops.
Round 3: Into each ch-5 loop work (sc, ch 3, sc, ch 5, sc, ch 3, sc).
Fasten off and block into a symmetrical six-point snowflake.
Attach the snowflake to the front of the candle sleeve.
Keep all yarn outside the glass holder and use a battery-operated LED candle.
7. Crochet the Miniature Christmas Gift Boxes
Make two small decorative presents using ivory and burgundy yarn.
Gift Box Panels
Using ivory yarn:
Row 1: Ch 13, sc in second chain from hook and across. (12)
Rows 2–12: Ch 1, turn, sc across.
Fasten off.
Make six matching square panels for each box.
Join the panels using sc stitches along the edges.
Before closing the final side, insert a small plastic canvas cube or lightly stuff the box.
Gift Ribbons
Using burgundy yarn, chain approximately 35 stitches.
Sl st along the chain to form a narrow ribbon.
Make two ribbons and cross them around the gift box.
Secure the ribbons at the top.
Gift Bow
Ch 30, join into a loop.
Wrap yarn around the center to create two bow loops.
Attach the bow to the top of the gift.
Repeat with reversed colors for the second present.
8. Crochet Decorative Berries
Using burgundy yarn:
Round 1: MR, 6 sc. (6)
Round 2: Inc in each stitch. (12)
Round 3: Sc around. (12)
Round 4: *Sc 2, dec* repeat around. (9)
Round 5: *Sc 1, dec* repeat around. (6)
Stuff lightly, close the opening, and weave in the ends.
Make approximately 12–18 berries.
Arrange the berries in small clusters around the candle and Christmas trees.
9. Crochet Mini Evergreen Sprigs
Using forest green yarn:
Ch 20.
Starting in the second chain from the hook, work sl st into the next 3 chains.
*Ch 6, sl st back along 5 chains, sl st into the next foundation chain*; repeat along the foundation chain.
Make several evergreen sprigs of different lengths.
For a fuller appearance, combine two or three sprigs into each cluster.
Arrange them around the base of the candle holder and beneath the miniature presents.
10. Assemble the Christmas Centerpiece
- Lay the finished scalloped lace mat flat on the table.
- Position the glass candle holder in the center.
- Place the forest green Christmas tree to the left of the candle.
- Place the ivory Christmas tree to the right.
- Arrange the miniature gift boxes toward the front.
- Add the crocheted evergreen sprigs around the central arrangement.
- Position the burgundy berry clusters between the trees and presents.
- Adjust the decorations until the arrangement appears balanced.
- Secure lightweight crochet elements with removable stitches if desired.
- Insert the LED candle into the glass holder.
For the closest resemblance to the photograph, keep the candle as the central focal point, with the green tree slightly taller than the ivory tree.
11. Finishing and Blocking
Block the lace mat separately before assembling the centerpiece.
Shape the tree branches with your fingers to emphasize their layered texture.
Adjust the star toppers so they stand upright.
Weave in all yarn ends securely.
Ensure the miniature presents sit flat and the decorations remain stable.
Advanced Crochet Tips
- Use cotton yarn for defined stitches and structured decorations.
- Choose a smaller hook for firmer miniature shapes.
- Stuff the Christmas trees lightly to avoid distorting the branches.
- Use plastic canvas inside the gift boxes for sharper corners.
- Block the lace mat before placing decorations on it.
- Keep the trees symmetrical while allowing natural variation in branch tiers.
- Use metallic gold yarn sparingly for elegant accents.
- Keep the arrangement low enough for comfortable conversation across a dining table.
- Use an LED candle to avoid heat and fire hazards.
Color Variations
- Traditional Christmas: Forest green, ivory, burgundy, and gold.
- Winter Wonderland: White, silver, and icy blue.
- Rustic Farmhouse: Cream, sage green, and muted red.
- Elegant Gold: Champagne, ivory, and antique gold.
- Nordic Christmas: White, deep red, and natural beige.
- Vintage Holiday: Dusty rose, olive green, and warm cream.
Frequently Asked Questions
Is this Christmas crochet centerpiece suitable for beginners?
This is an advanced project involving multiple shaped pieces, decorative lace, dimensional trees, and detailed assembly.
Can I use a real candle?
No. Use a battery-operated LED candle to prevent fire hazards around yarn and decorative greenery.
Can I make the centerpiece larger?
Yes. Add more rounds to the lace mat and increase the dimensions of the Christmas trees.
What yarn works best?
DK-weight cotton yarn provides excellent stitch definition and enough structure for the miniature decorations.
Can I make the Christmas trees separately?
Yes. The trees can be used as individual holiday decorations on shelves, mantels, or side tables.
Can I wash the centerpiece?
Wash the crochet pieces separately according to the yarn care instructions. Remove all beads, structural inserts, and non-crochet decorations when necessary.
How long does this project take?
The time depends on experience, yarn choice, and the amount of decorative detail. Allow several crafting sessions for the individual pieces and assembly.
Final Thoughts
This Christmas Crochet Centerpiece with Mini Trees and Candle Holder brings warmth, texture, and handmade elegance to holiday decorating.
With its delicate ivory lace base, miniature Christmas trees, festive gift boxes, snowflake candle sleeve, and rich traditional colors, it creates a charming centerpiece for Christmas dinners and seasonal gatherings.
Make it for your own holiday table or give it as a thoughtful handmade gift to someone who loves crochet decorations.
Save this free Christmas crochet centerpiece pattern to Pinterest and share it with your crochet-loving friends!
Pattern note: This is an original, untested interpretation inspired by the reference photograph. Some components are adaptable construction guides rather than fully stitch-count-verified instructions. Test the tree shaping, lace-base expansion, and candle-sleeve fit before making the complete centerpiece.

