Christmas Crochet Coaster Pattern
Beginner Friendly
Perfect for those just starting their crochet journey, with clear instructions and simple techniques
Single-Day Project
A satisfying project you can complete in a single afternoon or evening.
Handmade Gift
A beautiful keepsake — free forever. Read online or print at home.
About This Christmas Crochet Coaster Pattern
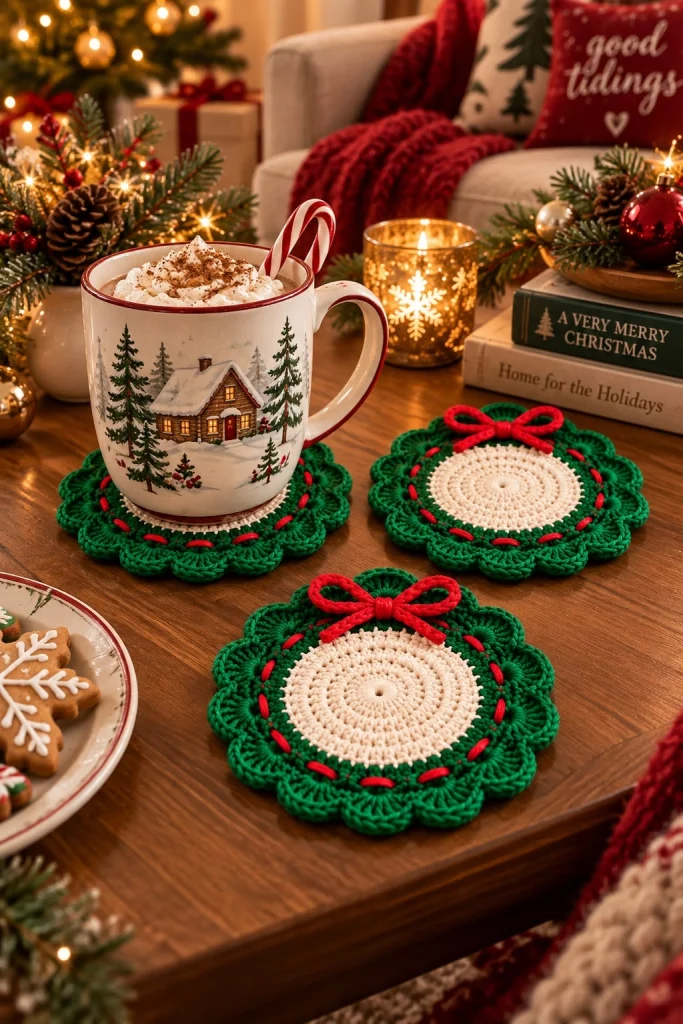
These Christmas crochet wreath coasters bring a cozy handmade touch to holiday coffee tables. Each coaster features a flat creamy center surrounded by a rich evergreen crochet border, decorative red ribbon-style stitches and a small dimensional crochet bow.
The finished design resembles a miniature Christmas wreath while remaining flat enough to comfortably hold mugs, glasses and holiday drinks. Make a matching set for your own Christmas table or bundle four together as a handmade holiday gift.
Materials
- Cream cotton yarn 25–30 g per coaster
- Christmas green cotton yarn 20–25 g per coaster
- Bright red cotton yarn 8–10 g per coaster
- 3.5–4.0 mm crochet hook 1
- Yarn needle 1
- Scissors 1 pair
- Stitch marker optional
Abbreviations – US Terms
MRmagic ringchchainsl stslip stitchscsingle crochethdchalf double crochetdcdouble crochettrtreble crochetinc2 stitches in same stitchFOfasten offFinished Size
Each finished coaster measures approximately 13–15 cm / 5–6 in across, including the green scalloped border.
The cream center should remain large enough for an average coffee mug while the decorative green edge remains visible around it.
Part 1 – Cream Center
Using cream yarn:
Round 1: Make MR, ch 2, work 12 dc into ring. Join with sl st. (12)
Round 2: ch 2, 2 dc in each stitch around. Join. (24)
Round 3: ch 2, *1 dc, 2 dc in next stitch* around. Join. (36)
Round 4: ch 2, *2 dc, 2 dc in next stitch* around. Join. (48)
Part 2 – Continue the Cream Circle
Round 5: ch 2, *3 dc, 2 dc in next stitch* around. Join. (60)
Round 6: ch 1, sc evenly around. Join with sl st.
FO cream yarn.
Lay the circle flat and gently shape it with your fingers.
Part 3 – Start the Green Wreath Border
Join Christmas green yarn into any stitch of Round 6.
Round 7: ch 1, sc in each stitch around. Join.
Round 8: ch 2, work hdc evenly around, increasing approximately every 5–6 stitches if necessary to keep the coaster perfectly flat.
Join with sl st.
Part 4 – Decorative Green Texture
Round 9: ch 1.
Work:
*sc, skip 1 stitch, 5 dc in next stitch, skip 1 stitch, sc in next stitch*
Repeat around.
This begins the rounded wreath-like scallops around the outside.
Part 5 – Deepen the Scalloped Border
For a fuller border similar to the inspiration, work an additional decorative round.
Sl st toward the center of the first shell.
Work:
*sc between shells, 2 hdc, 3 dc, 2 hdc across the top of each shell*
Repeat around.
Join and FO.
Part 6 – Red Ribbon Detail
Thread a yarn needle with a long strand of red yarn.
Beginning from the back, weave the red yarn over and under the stitches near the inner edge of the green wreath.
Keep approximately the same distance between each visible red section.
Continue around the entire coaster.
Bring both ends to the back and secure them.
Part 7 – Crochet the First Bow Loop
Using red yarn:
Ch 14.
Sl st into the first chain to form a loop.
Work approximately 18 sc evenly around the chain loop.
Join and FO.
This forms the first rounded bow loop.
Part 8 – Second Bow Loop
Repeat Part 7 to create a second matching loop.
Place the two loops side by side.
Use red yarn to sew their inner edges together.
Do not flatten the loops completely; keep them slightly raised for a soft dimensional bow.
Part 9 – Bow Center
Using red yarn:
Ch 6.
Starting in 2nd ch from hook, sc across. (5)
Ch 1 and turn.
Sc across for another 2–3 rows.
FO, leaving a sewing tail.
Wrap this small rectangle around the center of the two bow loops.
Sew securely at the back.
Part 10 – Optional Bow Tails
If you prefer a fuller bow, make two short tails.
Ch 9.
Starting in 2nd ch:
1 sc in each chain across.
FO.
Repeat for the second tail.
Sew the tails behind the bow center at a slight downward angle.
Part 11 – Attach the Bow
Position the finished red bow at the top edge of the coaster.
The bow should sit partly over the green scalloped border without covering too much of the cream center.
Sew through the back of the bow center and into several green stitches.
Secure firmly.
Part 12 – Final Shaping
Lay the coaster on a flat surface.
Arrange each green scallop evenly around the circle.
Shape the bow loops with your fingers.
Check that the cream center remains flat and that the bow does not interfere with the area where the mug will sit.
Part 13 – Blocking
Lightly dampen the coaster.
Place it flat on a blocking mat or folded towel.
Gently stretch the cream center into a smooth circle.
Arrange every green scallop evenly.
Allow the coaster to dry completely before removing it.
Make a Set of Four
For a matching Christmas coffee-table set, make 4 identical coasters.
You can also create subtle variations:
- 2 cream-center wreath coasters with red bows
- 1 red-center coaster with cream details
- 1 green-and-cream coaster without a bow
Keeping the same yarn palette makes the whole set coordinate beautifully.
Color Palette
Evergreen: deep classic Christmas green.
Cream: warm ivory rather than stark white.
Red: rich Christmas red or cranberry.
This traditional three-color palette works especially well with natural wood tables, Christmas mugs and warm holiday decorations.
Alternative Color Ideas
Vintage Christmas: forest green, burgundy and antique cream.
Nordic Christmas: cream, muted red and sage green.
Elegant Holiday: dark green, ivory and metallic gold.
Candy Cane: bright red, white and emerald green.
Winter Neutral: oatmeal, cream, taupe and deep pine.
Gift Set Idea
Stack four finished coasters together.
Tie them with a red ribbon or a length of natural twine.
Add a small handmade gift tag.
Pair the set with a Christmas mug, hot chocolate mix or coffee for a cozy handmade holiday gift.
Care Instructions
For cotton yarn, gently hand wash the coasters in cool or lukewarm water.
Press excess water out with a towel without twisting.
Reshape the scallops and bow while damp.
Lay flat to dry.
Avoid machine drying if you want the decorative edge and bow to keep their shape.
Frequently Asked Questions
Yes. A confident beginner who can crochet in the round and work basic stitches such as single crochet, half double crochet and double crochet should be able to complete them.
Cotton is the best choice because it is absorbent, heat tolerant for normal drinkware and gives the coaster good stitch definition.
The cream center should comfortably support the bottom of your mug. For most mugs, approximately 9–10 cm / 3.5–4 in before the decorative green border works well.
Yes. The coaster can be finished as a simple green Christmas wreath without the bow, or you can replace it with a small poinsettia, holly leaves or a tiny crochet bell.
A wavy coaster usually has too many increases. Reduce the number of increases in the final cream or green rounds and block the finished coaster flat.
Curling usually means there are too few stitches or your tension is too tight. Add a small number of evenly spaced increases or use a slightly larger crochet hook.
Yes. Make a smaller version with lighter yarn and add a hanging loop to create miniature crochet wreath ornaments.
Finished handmade coaster sets work especially well as Christmas craft-fair items, stocking fillers and small holiday gift sets.
The finished Christmas Crochet Coaster Pattern

