Christmas Crochet Door Hanging with Holly, Pinecone and Red Ornament – Free Pattern
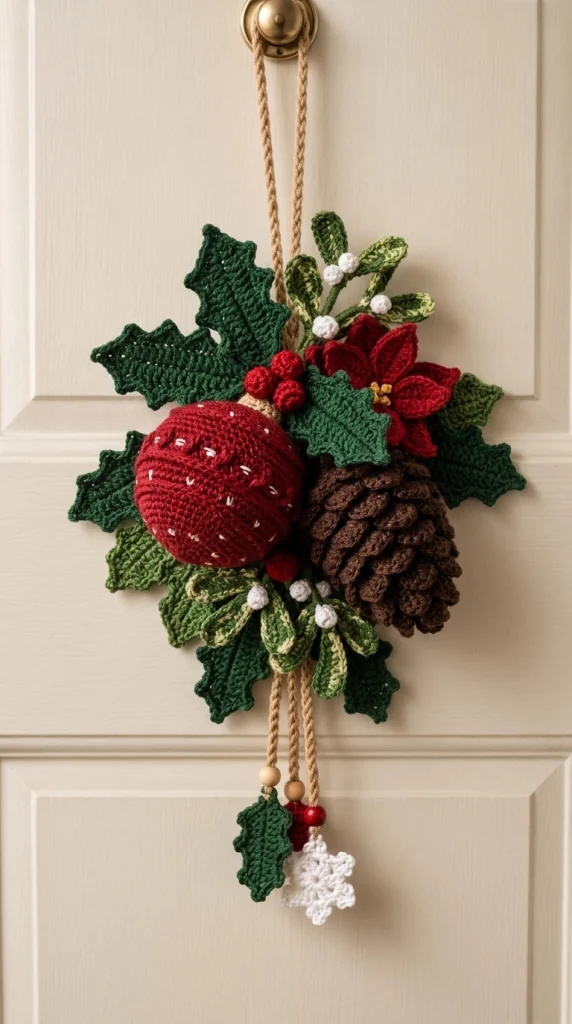
Bring handmade Christmas charm to your home with this beautiful Christmas crochet door hanging. Featuring deep green holly leaves, bright red berries, a textured brown pinecone, a festive red ornament, delicate mistletoe sprigs, and a rich red poinsettia flower, this decoration captures the warmth and beauty of the holiday season.
The arrangement is suspended from a rustic braided hanging cord and finished with three dangling decorative strands featuring wooden beads, a crochet holly leaf, and a delicate white snowflake. Its natural woodland-inspired colors make it a lovely alternative to a traditional Christmas wreath.
This free crochet pattern shows you how to create each decorative element separately before assembling them into an elegant holiday door hanging.
Design Note: This is an original crochet interpretation inspired by the reference photograph. Exact stitch counts and construction details cannot be determined from the image alone.
Pattern Information
- Skill Level: Intermediate to Advanced
- Finished Height: Approximately 45–55 cm (18–22 inches), including hanging cords
- Arrangement Width: Approximately 25–30 cm (10–12 inches)
- Yarn Weight: DK or light worsted-weight cotton yarn
- Hook Sizes: 2.5 mm, 3 mm, and 3.5 mm
- Terminology: US crochet terms
- Construction: Individual crochet motifs assembled onto a reinforced backing
- Estimated Time: 12–18 hours
Materials Needed
- Dark forest green cotton yarn
- Medium olive green cotton yarn
- Light sage green cotton yarn
- Christmas red cotton yarn
- Deep burgundy yarn for the poinsettia
- Dark brown yarn for the pinecone
- Cream or white yarn for mistletoe berries and snowflake
- Small amount of golden yellow yarn for the flower center
- Natural beige or jute-colored yarn for hanging cords
- 2.5 mm crochet hook
- 3 mm crochet hook
- 3.5 mm crochet hook
- Polyester fiberfill
- Yarn needle
- Stitch markers
- Scissors
- Small wooden beads
- One red decorative bead
- Floral wire or pipe cleaners, optional
- Small felt backing or firm crochet backing
- Hot glue, optional for non-washable decorative use
Crochet Abbreviations
- ch: Chain
- sc: Single crochet
- hdc: Half double crochet
- dc: Double crochet
- tr: Treble crochet
- sl st: Slip stitch
- st: Stitch
- inc: Increase
- dec: Invisible decrease
- MR: Magic ring
- BLO: Back loop only
- FLO: Front loop only
- FO: Fasten off
Part 1: Crochet the Large Holly Leaves
The dark green holly leaves create the main structure of the arrangement.
Make approximately 6–8 large holly leaves.
Foundation
Using dark forest green yarn and a 3 mm hook:
Ch 19.
Round 1
Sc in the second chain from the hook.
Hdc in the next 3 chains.
Dc in the next 10 chains.
Hdc in the next 3 chains.
Work 3 sc into the final chain.
Continue along the opposite side of the foundation chain.
Repeat the stitch sequence in reverse.
Join with a sl st.
Round 2: Holly Points
Work sc along the first section of the leaf.
At regular intervals, create pointed edges using:
Ch 3, sl st into the second chain from the hook, sc in the next chain.
Continue working sc along the leaf edge.
Repeat to create approximately 3 pointed sections on each side.
Round 3: Leaf Definition
Work slip stitches around the outer edge to strengthen the shape.
FO and leave a long tail for sewing.
Embroidered Veins
Using matching green yarn, embroider a central vein from the base to the tip.
Add smaller diagonal veins on both sides.
Optional: Insert thin floral wire through the back of each leaf to help maintain its shape.
Part 2: Crochet the Smaller Green Leaves
Make approximately 5–7 smaller leaves using medium green and olive green yarn.
Foundation
Ch 13.
Round 1
Sc in the second chain from the hook.
Hdc in the next 2 chains.
Dc in the next 6 chains.
Hdc in the next 2 chains.
Work 3 sc in the final chain.
Continue along the opposite side.
Repeat the stitch sequence in reverse.
Round 2
Work sc evenly around the leaf.
Add small pointed sections if desired.
FO and leave a long sewing tail.
These smaller leaves will fill the spaces between the larger holly leaves and the central ornaments.
Part 3: Crochet the Large Red Christmas Ornament
The round red ornament is one of the main focal points of the decoration.
Using Christmas red yarn and a 3 mm hook:
Round 1
6 sc in MR. (6)
Round 2
Inc in each stitch around. (12)
Round 3
(1 sc, inc) repeat around. (18)
Round 4
(2 sc, inc) repeat around. (24)
Round 5
(3 sc, inc) repeat around. (30)
Round 6
(4 sc, inc) repeat around. (36)
Round 7
(5 sc, inc) repeat around. (42)
Rounds 8–13
Sc in each stitch around. (42)
Round 14
(5 sc, dec) repeat around. (36)
Round 15
(4 sc, dec) repeat around. (30)
Round 16
(3 sc, dec) repeat around. (24)
Begin stuffing firmly with polyester fiberfill.
Round 17
(2 sc, dec) repeat around. (18)
Round 18
(1 sc, dec) repeat around. (12)
Round 19
Dec around. (6)
FO and close the opening.
Decorative Details
Using white yarn and a needle, embroider small scattered stitches across the red ornament.
These little white accents imitate the delicate speckled details visible in the reference design.
Part 4: Crochet the Textured Brown Pinecone
The brown pinecone adds natural woodland texture and dimension.
Using dark brown yarn and a 3 mm hook:
Base
Round 1: 6 sc in MR. (6)
Round 2: Inc around. (12)
Round 3: (1 sc, inc) repeat around. (18)
Rounds 4–10: Sc in each stitch around. (18)
Round 11: (1 sc, dec) repeat around. (12)
Stuff lightly.
Round 12: Dec around. (6)
FO and close.
Pinecone Scales
Join dark brown yarn to the surface of the pinecone.
Work small overlapping crochet scales using:
Ch 3, 2 dc into the same surface stitch, ch 2, sl st into the same stitch.
Repeat in staggered rows around the pinecone.
Continue until the entire pinecone is covered with layered scales.
For a more realistic appearance, use slightly different shades of brown yarn.
Part 5: Crochet the Red Poinsettia Flower
The small burgundy poinsettia creates a festive floral accent near the top of the arrangement.
Make one poinsettia flower.
Flower Center
Using golden yellow yarn:
Round 1: 6 sc in MR.
FO.
Petals
Join burgundy yarn to the flower center.
For each petal:
Ch 7.
Sc in the second chain from the hook.
Hdc in the next stitch.
Dc in the next 3 stitches.
Hdc in the final chain.
Sl st back into the flower center.
Repeat to create 5–6 pointed petals.
Finishing
Embroider small golden knots in the center.
Shape the petals gently with your fingers.
Part 6: Crochet the Red Holly Berries
Make approximately 8–12 small red berries.
Using bright red yarn and a 2.5 mm hook:
Round 1
6 sc in MR. (6)
Round 2
Inc around. (12)
Round 3
Sc around. (12)
Round 4
Dec around. (6)
Stuff lightly if needed.
FO and close.
Arrange the berries in small groups of three around the holly leaves.
Part 7: Crochet the Mistletoe Sprigs
The mistletoe adds a softer green texture and delicate white berries.
Make 2–3 small mistletoe sprigs.
Mistletoe Leaves
Using sage green yarn:
Ch 10.
Sc in the second chain from the hook.
Hdc in the next 2 chains.
Dc in the next 4 chains.
Hdc in the next chain.
Work 3 sc in the final chain.
Continue along the opposite side.
Repeat the sequence in reverse.
FO.
White Berries
Using white yarn:
Round 1: 5 sc in MR.
Round 2: Sc around.
FO and close.
Make approximately 6–9 white berries.
Assembly
Attach the white berries to short green stems.
Arrange the mistletoe leaves around them.
Use several shades of green to create a natural appearance.
Part 8: Create the Braided Hanging Cord
The rustic beige hanging cord supports the entire decoration.
Step 1
Cut three strands of beige cotton yarn, each approximately 90 cm long.
Step 2
Hold the strands together and tie a secure knot at one end.
Step 3
Braid the strands tightly and evenly.
Step 4
Secure the opposite end with another knot.
Step 5
Fold the braided cord into a hanging loop.
Step 6
Attach both ends securely to the reinforced backing of the arrangement.
Important: Use a strong cotton cord and reinforce the attachment points to support the weight of the finished decoration.
Part 9: Create the Three Dangling Decorative Strands
Three hanging strands complete the woodland Christmas look.
Step 1
Cut three beige yarn cords of different lengths:
- Short cord: approximately 12 cm
- Medium cord: approximately 16 cm
- Long cord: approximately 20 cm
Step 2
Attach each cord to the bottom of the main arrangement.
Step 3
Thread wooden beads onto the cords.
Step 4
Attach a small crochet holly leaf to one strand.
Step 5
Attach a small red berry decoration to another strand.
Step 6
Attach a white crochet snowflake to the longest strand.
Adjust the cords so the ornaments hang at slightly different heights.
Part 10: Crochet the Small White Snowflake
Using white cotton yarn and a 2.5 mm hook:
Round 1
Make a magic ring.
Ch 3.
Work 11 dc into the ring.
Join with a sl st.
Round 2
Ch 1.
Sc in the first stitch.
Ch 5.
Sl st into the second chain from the hook.
Sc in the next chain.
Ch 3.
Sl st into the second chain from the hook.
Sc in the next chain.
Sl st into the next available stitch of the center.
Repeat around to form six decorative snowflake points.
FO and weave in the ends.
Lightly block the snowflake to emphasize its shape.
Part 11: Assemble the Christmas Door Hanging
Before attaching the decorations permanently, arrange all the crochet pieces on a flat surface.
Step 1: Position the Backing
Use a small oval or circular felt backing approximately 12–15 cm wide.
Alternatively, crochet a firm backing using single crochet stitches.
Step 2: Arrange the Large Leaves
Place the dark green holly leaves around the outer edges.
Angle the leaves outward to create a full, natural shape.
Step 3: Position the Red Ornament
Place the large red crochet ornament slightly to the left of center.
Step 4: Position the Pinecone
Place the brown pinecone slightly to the right of center.
Allow the pinecone to overlap some of the surrounding leaves.
Step 5: Add the Poinsettia
Position the burgundy poinsettia above the pinecone.
Step 6: Add the Mistletoe
Arrange the mistletoe sprigs around the upper and lower sections.
Step 7: Add the Red Berries
Group the red berries in small clusters between the leaves.
Step 8: Fill the Gaps
Use smaller green leaves to fill any visible spaces.
Step 9: Secure the Decorations
Sew each element firmly onto the backing.
For heavier ornaments, sew through the base several times to create a strong attachment.
Step 10: Attach the Hanging Cords
Secure the main hanging loop to the upper backing.
Attach the three decorative dangling strands to the bottom.
Part 12: Final Finishing
- Weave in all loose yarn ends.
- Check that every decorative element is securely attached.
- Adjust the holly leaves to create a balanced arrangement.
- Gently reshape the pinecone scales.
- Position the mistletoe berries naturally.
- Check that the red ornament is firmly secured.
- Straighten the hanging cords.
- Adjust the wooden beads.
- Block the snowflake if necessary.
- Check that the finished decoration hangs evenly.
Creative Christmas Color Variations
Traditional Christmas
Forest green, bright red, deep burgundy, white, and natural brown.
Rustic Woodland
Olive green, dark brown, cranberry red, and warm cream.
Elegant Winter White
Ivory, champagne gold, sage green, and soft beige.
Vintage Christmas
Muted red, dusty green, antique gold, and oatmeal.
Scandinavian Christmas
Natural cream, deep green, soft red, and light wooden accents.
Festive Burgundy
Wine red, pine green, dark brown, and gold.
Helpful Crochet Tips
- Use cotton yarn for crisp stitch definition.
- Keep your stitches firm when making stuffed ornaments.
- Stuff the red ornament evenly to maintain its round shape.
- Do not overstuff the pinecone.
- Use different green shades for a more natural woodland appearance.
- Arrange all motifs before sewing them together.
- Use floral wire inside larger leaves if additional structure is needed.
- Keep the main ornament and pinecone as the central focal points.
- Attach heavier pieces directly to the backing.
- Use smaller leaves to hide attachment points.
- Keep the hanging cords evenly balanced.
- Reinforce the main hanging loop.
- Use a yarn needle rather than relying entirely on glue.
- Lightly block the leaves and snowflake.
- Keep the decoration away from open flames and excessive moisture.
Frequently Asked Questions
Is this Christmas crochet door hanging beginner-friendly?
This project is best suited to intermediate crocheters because it involves amigurumi, shaped leaves, floral motifs, and assembling multiple decorative pieces.
Can I make this decoration without the pinecone?
Yes. You can replace the pinecone with another crochet ornament, a small Christmas bell, or additional holly leaves.
Can I make the decoration larger?
Absolutely. Use thicker yarn, a larger hook, and additional leaves to create a fuller arrangement.
Can I use acrylic yarn?
Yes. Acrylic yarn works well, although cotton generally provides firmer stitch definition for decorative leaves.
How do I make the leaves hold their shape?
Use firm stitches, block the finished leaves, or add thin floral wire to the back.
Can I hang this decoration outdoors?
It is best displayed indoors or on a protected covered porch. Rain, snow, and direct sunlight may damage the yarn and decorative details.
Can I replace the red ornament with a Christmas bauble?
Yes. You can crochet a smaller bauble or use a lightweight decorative ornament.
Can I make this as a Christmas gift?
Absolutely. This handmade door hanging makes a thoughtful holiday gift for friends, family, and crochet lovers.
Can I sell finished decorations made from this pattern?
Yes. You may sell handmade decorations created using this pattern. Credit to the pattern designer is appreciated.
How should I store the decoration after Christmas?
Store it flat in a dry box with tissue paper around the ornaments to protect their shape.
Care Instructions
- Dust gently with a soft brush.
- Spot clean when necessary.
- Avoid machine washing assembled decorations containing beads or wire.
- Do not wring or twist.
- Allow to air dry completely.
- Keep away from open flames.
- Avoid prolonged exposure to direct sunlight.
- Store flat in a cool, dry place.
- Protect the pinecone scales from crushing.
- Reshape the leaves gently before displaying again.
Final Thoughts
This Christmas crochet door hanging with holly, pinecone, and red ornament is a charming way to bring handmade holiday warmth into your home. The layered green leaves, textured brown pinecone, cheerful red ornament, mistletoe sprigs, and delicate hanging snowflake create a beautiful woodland-inspired Christmas decoration.
Unlike a traditional circular wreath, this compact floral arrangement offers a unique and elegant alternative for decorating doors, entryways, cabinets, and festive corners.
Love this Christmas crochet project? Save this free Christmas crochet door hanging pattern to Pinterest and share it with your crochet friends for more beautiful handmade holiday decorating inspiration!

