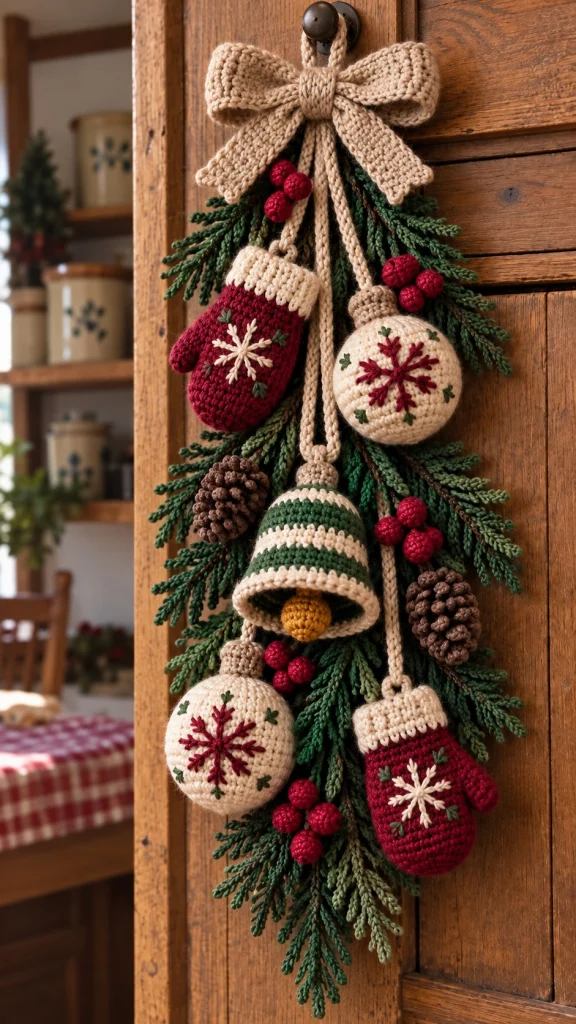
Christmas Crochet Door Swag Pattern – Cozy Mittens, Ornaments & Festive Bell
Nothing makes a home feel more welcoming at Christmas than a beautiful handmade decoration. This rustic Christmas crochet door swag combines classic holiday colors, cozy yarn textures, and charming winter details into one festive hanging arrangement.
With two burgundy crochet mittens, two cream snowflake ornaments, a green-and-ivory striped Christmas bell, pinecones, bright red berries, evergreen branches, and an oversized cream crochet bow, this decoration brings a warm farmhouse Christmas feeling to any doorway.
Whether you love making Christmas decorations for your own home or creating thoughtful handmade gifts, this is a wonderful seasonal crochet project.
Pattern note: This is an original, untested crochet interpretation inspired by the pictured decoration, not an exact reconstruction. The instructions below provide a practical starting point for recreating its individual components and overall arrangement.
Project Overview
- Project: Rustic Christmas Crochet Door Swag
- Skill Level: Intermediate
- Estimated Size: 45–60 cm long, depending on assembly
- Yarn: Worsted weight cotton or acrylic
- Hook: 3.5 mm or 4 mm
- Terminology: US crochet terms
- Main Colors: Burgundy, ivory, forest green, brown, and gold
- Style: Rustic farmhouse Christmas
Materials Needed
- Burgundy red yarn for the mittens and embroidered details
- Ivory yarn for the bow, ornaments, mitten cuffs, and bell stripes
- Forest green yarn for the bell and evergreen branches
- Brown yarn for pinecones and ornament caps
- Golden yellow yarn for the bell clapper
- Small amounts of red yarn for berries
- 3.5 mm crochet hook
- Yarn needle and scissors
- Stitch markers
- Polyester fiberfill
- Optional lightweight floral wire for shaping the branches
- Optional felt backing for assembly
- Sturdy hanging hook
Crochet Abbreviations
- MR: Magic ring
- ch: Chain
- sc: Single crochet
- hdc: Half double crochet
- dc: Double crochet
- sl st: Slip stitch
- inc: 2 sc in one stitch
- dec: Single crochet decrease
- FLO: Front loop only
- BLO: Back loop only
- FO: Fasten off
Part 1 – Crochet the Burgundy Christmas Mittens
The two deep burgundy mittens are among the most charming features of this Christmas door hanging. Each mitten has a rounded shape, a small thumb, a thick ivory cuff, and an embroidered snowflake.
Mitten Body – Make Two
Use burgundy yarn. Work in continuous rounds unless otherwise stated.
Round 1: 6 sc in MR. (6)
Round 2: Inc around. (12)
Round 3: (1 sc, inc) repeat 6 times. (18)
Round 4: (2 sc, inc) repeat 6 times. (24)
Round 5: (3 sc, inc) repeat 6 times. (30)
Rounds 6–14: Sc around. (30)
Creating the Thumb Opening
Round 15: Sc in the first 5 stitches, ch 5, skip 5 stitches, sc in the remaining 20 stitches. (30 stitches and chains)
Rounds 16–23: Sc around. (30)
FO, leaving a tail for sewing.
Crochet the Thumb
Join burgundy yarn at the thumb opening.
Work approximately 10 sc evenly around the opening.
Rounds 1–5: Sc around. (10)
Round 6: Dec 5 times. (5)
FO and close the opening.
Shape the thumb gently.
Ivory Mitten Cuff
Use ivory yarn.
Ch 9.
Row 1: Sc in the second chain from the hook and across. (8)
Rows 2–30: Ch 1, turn, sc in BLO across. (8)
Wrap the ribbed strip around the mitten opening.
Join the short ends to form a cuff and sew it securely to the mitten.
Repeat for the second mitten.
Embroidered Snowflakes
Using ivory yarn and a yarn needle, embroider a six-point snowflake on the front of each mitten.
Begin with six straight stitches radiating from the center, then add short diagonal branches near the tips.
Add a few tiny green embroidery stitches around the snowflake to recreate the festive details visible in the design.
Part 2 – Crochet the Cream Christmas Ornaments
The decoration includes two beautiful cream-colored round ornaments embroidered with burgundy snowflakes and tiny green accents.
Round Ornament – Make Two
Use ivory yarn.
Round 1: 6 sc in MR. (6)
Round 2: Inc around. (12)
Round 3: (1 sc, inc) repeat 6 times. (18)
Round 4: (2 sc, inc) repeat 6 times. (24)
Round 5: (3 sc, inc) repeat 6 times. (30)
Round 6: (4 sc, inc) repeat 6 times. (36)
Rounds 7–12: Sc around. (36)
Round 13: (4 sc, dec) repeat 6 times. (30)
Round 14: (3 sc, dec) repeat 6 times. (24)
Round 15: (2 sc, dec) repeat 6 times. (18)
Begin stuffing the ornament.
Round 16: (1 sc, dec) repeat 6 times. (12)
Round 17: Dec 6 times. (6)
FO and close the opening.
Ornament Cap
Use brown or taupe yarn.
Round 1: 6 sc in MR. (6)
Round 2: Inc around. (12)
Rounds 3–4: Sc around. (12)
FO and sew the cap onto the top of the ornament.
Attach a short cream hanging loop.
Embroidered Burgundy Snowflake
Use burgundy yarn to embroider a large six-point snowflake on the front of each ornament.
Add short branches along each arm of the snowflake.
Embroider several tiny forest-green accents around the snowflake for a traditional Christmas appearance.
Part 3 – Crochet the Green and Ivory Christmas Bell
The center bell is decorated with alternating green and ivory stripes and a golden clapper hanging inside.
Bell Body
Begin with forest green yarn.
Round 1: 6 sc in MR. (6)
Round 2: Inc around. (12)
Round 3: (1 sc, inc) repeat 6 times. (18)
Round 4: (2 sc, inc) repeat 6 times. (24)
Rounds 5–7: Sc around. (24)
Round 8: (3 sc, inc) repeat 6 times. (30)
Rounds 9–11: Sc around. (30)
Round 12: (4 sc, inc) repeat 6 times. (36)
Rounds 13–15: Sc around. (36)
Round 16: (5 sc, inc) repeat 6 times. (42)
Rounds 17–19: Sc around. (42)
Round 20: (6 sc, inc) repeat 6 times. (48)
Rounds 21–23: Sc around. (48)
Change between ivory and green yarn every two or three rounds to create the striped design.
Finish with an ivory border.
Scalloped Bell Edge
Attach ivory yarn to the lower edge.
*Sl st in next stitch, skip 1 stitch, 5 dc in next stitch, skip 1 stitch, sl st in next stitch, sl st in next stitch.* Repeat 8 times around the 48-stitch opening.
Join and FO.
Golden Bell Clapper
Use golden yellow yarn.
Round 1: 6 sc in MR. (6)
Round 2: Inc around. (12)
Round 3: (1 sc, inc) repeat 6 times. (18)
Rounds 4–5: Sc around. (18)
Round 6: (1 sc, dec) repeat 6 times. (12)
Add a little stuffing.
Round 7: Dec 6 times. (6)
FO and close the opening.
Attach the clapper to a short crocheted cord and sew it inside the top of the bell.
Part 4 – Crochet the Evergreen Branches
The evergreen branches create the lush background of this beautiful Christmas decoration.
Use dark forest green yarn and make several long, branching crochet pieces.
Basic Evergreen Sprig
Ch 35.
Beginning in the second chain from the hook, work a sl st in each of the first 4 chains.
Ch 8, sl st back along the chain, then sl st into the next stitch of the main stem.
Repeat this process, alternating short and long side branches.
Vary the side branches between 5 and 10 chains.
Continue until the main stem is covered with small branches.
FO and weave in the ends.
Make approximately 8–12 sprigs of different lengths.
For a fuller effect, overlap the branches and arrange them in a tapered shape.
Optional floral wire can be used inside or behind the stems to help them maintain their shape. Keep wire ends covered and secure.
Part 5 – Crochet the Red Holly Berries
The bright red berry clusters add beautiful contrast to the dark green branches.
Use red yarn.
Round 1: 6 sc in MR. (6)
Round 2: Inc around. (12)
Rounds 3–4: Sc around. (12)
Round 5: Dec 6 times. (6)
Stuff lightly and close the opening.
Make approximately 12–15 berries.
Arrange them into clusters of three and sew the clusters among the evergreen branches.
Part 6 – Crochet the Rustic Pinecones
The decoration includes two brown pinecones nestled among the evergreen branches.
Use medium brown and dark brown yarn.
Pinecone Base – Make Two
Round 1: 6 sc in MR. (6)
Round 2: Inc around. (12)
Round 3: (1 sc, inc) repeat 6 times. (18)
Rounds 4–8: Sc around. (18)
Round 9: (1 sc, dec) repeat 6 times. (12)
Round 10: Dec 6 times. (6)
Stuff lightly and close the opening.
Pinecone Scales
Using dark brown yarn, attach the yarn to the pinecone base.
Ch 3, then work 2 dc into the same stitch.
Sl st into the next stitch to anchor the scale.
Repeat around the pinecone, staggering the scales between rows.
Continue until the pinecone has a layered texture.
FO and shape the scales with your fingers.
Part 7 – Crochet the Large Cream Bow
The oversized ivory bow is the finishing feature at the top of the decoration.
Bow Body
Use ivory yarn.
Ch 17.
Row 1: Sc in the second chain from the hook and across. (16)
Rows 2–34: Ch 1, turn, sc across. (16)
FO, leaving a long tail.
Fold the rectangle so the short ends meet at the back.
Sew the ends together.
Pinch the center firmly and wrap ivory yarn around it several times.
Secure the yarn at the back to create two rounded bow loops.
Bow Tails
Make two tails.
Ch 13.
Row 1: Sc in the second chain from the hook and across. (12)
Continue working rows of sc until each tail measures approximately 15–18 cm.
FO and attach the tails behind the bow.
For a more elegant finish, shape the lower ends into soft points.
Part 8 – Crochet the Hanging Cords
Use ivory yarn to make several sturdy cords for suspending the ornaments.
Create cords in different lengths to achieve the cascading arrangement shown in the photograph.
- Upper hanging loop: approximately 12 cm
- Left mitten cord: approximately 12 cm
- Upper right ornament cord: approximately 16 cm
- Center bell cord: approximately 22 cm
- Lower left ornament cord: approximately 30 cm
- Lower right mitten cord: approximately 34 cm
For each cord, create a foundation chain slightly longer than the desired finished length.
Work sc along the foundation chain to create a stronger cord.
FO, leaving long tails for attachment.
For extra durability, use a crocheted I-cord.
Part 9 – Assemble the Christmas Crochet Door Swag
Step 1 – Arrange the Evergreen Background
Lay the evergreen sprigs on a flat surface.
Position the longest sprigs toward the bottom and the shorter sprigs toward the top.
Overlap them to create a lush, tapered arrangement.
Sew the branches together at their central stems.
Step 2 – Add the Hanging Cords
Attach the ivory hanging cords to the top of the evergreen arrangement.
Space the cords so the decorations hang at different heights without excessive overlap.
Step 3 – Position the Mittens
Attach one burgundy mitten to the upper left side.
Position the second mitten toward the lower right side.
Ensure both embroidered snowflakes face outward.
Step 4 – Add the Cream Ornaments
Hang one cream ornament on the upper right.
Position the second cream ornament toward the lower left.
Adjust them so the embroidered snowflakes are clearly visible.
Step 5 – Attach the Center Bell
Hang the striped green-and-ivory bell near the middle of the arrangement.
Allow the golden clapper to remain visible beneath the bell opening.
Step 6 – Add the Pinecones
Sew the two brown pinecones among the evergreen branches.
Place one toward the left center and one toward the right lower side.
Step 7 – Add the Berry Clusters
Arrange the red berry clusters around the evergreen branches.
Distribute them naturally throughout the decoration.
Step 8 – Attach the Cream Bow
Position the large cream bow at the top center.
Allow its long tails to fall naturally over the greenery.
Sew securely in place.
Step 9 – Add the Hanging Loop
Attach a strong crochet loop behind the bow.
Check that the entire decoration hangs evenly.
Reinforce all attachment points before displaying.
Christmas Color Variations
Classic Farmhouse Christmas
Burgundy, cream, forest green, brown, and warm gold.
Traditional Red and Green
Bright Christmas red, evergreen, snowy white, and gold.
Vintage Christmas
Dusty cranberry, antique ivory, sage green, and taupe.
Winter Wonderland
White, silver gray, icy blue, and soft beige.
Natural Scandinavian Christmas
Oatmeal, muted red, pine green, and warm wood tones.
Creative Ways to Display Your Crochet Door Swag
1. Front Door Decoration
Hang the finished decoration on a sheltered front door for a welcoming handmade Christmas touch.
2. Farmhouse Kitchen
Display it on a pantry door or rustic wooden cabinet.
3. Christmas Entryway
Hang it above a console table decorated with candles, greenery, and small Christmas ornaments.
4. Living Room Wall Hanging
Use it as a festive wall decoration near the Christmas tree.
5. Handmade Christmas Gift
Create one for a friend, family member, or neighbor who loves cozy holiday decor.
6. Christmas Craft Fair
Make several versions in coordinating holiday colors for a handmade seasonal display.
Helpful Crochet Tips
- Use consistent yarn weight for all components.
- Keep your stitches tight for neat mittens and ornaments.
- Use stitch markers when crocheting in continuous rounds.
- Stuff ornaments lightly to preserve their rounded shape.
- Block the bow tails before final assembly.
- Embroider the snowflakes before attaching the decorations.
- Use sturdy cords for hanging the heavier pieces.
- Distribute the weight evenly across the upper arrangement.
- Keep all wire ends concealed if using floral wire.
- Store the decoration in a dry box after Christmas.
Frequently Asked Questions
Is this Christmas crochet door swag suitable for beginners?
The individual components use basic crochet stitches, but the full project is best for intermediate crocheters because of the shaping, embroidery, and assembly.
How many decorations are included?
The design features two mittens, two round ornaments, one striped bell, two pinecones, berry clusters, evergreen branches, and a large cream bow.
What type of yarn works best?
Worsted weight cotton or acrylic yarn is a good choice. Cotton gives the decorations more structure, while acrylic provides a softer texture.
Can I make the hanging decoration smaller?
Yes. Use thinner yarn, a smaller hook, and shorter hanging cords.
Can I change the colors?
Absolutely. You can use traditional Christmas colors, vintage shades, or a neutral farmhouse palette.
Can this decoration be displayed outdoors?
It is best displayed on a sheltered door where it will remain protected from rain and moisture.
How can I make the evergreen branches fuller?
Make additional crochet sprigs in different lengths and overlap them during assembly.
How do I keep the hanging ornaments in place?
Secure the cords firmly and add discreet stitches behind the ornaments if necessary.
Can I use real pinecones?
Yes. You can substitute clean, dried pinecones for the crocheted versions if you prefer a mixed-material rustic design.
Can I add Christmas bells?
Yes. Small metal jingle bells can be attached to the arrangement for a gentle festive sound. Secure them carefully and keep small parts away from young children.
Final Thoughts
This Christmas crochet door swag is a beautiful way to celebrate the holiday season with handmade warmth and creativity.
The combination of burgundy mittens, cream snowflake ornaments, a striped Christmas bell, evergreen branches, red berries, rustic pinecones, and an oversized crochet bow creates a timeless festive decoration.
Hang it on a wooden door, display it in your entryway, or give it as a thoughtful handmade Christmas gift.
With a little yarn, patience, and creativity, you can make a Christmas decoration that brings joy year after year.
Happy crocheting and Merry Christmas! 🎄🧶❤️

