Christmas Crochet Door Swag with Stars, Bells & Burgundy Bow – Free Advanced Pattern
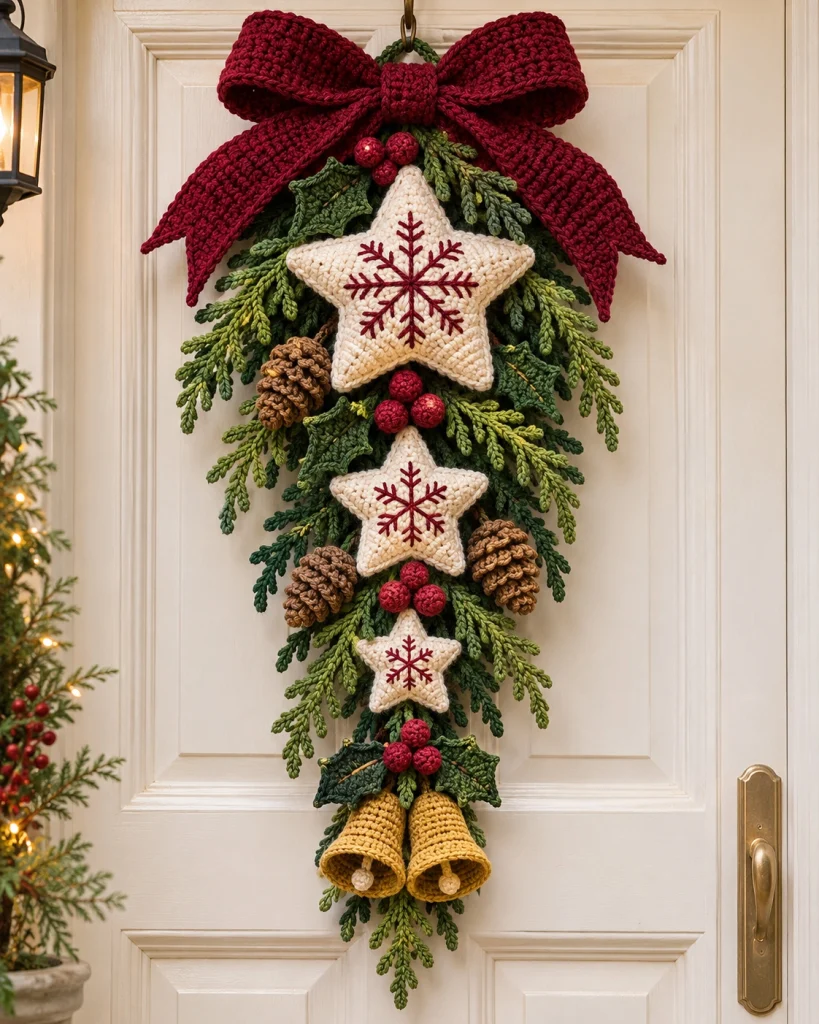
Welcome the holiday season with this elegant handmade Christmas Crochet Door Swag! Featuring a luxurious burgundy crochet bow, three dimensional ivory stars embroidered with red snowflakes, cascading evergreen branches, festive berries, pinecones, and golden crochet bells, this beautiful vertical Christmas decoration brings timeless charm to your front door.
Inspired by traditional Christmas greenery and classic holiday colors, this advanced crochet project combines intricate shaping, textured stitches, embroidery, and carefully arranged decorative elements to create a stunning handmade door hanging.
Unlike a traditional circular Christmas wreath, this vertical crochet swag has a graceful cascading silhouette, making it perfect for front doors, interior doors, entryways, fireplaces, and festive wall displays.
Pattern Details
- Skill Level: Advanced
- Finished Size: Approximately 65–75 cm long and 25–30 cm wide
- Construction: Separate crochet pieces assembled onto a vertical foundation
- Style: Traditional Christmas, elegant farmhouse, vintage holiday decor
- Terminology: US crochet terms
- Main Colors: Burgundy, ivory, forest green, olive green, golden yellow, and brown
- Recommended Hook: 3.0 mm and 3.5 mm
- Estimated Time: 18–30 hours
Materials Needed
- 100 g burgundy DK-weight cotton yarn
- 100 g ivory DK-weight cotton yarn
- 150 g forest green DK-weight cotton yarn
- 100 g olive green DK-weight cotton yarn
- 50 g golden yellow DK-weight cotton yarn
- 50 g brown DK-weight cotton yarn
- Small amount of bright red yarn for berries
- 3.0 mm crochet hook
- 3.5 mm crochet hook
- Polyester fiberfill
- Tapestry needle
- Scissors
- Stitch markers
- Floral wire or flexible craft wire
- Green floral tape
- Strong sewing thread
- Optional small bells for a gentle ringing sound
- Door hook or decorative hanging ring
Note: Yarn quantities are approximate. Use lightweight stuffing and a sturdy hanging foundation to prevent the finished decoration from stretching.
Crochet Abbreviations
- MR: Magic ring
- ch: Chain
- sc: Single crochet
- hdc: Half double crochet
- dc: Double crochet
- tr: Treble crochet
- sl st: Slip stitch
- st: Stitch
- inc: Increase
- dec: Decrease
- BLO: Back loop only
- FLO: Front loop only
- FO: Fasten off
1. Crochet the Large Burgundy Christmas Bow
The oversized burgundy bow is the focal point at the top of the door swag. Its rich color and textured crochet stitches create a luxurious, festive appearance.
Bow Loops – Make 2
Using burgundy yarn and a 3.5 mm hook:
Row 1: Ch 31. Starting in the second chain from the hook, work 30 sc. Ch 1, turn.
Rows 2–12: Work 30 sc across. Ch 1, turn.
Row 13: Work 30 sc. Fasten off, leaving a long sewing tail.
Fold each rectangular piece into a loop by bringing the short ends together.
Sew the ends securely.
Gently pinch the center of each loop to create the characteristic bow shape.
Bow Tails – Make 2
Row 1: Ch 36. Work 35 sc across. Ch 1, turn.
Rows 2–9: Work 35 sc across. Ch 1, turn.
Row 10: Work 35 sc and fasten off.
To create pointed ribbon ends, fold each tail lengthwise and cut the visual shape using decreases or sew the corners inward to form a decorative V-shaped finish.
For a fully crocheted pointed finish, decrease one stitch at each end of successive short rows until the desired taper is achieved.
Bow Center
Ch 11 and work 10 sc across.
Continue for 5 rows.
Fasten off, leaving a long sewing tail.
Arrange the two loops and two tails together.
Wrap the center strip tightly around the middle and sew securely at the back.
Shape the bow so both loops appear full and symmetrical.
2. Crochet the Large Ivory Christmas Star
The upper ivory star is the largest decorative element and features a beautiful burgundy embroidered snowflake.
Using ivory yarn and a 3.0 mm hook:
Star Center
Round 1: Make a magic ring and work 10 sc into the ring. Join with a sl st.
Round 2: Ch 1, work 2 sc in each stitch around. Join. (20 sc)
Round 3: *Sc in next stitch, 2 sc in next stitch.* Repeat around. (30 sc)
Star Points
Divide the 30 stitches into five equal groups of six stitches.
For each point:
Row 1: Work 6 sc. Ch 1, turn.
Row 2: Sc2tog, 2 sc, sc2tog. Ch 1, turn. (4 stitches)
Row 3: Work 4 sc. Ch 1, turn.
Row 4: Sc2tog twice. Ch 1, turn. (2 stitches)
Row 5: Sc2tog. Fasten off.
Repeat for the remaining four points.
Work one round of sc evenly around the star, placing additional stitches at the tips if needed to maintain a smooth shape.
Make the Star Three-Dimensional
Crochet a second identical star.
Place both stars with their wrong sides together.
Join the edges using sc, leaving a small opening.
Lightly stuff with polyester fiberfill.
Close the opening and weave in the ends.
Do not overstuff. The star should remain softly padded rather than round.
3. Embroider the Burgundy Snowflake
Using burgundy yarn and a tapestry needle, embroider a six-armed snowflake on the front of the ivory star.
- Mark the center of the star.
- Embroider three straight lines crossing at the center to form six arms.
- Add two small diagonal branches to each arm.
- Keep the stitches evenly spaced.
- Secure the embroidery ends inside the star.
The burgundy snowflake should remain centered and clearly visible against the ivory background.
4. Crochet the Medium and Small Stars
The reference design features three ivory stars arranged vertically, decreasing in size from top to bottom.
Medium Star
Use the same construction method as the large star, but begin with 20 stitches in the center and divide them into five groups of four stitches.
Shape each point by decreasing evenly until one stitch remains.
Make two identical panels, join, and lightly stuff.
Embroider a smaller burgundy snowflake on the front.
Small Star
Begin with 15 sc in a magic ring.
Divide the stitches into five groups of three stitches.
For each point, work three sc, then decrease across the following rows to form a tapered tip.
Make two matching panels.
Join, lightly stuff, and embroider a miniature burgundy snowflake.
Designer Tip: Keep all three stars in the same ivory shade and use matching burgundy embroidery for a coordinated appearance.
5. Crochet the Evergreen Branches
The lush green foliage creates the cascading structure of the Christmas door swag.
Use two shades of green to create depth and a natural evergreen appearance.
Main Branch Stem
Using forest green yarn:
Ch 51.
Starting in the second chain from the hook, work 50 sl st along the chain.
Fasten off.
Evergreen Needle Clusters
Attach green yarn to the main stem.
*Ch 8, sl st back along 7 chains, sl st into the next stem stitch.*
Repeat along the stem, alternating the direction of the branches.
For a fuller appearance, create additional clusters using chains of varying lengths:
- Short needles: Ch 5–6
- Medium needles: Ch 7–8
- Long needles: Ch 9–11
Work several branches in forest green and olive green.
Make approximately 12–16 branches in different lengths.
For extra stability, sew the branches onto flexible floral wire wrapped in green floral tape.
Ensure that all wire ends are covered and cannot scratch the door.
6. Crochet the Holly Leaves
Dark green holly leaves add beautiful texture around the bow, stars, and golden bells.
Using forest green yarn and a 3.0 mm hook:
Round 1: Ch 15.
Starting in the second chain from the hook, work:
1 sc, 2 hdc, 3 dc, 2 hdc, 2 sc, 2 hdc, 1 sc.
Work around the opposite side of the foundation chain using a similar sequence.
Join with a sl st.
Shape the Holly Points
Work around the leaf edge, alternating small picots with sc stitches.
To make a picot:
Ch 3, sl st into the first chain.
Repeat at three or four positions along each side of the leaf.
Fasten off, leaving a sewing tail.
Make approximately 6–8 holly leaves.
Optional: Embroider a fine central vein using olive green or golden yarn.
7. Crochet the Red Holly Berries
The small red berry clusters add bright festive accents throughout the greenery.
Using red yarn and a 3.0 mm hook:
Round 1: Make a magic ring and work 6 sc. (6)
Round 2: Work 2 sc in each stitch. (12)
Rounds 3–4: Work 12 sc around.
Round 5: *Sc, dec.* Repeat around. (8)
Lightly stuff the berry.
Round 6: Dec around. (4)
Fasten off and close the opening.
Make approximately 12–15 berries.
Arrange the berries in clusters of three.
Sew each cluster securely to the evergreen branches.
8. Crochet the Brown Pinecones
The pinecones introduce warm, rustic texture and help balance the soft ivory stars and lush greenery.
Using brown yarn and a 3.0 mm hook:
Pinecone Core
Round 1: Make a magic ring with 6 sc. (6)
Round 2: Work 2 sc in each stitch. (12)
Round 3: *Sc, inc.* Repeat around. (18)
Rounds 4–10: Work 18 sc around.
Round 11: *Sc, dec.* Repeat around. (12)
Round 12: Dec around. (6)
Lightly stuff and close.
Pinecone Scales
Join brown yarn to the outer surface of the pinecone.
Work small shell-shaped scales around the core:
*Ch 2, work 3 dc into the same surface stitch, ch 2, sl st into the next available stitch.*
Repeat in staggered rows.
Allow each row of scales to overlap the previous row slightly.
Make three pinecones in total.
For a realistic finish, use two slightly different shades of brown.
9. Crochet the Golden Christmas Bells
Two golden crochet bells hang from the bottom of the swag, completing the elegant traditional Christmas design.
Using golden yellow yarn and a 3.0 mm hook:
Bell Body – Make 2
Round 1: Make a magic ring and work 6 sc. (6)
Round 2: Inc in each stitch. (12)
Round 3: *Sc, inc.* Repeat around. (18)
Rounds 4–8: Work 18 sc around.
Round 9: *2 sc, inc.* Repeat around. (24)
Round 10: Work 24 sc around.
Round 11: *3 sc, inc.* Repeat around. (30)
Round 12: Work 30 sc around.
Round 13: Work 30 sc in BLO to create a defined rim.
Round 14: Work 30 sc around.
Fasten off and weave in the ends.
Shape the bell with your fingers.
For a more structured bell, use removable fabric stiffener suitable for crochet.
Bell Clapper
Using ivory yarn:
Make a magic ring with 6 sc.
Work one round of 6 sc.
Fasten off, leaving a long tail.
Attach the clapper inside the top center of the bell so it hangs slightly below the rim.
Repeat for the second bell.
10. Create the Vertical Hanging Foundation
The foundation supports all decorative pieces and helps maintain the cascading shape.
Using forest green yarn and a 3.5 mm hook:
Ch 121.
Starting in the second chain from the hook, work 120 sc.
Ch 1, turn.
Work another row of 120 sc.
Repeat for a total of four rows.
Fasten off.
This creates a narrow crocheted support strip.
For additional strength, sew a matching fabric ribbon or covered flexible wire along the back.
Fold the upper end into a hanging loop and stitch securely.
Test the foundation before attaching the decorations.
11. Arrange the Evergreen Branches
Place the foundation vertically on a flat surface.
Arrange the evergreen branches along both sides, allowing them to extend outward and downward.
Position the longest branches near the upper section.
Use shorter branches toward the bottom to create a gently tapered silhouette.
Alternate forest green and olive green branches for natural color variation.
Sew each branch securely to the foundation.
Keep the greenery dense enough to hide the support strip without making the decoration excessively heavy.
12. Attach the Three Ivory Stars
Arrange the stars vertically down the center of the swag.
- Place the largest star just below the burgundy bow.
- Position the medium star in the center.
- Place the smallest star near the lower section.
- Check that all burgundy snowflake embroidery faces forward.
- Sew each star securely through its back panel and into the foundation.
Leave enough greenery visible between the stars to create a layered, dimensional appearance.
13. Add the Holly Berries and Pinecones
Arrange the red berry clusters between the ivory stars and around the upper greenery.
Position the pinecones asymmetrically to create a natural festive arrangement.
Suggested placement:
- One pinecone near the upper left side
- One pinecone near the middle right side
- One smaller pinecone near the lower left side
Sew the pinecones securely to the foundation and surrounding greenery.
Add the holly leaves around the berries to create rich decorative clusters.
14. Attach the Golden Bells
Place the two golden crochet bells at the lower center of the swag.
Angle them slightly outward, allowing the open ends to remain visible.
Attach both bells using strong yarn or sewing thread.
Add a small cluster of holly leaves and red berries above the bells to hide the attachment points.
Make sure the bells hang evenly and do not pull the foundation out of shape.
15. Attach the Burgundy Bow
Position the large burgundy bow at the very top of the door swag.
Arrange the two loops symmetrically.
Allow the ribbon tails to extend diagonally downward over the upper greenery.
Sew the bow firmly to the foundation.
Add a small cluster of green leaves and red berries beneath the bow center for a polished festive finish.
16. Final Assembly and Shaping
- Lay the completed swag flat.
- Check the alignment of the three ivory stars.
- Adjust the evergreen branches for a natural cascading shape.
- Ensure the burgundy bow remains centered.
- Reposition the berry clusters if necessary.
- Check that the pinecones are securely attached.
- Make sure both golden bells hang evenly.
- Weave in all remaining yarn ends.
- Inspect the back for exposed wire or loose stitches.
- Hang the decoration temporarily to check its balance.
Your elegant handmade Christmas Crochet Door Swag is complete!
17. Alternative Christmas Color Combinations
Classic Burgundy and Forest Green
Deep burgundy, ivory, forest green, and antique gold create a traditional and luxurious Christmas appearance.
Rustic Red and Cream
Bright red, warm cream, olive green, and natural brown create a cozy farmhouse-inspired decoration.
Winter White and Silver
Ivory stars, snowy white greenery, silver embroidery, and pale gray accents create a sophisticated winter design.
Champagne Gold and Sage Green
Champagne-colored stars, sage green branches, and muted gold bells offer an elegant neutral alternative.
Traditional Red and Emerald Green
Bright red bows, emerald green foliage, white stars, and golden bells create a cheerful festive look.
18. Advanced Crochet Tips
- Use tightly worked stitches for stuffed stars and berries.
- Maintain consistent tension throughout the project.
- Use smaller hooks for delicate decorative details.
- Lightly stuff the stars to preserve their pointed shapes.
- Use different shades of green for realistic foliage.
- Arrange all components before sewing them permanently.
- Keep the largest decorative elements near the upper section.
- Reinforce the hanging loop with strong thread.
- Use lightweight stuffing to prevent excessive weight.
- Secure every decorative component carefully for long-term durability.
19. How to Display Your Christmas Crochet Door Swag
This beautiful vertical Christmas decoration can be displayed in several ways.
- Hang it on your front door using a decorative wreath hook.
- Display it on an interior bedroom or living room door.
- Hang it beside a fireplace mantel.
- Use it as festive wall decor in an entryway.
- Display it above a narrow console table.
- Give it as a handmade Christmas housewarming gift.
Safety Tip: Keep the decoration away from open flames, hot lights, and other heat sources. If displayed outdoors, protect it from rain, strong wind, and prolonged moisture.
20. Care Instructions
To keep your handmade crochet door swag looking beautiful:
- Remove dust gently with a soft brush.
- Spot-clean with cool water and mild detergent.
- Avoid soaking wired components.
- Do not machine wash the assembled decoration.
- Allow cleaned sections to dry completely.
- Store flat or loosely supported to prevent crushing.
- Keep in a dry storage box between holiday seasons.
- Protect the bow and star points from excessive pressure.
Frequently Asked Questions
Is this Christmas crochet door swag suitable for beginners?
This project is best suited to intermediate and advanced crocheters because it combines multiple shaped components, dimensional stars, embroidery, foliage, bells, and detailed assembly.
How long does it take to make this crochet decoration?
The complete project may take approximately 18–30 hours, depending on your crochet experience and the amount of decorative foliage.
Can I make the swag smaller?
Yes. Reduce the length of the foundation, use smaller stars, and crochet fewer evergreen branches.
Can I use acrylic yarn?
Yes. Acrylic yarn works well for decorative crochet projects, although cotton generally provides better stitch definition and structure.
How do I keep the stars from losing their shape?
Use tight stitches, avoid overstuffing, and lightly block the star panels before assembly.
Can I use real bells?
Yes. Small lightweight metal bells can be attached inside the crocheted golden bells if you want them to make a gentle sound.
How can I make the greenery look realistic?
Combine different lengths of crochet branches and alternate dark forest green with softer olive green.
Can this decoration be used outdoors?
It is best displayed indoors or on a covered porch protected from rain and strong sunlight.
Can I change the embroidered snowflake design?
Absolutely. You can replace the snowflakes with stars, geometric winter motifs, or simple decorative embroidery.
Can I sell finished decorations made from this pattern?
Yes. You may sell handmade decorations created using this original pattern. Credit to Cozy Crochet Patterns is appreciated.
Final Thoughts
This Christmas Crochet Door Swag with Stars, Bells & Burgundy Bow is a beautiful way to celebrate the holiday season with handmade creativity.
The luxurious burgundy bow, delicate ivory stars, textured evergreen foliage, festive berries, rustic pinecones, and golden bells work together to create an elegant Christmas decoration that feels both traditional and unique.
Whether you hang it on your front door, display it inside your home, or create it as a thoughtful handmade gift, this advanced crochet project is sure to become a treasured part of your holiday decorations.
Save this free Christmas crochet door swag pattern to Pinterest and share it with your crochet-loving friends!
Pattern note: This is an original, untested crochet interpretation inspired by the reference photograph. It is not an exact stitch-for-stitch reproduction. Component sizing and assembly may require adjustments to achieve the pictured proportions.

