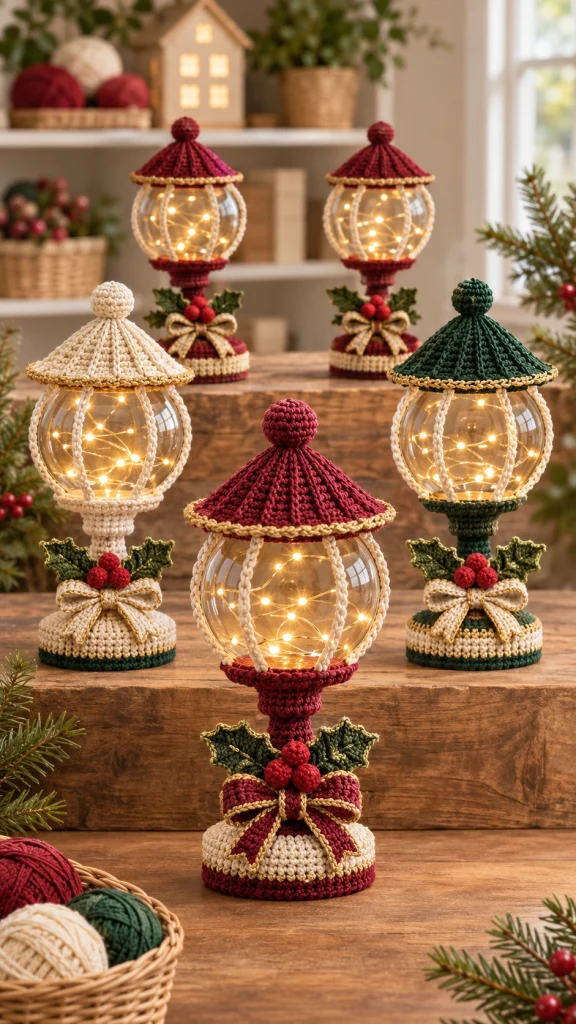
Christmas Crochet Lanterns with Fairy Lights – Free Advanced Pattern
Bring a warm, magical glow into your home with these beautiful Christmas Crochet Lanterns! Featuring elegant crocheted roofs, transparent glowing globes, delicate vertical crochet supports, festive holly leaves, and decorative bows, these handmade lanterns make charming holiday decorations.
Designed in classic Christmas colors of burgundy red, forest green, warm ivory, and shimmering gold, these lanterns combine traditional crochet craftsmanship with the beauty of illuminated holiday décor.
Each lantern features a round transparent globe filled with warm white LED fairy lights, a beautifully textured crochet roof topped with a small decorative ball, and a sturdy crocheted pedestal embellished with holly berries and an elegant bow.
This advanced crochet project is perfect for experienced crocheters who enjoy creating unique handmade decorations, festive centerpieces, and memorable holiday gifts.
Pattern Details
- Skill Level: Advanced
- Finished Height: Approximately 24–30 cm
- Globe Diameter: Approximately 12–15 cm
- Style: Vintage Christmas street lantern
- Construction: Separate crocheted roof, globe frame, pedestal, leaves, berries, and bow
- Yarn Weight: DK cotton yarn
- Crochet Hooks: 2.5 mm, 3.0 mm, and 3.5 mm
- Lighting: Battery-operated warm white LED fairy lights
- Colors: Burgundy, ivory, forest green, and gold
- Terminology: US crochet terms
Important Safety Note: Use only low-heat, battery-operated LED fairy lights. Never place a real candle, open flame, or heat-producing bulb inside or near the crocheted lantern. Keep the battery compartment accessible and away from yarn and moisture.
Materials Needed
- 100 g burgundy red cotton yarn
- 100 g warm ivory cotton yarn
- 75 g forest green cotton yarn
- 25 g gold or metallic gold yarn
- Small amount of bright red yarn for holly berries
- 2.5 mm crochet hook
- 3.0 mm crochet hook
- 3.5 mm crochet hook
- One transparent acrylic or glass globe, approximately 12–15 cm in diameter
- One battery-operated warm white micro-LED fairy light strand
- Rigid circular base insert or craft board
- Optional lightweight plastic tube for pedestal support
- Polyester fiberfill
- Tapestry needle
- Stitch markers
- Scissors
- Measuring tape
- Fabric-safe craft glue, optional
Recommended Yarn: Firm cotton yarn works best because it provides excellent stitch definition and helps maintain the lantern’s decorative shape.
Crochet Abbreviations
- MR: Magic ring
- ch: Chain
- sc: Single crochet
- hdc: Half double crochet
- dc: Double crochet
- sl st: Slip stitch
- st: Stitch
- inc: Increase
- dec: Decrease
- BLO: Back loop only
- FLO: Front loop only
- FO: Fasten off
- RS: Right side
- WS: Wrong side
1. Understanding the Lantern Construction
Each Christmas crochet lantern is made from several separate components that are assembled around a transparent globe.
The main components include:
- A pointed crochet roof with decorative gold edging
- A small stuffed crochet ball at the roof peak
- A transparent globe with vertical crochet support strips
- A decorative lower globe ring
- A narrow crocheted lantern stem
- A reinforced circular pedestal base
- Two textured holly leaves
- Three crocheted red berries
- A decorative crochet bow
All components should be completed and checked for fit before final assembly.
2. Crochet the Decorative Roof Topper
Using burgundy yarn and a 2.5 mm hook, begin with a magic ring.
Round 1
Work 6 sc into MR. (6)
Round 2
Inc in every stitch around. (12)
Round 3
(1 sc, inc) repeat 6 times. (18)
Rounds 4–5
Sc in each stitch around. (18)
Round 6
(1 sc, dec) repeat 6 times. (12)
Stuff lightly with polyester fiberfill.
Round 7
Dec around. (6)
Fasten off, close the opening, and leave a long yarn tail for attaching the topper to the roof.
3. Crochet the Pointed Lantern Roof
Using burgundy yarn and a 3.0 mm hook, begin with a magic ring.
Round 1
Work 6 sc into MR. (6)
Round 2
Sc around. (6)
Round 3
Inc in every stitch. (12)
Round 4
Sc around. (12)
Round 5
(1 sc, inc) repeat 6 times. (18)
Round 6
Sc around. (18)
Round 7
(2 sc, inc) repeat 6 times. (24)
Round 8
Sc around. (24)
Round 9
(3 sc, inc) repeat 6 times. (30)
Round 10
Sc around. (30)
Round 11
(4 sc, inc) repeat 6 times. (36)
Round 12
Sc around. (36)
Round 13
(5 sc, inc) repeat 6 times. (42)
Round 14
Sc around. (42)
Round 15
(6 sc, inc) repeat 6 times. (48)
Round 16
Sc around. (48)
Round 17
(7 sc, inc) repeat 6 times. (54)
Round 18
Sc around. (54)
Round 19
(8 sc, inc) repeat 6 times. (60)
Round 20
Sc around. (60)
Continue increasing by six stitches every second round until the roof extends slightly beyond the widest part of your globe.
The roof should form a gently pointed cone with a broad decorative brim.
4. Add the Gold Roof Edging
Join gold yarn to the outer edge of the completed roof.
Edging Round
Work 1 sc into each stitch around.
Join with a sl st.
For a decorative scalloped effect, repeat:
(Sl st, skip 1 stitch, 3 hdc into the next stitch, skip 1 stitch).
Adjust the spacing if necessary to keep the edging flat.
Fasten off and weave in the ends.
Sew the stuffed burgundy topper securely to the center of the roof peak.
5. Crochet the Lower Globe Ring
Using burgundy yarn and a 3.0 mm hook, make a foundation chain long enough to fit around the lower opening of the transparent globe.
Join the chain into a ring without twisting.
Round 1
Ch 1 and work 1 sc into each chain.
Rounds 2–4
Sc around.
Round 5
Work one round of reverse single crochet for a decorative corded edge.
Fasten off.
Test the fit around the lower portion of the globe.
The ring should fit snugly without placing excessive pressure on the transparent material.
6. Crochet the Vertical Globe Supports
The delicate ivory vertical strips give the lantern its traditional streetlamp appearance.
Using ivory yarn and a 2.5 mm hook, make a foundation chain long enough to extend from the lower globe ring to the underside of the roof.
Row 1
Sc into the second chain from the hook and across.
Row 2
Ch 1, turn, and sc across.
Fasten off, leaving a long tail for assembly.
Make six identical support strips.
Arrange them evenly around the globe.
Attach their lower ends to the burgundy ring and their upper ends to a separate ivory support ring beneath the roof.
Use small, secure stitches to maintain even spacing.
Tip: The support strips should follow the globe’s curvature naturally without pulling it out of shape.
7. Crochet the Upper Globe Ring
Using ivory yarn, chain enough stitches to fit around the upper part of the globe.
Join into a ring.
Work three rounds of sc.
Fasten off.
Attach the upper ends of the six vertical supports evenly around this ring.
The roof will later be secured to this upper structure.
8. Crochet the Lantern Stem
Using burgundy yarn and a 3.0 mm hook, begin with a magic ring.
Round 1
6 sc into MR. (6)
Round 2
Inc around. (12)
Round 3
Sc around in BLO. (12)
Rounds 4–12
Sc in each stitch around. (12)
Continue until the stem reaches approximately 6–8 cm.
For added stability, insert a lightweight plastic support tube inside the crocheted stem.
Fasten off, leaving a long tail.
The stem should be firm enough to support the decorative globe without bending.
9. Crochet the Circular Pedestal Base
Using burgundy or ivory yarn and a 3.5 mm hook, begin with a magic ring.
Round 1
6 sc into MR. (6)
Round 2
Inc around. (12)
Round 3
(1 sc, inc) repeat 6 times. (18)
Round 4
(2 sc, inc) repeat 6 times. (24)
Round 5
(3 sc, inc) repeat 6 times. (30)
Round 6
(4 sc, inc) repeat 6 times. (36)
Round 7
(5 sc, inc) repeat 6 times. (42)
Round 8
(6 sc, inc) repeat 6 times. (48)
Round 9
(7 sc, inc) repeat 6 times. (54)
Round 10
(8 sc, inc) repeat 6 times. (60)
Continue increasing evenly until the circle measures approximately 10–12 cm in diameter.
Work one round in BLO to create the beginning of the raised side wall.
Continue with three to five rounds of sc.
Change to ivory or forest green yarn to create contrasting decorative stripes.
Make a second flat circle of the same diameter for the underside.
Insert a rigid circular support between the layers and join them with sc.
Fasten off and weave in the ends.
10. Crochet the Holly Leaves
Using forest green yarn and a 2.5 mm hook, ch 13.
Leaf Side One
Sc into the second chain from the hook.
Hdc into the next stitch.
Dc into the next 3 stitches.
Work (ch 2, sl st into the first chain) to create a pointed holly tip.
Continue with 3 dc, 1 hdc, and 1 sc.
Work 3 sc into the final chain to turn around the foundation.
Leaf Side Two
Work along the opposite side of the chain.
Mirror the stitches from the first side.
Create two additional pointed sections using ch-2 picots.
Join with a sl st.
Fasten off, leaving a long sewing tail.
Make two holly leaves for each lantern.
For extra detail, embroider a central vein using lighter green or gold yarn.
11. Crochet the Holly Berries
Using bright red yarn and a 2.5 mm hook, begin with a magic ring.
Round 1
6 sc into MR. (6)
Round 2
Inc around. (12)
Rounds 3–4
Sc around. (12)
Round 5
Dec around. (6)
Stuff lightly with polyester fiberfill.
Fasten off and close the opening.
Make three berries for each lantern.
Arrange the berries into a small triangular cluster.
Sew them together securely.
12. Crochet the Decorative Christmas Bow
Using ivory yarn and a 2.5 mm hook, ch 31.
Row 1
Sc into the second chain from the hook and across.
Rows 2–8
Ch 1, turn, and sc across.
Fasten off.
Fold both ends toward the center to form two bow loops.
Sew the ends together at the center.
Wrap a narrow strip of ivory yarn around the middle to create the bow knot.
Bow Tails
Ch 16.
Sc into the second chain from the hook and across.
Repeat for a second tail.
Attach both tails behind the bow.
Trim the ends into gentle V shapes if desired.
Use gold yarn to embroider a delicate decorative outline along the bow edges.
13. Assemble the Lantern Pedestal
- Position the completed crochet stem at the center of the reinforced circular base.
- Sew the stem securely to the base using strong yarn and repeated stitches.
- Ensure that the stem stands vertically.
- Attach the holly leaves to the front of the stem.
- Position the three red berries between the leaves.
- Sew the decorative bow beneath the berries.
- Check that all decorative components are firmly attached.
The completed pedestal should be balanced and stable before the globe is installed.
14. Install the Transparent Globe
Position the transparent globe above the completed lantern stem.
Attach the lower crochet ring to the globe’s supporting structure.
Secure the globe to the pedestal using a stable mechanical connection suitable for the globe material.
Do not rely on yarn tension alone to support a heavy glass globe.
For best results, use a lightweight acrylic globe and a rigid internal support.
Attach the six ivory vertical supports around the globe.
Position the upper support ring evenly above the globe.
Make sure the transparent globe remains centered.
15. Attach the Crochet Roof
Position the completed pointed roof over the upper support ring.
The roof should extend slightly beyond the transparent globe.
Sew the roof securely to the support structure at evenly spaced points.
Check that the roof sits straight and does not tilt.
The decorative gold edging should remain visible around the entire brim.
Adjust the topper if necessary to keep it centered.
16. Add the Warm White Fairy Lights
Carefully place a short strand of battery-operated warm white micro-LED fairy lights inside the transparent globe.
Distribute the lights evenly to create a soft, magical glow.
Keep the battery pack outside the globe in an accessible location, following the light manufacturer’s instructions.
Use a removable opening or accessible support arrangement so the lights can be replaced easily.
Never place an open flame inside the lantern.
Turn on the LED lights and check the overall appearance.
The light should illuminate the transparent globe while highlighting the delicate ivory crochet strips.
17. Make Different Color Variations
One of the most beautiful features of this project is the ability to create coordinated lanterns in several festive color combinations.
Classic Burgundy Lantern
Use a burgundy roof and pedestal with ivory globe supports, gold trim, and a burgundy bow.
Elegant Ivory Lantern
Create the roof and pedestal in warm ivory, with delicate gold edging and dark green accents.
Forest Green Lantern
Use a deep forest green roof, matching pedestal, ivory supports, and a gold-trimmed bow.
Vintage Red and Cream Lantern
Combine a deep red roof with a cream pedestal and classic holly decorations.
Winter White Lantern
Use white and silver yarn with icy blue decorative accents for a winter-inspired variation.
18. Advanced Crochet Tips
- Use cotton yarn for better structure and crisp stitch definition.
- Measure the transparent globe before crocheting the support rings.
- Keep the roof increases evenly distributed.
- Block the roof lightly to improve its conical shape.
- Use a rigid base insert to prevent tipping.
- Choose lightweight acrylic globes when possible.
- Keep the vertical support strips evenly spaced.
- Reinforce all structural attachment points.
- Use gold edging sparingly for an elegant finish.
- Keep the LED battery compartment accessible.
- Use only lighting rated as suitable for the intended installation.
- Test the completed lantern on a stable surface before displaying it.
19. Decorating Ideas
These Christmas crochet lanterns are perfect for creating warm and inviting holiday displays.
- Arrange three lanterns together on a wooden mantel.
- Place a matching pair on a festive sideboard.
- Use the lanterns as illuminated Christmas table decorations.
- Display them beside miniature Christmas trees.
- Combine them with pinecones and evergreen branches.
- Create a coordinated collection in red, ivory, and green.
- Use them as handmade gifts for friends and family.
- Place them on a covered indoor entryway console.
Display Tip: For a balanced arrangement, combine lanterns of different heights while keeping the same overall design and color palette.
20. How to Care for Your Crochet Lanterns
- Dust gently using a soft brush.
- Spot clean the crochet components when necessary.
- Keep the lantern away from moisture.
- Avoid direct contact with open flames or heaters.
- Remove batteries before long-term storage.
- Store in a dry, dust-free container.
- Protect the pointed roof from crushing.
- Keep delicate decorative berries and bows away from rough surfaces.
- Check the lighting components before each seasonal display.
Frequently Asked Questions
Are these Christmas crochet lanterns suitable for beginners?
This pattern is designed for advanced crocheters because it includes shaped crochet components, decorative appliqués, structural assembly, and careful fitting around a transparent globe.
Can I use real candles inside the lanterns?
No. Real candles and open flames should never be used with crochet lanterns. Use battery-operated LED fairy lights only.
What type of globe should I use?
A lightweight transparent acrylic globe is recommended because it is easier to support and less fragile than glass.
Can I make the lanterns taller?
Yes. Increase the stem length and use a wider, heavier reinforced base to maintain stability.
How do I make the roof larger?
Continue the established increase pattern, adding six stitches on each increase round until the roof reaches the desired diameter.
Can I make these lanterns without lights?
Absolutely. The lanterns can be displayed as decorative crochet ornaments without internal illumination.
How many lanterns should I make for a centerpiece?
Three lanterns in coordinating colors can create a beautiful balanced centerpiece. A collection of five works well for a larger decorative arrangement.
Can I use different yarn colors?
Yes. Burgundy, ivory, forest green, and gold create a classic Christmas look, but the design can also be adapted to neutral, pastel, or winter-inspired color palettes.
How can I keep the lantern standing straight?
Use a rigid base insert, reinforce the crochet stem, and choose a lightweight globe. The base should be wide enough to support the completed lantern safely.
Final Thoughts
These Christmas Crochet Lanterns with Fairy Lights combine elegant crochet craftsmanship with the warm glow of festive holiday lighting.
From the beautifully textured pointed roofs and delicate ivory supports to the decorative holly leaves, berries, and gold-trimmed bows, every detail adds charm to this unique handmade decoration.
Whether displayed on a mantel, arranged as a centerpiece, or given as a thoughtful handmade gift, these crochet lanterns bring a cozy and timeless Christmas atmosphere into any home.
Save this free Christmas crochet lantern pattern to Pinterest and share it with your crochet-loving friends!
Designer note: This is an original, untested pattern inspired by the reference image, not an exact reconstruction. The crochet components and structural assembly should be tested with your chosen globe and LED lighting before final display. Never use real flames or heat-producing lights.

