Christmas Crochet Poinsettia Candle Centerpiece – Free Advanced Pattern
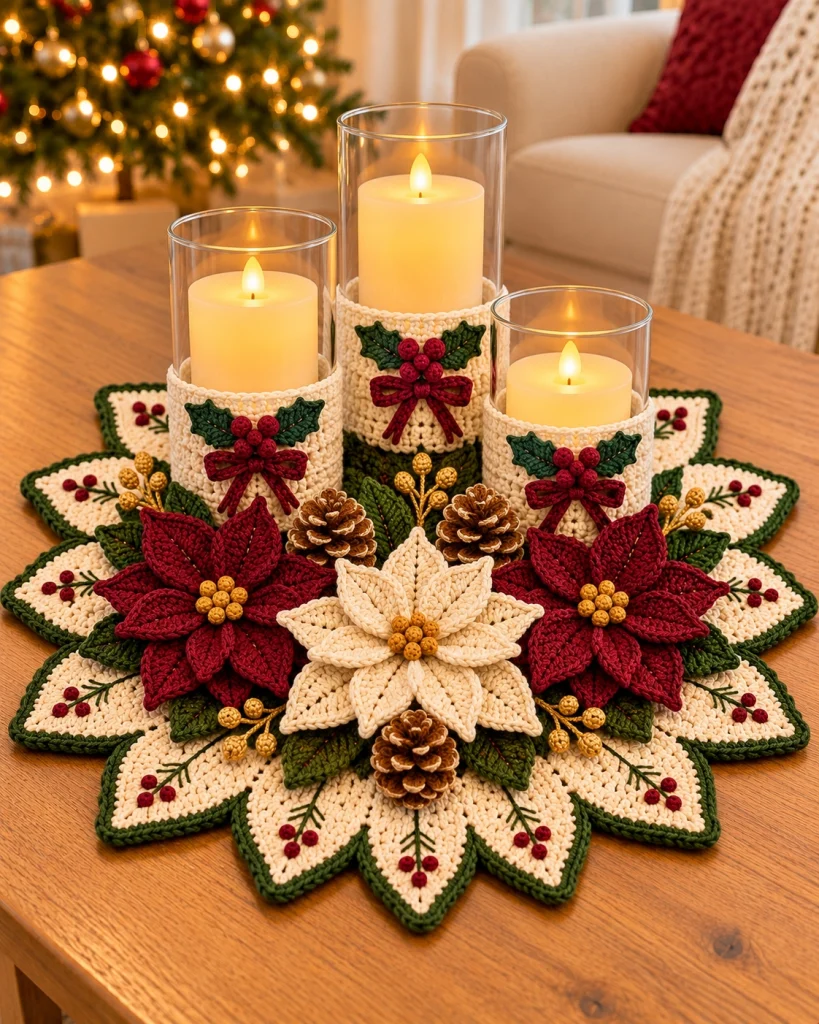
Create a breathtaking handmade Christmas decoration with this elegant Crochet Poinsettia Candle Centerpiece! Featuring three glowing LED candles, delicate ivory crochet candle sleeves, richly textured burgundy poinsettias, golden berry accents, pinecones, and a beautiful star-shaped crochet base, this festive arrangement brings warmth and timeless charm to your holiday home.
The design combines traditional Christmas colors with intricate crochet craftsmanship. Deep burgundy flowers contrast beautifully with warm ivory petals, forest green leaves, and shimmering golden details.
Three glass candle holders of different heights rise from the center of a large, layered crochet arrangement, creating an elegant focal point for a dining table, coffee table, or holiday mantel.
This advanced crochet project is perfect for experienced crocheters who love dimensional floral designs, decorative stitching, and sophisticated handmade Christmas decorations.
Pattern Details
- Skill Level: Advanced
- Finished Diameter: Approximately 45–55 cm
- Finished Height: Approximately 20–30 cm, depending on candle holders
- Construction: Separate crochet base, pointed panels, flowers, leaves, candle sleeves, berries, and decorative elements
- Yarn Weight: DK cotton yarn
- Crochet Hooks: 2.5 mm, 3.0 mm, and 3.5 mm
- Colors: Warm ivory, burgundy red, forest green, and gold
- Candles: Three battery-operated flameless LED candles
- Terminology: US crochet terms
Safety: Use only battery-operated flameless LED candles. Never use real flames or heat-producing candles with this crochet centerpiece. Keep electrical components accessible and follow the LED manufacturer’s instructions.
Materials Needed
- 250 g warm ivory cotton yarn
- 150 g burgundy red cotton yarn
- 100 g forest green cotton yarn
- 25 g metallic gold yarn
- Small amount of dark brown yarn for pinecones
- Small amount of golden yellow yarn for berry accents
- 2.5 mm crochet hook
- 3.0 mm crochet hook
- 3.5 mm crochet hook
- Three transparent cylindrical glass candle holders in different heights
- Three battery-operated LED pillar candles
- Stitch markers
- Tapestry needle
- Scissors
- Measuring tape
- Optional floral wire for shaping decorative stems
- Optional small gold beads for flower centers
- Fabric-safe craft glue, optional
- Blocking mat and rustproof pins
Crochet Abbreviations
- MR: Magic ring
- ch: Chain
- sc: Single crochet
- hdc: Half double crochet
- dc: Double crochet
- tr: Treble crochet
- sl st: Slip stitch
- st: Stitch
- inc: Increase
- dec: Decrease
- BLO: Back loop only
- FLO: Front loop only
- FO: Fasten off
- RS: Right side
- WS: Wrong side
1. Understanding the Centerpiece Construction
The centerpiece is assembled from several individual crochet components to create the layered, dimensional appearance shown in the finished design.
The main components include:
- One large circular crochet foundation
- Twelve elongated ivory pointed panels
- Twelve forest green border sections
- Two large burgundy poinsettias
- One large ivory poinsettia
- Six to eight forest green leaves
- Three decorative crochet candle sleeves
- Three small holly appliqués
- Multiple golden berry clusters
- Decorative crochet pinecones
- Embroidered holly sprigs and berry details
The individual components are arranged in overlapping layers to produce a rich, elegant Christmas centerpiece.
2. Crochet the Circular Foundation
Using ivory yarn and a 3.5 mm crochet hook, begin with a magic ring.
Round 1
Work 12 dc into MR. Join with sl st. (12)
Round 2
Ch 3, dc into the same stitch, then work 2 dc into each stitch around. Join. (24)
Round 3
Ch 3, work 1 dc into the next stitch, then 2 dc into the following stitch. Repeat around. Join. (36)
Round 4
Ch 3, dc into the next 2 stitches, then 2 dc into the next stitch. Repeat around. Join. (48)
Round 5
Ch 3, dc into the next 3 stitches, then 2 dc into the next stitch. Repeat around. Join. (60)
Round 6
Ch 3, dc into the next 4 stitches, then 2 dc into the next stitch. Repeat around. Join. (72)
Round 7
Ch 3, dc into the next 5 stitches, then 2 dc into the next stitch. Repeat around. Join. (84)
Round 8
Ch 3, dc into the next 6 stitches, then 2 dc into the next stitch. Repeat around. Join. (96)
Continue increasing evenly until the foundation measures approximately 25–30 cm in diameter.
Fasten off and weave in the ends.
Block the foundation gently so that it lies completely flat.
3. Crochet the Pointed Ivory Panels
The large pointed panels create the distinctive star-shaped outline of the centerpiece.
Using ivory yarn and a 3.0 mm hook, ch 19.
Row 1
Sc into the second chain from the hook and across. (18)
Row 2
Ch 1, turn, sc across. (18)
Row 3
Ch 2, turn, hdc across. (18)
Row 4
Ch 3, turn, dc across. (18)
Row 5
Ch 3, turn, dc2tog, dc across until the last 2 stitches, dc2tog. (16)
Row 6
Ch 3, turn, dc across. (16)
Row 7
Ch 3, turn, dc2tog, dc across until the last 2 stitches, dc2tog. (14)
Row 8
Ch 3, turn, dc across. (14)
Continue decreasing by two stitches every second row until only two stitches remain.
Work dc2tog over the final two stitches.
Fasten off.
Make twelve identical pointed panels.
4. Add the Forest Green Border
Join forest green yarn to the edge of one completed ivory panel.
Work one round of sc around the entire panel.
At the pointed tip, work 3 sc into the same stitch to maintain a sharp, symmetrical point.
For a more decorative finish, add a second round of reverse single crochet.
Fasten off and weave in the ends.
Repeat for all twelve pointed panels.
The forest green edging should form a clean, continuous border around every ivory panel.
5. Embroider the Decorative Holly Sprigs
Using forest green yarn and a tapestry needle, embroider a delicate branch along the center of each ivory panel.
Begin near the base of the panel and work toward the pointed tip.
Add small diagonal branches on both sides of the main stem.
Using burgundy yarn, embroider three small berries near the end of each branch.
Keep the embroidered motifs symmetrical and evenly spaced.
For an elegant appearance, avoid making the branches too thick.
6. Attach the Pointed Panels
Arrange the twelve completed panels evenly around the circular foundation.
Position the wide ends toward the center and the pointed tips facing outward.
Overlap adjacent panels slightly to create the appearance of a continuous star-shaped crochet base.
Use stitch markers to hold the panels in place.
Sew the wide ends securely to the foundation.
Keep the outer pointed sections free so that they retain their dimensional appearance.
Check the symmetry of the entire arrangement before fastening off.
7. Crochet the Burgundy Poinsettia Petals
Using burgundy yarn and a 2.5 mm crochet hook, ch 15.
Petal Round 1
Sc into the second chain from the hook.
Hdc into the next 2 stitches.
Dc into the next 3 stitches.
Tr into the next 4 stitches.
Dc into the next 2 stitches.
Hdc into the next stitch.
Work 3 sc into the final chain to turn around the foundation.
Continue along the opposite side of the chain, mirroring the stitch sequence.
Join with sl st.
Petal Round 2
Work one round of sc around the petal.
At the pointed tip, work (sc, ch 2, sc) into the same stitch.
Fasten off, leaving a long sewing tail.
Make eight petals for each large burgundy poinsettia.
For a fuller appearance, make four additional slightly smaller petals using a foundation chain of 11 stitches.
8. Assemble the Burgundy Poinsettias
Arrange eight large petals in a circular formation, overlapping their bases slightly.
Sew the bases together securely.
Position four smaller petals above the first layer, placing them between the larger petals.
Sew the smaller petals into place.
Use golden yellow yarn to create the flower center.
Make six small crocheted balls or attach decorative gold beads to form a clustered center.
Secure the center firmly.
Make two identical burgundy poinsettias.
Each completed flower should measure approximately 15–18 cm across, depending on yarn tension.
9. Crochet the Ivory Poinsettia
Repeat the same petal construction using warm ivory yarn.
Make eight large ivory petals and four smaller ivory petals.
Arrange the petals in two overlapping layers.
Sew the bases together securely.
Add a decorative golden berry cluster to the center.
Shape the petals gently to create a slightly raised, three-dimensional flower.
The ivory poinsettia will be positioned at the front center of the finished arrangement.
10. Crochet the Forest Green Leaves
Using forest green yarn and a 2.5 mm hook, ch 17.
Round 1
Sc into the second chain from the hook.
Hdc into the next 2 stitches.
Dc into the next 4 stitches.
Tr into the next 4 stitches.
Dc into the next 3 stitches.
Hdc into the final stitch.
Work 3 sc into the end chain.
Continue along the opposite side of the foundation chain, mirroring the stitches.
Join with sl st.
Round 2
Work sc around the entire leaf.
At the tip, work (sc, ch 2, sc).
Fasten off.
Make six to eight leaves.
For added texture, embroider a central vein using a lighter shade of green yarn.
11. Crochet the Golden Berry Clusters
Using golden yellow yarn and a 2.5 mm hook, begin with a magic ring.
Round 1
6 sc into MR. (6)
Round 2
Inc around. (12)
Rounds 3–4
Sc around. (12)
Round 5
Dec around. (6)
Stuff lightly if desired.
Fasten off and close the opening.
Make approximately 20–30 small berries.
Group the berries into clusters of three to five.
Attach the clusters to short crocheted green stems.
For a more decorative finish, use metallic gold yarn to embroider small highlights on the berries.
12. Crochet the Candle Sleeves
The three ivory crochet sleeves add texture and elegance to the glass candle holders.
Measure the circumference of each glass holder before beginning.
Using ivory yarn and a 3.0 mm hook, make a foundation chain that fits snugly around the lower section of the glass holder.
Join into a ring without twisting.
Round 1
Ch 1, sc into each chain around. Join.
Round 2
Ch 3, dc into each stitch around. Join.
Round 3
Ch 1, sc into each stitch around. Join.
Round 4
Ch 3, skip 1 stitch, dc into the next stitch, ch 1. Repeat around. Join.
Round 5
Ch 1, work 1 sc into each stitch and chain space around. Join.
Repeat Rounds 2–5 until the sleeve reaches the desired height.
Finish with one round of sc.
Fasten off and weave in the ends.
Make three sleeves, adjusting each one to fit its corresponding glass holder.
The sleeves should cover only the lower portion of the glass, leaving the upper transparent section visible.
13. Crochet the Holly Decorations for the Candle Sleeves
Using forest green yarn, ch 11.
Work sc, hdc, dc, and pointed picot stitches along the chain to form a small holly leaf.
Mirror the stitches along the opposite side.
Make two leaves for each candle sleeve.
Using burgundy yarn, crochet three small berries for each decoration.
Sew the leaves and berries together.
Attach one holly decoration to the front of each ivory candle sleeve.
14. Crochet the Burgundy Candle Bows
Using burgundy yarn and a 2.5 mm hook, ch 25.
Row 1
Sc into the second chain from the hook and across.
Rows 2–5
Ch 1, turn, sc across.
Fasten off.
Fold both ends toward the center to form two bow loops.
Wrap a short piece of burgundy yarn around the center to secure the bow.
Make two narrow crochet tails and attach them behind the bow.
Repeat to create three matching bows.
Sew one bow beneath the holly decoration on each candle sleeve.
15. Crochet the Decorative Pinecones
Using dark brown yarn and a 2.5 mm hook, begin with a magic ring.
Round 1
6 sc into MR. (6)
Round 2
Inc around. (12)
Round 3
Sc around in BLO. (12)
Round 4
(1 sc, inc) repeat 6 times. (18)
Round 5
Sc around in BLO. (18)
Round 6
(2 sc, inc) repeat 6 times. (24)
Round 7
Sc around in BLO. (24)
Continue for several rounds to create an elongated pinecone shape.
Work decreases gradually toward the top.
Fasten off and close the opening.
Join brown yarn to the exposed front loops from the BLO rounds.
Work small shell stitches into these loops to create overlapping pinecone scales.
Use a slightly lighter brown yarn for selected scale edges to create depth.
Make three or four pinecones.
16. Arrange the Three Candle Holders
Position the tallest candle holder toward the back center of the circular foundation.
Place the medium-height candle holder slightly to the left.
Position the shortest candle holder slightly to the right.
The three holders should form a balanced triangular arrangement.
Ensure that each holder rests on a stable, level surface and does not depend on loose crochet layers for support.
Insert one flameless LED pillar candle into each holder.
Adjust the arrangement until all three candles are clearly visible.
17. Attach the Large Poinsettias
Position one burgundy poinsettia at the front left of the arrangement.
Place the second burgundy poinsettia at the front right.
Position the large ivory poinsettia between them, slightly forward.
Arrange the flowers so that their petals overlap naturally without completely hiding the pointed crochet base.
Sew the flower bases securely to the foundation.
Leave the outer petals slightly raised to create a dimensional floral appearance.
18. Add Leaves, Berries, and Pinecones
Arrange the forest green leaves beneath and between the poinsettias.
Position the golden berry clusters in the open spaces around the flowers.
Add the decorative pinecones between the candle holders and the front flowers.
Distribute the decorations evenly to maintain a balanced composition.
Use small stitches to secure each element to the foundation.
Avoid overcrowding the centerpiece. Allow the pointed ivory panels and green borders to remain visible around the outer edge.
19. Final Assembly and Finishing
- Lay the completed star-shaped crochet base flat on a table.
- Check that all twelve pointed panels are evenly spaced.
- Position the three LED candle holders in the center.
- Arrange the burgundy poinsettias on the left and right.
- Place the ivory poinsettia at the front center.
- Add forest green leaves beneath the flowers.
- Attach the golden berry clusters.
- Position the decorative pinecones.
- Check the balance and symmetry of the arrangement.
- Weave in all remaining yarn ends.
- Gently shape the flowers and pointed panels.
- Turn on the flameless LED candles to reveal the finished centerpiece.
The completed design should feature a large star-shaped ivory and green base, three glowing candles, and a richly layered arrangement of burgundy and ivory crochet flowers.
20. Advanced Crochet Tips
- Use tightly spun cotton yarn for crisp stitch definition.
- Keep the pointed panels uniform in size.
- Block the foundation before attaching decorative elements.
- Use a smaller hook for detailed flower petals.
- Maintain consistent yarn tension across all components.
- Shape the poinsettia petals individually before assembly.
- Use contrasting yarn shades to highlight the dimensional texture.
- Keep the flower centers compact and symmetrical.
- Arrange the decorative elements before sewing them permanently.
- Use only battery-operated flameless LED candles.
- Keep the battery compartments accessible.
- Place the centerpiece on a stable, heat-free surface.
21. Color Variations
Traditional Christmas Red
Use deep red poinsettias, ivory pointed panels, dark green borders, and golden berry accents.
Elegant Winter White
Create all three poinsettias in ivory and add silver accents with pale sage green leaves.
Vintage Burgundy and Gold
Combine burgundy flowers with warm cream panels, antique gold edging, and olive green leaves.
Rustic Woodland Christmas
Use forest green, warm beige, brown, and muted red for a natural woodland-inspired centerpiece.
Classic Red and Green
Use bright red poinsettias, rich green leaves, ivory candle sleeves, and traditional gold details.
22. Decorating Ideas
This handmade crochet centerpiece is a beautiful addition to a variety of Christmas displays.
- Use it as the focal point of a Christmas dining table.
- Display it on a wooden coffee table.
- Place it on a holiday sideboard.
- Pair it with matching crochet Christmas ornaments.
- Use it as a festive centerpiece for a family gathering.
- Combine it with natural pinecones and evergreen branches.
- Create a coordinated set of crochet candle decorations.
- Give it as a handmade Christmas gift.
23. Caring for Your Crochet Centerpiece
- Dust gently using a soft brush.
- Spot clean individual crochet components when needed.
- Avoid soaking assembled decorative flowers.
- Keep the centerpiece away from moisture and heat.
- Remove batteries from the LED candles before storage.
- Store the centerpiece flat in a dry container.
- Protect the dimensional poinsettia petals from crushing.
- Keep decorative beads and small elements away from young children and pets.
Frequently Asked Questions
Is this crochet centerpiece suitable for beginners?
This project is designed for advanced crocheters because it includes multiple shaped components, dimensional flowers, decorative appliqués, and detailed assembly.
Can I use real candles?
No. Only battery-operated flameless LED candles should be used. Real flames and heat-producing candles are unsafe near crochet decorations.
Can I make the centerpiece smaller?
Yes. Reduce the size of the circular foundation, shorten the pointed panels, and use smaller flowers and candle holders.
How many poinsettias are needed?
The featured design uses two large burgundy poinsettias and one large ivory poinsettia.
What yarn works best?
DK cotton yarn is recommended because it provides good structure, durability, and excellent stitch definition.
Can I use different flower colors?
Absolutely. White, blush pink, gold, burgundy, and classic red are all beautiful options.
How do I keep the base flat?
Maintain even increases, avoid overly tight stitches, and block the completed foundation before attaching the decorative panels.
Can I make matching candle holders?
Yes. The ivory candle sleeves can be made separately and decorated with matching holly leaves, berries, and burgundy bows.
Can this centerpiece be used after Christmas?
Yes. Replace the holly and poinsettia decorations with neutral or seasonal flowers to create a centerpiece suitable for other occasions.
Final Thoughts
This Christmas Crochet Poinsettia Candle Centerpiece is a beautiful celebration of handmade craftsmanship and traditional holiday elegance.
With its dramatic star-shaped crochet base, richly textured poinsettias, delicate holly decorations, golden berry accents, and softly glowing LED candles, this advanced project creates a warm and inviting focal point for your festive home.
Whether displayed on a dining table, arranged on a holiday mantel, or given as a thoughtful handmade gift, this crochet centerpiece is sure to become a treasured part of your Christmas decorations.
Save this free Christmas crochet centerpiece pattern to Pinterest and share it with your crochet-loving friends!
Designer note: This is an original, untested crochet pattern inspired by the reference image, rather than an exact reconstruction. Finished dimensions and assembly details may require adjustment. Use only flameless LED candles.

