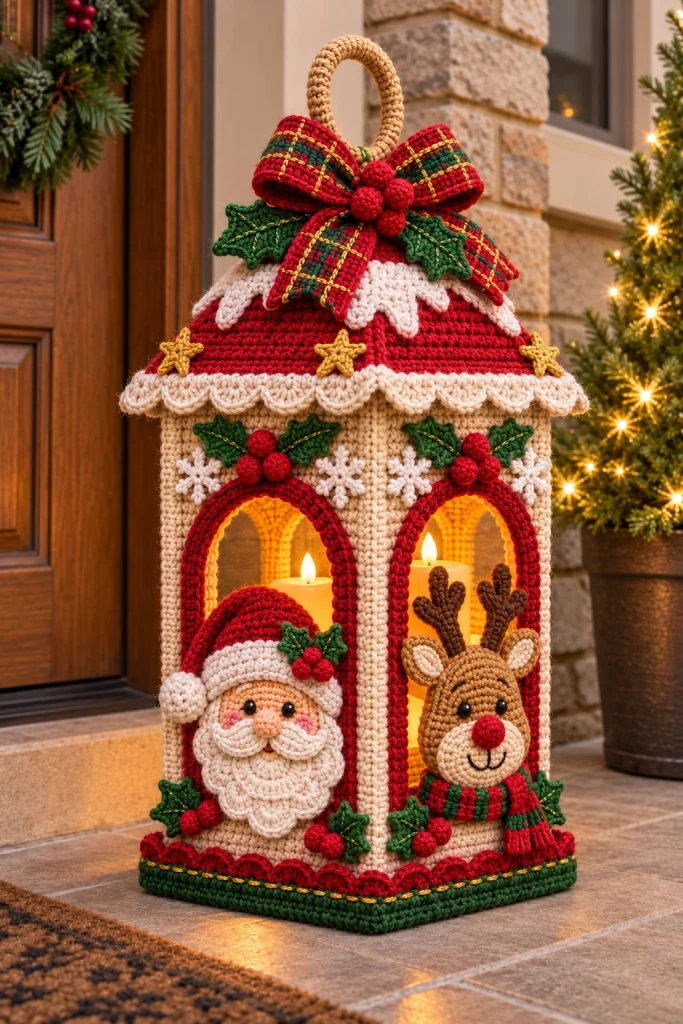
Christmas Crochet Santa & Reindeer Lantern – Free Advanced Pattern
Bring a magical handmade glow to your Christmas decorations with this adorable Christmas Crochet Santa and Reindeer Lantern! Featuring a charming Santa Claus, a smiling Rudolph reindeer, beautiful arched windows, a festive red roof, and an oversized plaid bow, this enchanting crochet lantern is the perfect decoration for a cozy holiday home.
The design combines traditional Christmas colors with detailed amigurumi appliques, textured crochet walls, decorative holly leaves, tiny snowflakes, golden stars, and warm LED lighting. The finished lantern makes a beautiful addition to an entryway, fireplace mantel, covered porch, or holiday display.
This advanced crochet pattern is inspired by the supplied reference image and uses separate crocheted components assembled over a lightweight internal frame to achieve the lantern’s architectural shape.
Pattern Details
- Skill Level: Advanced
- Finished Height: Approximately 38–45 cm including handle
- Finished Width: Approximately 22–26 cm
- Construction: Structured lantern with separate panels, roof, handle, and dimensional appliques
- Yarn Weight: DK or worsted cotton yarn
- Hook Sizes: 2.5 mm, 3.0 mm, and 3.5 mm
- Terminology: US crochet terms
- Main Colors: Cream, Christmas red, forest green, tan, brown, white, and gold
- Estimated Time: 25–35 hours
- Lighting: Battery-operated LED candles only
Materials Needed
- Cream cotton yarn – approximately 250 g
- Christmas red cotton yarn – approximately 180 g
- Forest green cotton yarn – approximately 100 g
- Tan cotton yarn – approximately 80 g
- Dark brown cotton yarn – approximately 40 g
- White cotton yarn – approximately 60 g
- Peach cotton yarn – approximately 30 g
- Small amount of gold metallic embroidery thread
- 2.5 mm, 3.0 mm, and 3.5 mm crochet hooks
- Polyester fiberfill
- Black safety eyes or embroidered eyes
- Small red decorative beads, optional
- Plastic canvas sheets for structural support
- Flexible plastic tubing for the handle
- Transparent heat-resistant-looking but non-heated plastic window inserts, optional
- Battery-operated LED tea lights
- Tapestry needle
- Stitch markers
- Scissors
- Fabric glue suitable for yarn, optional
Important Safety Note: This lantern is decorative only. Never place a real candle, open flame, or heat-producing light inside the crochet structure. Use cool-running battery-operated LED lights exclusively. Do not leave the lantern outdoors in rain or snow.
Crochet Abbreviations
- MR: Magic ring
- ch: Chain
- sc: Single crochet
- hdc: Half double crochet
- dc: Double crochet
- tr: Treble crochet
- sl st: Slip stitch
- inc: Increase
- dec: Decrease
- BLO: Back loop only
- FLO: Front loop only
- FO: Fasten off
- st: Stitch
- sp: Space
- picot: Ch 3, sl st into first chain
1. Crochet the Lantern Base
The lantern begins with a sturdy square foundation.
Using forest green yarn and a 3.5 mm hook:
Row 1: Ch 51.
Row 2: Starting in the second chain from the hook, sc across. (50)
Rows 3–50: Ch 1, turn, sc across. (50)
Fasten off.
Make a second identical square.
Cut a piece of plastic canvas slightly smaller than the crocheted squares.
Place the plastic canvas between the two layers.
Join the layers using single crochet around all four sides.
Work 3 sc into each corner to maintain a square shape.
Fasten off and weave in the ends.
2. Crochet the Cream Lantern Walls
Make four rectangular wall panels.
Using cream yarn and a 3.0 mm hook:
Row 1: Ch 51.
Row 2: Sc in the second chain from the hook and across. (50)
Rows 3–12: Ch 1, turn, sc across. (50)
These first rows create the solid lower section of the lantern wall.
Create the Arched Window Opening
Row 13: Sc 10, ch 30, skip 30 stitches, sc 10.
Rows 14–35: Work 10 sc along each side of the window opening separately, maintaining the open central space.
To shape the arch, gradually decrease the opening width near the top by adding stitches to the inner edges of the side sections.
Continue until the window opening narrows to approximately 10 stitches.
Join the two sides with a chain bridge.
Rows 36–45: Sc evenly across the full width.
Fasten off.
Repeat to make four wall panels.
Construction note: The window shaping above is a design guide rather than a fully stitch-counted arch chart. Before cutting the support panels, block one completed wall and adjust the arch so both sides are symmetrical.
3. Crochet the Red Window Frames
Each arched window is outlined with a raised red crochet border.
Using Christmas red yarn and a 2.5 mm hook:
Join yarn at the lower corner of the window opening.
Work single crochet evenly around the entire window edge.
At the curved upper section, place additional stitches as needed to prevent pulling.
Complete a second round of single crochet.
For a thicker raised frame, work one final round of slip stitches.
Fasten off.
Repeat around all four windows.
4. Assemble the Lantern Body
Position the four cream panels upright around the square base.
Join neighboring panels using single crochet seams in cream yarn.
Insert narrow plastic canvas supports along the solid wall sections and corners, keeping the arched openings unobstructed.
Secure the supports between the crochet layers or with hidden yarn ties.
Attach the walls to the base using single crochet around the lower perimeter.
Check that the lantern stands upright and the windows remain evenly shaped.
5. Crochet the Christmas Red Roof
The reference lantern features a beautiful sloping red roof with cream scalloped trim and small golden stars.
Make four triangular roof panels.
Using Christmas red yarn and a 3.0 mm hook:
Row 1: Ch 51.
Row 2: Sc across. (50)
Row 3: Dec, sc across until 2 stitches remain, dec. (48)
Row 4: Sc across. (48)
Continue decreasing two stitches on every alternate row until approximately 4 stitches remain.
Fasten off.
Repeat for four roof panels.
Join the triangular panels along their sloping edges to create a pyramidal roof.
Add lightweight plastic canvas supports beneath the roof to maintain its shape.
6. Crochet the Cream Scalloped Roof Trim
Using cream yarn and a 3.0 mm hook:
Join yarn along the lower edge of the roof.
Rnd 1: Sc evenly around the entire roof edge.
Rnd 2: (Skip 2 stitches, 5 dc in next stitch, skip 2 stitches, sl st in next stitch) repeat around.
Fasten off.
The scalloped trim should hang slightly beyond the lantern walls.
7. Crochet the White Snow-Covered Roof Detail
Make four decorative snow sections using white yarn.
Each section follows the upper portion of the roof and creates the appearance of soft snow resting beneath the festive bow.
Row 1: Ch 25.
Row 2: Sc across.
Rows 3–10: Decrease one stitch at each end of every alternate row.
Finish the lower edge with a decorative scalloped border.
Fasten off.
Sew the white sections around the upper roof, allowing their pointed ends to extend downward.
8. Crochet the Large Christmas Plaid Bow
The oversized red and green bow is one of the most distinctive features of this lantern.
Bow Loops – Make Two
Using Christmas red yarn and a 3.0 mm hook:
Row 1: Ch 41.
Row 2: Sc across. (40)
Rows 3–12: Ch 1, turn, sc across. (40)
Fasten off.
Using forest green yarn, embroider horizontal stripes across the red fabric.
Using gold metallic thread, embroider thin vertical and horizontal lines to create a festive tartan effect.
Fold each rectangle into a loop and sew the short ends together.
Bow Tails – Make Two
Ch 16 with red yarn.
Work 35 rows of single crochet.
Decorate with the same green and gold plaid pattern.
Shape the lower ends into a V-cut appearance by decreasing toward the center.
Bow Center
Ch 11.
Work six rows of single crochet.
Wrap around the center of the assembled bow and sew securely.
Attach the bow to the front of the lantern roof.
9. Crochet the Golden Lantern Handle
Using tan or golden beige yarn and a 3.0 mm hook:
Row 1: Ch 9.
Row 2: Sc across. (8)
Continue working rows of single crochet until the strip measures approximately 35–40 cm.
Wrap the crochet strip around flexible plastic tubing and sew the long edges together.
Bend the tubing into a smooth arch.
Secure both ends of the handle to reinforced points near the roof peak.
Note: This handle is decorative and should not be used to carry the lantern unless the internal frame and attachments have been separately load-tested.
10. Crochet Santa Claus Face Applique
Santa’s smiling face is positioned beneath the left arched window.
Santa Head
Using peach yarn and a 2.5 mm hook:
Rnd 1: 6 sc in MR. (6)
Rnd 2: Inc around. (12)
Rnd 3: (1 sc, inc) x 6. (18)
Rnd 4: (2 sc, inc) x 6. (24)
Rnd 5: (3 sc, inc) x 6. (30)
Rnd 6: (4 sc, inc) x 6. (36)
Rnd 7: (5 sc, inc) x 6. (42)
Rnd 8: (6 sc, inc) x 6. (48)
Fasten off, leaving a long sewing tail.
Insert black safety eyes or embroider the eyes with black yarn.
Using peach yarn, make a small raised nose with 6 sc in a magic ring.
Sew the nose between the eyes.
Santa Beard
Using white yarn:
Ch 31.
Work 30 sc across.
Continue for approximately 8 rows, decreasing at both ends every second row.
Finish with decorative scallops along the lower edge.
Make two smaller curved pieces for the moustache.
Sew the beard beneath Santa’s face.
Attach the moustache on either side of the nose.
Santa Hat
Using red yarn:
Rnd 1: 6 sc in MR. (6)
Rnd 2: Sc around. (6)
Rnd 3: (1 sc, inc) x 3. (9)
Rnd 4: Sc around. (9)
Rnd 5: (2 sc, inc) x 3. (12)
Continue increasing gradually until the hat is wide enough to cover the upper portion of Santa’s head.
Finish with three rounds of white single crochet.
Make a small white pom-pom and attach it to the tip.
Sew the hat above Santa’s face.
11. Crochet Rudolph Reindeer Applique
Rudolph is positioned beneath the right arched window.
Reindeer Head
Using tan yarn and a 2.5 mm hook:
Rnd 1: 6 sc in MR. (6)
Rnd 2: Inc around. (12)
Rnd 3: (1 sc, inc) x 6. (18)
Rnd 4: (2 sc, inc) x 6. (24)
Rnd 5: (3 sc, inc) x 6. (30)
Rnd 6: (4 sc, inc) x 6. (36)
Rnd 7: (5 sc, inc) x 6. (42)
Fasten off.
Add two black eyes.
Reindeer Muzzle
Using cream yarn:
Rnd 1: 6 sc in MR. (6)
Rnd 2: Inc around. (12)
Rnd 3: (1 sc, inc) x 6. (18)
Fasten off.
Sew the muzzle onto the lower part of the head.
Make a small red crochet ball for Rudolph’s nose.
Embroider a cheerful smile beneath the nose.
Reindeer Ears – Make Two
Using tan yarn:
Ch 9.
Starting in the second chain, sc 2, hdc 3, dc 2, 3 sc in the final chain.
Work along the opposite side of the foundation chain.
Fasten off.
Add a smaller cream-colored inner ear.
Reindeer Antlers – Make Two
Using dark brown yarn:
Ch 15.
Sl st back along the chain.
At selected points, create small branches using chains of 4–6 stitches.
Fasten off.
Sew the antlers securely behind the upper portion of the head.
12. Crochet Rudolph’s Christmas Scarf
Using red yarn and a 2.5 mm hook:
Ch 61.
Starting in the second chain, sc across.
Work four rows of single crochet.
Change to forest green yarn and work two rows.
Return to red yarn for the final two rows.
Fasten off.
Add short fringe to both ends.
Wrap the scarf around Rudolph’s lower head area and secure it with a few hidden stitches.
13. Crochet the Holly Leaves
Make approximately 12–16 holly leaves using forest green yarn.
Row 1: Ch 15.
Row 2: Starting in the second chain, sc 2, hdc 3, dc 4, hdc 3, sc 2.
Continue around the opposite side of the foundation chain.
Along the outer edge, work small picots to create the characteristic pointed holly leaf shape.
Fasten off.
Embroider a central vein with gold metallic thread.
Arrange the leaves around the windows, roof, and lower lantern corners.
14. Crochet the Red Holly Berries
Make approximately 20–25 berries using red yarn.
Rnd 1: 6 sc in MR. (6)
Rnd 2: Inc around. (12)
Rnd 3: Sc around. (12)
Rnd 4: Dec around. (6)
Stuff lightly.
Fasten off and close.
Arrange the berries in clusters of three.
Sew them onto the holly leaf groups.
15. Crochet the White Snowflakes
Make six to eight miniature snowflakes using white cotton yarn and a 2.0 mm hook.
Rnd 1: 6 sc in MR. Join. (6)
Rnd 2: (Ch 5, sl st into next stitch) repeat six times.
Rnd 3: Into each chain loop work: sc, ch 3, sl st into first chain, sc.
Fasten off.
Block the snowflakes to emphasize their delicate shape.
Sew them onto the cream walls between the window arches.
16. Crochet the Golden Stars
Make four small stars using golden yellow yarn.
Rnd 1: 10 sc in MR. Join. (10)
Rnd 2: (Ch 4, sl st in second chain, sc in next chain, hdc in next chain, skip 1 stitch, sl st in next stitch) repeat five times.
Fasten off.
Attach the stars around the lower edge of the red roof.
Optional: Add a few small stitches of gold metallic thread to make the stars sparkle.
17. Crochet the Decorative Bottom Border
Using Christmas red yarn:
Join yarn along the lower edge of the lantern walls.
Rnd 1: Sc evenly around.
Rnd 2: (Skip 2 stitches, 5 dc in next stitch, skip 2 stitches, sl st in next stitch) repeat around.
Fasten off.
Using forest green yarn, work three rounds of single crochet beneath the red scalloped border.
Finish with a decorative line of gold embroidery stitches.
18. Assemble the Christmas Lantern
Once all components are complete, begin the final assembly.
- Place the completed cream lantern walls onto the reinforced square base.
- Secure the four corners with firm crochet seams.
- Check that the structure stands straight.
- Attach the red arched window frames.
- Position Santa’s face beneath the left window.
- Position Rudolph’s face beneath the right window.
- Attach the holly leaves and berry clusters around the windows.
- Sew the miniature white snowflakes onto the cream walls.
- Attach the red roof to the upper wall edges.
- Add the cream scalloped roof trim.
- Attach the white snow-covered roof details.
- Sew the golden stars onto the red roof.
- Position the large plaid bow at the front of the roof.
- Attach the decorative golden handle.
- Finish the bottom border with red scallops and green crochet trim.
- Place the battery-operated LED lights inside the lantern.
For the best result, position the LED lights so their glow is visible through both front windows without directly touching the crochet fabric.
19. Optional Christmas Lantern Variations
Traditional Santa Lantern
- Classic red roof
- Cream walls
- Santa Claus and Rudolph appliques
- Red and green plaid bow
- Golden stars
Winter Woodland Lantern
- Forest green roof
- Ivory walls
- Reindeer and snowflake appliques
- Natural beige bow
- White snow-covered trim
Elegant White Christmas Lantern
- White roof
- Soft cream walls
- Silver snowflakes
- Champagne gold bow
- Warm white LED lights
Gingerbread Christmas Lantern
- Warm brown roof
- Caramel-colored walls
- White icing-inspired trim
- Red candy decorations
- Miniature gingerbread appliques
20. Tips for a Professional Finish
- Use tightly worked cotton stitches to create firm lantern walls.
- Reinforce the base and corners with plastic canvas.
- Keep the window openings symmetrical.
- Block the roof panels before joining them.
- Use a smaller hook for detailed appliques.
- Stuff Santa’s nose and Rudolph’s muzzle lightly for dimensional detail.
- Embroider facial expressions carefully to create a friendly appearance.
- Use consistent stitch tension for the plaid bow.
- Arrange holly berries in natural-looking clusters.
- Keep decorative snowflakes flat against the walls.
- Use a lightweight internal frame to support the roof.
- Keep all LED lighting accessible for battery replacement.
21. Care Instructions
- Remove the LED lights before cleaning.
- Dust the lantern gently with a soft brush.
- Spot-clean using a slightly damp cloth.
- Do not machine wash the assembled lantern.
- Avoid crushing the roof or decorative handle.
- Keep away from moisture and direct heat.
- Store upright in a protective box.
- Remove batteries before long-term storage.
- Keep the lantern indoors or in a completely dry, sheltered location.
Frequently Asked Questions
Is this Christmas crochet lantern suitable for beginners?
This is an advanced project because it combines structured crochet construction, arched window shaping, dimensional amigurumi appliques, detailed embroidery, and decorative assembly.
How tall is the finished lantern?
The lantern measures approximately 38–45 cm tall, including the decorative handle.
Can I use real candles inside the lantern?
No. Use battery-operated LED candles only. Crochet yarn, plastic canvas, and decorative embellishments are flammable.
Can I make the lantern smaller?
Yes. Reduce the foundation stitch counts and the number of rows in the wall panels, roof sections, and decorative appliques.
How can I make the lantern stand upright?
Use plastic canvas supports inside the walls, corners, roof, and base. Secure the crochet panels firmly around the supporting structure.
Can I hang the lantern from its handle?
The handle in this pattern is decorative. Display the lantern on a stable, flat surface unless you have independently engineered and tested a load-bearing hanging system.
Can I change the Santa and reindeer decorations?
Absolutely! You can replace them with snowmen, gingerbread characters, Christmas trees, or other holiday appliques.
Can I sell finished lanterns made from this pattern?
Yes. You may sell handmade finished items made from this original pattern. Credit to Cozy Crochet Patterns is appreciated.
Final Thoughts
This Christmas Crochet Santa and Reindeer Lantern combines the charm of traditional holiday decorations with the beauty of handmade crochet craftsmanship.
From the cheerful Santa and Rudolph faces to the festive plaid bow, delicate snowflakes, golden stars, and glowing arched windows, every detail makes this lantern a memorable Christmas decoration.
Display it beside your Christmas tree, on an entryway table, or as part of a cozy winter arrangement. It also makes a thoughtful handmade gift for someone who loves festive home decor.
Enjoy creating this magical Christmas lantern, one stitch at a time!
Save this free Christmas crochet lantern pattern to Pinterest and share it with your crochet-loving friends!
Pattern note: This is an original design interpretation of the supplied reference image, not an exact reproduction or sample-tested pattern. Window shaping, panel measurements, and structural assembly may require adjustments to fit your chosen yarn, gauge, and support frame.

