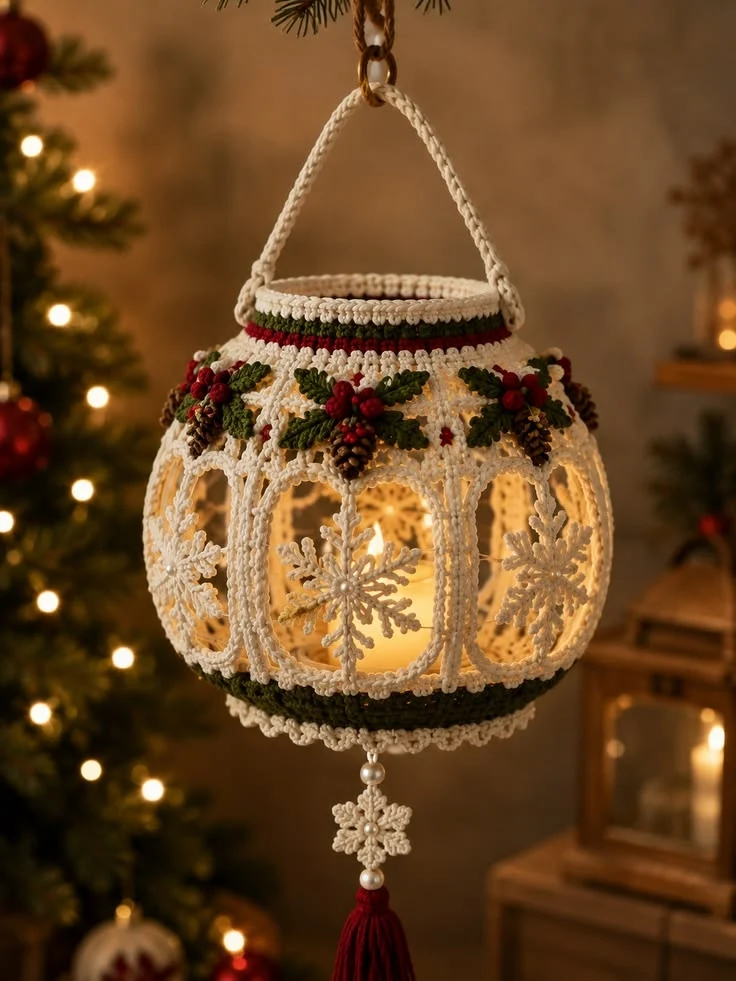
Christmas Crochet Snowflake Lantern – Free Hanging Lantern Pattern
Create a magical handmade Christmas decoration with this elegant crochet snowflake lantern. Featuring delicate ivory lace panels, beautiful snowflake motifs, forest green holly leaves, red berries, miniature pinecones, and a festive tassel, this hanging lantern brings warmth and charm to your holiday decorations.
The softly illuminated lantern looks beautiful beside a Christmas tree, hanging near a window, or decorating a cozy living room.
Pattern Information
- Skill Level: Advanced
- Finished Height: Approximately 30–35 cm including handle and tassel
- Lantern Diameter: Approximately 18 cm
- Yarn: Cotton DK or sport-weight yarn
- Hook Sizes: 2.5 mm and 3 mm
- Terminology: US crochet terms
- Construction: Separate lace panels, structural rings, decorative motifs, and assembled hanging elements
Materials Needed
- Ivory cotton yarn – approximately 180 g
- Forest green cotton yarn – approximately 35 g
- Deep red cotton yarn – approximately 20 g
- Brown cotton yarn – approximately 15 g
- 2.5 mm and 3 mm crochet hooks
- Two lightweight rigid rings, approximately 12 cm diameter
- Six flexible structural ribs or craft supports
- Battery-operated LED candle
- Small pearl beads
- Gold hanging ring
- Stitch markers
- Tapestry needle
- Scissors
- Fabric stiffener, optional
Safety: Use only a cool-running battery-operated LED candle. Never place a real flame inside a crochet lantern. Keep the LED and battery compartment accessible.
Crochet Abbreviations
- MR: Magic ring
- ch: Chain
- sl st: Slip stitch
- sc: Single crochet
- hdc: Half double crochet
- dc: Double crochet
- tr: Treble crochet
- inc: Increase
- dec: Decrease
- sp: Space
- st: Stitch
- FO: Fasten off
1. Crochet Lantern Base
Using ivory yarn and a 3 mm crochet hook:
- Round 1: Work 6 sc into MR. (6)
- Round 2: Inc in each stitch. (12)
- Round 3: *Sc 1, inc* around. (18)
- Round 4: *Sc 2, inc* around. (24)
- Round 5: *Sc 3, inc* around. (30)
- Round 6: *Sc 4, inc* around. (36)
- Round 7: *Sc 5, inc* around. (42)
- Round 8: *Sc 6, inc* around. (48)
- Round 9: *Sc 7, inc* around. (54)
- Round 10: *Sc 8, inc* around. (60)
- Round 11: *Sc 9, inc* around. (66)
- Round 12: *Sc 10, inc* around. (72)
Continue increasing by six stitches per round until the base measures approximately 12 cm across. Adjust the final round to fit the lower structural ring.
Decorative Bottom Border
Join forest green yarn and crochet one round of sc.
Change to ivory and work a decorative scalloped edging: *Skip 1 st, 5 dc in next st, skip 1 st, sl st in next st*. Repeat around.
2. Upper Lantern Ring
Using ivory yarn:
- Ch enough stitches to fit around the upper rigid ring without stretching.
- Join into a circle without twisting.
- Round 1: Sc around.
- Round 2: Dc around.
- Round 3: Sc around.
- Round 4: Change to forest green and work sc around.
- Round 5: Change to deep red and work sc around.
- Round 6: Return to ivory and work sc around.
Wrap or sew the finished crochet band securely around the rigid upper ring.
3. Snowflake Lace Panels – Make 6
Each panel contains an open oval-shaped lace window with a delicate snowflake motif suspended in the center.
Snowflake Center
Using ivory yarn and a 2.5 mm hook:
- Round 1: Work 12 sc into MR. Join.
- Round 2: *Sc 1, ch 5, skip 1 st*. Repeat six times.
- Round 3: In each ch-5 loop work (sc, ch 3, sc, ch 5, sc, ch 3, sc).
- Round 4: Work decorative branches using ch-4 and ch-6 loops, securing each branch with slip stitches.
Fasten off and block the snowflake to emphasize its six symmetrical points.
Oval Lace Frame
- Ch 22.
- Work sc along the foundation chain.
- At the final chain, work 5 sc to turn the corner.
- Continue along the opposite side.
- Work 5 sc at the opposite end to create an oval.
- Continue in joined rounds, increasing at the curved ends until the oval measures approximately 12 cm tall.
- Work one final round of decorative picot edging.
Attach the snowflake inside the oval using small chain bridges at six evenly spaced points.
Connecting the Panels
Join the six oval frames side by side using slip stitches or small chain bridges. Leave evenly spaced gaps for the structural ribs.
Secure the upper and lower edges of the panels to the corresponding lantern rings.
4. Decorative Holly Leaves – Make 8
Using forest green yarn:
- Ch 13.
- Starting in the second chain, work 2 sc, 3 hdc, 4 dc, 2 hdc, 1 sc.
- Work 3 sc in the last chain.
- Continue along the opposite side, mirroring the stitches.
- Work a decorative edging with small picots to create the pointed holly leaf shape.
Embroider the central leaf vein using a lighter shade of green if desired.
5. Red Crochet Berries
Make approximately 18 small berries using deep red yarn.
- Round 1: Work 6 sc in MR. (6)
- Round 2: Inc around. (12)
- Round 3: Sc around. (12)
- Round 4: Dec around. (6)
Lightly stuff the berries, close the opening, and leave a yarn tail for attachment.
6. Miniature Crochet Pinecones
Using brown yarn, make 4–6 miniature pinecones.
- Round 1: Work 6 sc into MR.
- Round 2: Inc around. (12)
- Round 3: Work in back loops only, sc around.
- Round 4: *Sc 2, inc* around. (16)
- Round 5: Work sc around.
- Round 6: *Sc 2, dec* around. (12)
- Round 7: Dec around. (6)
Close the pinecone and add decorative surface loops to create a layered scale effect.
7. Crochet Hanging Handle
Using ivory yarn:
- Ch 75, or enough chains to create the desired hanging length.
- Row 1: Sc in the second chain from the hook and across.
- Row 2: Ch 1, turn, sc across.
- Row 3: Ch 1, turn, sc across.
- Fasten off, leaving a long sewing tail.
Fold the handle lengthwise and sew the long edges together to form a sturdy cord.
Attach both ends securely to opposite sides of the upper lantern ring.
8. Hanging Snowflake and Red Tassel
Mini Snowflake
Make a smaller version of the snowflake motif using ivory yarn and a 2.5 mm hook.
Red Tassel
- Wrap deep red yarn approximately 30 times around a 10 cm cardboard template.
- Slide the wrapped yarn off carefully.
- Tie the top securely.
- Wrap a separate yarn strand around the upper section to create the tassel head.
- Cut the lower loops evenly.
- Attach a pearl bead and the miniature snowflake above the tassel.
9. Final Lantern Assembly
- Secure the crocheted base around the lower structural ring.
- Attach the six structural ribs between the lower and upper rings.
- Position the lace panels evenly around the lantern frame.
- Stitch each panel to the upper and lower crochet bands.
- Attach holly leaves and red berries around the upper decorative section.
- Add miniature pinecones between the holly clusters.
- Secure the hanging handle to the upper ring.
- Attach the decorative snowflake and tassel beneath the lantern.
- Place a lightweight battery-operated LED candle inside the lantern.
- Check the balance and ensure every attachment is secure before hanging.
Finishing and Blocking
Lightly dampen the lace motifs and block them to shape. If needed, use fabric stiffener on the lace panels before attaching them to the frame.
Allow all pieces to dry completely before final assembly.
Customization Ideas
- Classic Christmas: Ivory, forest green, burgundy, and gold.
- Winter Wonderland: White, silver, and icy blue.
- Rustic Cottage: Natural cotton, sage green, and cinnamon brown.
- Elegant Holiday: Champagne, emerald, and antique gold.
Frequently Asked Questions
Can I use a real candle inside this crochet lantern?
No. Always use a battery-operated LED candle. Cotton yarn and decorative fibers are flammable.
How can I make the lantern hold its shape?
Use lightweight structural rings, supporting ribs, and optional fabric stiffener to maintain the rounded lantern shape.
Can I make a smaller lantern?
Yes. Use thinner cotton yarn, a smaller crochet hook, and smaller supporting rings. Adjust the lace panels to fit the new dimensions.
Is this suitable for beginners?
This is an advanced crochet project involving lace motifs, shaping, dimensional decorations, and structural assembly.
Can I sell finished lanterns?
Yes, you may sell handmade lanterns created using this original pattern.
Final Thoughts
This beautiful Christmas crochet snowflake lantern combines delicate lacework, dimensional holiday decorations, and warm LED lighting to create an elegant handmade centerpiece.
Whether displayed beside your Christmas tree or gifted to someone special, this festive lantern is a lovely way to celebrate the art of crochet.
Save this free crochet pattern to Pinterest and share it with your crochet-loving friends!

