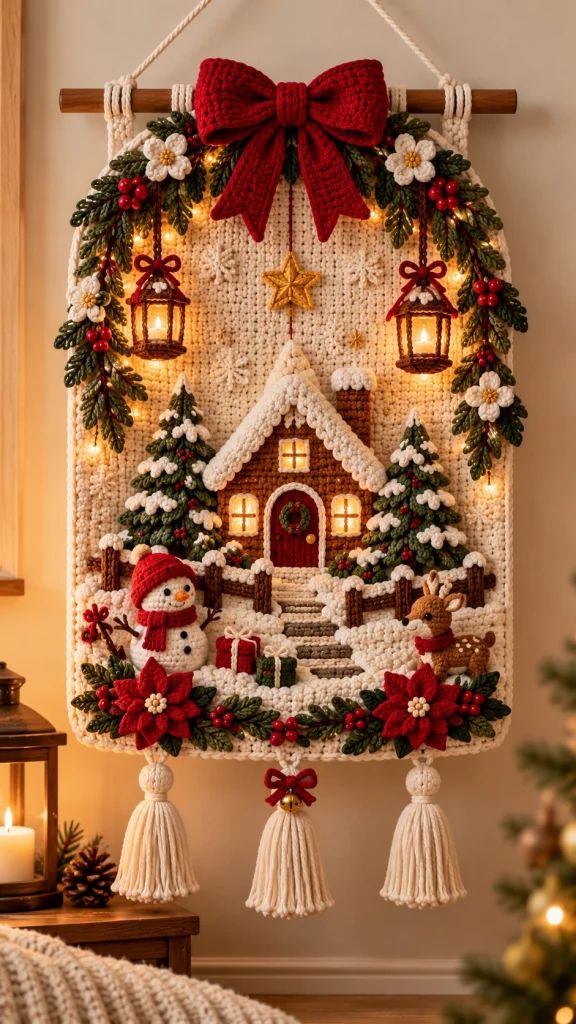
Christmas Crochet Winter Village Wall Hanging: Free Crochet Pattern
Transform your home into a cozy Christmas wonderland with this enchanting Christmas crochet winter village wall hanging. Featuring a snowy cottage, miniature evergreen trees, a cheerful snowman, an adorable reindeer, glowing lanterns, and rich red poinsettia flowers, this festive handmade tapestry captures the warmth and magic of the holiday season.
The design combines dimensional crochet appliques, textured stitches, embroidery, and decorative finishing details to create a beautiful winter village scene. A soft ivory crochet background provides the perfect foundation for the richly colored ornaments, while a wooden dowel and oversized red bow give the hanging a traditional farmhouse-inspired appearance.
At the center of the tapestry stands a charming gingerbread-brown cottage with a snow-covered roof, glowing windows, a festive red door, and a miniature wreath. Snowy evergreen trees frame the cottage, while a little snowman and reindeer bring playful personality to the winter landscape.
Along the upper edge, cascading evergreen garlands decorated with berries and ivory flowers surround two miniature lanterns. At the bottom, large red poinsettias, winter greenery, golden bells, and three soft ivory tassels complete the arrangement.
This tutorial walks you through the main construction stages, from crocheting the tapestry background to creating the cottage, winter characters, Christmas trees, floral decorations, hanging details, and final assembly.
Pattern at a Glance
Measurements are approximate. The final dimensions depend on yarn weight, gauge, dowel length, and the placement of dimensional decorations.
Materials and Supplies
- Approximately 400–500 g of worsted-weight yarn in warm ivory for the tapestry background, snow, and tassels.
- Approximately 150–200 g of gingerbread-brown yarn for the cottage, reindeer, lanterns, and decorative details.
- Approximately 150 g of forest-green yarn for Christmas trees, garlands, leaves, and wreaths.
- Approximately 100–150 g of deep Christmas red yarn for the bow, poinsettias, scarf, door, and berries.
- Small amounts of white yarn for snow details and snowman components.
- Small amounts of gold or mustard yarn for stars, flower centers, and decorative accents.
- Small amounts of black and orange yarn for facial embroidery.
- 4 mm crochet hook for the tapestry background.
- 3.5 mm crochet hook for dimensional decorations.
- 3 mm crochet hook for miniature details.
- Wooden dowel approximately 55–60 cm long.
- Strong cotton cord for hanging.
- Polyester fiberfill for dimensional ornaments.
- Yarn needle and embroidery needle.
- Stitch markers and scissors.
- Measuring tape.
- Optional lightweight felt backing for stability.
- Optional battery-operated micro LED fairy lights.
- Optional small golden decorative bells.
- Blocking mat and rustproof pins.
Gauge and Preparation
For the tapestry background, aim for approximately 16 single crochet stitches and 18 rows per 10 cm using the 4 mm hook.
For dimensional ornaments, use a slightly smaller hook to create firm stitches that hold stuffing securely.
Before beginning, sketch the arrangement on paper or lay out the main elements on a flat surface. This helps maintain balanced spacing between the cottage, Christmas trees, characters, and floral decorations.
Abbreviations
All instructions use US crochet terminology. Turning chains do not count as stitches unless otherwise specified.
Part 1: Crochet the Ivory Tapestry Background
The rectangular ivory background forms the foundation of the entire Christmas village scene.
Foundation and main panel
Using ivory yarn and a 4 mm hook, ch 81.
Row 1: Sc in the second chain from the hook and across. 80 sc.
Row 2: Ch 1, turn, and sc in each stitch across. 80 sc.
Rows 3–90: Repeat Row 2.
Continue until the panel measures approximately 50–55 cm tall, adjusting the number of rows as necessary.
Decorative border
Work one round of sc evenly around the entire panel, placing 3 sc in each corner.
For additional texture, work a second round of reverse single crochet or tightly spaced slip stitches.
FO and weave in the yarn ends.
Block the panel gently to create straight edges and a smooth surface.
Part 2: Create the Wooden Dowel Hanging
A wooden dowel provides structure and allows the finished tapestry to hang evenly.
Dowel attachment
- Place the wooden dowel along the upper edge of the tapestry.
- Cut several lengths of ivory yarn approximately 25 cm long.
- Wrap the yarn around the dowel and through the upper stitches of the tapestry.
- Space the attachment points evenly.
- Secure each section with strong knots on the back.
- Attach a long cotton hanging cord to both ends of the dowel.
Check that the tapestry hangs straight before attaching the dimensional decorations.
Part 3: Crochet the Gingerbread Cottage Walls
The cozy gingerbread-brown cottage is the main focal point of the winter village.
Front wall
Using brown yarn and a 3.5 mm hook, ch 37.
Row 1: Sc in the second chain from the hook and across. 36 sc.
Rows 2–28: Ch 1, turn, and sc across.
FO and weave in the ends.
Upper triangular gable
Join brown yarn at the upper edge.
Row 1: Sc across all 36 stitches.
Row 2: Ch 1, turn, sc2tog, sc across to the last two stitches, sc2tog. 34 sc.
Continue decreasing one stitch at each end of every row until only two stitches remain.
FO and weave in the ends.
The finished cottage silhouette should have a rectangular lower section and a pointed roof gable.
Part 4: Crochet the Snow-Covered Roof
A thick ivory roof creates the charming snow-covered appearance of the Christmas cottage.
Roof strips
Using ivory yarn, ch 45.
Row 1: Hdc in the second chain from the hook and across.
Rows 2–5: Ch 1, turn, and hdc across.
FO, leaving a long tail for sewing.
Make two matching strips.
Decorative snow edging
Along one long edge of each strip, work small shell groups using 3 dc in selected stitches to create a soft scalloped snow effect.
Attach the strips diagonally along the upper edges of the cottage gable.
Overlap the strips slightly at the roof peak.
Part 5: Crochet the Cottage Chimney
Chimney instructions
Using brown yarn, ch 11.
Row 1: Sc in the second chain from the hook and across. 10 sc.
Rows 2–16: Ch 1, turn, and sc across.
FO and weave in the ends.
Snow-covered chimney top
Using ivory yarn, ch 13.
Work three rows of sc.
Attach the ivory strip along the upper edge of the chimney.
Sew the chimney behind the right side of the cottage roof.
Part 6: Make the Cottage Windows
Warm golden windows give the cottage a magical illuminated appearance.
Window panels — make three
Using golden-yellow yarn, ch 9.
Row 1: Sc in the second chain from the hook and across. 8 sc.
Rows 2–8: Ch 1, turn, and sc across.
FO and weave in the ends.
Window frames
Using ivory or brown yarn, work a round of sc around each window panel.
Embroider one vertical and one horizontal line across each window to create four small panes.
Position one window near the upper gable and two windows on either side of the door.
For a warm glowing effect, place cool battery-operated micro LEDs behind the decorative window panels using a suitable backing layer.
Part 7: Crochet the Red Cottage Door
Door instructions
Using deep red yarn, ch 13.
Row 1: Sc in the second chain from the hook and across. 12 sc.
Rows 2–18: Ch 1, turn, and sc across.
FO and weave in the ends.
Door frame
Using ivory yarn, crochet a narrow strip around the door edges.
Attach the door to the center of the cottage front.
Add a small golden French knot or bead for the door handle.
Part 8: Crochet the Mini Christmas Wreath
A tiny green wreath decorates the red cottage door.
Wreath instructions
Using forest-green yarn, ch 16.
Join to form a ring.
Work 24 sc around the ring and join.
FO and weave in the ends.
Add tiny red French knots to represent berries.
Sew the wreath onto the upper section of the cottage door.
Part 9: Crochet the Snowy Christmas Trees
Two dimensional evergreen trees frame the cottage and create a charming winter forest scene.
Tree foundation
Using forest-green yarn, ch 31.
Row 1: Sc in the second chain from the hook and across. 30 sc.
Row 2: Ch 1, turn, sc2tog, sc across to the last two stitches, sc2tog. 28 sc.
Row 3: Ch 1, turn, and sc across.
Continue repeating the decrease row and straight row until only two stitches remain.
FO and weave in the ends.
Textured evergreen branches
Using dark green yarn, crochet small scalloped branch strips.
Attach the strips horizontally across the triangular tree foundation, beginning at the bottom and overlapping upward.
Snow accents
Using ivory yarn, embroider irregular white stitches along selected branches to create a snowy appearance.
Add tiny red berry details between the branches.
Make two trees in slightly different sizes for a natural winter landscape.
Part 10: Crochet the Snowman Body
The cheerful snowman stands near the lower left side of the winter village.
Snowman body
Using white yarn, make a magic ring.
Round 1: 6 sc into the ring.
Round 2: Inc around. 12 sc.
Round 3: (Sc 1, inc) repeat six times. 18 sc.
Round 4: (Sc 2, inc) repeat six times. 24 sc.
Rounds 5–10: Sc around. 24 sc.
Round 11: (Sc 2, dec) repeat six times. 18 sc.
Round 12: (Sc 1, dec) repeat six times. 12 sc.
Stuff lightly and FO, leaving a long tail.
Snowman head
Make a second smaller sphere using the same method, increasing to 18 stitches instead of 24.
Stuff the head and sew it securely to the body.
Part 11: Add the Snowman Hat and Scarf
Red winter hat
Using red yarn, ch 25 and join to form a ring.
Work five rounds of sc.
Begin decreasing evenly over the next rounds until the top closes.
FO and attach the hat to the snowman’s head.
Red scarf
Using red yarn, ch 36.
Work three rows of sc.
FO and wrap the scarf around the snowman’s neck.
Facial details
Embroider two black eyes and a smiling mouth.
Use orange yarn to create a small carrot-shaped nose.
Add three black buttons down the front of the body.
Part 12: Crochet the Baby Reindeer
A small brown reindeer adds a sweet woodland detail to the Christmas scene.
Reindeer body
Using caramel-brown yarn, make a magic ring.
Round 1: 6 sc into the ring.
Round 2: Inc around. 12 sc.
Round 3: (Sc 1, inc) repeat six times. 18 sc.
Rounds 4–10: Sc around. 18 sc.
Round 11: (Sc 1, dec) repeat six times. 12 sc.
Stuff lightly and FO.
Reindeer head
Make a small rounded head using the same amigurumi method, increasing to 18 stitches.
Attach the head to the front of the body.
Legs
Make four small cylindrical legs using brown yarn.
Attach the legs beneath the body.
Ears and antlers
Crochet two small pointed ears using brown yarn.
Use darker brown yarn to make short branched antlers.
Sew the ears and antlers securely to the head.
Reindeer finishing details
Embroider small black eyes and a dark nose.
Add a few tiny white spots along the back.
Wrap a miniature red scarf around the neck.
Part 13: Crochet the Red Poinsettia Flowers
Large dimensional poinsettias decorate the lower corners of the tapestry.
Flower center
Using ivory yarn, make a magic ring.
Round 1: Work 6 sc into the ring.
Round 2: Inc around. 12 sc.
Red petals
Change to deep red yarn.
Repeat six times: sl st into the next stitch, ch 8, work 1 sc in the second chain from the hook, 1 hdc, 4 dc, 1 hdc, and sl st into the next available base stitch.
For a fuller flower, make a second layer of slightly longer petals behind the first layer.
FO and leave a long sewing tail.
Make two matching poinsettias and attach small cream or gold-colored decorative centers.
Part 14: Crochet the Evergreen Garland
Rich green garlands frame the upper and side edges of the tapestry.
Garland foundation
Using forest-green yarn, ch 51.
Starting in the second chain from the hook, work sl st along the foundation chain.
Create the evergreen branches
Along the central stem, repeat: ch 7, sl st back along the chain, and sl st into the next stem stitch.
Continue along both sides of the stem.
FO and leave a long tail for attachment.
Make several garland sections and arrange them along the upper sides of the tapestry.
Part 15: Crochet the Small Ivory Flowers and Berries
Small ivory flower
Using ivory yarn, make a magic ring.
Work 5 sc into the ring.
For each petal, work ch 3, 2 dc, ch 3, and sl st into the same base stitch.
Repeat until five petals are formed.
FO and add a small golden center.
Mini red berries
Using red yarn, make a magic ring.
Work 6 sc into the ring.
Work one additional round of sc.
Close the opening and shape into a small berry.
Make several flowers and berry clusters for the garlands and lower decorative border.
Part 16: Crochet the Large Red Bow
An oversized deep red bow crowns the wall hanging and creates a dramatic festive focal point.
Bow panel
Using deep red yarn, ch 41.
Row 1: Sc in the second chain from the hook and across. 40 sc.
Rows 2–22: Ch 1, turn, and sc across.
FO and weave in the ends.
Shape the bow
- Fold the rectangular panel into two large loops.
- Pinch the center tightly.
- Wrap a separate strip of red yarn around the center.
- Sew the center wrap securely.
- Adjust the loops into a symmetrical bow shape.
Bow tails
Make two long red strips approximately 25–30 cm long.
Attach the strips behind the bow center.
Shape the lower ends into pointed ribbon tails.
Part 17: Crochet the Golden Christmas Star
A small golden star hangs beneath the bow near the top center of the tapestry.
Star instructions
Using golden-yellow yarn, make a magic ring.
Round 1: Work 10 sc into the ring.
Round 2: Repeat five times: sl st into the next stitch, ch 4, work 1 sc in the second chain from the hook, 1 hdc, 1 dc, and sl st into the next available base stitch.
FO and weave in the ends.
Attach the star using a short length of red yarn.
Part 18: Make the Miniature Hanging Lanterns
Two small decorative lanterns hang from the upper garlands and add a magical Christmas village atmosphere.
Lantern frame
Using brown yarn, ch 25 and join to form a ring.
Work three rounds of sc.
Make four short vertical crochet strips and attach them evenly around the ring.
Create a small upper roof section using decreasing rounds.
Lantern hanging loop
Using brown yarn, ch 20.
Sl st back along the chain.
Attach the loop to the lantern roof.
Decorative bow
Make a miniature red bow and sew it near the lantern top.
Place only a suitable cool, battery-powered miniature LED light inside a securely constructed lantern. Alternatively, use golden-yellow yarn to imitate a warm glow without any electronics.
Part 19: Create the Snowy Ground and Cottage Path
Textured ivory crochet stitches create the appearance of a snowy winter landscape.
Snowdrift strips
Using ivory yarn, ch 51.
Row 1: Sc in the second chain from the hook and across.
Row 2: Ch 1, turn, and hdc across.
Row 3: Work small shell groups at irregular intervals to create a softly uneven snow edge.
FO and weave in the ends.
Cottage pathway
Using light beige yarn, crochet several small rectangular strips.
Arrange them in a descending pathway from the cottage door toward the lower edge of the tapestry.
Use ivory yarn to add small snow accents around the pathway.
Part 20: Crochet the Three Ivory Tassels
Three long ivory tassels complete the lower edge of the wall hanging.
Tassel instructions
- Cut approximately 30–40 strands of ivory yarn, each measuring 35–40 cm.
- Fold the strands in half.
- Use a separate piece of yarn to tie the folded center securely.
- Wrap another length of yarn around the tassel approximately 3 cm below the top.
- Secure the wrap with a strong knot.
- Trim the lower ends evenly.
- Repeat to create three matching tassels.
Attach one tassel near each lower corner and one at the center.
Part 21: Assemble the Christmas Village Scene
Arrange all the crocheted components on the tapestry before sewing them permanently.
Step 1: Position the cottage
Place the cottage in the central lower half of the tapestry. Sew the outer edges securely, leaving selected roof details slightly raised for dimension.
Step 2: Attach the Christmas trees
Position one tree on each side of the cottage. Allow the branches to overlap slightly with the snowy ground.
Step 3: Add the snowman
Place the snowman near the lower left side of the scene.
Step 4: Attach the reindeer
Position the reindeer near the lower right side, facing slightly toward the cottage.
Step 5: Add the snowy pathway
Arrange the beige pathway pieces beneath the cottage door and surround them with textured snowdrifts.
Step 6: Attach the upper garlands
Sew the evergreen garlands along the upper and side edges of the tapestry.
Step 7: Add the lanterns
Hang one lantern on each upper side, making sure both are securely attached.
Step 8: Position the poinsettias
Attach the two large red poinsettias near the lower corners.
Step 9: Add the large bow
Center the red bow along the wooden dowel and secure it firmly.
Step 10: Attach the golden star and tassels
Hang the golden star beneath the bow and attach the three ivory tassels along the lower edge.
Part 22: Add the Optional Warm LED Lighting
Warm white LED lights can enhance the magical Christmas village atmosphere.
Lighting placement
- Choose a battery-operated micro LED light strand designed for decorative use.
- Position selected lights behind the cottage windows.
- Arrange additional lights behind the evergreen garlands.
- Secure the wiring discreetly to the back of the tapestry.
- Keep the battery pack accessible for switching and replacement.
- Ensure that all lights remain cool during operation.
- Test the lighting before hanging the finished decoration.
Do not use mains-powered decorative lights unless the product is specifically designed and certified for the intended textile application.
Part 23: Final Assembly and Finishing
- Weave in all loose yarn ends.
- Inspect the tapestry border for even tension.
- Check that the cottage is securely attached.
- Adjust the snow-covered roof edges.
- Arrange the Christmas tree branches naturally.
- Secure the snowman and reindeer.
- Inspect the poinsettia flowers and garlands.
- Check the lantern hanging loops.
- Adjust the large red bow and ribbon tails.
- Trim the three ivory tassels evenly.
- Test the wooden dowel and hanging cord.
- Check that the finished decoration hangs straight.
- Keep the tapestry away from open flames and heat sources.
Customization Ideas
1. Create a Scandinavian Christmas village
Use ivory, soft gray, muted red, and natural wood tones for a minimalist Nordic-inspired holiday design.
2. Make a gingerbread-themed tapestry
Add candy canes, gingerbread characters, and extra icing details around the cottage.
3. Create a snowy woodland scene
Replace the cottage with additional evergreen trees, woodland animals, and snowflake ornaments.
4. Add personalized Christmas details
Embroider a family name, festive greeting, or holiday year near the upper section of the tapestry.
5. Make a smaller wall hanging
Reduce the background dimensions and use only the cottage, two trees, and one festive character.
6. Create a matching Christmas collection
Use the same poinsettia, snowman, and cottage motifs to make coordinating ornaments, garlands, and decorative pillows.
Care Instructions
- Dust the wall hanging gently with a soft brush.
- Spot-clean stained crochet areas using a damp cloth when appropriate.
- Avoid machine washing the fully assembled tapestry.
- Remove electronic lighting and batteries before cleaning or storing.
- Do not twist or wring dimensional ornaments.
- Allow damp sections to dry completely.
- Store the tapestry flat or loosely rolled.
- Protect dimensional decorations with tissue paper.
- Keep away from direct heat, open flames, and prolonged moisture.
Frequently Asked Questions
Is this Christmas crochet wall hanging suitable for beginners?
The complete project is best suited to advanced crocheters because it combines tapestry construction, amigurumi, decorative appliques, embroidery, and multi-piece assembly. Beginners can practice individual motifs before making the full design.
What yarn works best for this Christmas tapestry?
Worsted-weight cotton or cotton-blend yarn provides good stitch definition and helps dimensional decorations maintain their shape. Acrylic yarn can also be used for softer decorative elements.
Can I make the wall hanging without LED lights?
Yes. The cottage windows and lanterns can be made with golden-yellow yarn to create the appearance of warm lighting without electronics.
How can I prevent the tapestry from stretching?
Use a firm crochet tension, choose a sturdy wooden dowel, and consider adding a lightweight felt backing behind the heavier decorations.
Can I make the snowman and reindeer separately?
Absolutely. Both characters can be used as individual Christmas ornaments, gift decorations, or festive shelf displays.
How long does this crochet wall hanging take to make?
The time required depends on your experience, yarn choice, and decorative details. Because the design includes many separate components, it is best approached as a multi-session project.
Final Thoughts
This Christmas crochet winter village wall hanging brings together everything that makes handmade holiday decorations special: cozy textures, festive colors, charming characters, and beautiful dimensional details.
The snowy cottage, evergreen trees, cheerful snowman, adorable reindeer, rich red poinsettias, golden star, and oversized bow create a magical Christmas scene that feels warm, nostalgic, and full of seasonal joy.
Whether you display it above a fireplace, hang it in an entryway, or give it as a thoughtful handmade gift, this festive crochet tapestry is a wonderful way to celebrate the holiday season.
Enjoyed this pattern? Save it to your Christmas crochet inspiration board and share your finished winter village wall hanging with fellow crochet lovers.

