Christmas Crochet Wreath Pattern – Poinsettia & Bow Door Wreath
Beginner Friendly
Perfect for those just starting their crochet journey, with clear instructions and simple techniques
Single-Day Project
A satisfying project you can complete in a single afternoon or evening.
Handmade Gift
A beautiful keepsake — free forever. Read online or print at home.
About This Christmas Crochet Wreath Pattern – Poinsettia & Bow Door Wreath
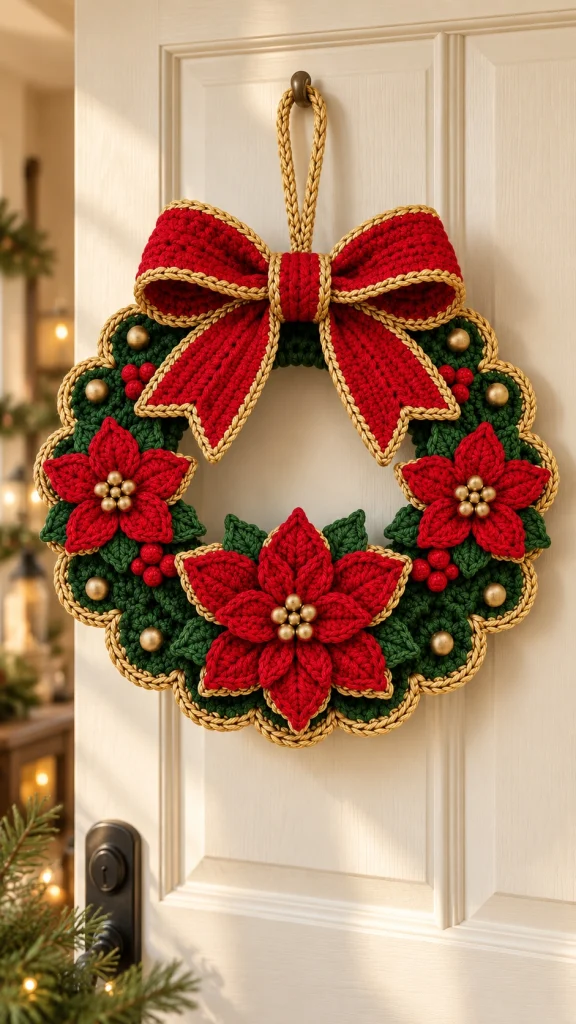
This Christmas crochet wreath is a rich, traditional holiday decoration designed around deep evergreen crochet, dimensional red poinsettias and a dramatic red bow. Small berries and warm gold details give the finished wreath an elegant Christmas look without losing the soft handmade character of crochet.
The wreath is designed as a statement piece for a front door, interior door or holiday wall. The individual elements are crocheted separately and then assembled, making it easy to adjust the placement before everything is permanently attached.
Materials
- Deep evergreen worsted yarn 250–300 g
- Christmas red worsted yarn 180–220 g
- Leaf green yarn 60–80 g
- Metallic gold or warm mustard yarn 40–60 g
- Brown or neutral yarn small amount
- 4.0–4.5 mm crochet hook 1
- 30–35 cm wreath form 1
- Gold beads approximately 20–25
- Fiberfill small amount
- Yarn needle 1
- Scissors 1 pair
- Stitch markers optional
Abbreviations – US Terms
MRmagic ringchchainsl stslip stitchscsingle crochethdchalf double crochetdcdouble crochettrtreble crochetinc2 stitches in same stitchdecdecreaseFOfasten offFinished Size
The finished wreath measures approximately 38–42 cm / 15–16.5 in across, depending on your yarn, tension and the size of the bow and flowers.
The large top bow adds additional height, creating a substantial front-door decoration.
Part 1 – Crochet the Wreath Base
Using deep evergreen yarn, make a foundation chain long enough to wrap completely around your wreath form.
Row 1: Starting in 2nd ch from hook, sc across. Ch 1, turn.
Rows 2 onward: sc across each row until the rectangle is long enough to wrap around the full circumference of the wreath form.
FO, leaving a long sewing tail.
Part 2 – Cover the Wreath Form
Wrap the green crochet rectangle around the wreath form.
Bring the long edges together along the back of the wreath.
Using the long yarn tail, whip stitch the edges together around the entire ring.
Massage the crochet covering gently so the seam remains positioned at the back.
Part 3 – Scalloped Evergreen Edge
Join green yarn near the outside edge of the wreath.
Work evenly around:
*sc, skip 1 stitch, 5 dc in next stitch, skip 1 stitch*
Repeat around to create the rounded decorative scallops.
Join with sl st.
Repeat around the inner edge if you want the same full scalloped effect on both sides.
Part 4 – Gold Wreath Edging
Join metallic gold or warm mustard yarn to the outer scalloped edge.
Work one loose round of sl st or surface crochet along the outermost edge.
Keep your tension relaxed so the gold line follows each scallop without pulling the wreath inward.
Repeat along the inner edge if desired.
Part 5 – Large Poinsettia Petals
Make 18 large red petals for three flowers.
Using red yarn:
Ch 11.
Starting in 2nd ch from hook:
sl st, sc, hdc, dc, 3 tr, dc, hdc, sc.
Work 3 sc into the final chain.
Continue along the opposite side:
sc, hdc, dc, 3 tr, dc, hdc, sc, sl st.
FO, leaving a sewing tail.
Part 6 – Smaller Poinsettia Petals
Make 15–18 smaller petals.
Ch 8.
Starting in 2nd ch:
sl st, sc, hdc, 2 dc, hdc, sc.
Work 3 sc in the final chain.
Repeat the stitch sequence along the opposite side.
FO.
Part 7 – Shape the Poinsettias
Arrange six large petals in a circle with their narrow ends meeting in the center.
Sew securely through the base of every petal.
Place five or six smaller petals over the first layer, rotating them so they sit between the larger petals.
Sew the second layer firmly in place.
Repeat until you have 3 dimensional red poinsettias.
Part 8 – Gold Flower Centers
Sew approximately 6–7 small gold beads into the center of each poinsettia.
Cluster the beads closely rather than arranging them in a perfectly flat circle.
This creates the dimensional golden center visible in traditional poinsettia-inspired Christmas decorations.
Part 9 – Crochet Leaves
Using leaf-green yarn:
Ch 12.
Starting in 2nd ch:
sl st, sc, hdc, dc, 3 tr, dc, hdc, sc, sl st.
Work 3 sc into the final chain.
Repeat along the opposite side.
FO.
Make approximately 12–16 leaves.
Part 10 – Leaf Veins
Thread a yarn needle with a slightly lighter or darker green yarn.
Embroider one line from the base to the tip of each leaf.
Add two or three short diagonal stitches on either side to imitate natural leaf veins.
This small detail gives the foliage more definition when placed against the dark green wreath.
Part 11 – Crochet Red Berries
Using red yarn:
Round 1: MR, 6 sc into ring. (6)
Round 2: inc around. (12)
Round 3: sc around. (12)
Add a tiny amount of fiberfill.
Round 4: dec around. (6)
FO and close the opening.
Make approximately 12–15 berries.
Part 12 – Gold Accent Berries
For the scattered gold details, either use wooden or metallic beads or crochet small spheres using gold yarn.
For a crochet version:
Round 1: MR, 6 sc. (6)
Round 2: sc around. (6)
Stuff very lightly.
FO and close.
Make approximately 6–8.
Part 13 – Large Red Bow Loops
Using red yarn, ch approximately 36–42.
Join carefully with sl st, making sure the chain is not twisted.
Rounds 1–6: sc around.
FO.
Make a second identical loop.
Flatten each loop gently into an oval.
Part 14 – Gold Bow Edging
Join gold yarn along the outside edge of each red bow loop.
Work loose surface slip stitches around both edges.
Repeat on the second loop.
The gold border should remain thin so the red crochet stays visually dominant.
Part 15 – Bow Tails
Make 2 red rectangles.
Ch 13.
Starting in 2nd ch, sc across. Ch 1, turn.
Continue until each tail measures approximately 18–20 cm / 7–8 in.
Decrease gradually during the final rows or fold the bottom corners inward to create a pointed ribbon end.
Add gold edging around each tail.
Part 16 – Bow Center
Using red yarn:
Ch 9.
Starting in 2nd ch, sc across. (8)
Continue for approximately 8–10 rows.
Wrap the rectangle tightly around the center of the two bow loops and the upper ends of the tails.
Sew securely at the back.
Part 17 – Hanging Loop
Using gold yarn, ch approximately 45–55.
Sl st back along the entire chain to create a stronger cord.
Fold the cord in half.
Sew both ends securely behind the top of the wreath.
Test the hanging loop before adding the final decorations.
Part 18 – Position the Flowers
Before sewing anything permanently, lay the wreath flat.
Position:
- 1 large poinsettia at the bottom center
- 1 poinsettia on the lower left
- 1 poinsettia on the lower right
Leave the top section relatively open for the oversized bow.
Part 19 – Add the Foliage
Arrange the green leaves behind and between the poinsettias.
Point some leaves toward the center opening and others toward the outside edge.
Overlap the bases slightly so no large gaps remain visible.
Sew each leaf securely through its center and base.
Part 20 – Add the Berries
Arrange red berries in small clusters of three.
Place several clusters beside the flowers and near the upper sides of the wreath.
Add individual gold berries between the green scallops for small highlights.
Avoid making the placement perfectly symmetrical; slight variation creates a more natural arrangement.
Part 21 – Attach the Statement Bow
Center the large red bow at the top of the wreath.
The loops should extend slightly beyond the outer edge of the wreath.
Allow the two tails to angle downward toward the center opening.
Sew through the bow center several times and secure it firmly to the wreath base.
Add a few hidden stitches beneath each loop and tail so the bow does not move when the wreath hangs vertically.
Part 22 – Final Gold Details
Inspect the finished wreath and add small gold details only where needed.
You can use surface crochet around selected leaves, flower petals or scallops.
Keep these accents thin and consistent.
The final balance should remain primarily deep green + Christmas red, with gold acting only as an elegant highlight.
Part 23 – Final Shaping
Hang the wreath temporarily on a door.
Shape the bow loops with your fingers.
Separate the poinsettia petals so both layers are visible.
Adjust the leaves and berry clusters until the wreath appears full and balanced.
Secure any elements that droop when the wreath is vertical.
Color Palette
Evergreen: dark pine or forest green.
Red: classic Christmas red or deep cranberry.
Gold: antique gold, champagne or warm mustard.
This combination creates the rich traditional Christmas appearance of the finished wreath.
Alternative Color Ideas
Vintage Christmas: burgundy, forest green and antique cream.
Elegant Christmas: ivory, champagne gold and deep emerald.
Nordic Christmas: muted red, oatmeal and sage.
Winter Wonderland: white, icy blue and silver.
Rustic Christmas: cranberry, olive green, cream and natural brown.
Displaying Your Crochet Wreath
Hang the finished wreath from an interior door, protected front door, fireplace wall or entryway.
If displaying outdoors, keep it protected from rain, snow and prolonged direct sunlight unless the yarn and internal wreath form are suitable for exterior use.
At the end of the season, store the wreath flat in a large box so the bow and poinsettias keep their dimensional shape.
Frequently Asked Questions
The individual stitches are straightforward, but the project includes shaping, layered flowers and assembly. It is best suited to an intermediate crocheter or a confident advanced beginner.
Yes. You can crochet a thick tubular ring and stuff it firmly with fiberfill, although a ready-made wreath form gives the finished decoration a more stable circular shape.
Use two layers of petals, keep the stitches fairly tight and sew only the bases of the petals firmly. Leaving the outer sections free allows you to shape them outward.
Yes. Sew the bow to a small felt or crochet backing and attach it to the wreath with hidden ties. This also makes seasonal storage easier.
Warm mustard, caramel or antique-gold cotton yarn gives a similar appearance and is often easier to crochet than metallic yarn.
Use a rigid wreath form, sew heavy decorations through several stitches of the base and add hidden securing stitches behind the large bow and flowers.
Yes. Use DK yarn with a smaller hook and a 20–25 cm wreath form. Reduce the size of the bow and use two poinsettias instead of three.
Finished handmade wreaths are especially suitable for holiday craft fairs, Christmas markets and seasonal handmade gift collections.
The finished Christmas Crochet Wreath Pattern – Poinsettia & Bow Door Wreath

