Christmas Crochet Wreath Pattern with Sleeping Deer
Advanced
For experienced crocheters who enjoy complex shaping, fine detail, and ambitious construction
Weekend Project
A satisfying weekend make — start Friday, finish Sunday, enjoy forever.
Handmade Gift
A beautiful keepsake — free forever. Read online or print at home.
About This Christmas Crochet Wreath Pattern with Sleeping Deer
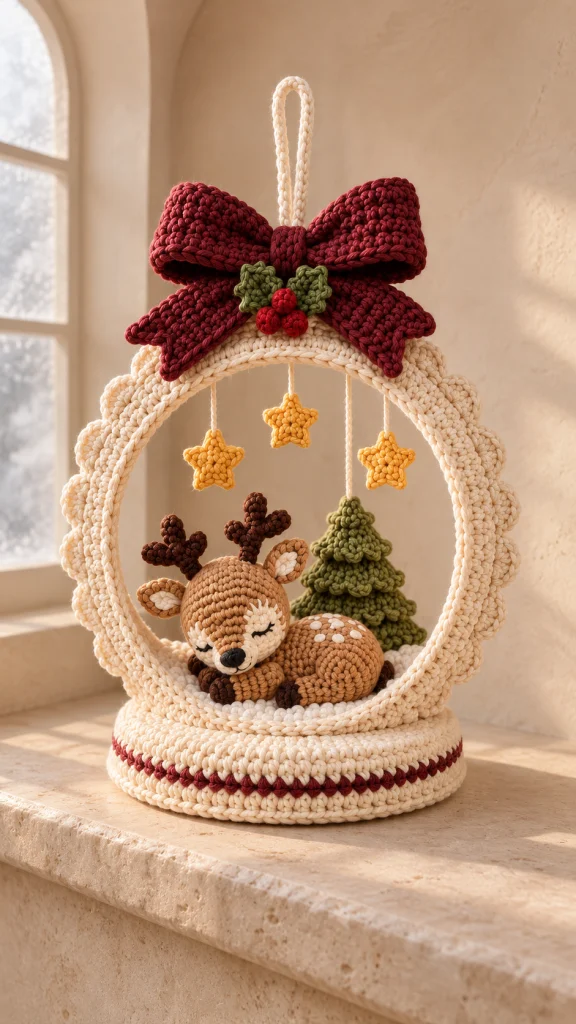
This Christmas crochet wreath pattern creates a freestanding holiday display with a sleeping deer nestled inside an ivory frame. A layered evergreen, three golden stars, a burgundy bow, and tiny holly berries give the scene its familiar Christmas colors and soft, sculptural detail.
The project is home decor built around a rigid craft hoop and a weighted circular base. Its advanced construction combines a fitted hoop covering, a scalloped edging, shaped decorative crochet, surface embroidery, and concealed structural attachments. Allow approximately 28–36 hours, including careful assembly.
This design suits experienced crocheters who enjoy making detailed seasonal displays. The small deer is one component of the wreath, while the reinforced frame and base hold the entire scene upright on a shelf or mantel.
Materials
- Bulky weight 5 ivory yarn: approximately 400 g or 440 m, including the frame, base, and snow texture.
- Bulky weight 5 burgundy yarn: approximately 25 g or 28 m for the base stripe.
- DK weight 3 yarn: approximately 65 g burgundy, 55 g caramel, 40 g olive green, 20 g cream, 15 g dark brown, 15 g golden yellow, and 8 g red.
- Small amounts of black embroidery thread for the nose and closed eyes.
- 5 mm crochet hook for bulky yarn.
- 3 mm crochet hook for DK yarn, or the size needed for firm decorative fabric.
- Rigid craft hoop measuring 25 cm outside diameter, with an approximately 8 mm round cross-section.
- Two smooth plastic base disks, each approximately 21 cm in diameter; the lower disk needs four paired attachment holes positioned beneath the hoop.
- Firm upholstery foam, approximately 21 cm in diameter and 2.5 cm thick.
- A securely stitched fabric pouch holding approximately 500 g of flat steel washers, spread evenly beneath the foam.
- Four small cable ties for securing the hoop to the lower plastic disk.
- Polyester stuffing for the deer, tree, berries, and lightly padded stars.
- Thin quilt batting for padding the hoop.
- Strong polyester sewing thread for structural attachments and matching yarn for decorative seams.
- Tapestry needle, embroidery needle, stitch markers, scissors, pins, measuring tape, and sewing clips.
- A small piece of felt to cover trimmed cable-tie ends inside the base.
Abbreviations
chchainsl stslip stitchscsingle crochethdchalf double crochetdcdouble crochettrtreble crochetincwork 2 single crochet in one stitchdecsingle crochet 2 stitches together; use an invisible decrease on stuffed piecesMRmagic ringBLOback loop onlyFLOfront loop onlyststitchstsstitchesIvory Hoop Covering
- Wrap the hoop in a thin, even layer of quilt batting. Secure the batting with sewing thread, keeping the padding slim enough for the cover to close around it.
- With bulky ivory yarn and the 5 mm hook, ch 9. Row 1: sc in the second chain from the hook and each remaining chain. Turn. (8 sts)
- Rows 2–126: ch 1, sc in each stitch across. Turn after every row except the last. (8 sts per row; approximately 79 cm long)
- Check the strip against the padded hoop. Its short ends should meet without stretching the hoop out of shape. If your row gauge differs, add or remove complete 8-stitch rows until the length equals the padded hoop circumference.
- Join the two short ends with a mattress seam, matching all 8 stitches. Position this seam at the bottom of the hoop.
- Wrap the strip around the hoop and sew its long edges together, matching row ends. Keep this seam along the outside circumference, where the scalloped edging will cover it. Close the final section after checking that the fabric lies evenly.
Scalloped Frame Edge and Inner Cord
- With bulky ivory and the 5 mm hook, ch 127. Row 1: sc in the second chain from the hook and each chain across. Turn. (126 sts)
- Row 2: ch 1; repeat the following 21 times: skip 2 sts, work 7 dc in the next stitch, skip 2 sts, sl st in the next stitch. Fasten off. (21 shells and 21 anchoring slip stitches)
- Join the short ends of the edging. Pin its foundation edge around the outside seam of the hoop, distributing one shell over every 6 cover rows when using the stated 126-row cover. Sew the foundation edge firmly in place, leaving the shells free.
- If the hoop cover required a different row count, retain all 21 shells and distribute the edging evenly around the hoop; do not force individual shell repeats to match cover rows.
- For the raised inner rim, use two strands of bulky ivory held together and make a loose chain approximately 76 cm long. Check the chain against the inner circumference of the covered hoop, adjusting the chain count to fit without tension.
- Join the chain ends and couch the cord around the front inner edge with matching yarn, taking a small securing stitch every 1.5 cm.
Weighted Circular Base
- Make two disks with bulky ivory and the 5 mm hook. For each disk, Round 1: 6 sc in MR. (6 sts)
- Round 2: inc in each stitch. (12 sts)
- Round 3: repeat [sc, inc] 6 times. (18 sts)
- Round 4: repeat [2 sc, inc] 6 times. (24 sts)
- Round 5: repeat [3 sc, inc] 6 times. (30 sts)
- Round 6: repeat [4 sc, inc] 6 times. (36 sts)
- Round 7: repeat [5 sc, inc] 6 times. (42 sts)
- Round 8: repeat [6 sc, inc] 6 times. (48 sts)
- Round 9: repeat [7 sc, inc] 6 times. (54 sts)
- Round 10: repeat [8 sc, inc] 6 times. (60 sts)
- Round 11: repeat [9 sc, inc] 6 times. (66 sts)
- Round 12: repeat [10 sc, inc] 6 times. (72 sts)
- Round 13: repeat [11 sc, inc] 6 times. (78 sts)
- Round 14: repeat [12 sc, inc] 6 times. (84 sts)
- Round 15: repeat [13 sc, inc] 6 times. (90 sts)
- Round 16: repeat [14 sc, inc] 6 times. (96 sts) Each disk should measure approximately 22 cm across. Fasten off the bottom disk only.
- On the top disk, side Round 1: work sc around in BLO. (96 sts)
- Side Round 2: sc around in ivory. (96 sts)
- Side Round 3: change to bulky burgundy and sc around. (96 sts)
- Side Rounds 4–5: change to ivory and sc around. (96 sts per round) Fasten off, leaving a long sewing tail.
- Prepare the base insert before closing the cover. Cut a narrow channel across the upper foam surface, positioned about 4 cm behind its center. Seat the lowest 5–6 cm of the covered hoop in this channel so the hoop stands vertically.
- Place the weight pouch beneath the foam and the lower plastic disk beneath the pouch. Use four cable ties through paired holes in the lower disk, passing each tie around the covered lower hoop arc and through the foam. Distribute the ties across the seated arc. Tighten until the hoop cannot rock; trim and cover the cut ends with felt.
- Use the second plastic disk as a firm upper platform. Cut a rear slot wide enough to slide it around the hoop uprights, then place it over the foam. Smooth all cut edges before assembly.
- Slide the top crochet disk over the upper platform, with the hoop emerging through two gaps gently opened between stitches. Do not cut crochet yarn. Ease the sidewall down around the insert.
- Pin the bottom crochet disk to the sidewall and sew all 96 stitch pairs together. Check the display on a level surface before completing the seam; redistribute the weight pouch if necessary.
Snow Cushion
- With bulky ivory and the 5 mm hook, ch 25. Row 1: sc in the second chain from the hook and each remaining chain. Turn. (24 sts)
- Rows 2–10: ch 1, sc across, turn. (24 sts per row)
- Edging: ch 1 and work 24 sc across the last row, 10 sc down the row ends, 24 sc across the foundation edge, and 10 sc up the other row ends. Join with sl st. (68 sts)
- Texture round: repeat [ch 3, sl st in the next edging stitch] 68 times. Fasten off. (68 chain loops)
- Position the cushion on the front half of the base, inside the hoop. Sew around its foundation fabric, keeping the chain loops free.
Layered Evergreen
- Use olive DK and the 3 mm hook. Round 1: 6 sc in MR. (6 sts)
- Round 2: sc around. (6 sts)
- Round 3: inc in each stitch. (12 sts)
- Round 4: sc around. (12 sts)
- Round 5: repeat [sc, inc] 6 times. (18 sts)
- Round 6: sc around in BLO, leaving the front loops free for a branch tier. (18 sts)
- Round 7: sc around. (18 sts)
- Round 8: repeat [2 sc, inc] 6 times. (24 sts)
- Round 9: sc around in BLO. (24 sts)
- Round 10: sc around. (24 sts)
- Round 11: repeat [3 sc, inc] 6 times. (30 sts)
- Round 12: sc around in BLO. (30 sts)
- Round 13: sc around. (30 sts)
- Round 14: repeat [4 sc, inc] 6 times. (36 sts)
- Round 15: sc around in BLO. (36 sts)
- Round 16: sc around. (36 sts)
- Round 17: repeat [5 sc, inc] 6 times. (42 sts)
- Round 18: sc around in BLO. (42 sts)
- Round 19: sc around. (42 sts) Fasten off, leaving a sewing tail. Stuff the cone lightly enough to preserve its tapered shape.
- Make the bottom disk: Round 1: 6 sc in MR. (6 sts)
- Bottom Round 2: inc around. (12 sts)
- Bottom Round 3: repeat [sc, inc] 6 times. (18 sts)
- Bottom Round 4: repeat [2 sc, inc] 6 times. (24 sts)
- Bottom Round 5: repeat [3 sc, inc] 6 times. (30 sts)
- Bottom Round 6: repeat [4 sc, inc] 6 times. (36 sts)
- Bottom Round 7: repeat [5 sc, inc] 6 times. (42 sts) Fasten off and sew its 42 stitches to the cone opening.
- Add one branch tier to each set of free front loops from cone Rounds 6, 9, 12, 15, and 18. With the tree tip pointing toward you, join olive yarn in a free loop; repeat [sl st in the next loop, skip 1 loop, 5 dc in the next loop] around. Join to the first slip stitch and fasten off. The tiers contain 6, 8, 10, 12, and 14 shells respectively.
- Place the tree behind the deer on the right. Sew its bottom disk to the snow cushion and add two concealed thread anchors from its back to the hoop covering.
Sleeping Deer Body
- With caramel DK and the 3 mm hook, Round 1: 6 sc in MR. (6 sts)
- Round 2: inc around. (12 sts)
- Round 3: repeat [sc, inc] 6 times. (18 sts)
- Round 4: repeat [2 sc, inc] 6 times. (24 sts)
- Round 5: repeat [3 sc, inc] 6 times. (30 sts)
- Round 6: repeat [4 sc, inc] 6 times. (36 sts)
- Round 7: repeat [5 sc, inc] 6 times. (42 sts)
- Rounds 8–15: sc around. (42 sts per round)
- Round 16: repeat [5 sc, dec] 6 times. (36 sts)
- Round 17: repeat [4 sc, dec] 6 times. (30 sts)
- Round 18: repeat [3 sc, dec] 6 times. (24 sts) Stuff firmly, keeping the underside slightly flattened.
- Round 19: repeat [2 sc, dec] 6 times. (18 sts)
- Round 20: repeat [sc, dec] 6 times. (12 sts)
- Round 21: dec 6 times. (6 sts) Fasten off and draw the remaining stitches closed. Lay the body horizontally, with its starting end forming the rounded rump on the right.
Deer Head and Muzzle
- For the head, use caramel DK. Round 1: 6 sc in MR. (6 sts)
- Round 2: inc around. (12 sts)
- Round 3: repeat [sc, inc] 6 times. (18 sts)
- Round 4: repeat [2 sc, inc] 6 times. (24 sts)
- Round 5: repeat [3 sc, inc] 6 times. (30 sts)
- Round 6: repeat [4 sc, inc] 6 times. (36 sts)
- Round 7: repeat [5 sc, inc] 6 times. (42 sts)
- Rounds 8–13: sc around. (42 sts per round)
- Round 14: repeat [5 sc, dec] 6 times. (36 sts)
- Round 15: repeat [4 sc, dec] 6 times. (30 sts)
- Round 16: repeat [3 sc, dec] 6 times. (24 sts) Stuff, rounding the crown and leaving the lower face slightly softer.
- Round 17: repeat [2 sc, dec] 6 times. (18 sts)
- Round 18: repeat [sc, dec] 6 times. (12 sts)
- Round 19: dec 6 times. (6 sts) Fasten off and close.
- For the cream muzzle, ch 5. Round 1: sc in the second chain, 2 sc along the chain, 3 sc in the last chain; working along the opposite side, 2 sc, then 2 sc in the chain containing the first sc. (10 sts)
- Muzzle Round 2: inc, 2 sc, inc in each of the next 3 sts, 2 sc, inc in each of the last 2 sts. (16 sts)
- Muzzle Round 3: sc around. (16 sts) Fasten off, leaving a sewing tail.
- Choose the front of the head and center the muzzle over Rounds 13–18, with its long axis horizontal. Add a small amount of stuffing and sew around all 16 edge stitches.
- Embroider a black oval nose approximately 1 cm wide on the upper center of the muzzle. Add a short vertical stitch beneath it.
- Embroider two closed eyes across head Rounds 12–13, one on either side of the muzzle, leaving approximately 9 stitches between their inner ends. Make each curved eyelid span 4 stitches and add two short outward lashes.
- With cream yarn, add closely spaced straight stitches beside the muzzle and above the outer ends of the eyes. Keep the cheek patches symmetrical and clear of the eyelid embroidery.
Deer Ears and Antlers
- Make two ears in caramel DK. Round 1: 6 sc in MR. (6 sts)
- Ear Round 2: repeat [sc, inc] 3 times. (9 sts)
- Ear Round 3: repeat [2 sc, inc] 3 times. (12 sts)
- Ear Rounds 4–5: sc around. (12 sts per round)
- Ear Round 6: repeat [2 sc, dec] 3 times. (9 sts) Leave unstuffed, flatten, and fasten off with a sewing tail.
- For each inner ear, use cream DK and ch 4. Work sc in the second chain, hdc in the next chain, and 3 sc in the last chain; on the opposite side work hdc in the next chain and sc in the final chain. (7 sts) Fasten off and sew to the front of an ear.
- Pinch each ear base and stitch it closed. Sew the ears to opposite sides of the head across Rounds 7–9, with their tips pointing outward.
- Make two main antler stems in dark brown DK. Round 1: 6 sc in MR. (6 sts)
- Main stem Rounds 2–8: sc around. (6 sts per round) Fasten off with a sewing tail. Add only a wisp of stuffing.
- Make four antler branches. Round 1: 6 sc in MR. (6 sts)
- Branch Rounds 2–3: sc around. (6 sts per round) Fasten off. Flatten the open edge of each branch and sew two branches to each main stem, one at stem Round 4 and one on the opposite side at Round 6.
- Sew the open ends of the antler stems to the crown across head Rounds 4–6, approximately 8 stitches apart, just inside the ears. Keep the antlers upright without inserting wire.
Folded Legs, Haunch, Tail, and Spots
- Make two folded forelegs, beginning in dark brown DK. Round 1: 6 sc in MR. (6 sts)
- Foreleg Round 2: repeat [sc, inc] 3 times. (9 sts)
- Foreleg Round 3: sc around. (9 sts)
- Foreleg Rounds 4–9: change to caramel and sc around. (9 sts per round) Stuff the hoof lightly and leave the upper leg soft. Flatten the opening and sew it closed.
- For the visible haunch, use caramel. Round 1: 6 sc in MR. (6 sts)
- Haunch Round 2: inc around. (12 sts)
- Haunch Round 3: repeat [sc, inc] 6 times. (18 sts)
- Haunch Round 4: repeat [2 sc, inc] 6 times. (24 sts)
- Haunch Round 5: sc around. (24 sts) Fasten off with a sewing tail. Lightly pad this shallow cup and sew it to the front-facing side of the rump, keeping its circular center visible.
- For the tail, use caramel. Round 1: 6 sc in MR. (6 sts)
- Tail Rounds 2–3: sc around. (6 sts per round) Fasten off, flatten, and sew to the rear of the body.
- Make seven cream spots: work 5 sc in MR, sl st to the first sc, fasten off, and pull the ring closed. (5 sts per spot) Sew them in two staggered rows over the upper rump.
- Sew the forelegs side by side beneath the front of the body, with the dark hooves facing left and slightly forward. Sew the head to the front upper body, tilting the muzzle down until it rests against the forelegs. Use a broad attachment area across at least 12 head stitches.
- Set the deer in front of the tree, with the head to the left and rump to the right. Sew the underside of the body and both forelegs to the snow cushion.
Three Hanging Stars
- Make six identical star faces in golden DK. For each face, Round 1: 5 sc in MR. (5 sts)
- Round 2: inc in each stitch. (10 sts)
- Round 3: repeat the following point sequence 5 times: in the next stitch work [sc, hdc, dc, tr, ch 2, sl st in the second chain from the hook, dc, hdc, sc]; sl st in the next stitch. (5 points; 35 point stitches and 5 valley slip stitches, excluding picots) Fasten off.
- Pair the faces with wrong sides together. Whipstitch corresponding edge stitches and picots, adding a very thin layer of stuffing before closing each star.
- Attach an ivory DK cord securely to the upper point of each star. Suspend the center star approximately 3 cm below the upper inner rim and the two side stars approximately 7 cm below it.
- Sew the cord ends into the hoop covering at approximately the 10:30, 12, and 1:30 positions. Adjust the side cords so the stars remain clear of the antlers and tree. Trim only after checking the assembled scene.
Burgundy Bow and Tails
- With burgundy DK and the 3 mm hook, ch 19. Row 1: sc in the second chain and each remaining chain. Turn. (18 sts)
- Rows 2–76: ch 1, sc across, turn. (18 sts per row) Fasten off. The strip should measure approximately 7.5 × 29 cm.
- Join the short ends to form a broad band. Flatten the band with the seam centered at the back; gather the middle to create two approximately equal loops. Secure the gathered center with sewing thread.
- For the center wrap, ch 7. Row 1: sc in the second chain and each remaining chain. Turn. (6 sts)
- Center wrap Rows 2–18: ch 1, sc across, turn. (6 sts per row) Fasten off. Wrap this strip around the gathered bow center and sew its short ends together at the back.
- Make two tails. Ch 15. Tail Row 1: sc in the second chain and each remaining chain. Turn. (14 sts)
- Tail Rows 2–16: ch 1, sc across, turn. (14 sts per row)
- Tail Row 17: ch 1, dec, 10 sc, dec. Turn. (12 sts)
- Tail Row 18: ch 1, dec, 8 sc, dec. Turn. (10 sts)
- Tail Row 19: ch 1, dec, 6 sc, dec. Turn. (8 sts)
- Tail Row 20: ch 1, dec, 4 sc, dec. Turn. (6 sts)
- Tail Row 21: ch 1, dec, 2 sc, dec. Turn. (4 sts)
- Tail Row 22: ch 1, dec twice. Turn. (2 sts)
- Tail Row 23: ch 1, dec. (1 st) Fasten off. Sew each tail’s 14-stitch starting edge behind the bow center, angling the tapered ends down and outward.
- Sew the bow across the top of the hoop, anchoring its center and the lower back of each loop to the covering. Keep the loops softly open and the tails in front of the upper frame.
Holly Leaves, Berries, and Top Loop
- Make two leaves with olive DK. Ch 9. Leaf Row 1: sc in the second chain, hdc in the next, dc in the next 4 chains, hdc in the next, and 3 sc in the last chain; working along the opposite side, hdc in the next chain, dc in the next 4 chains, hdc in the next, and sc in the last chain. Join with sl st to the first sc. (17 sts)
- Leaf edging: repeat [sl st in the next stitch, ch 3, sl st in the third chain from the hook, sl st in the next stitch] 8 times; sl st in the final stitch. (8 picots) Fasten off with a sewing tail.
- Make three berries with red DK. Round 1: 6 sc in MR. (6 sts)
- Berry Round 2: sc around. (6 sts)
- Berry Round 3: dec 3 times. (3 sts) Add a tiny amount of stuffing before drawing the remaining stitches closed.
- Sew the two leaves below the bow center with their tips angled outward. Sew the three berries over the leaf bases in a triangular cluster.
- For the ornamental top loop, use two strands of bulky ivory held together and ch 35, leaving long tails. Check that the folded chain rises approximately 10 cm above the bow, adjusting its length if needed.
- Sew both chain ends to the back of the hoop covering directly behind the bow. Reinforce with strong sewing thread. Keep the completed display supported on its base.
Finishing
- Check the full arrangement from the front before securing the last threads. Keep the deer’s face visible beneath the left star, and let the tree rise behind the right side of its body.
- Reinforce the bow, tree, deer, and star-cord attachments with small concealed stitches. Pass structural thread around the covered hoop where possible, rather than relying on a single crochet stitch.
- Weave every yarn end through several stitches and reverse direction before trimming. Hide embroidery ends inside the stuffed pieces.
- Set the wreath on a level surface and gently nudge it from the front and sides. If it rocks, reopen a short section of the bottom seam and correct the weight distribution or hoop attachments before displaying it.
Use your fingers to open the bow loops and arrange the scallops evenly around the frame. Lift any flattened snow loops with a tapestry needle, then settle the deer into its resting pose.
Keep the finished wreath on a dry indoor shelf away from direct heat. Dust with a soft brush and spot-clean the crochet gently, keeping the enclosed base dry.
Tips for Success
- Check the cover strip after 20 rows: its width must wrap around the padded hoop with enough ease for a neat seam.
- Mark the tree’s BLO rounds as you work so all five branch tiers attach to the correct free loops.
- Embroider the eyes before attaching the head; the tilted sleeping pose makes later embroidery awkward.
- Pin all three stars in place together and view the arrangement from the front before trimming their cords.
- Keep the base weights low and evenly spread; a firm hoop attachment matters as much as the total weight.
Common Mistakes to Avoid
- A twisted hoop covering creates a rippled inner rim. Keep the long seam on the outside circumference while sewing.
- Working tree tiers through both loops closes the intended attachment line. Use only the free front loops from the marked rounds.
- Overstuffing the muzzle pushes the closed eyes apart visually. Use just enough filling to lift the cream oval from the head.
- Attaching the bow only at its center allows the loops to droop. Add a concealed anchor behind each lower loop.
- Using the decorative top loop to lift the complete display strains the crochet covering. Move the piece by supporting the base with both hands.
Ways to Customize This Pattern
- Replace burgundy with forest green for the bow and base stripe while retaining the ivory frame and golden stars.
- Add tiny cream straight stitches to the outer edges of the tree shells for a snowy effect; keep them loose enough to preserve the scallops.
- Use copper-colored yarn for the stars and a deeper brown for the deer to create a warmer woodland palette.
- Omit the ornamental top loop for a cleaner mantel display; the weighted base and reinforced hoop remain the support system.
- For a larger version, recalculate the hoop-cover length from the new padded circumference and enlarge the base accordingly. Keep the decorative pieces at their original size only if the added open space is intentional.
Frequently asked questions
This version is a freestanding tabletop wreath with a weighted base. Its top loop is decorative. The enclosed weights and base construction are intended to remain supported on a shelf or mantel.
The two yarn weights create the proportions shown: a substantial ivory frame with smaller, detailed decorations. Using bulky yarn for the deer and tree makes them much larger and may crowd the opening. Swatch and check their finished dimensions before changing weights.
Check your bulky-yarn gauge first. A 96-stitch circumference should measure approximately 68.5 cm at the stated gauge. Adjust the hook size and remake the disks so they fit the 21 cm inserts with a little ease; do not force an undersized cover over the structure.
Place the eyelids low on the face, keep the muzzle lightly padded, and tilt the head forward onto the forelegs. Pin this pose before sewing the head to the body so the eyes remain visible from the front.
Spot-clean only after assembly. The rigid disks, enclosed weights, and foam make machine washing unsuitable. If you expect frequent cleaning, leave the bottom seam accessible so the crochet base cover can be removed from its insert.
The finished Christmas Crochet Wreath Pattern with Sleeping Deer

