Christmas Flower Crochet Ornament with a Bell
Advanced
For experienced crocheters who enjoy complex shaping, fine detail, and ambitious construction
Single-Day Project
A satisfying project you can complete in a single afternoon or evening.
Handmade Gift
A beautiful keepsake — free forever. Read online or print at home.
About This Christmas Flower Crochet Ornament with a Bell
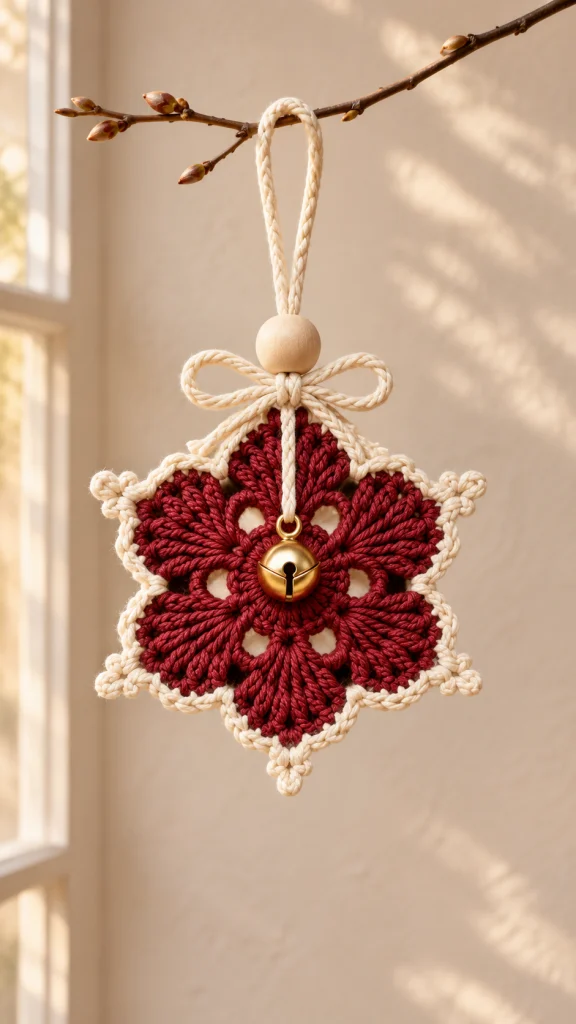
This Christmas flower crochet ornament pattern creates a six-petal decoration with deep red fans, a fine cream border, and a gold bell suspended over the center. A wooden bead and cream bow finish the hanging loop, giving the ornament the warm, natural look of a handmade Christmas decoration.
The flower is worked as one circular motif with six open arches supporting graduated fans. Tall stitches build each pointed petal, while a contrasting border outlines the curves and adds a small trefoil at every tip. The instructions use US crochet terminology and suit advanced crocheters comfortable controlling very tall stitches and working into their top loops.
Allow approximately 3–4 hours for crocheting and assembly, with additional time for blocking and drying. Make one ornament for a special branch or repeat the same motif in red, ivory, and forest green for a coordinated set.
Materials
- DK cotton yarn in deep cranberry red: approximately 35 m.
- Matching DK cotton yarn in warm cream: approximately 20 m, including cords.
- 3 mm crochet hook, or size needed for firm fabric with flexible petal tips.
- One unfinished wooden bead, approximately 18–20 mm across, with a hole at least 4 mm wide.
- One gold jingle bell, approximately 18–20 mm across, with an integral hanging eye.
- Tapestry needle and a fine needle that fits through the bell eye.
- Strong cream sewing thread for securing the bell and bow.
- Six removable stitch markers.
- Scissors and measuring tape.
- Blocking mat and rustproof pins.
- Optional fabric stiffener suitable for cotton, used according to its label.
Abbreviations
chchainsl stslip stitchscsingle crochethdchalf double crochetdcdouble crochettrtreble crochet: yarn over twice, insert hook and draw up a loop, then yarn over and draw through two loops three timesdtrdouble treble crochet: yarn over three times, insert hook and draw up a loop, then yarn over and draw through two loops four timestrtrtriple treble crochet: yarn over four times, insert hook and draw up a loop, then yarn over and draw through two loops five timesMRmagic ringststitchFlower Center and Open Arches
- Round 1, red: Make an MR, ch 1, and work 12 sc into the ring. Pull the ring closed and join with a sl st to the first sc. Leave a 15 cm starting tail for securing the center. Count: 12 sc.
- Round 2: Ch 1, sc in the first st, ch 5, skip the next st; repeat the sequence of sc in the next st, ch 5, skip the next st five more times. Join with a sl st to the first sc. Count: 6 sc anchors and 6 ch-5 arches. All 12 stitches of Round 1 have been used or skipped once.
Six Graduated Fan Petals
- Round 3, first petal: Sl st into the first ch-5 arch. Working around the chains rather than into individual chain stitches, make sc, hdc, dc, tr, dtr, trtr, dtr, tr, dc, hdc, sc into that arch. Mark the top of the trtr. Sl st into the next sc anchor. Count: 11 fan stitches and 1 valley sl st.
- Round 3, remaining petals: Into the next ch-5 arch work sc, hdc, dc, tr, dtr, trtr, dtr, tr, dc, hdc, sc; mark the trtr, then sl st into the next sc anchor. Work this sequence five times in total, ending in the first anchor of Round 2. Count for the complete round: 6 fans containing 66 fan stitches, separated by 6 valley slip stitches. The initial positioning sl st is not part of this count.
- Fasten off red. Spread the stitches evenly around each arch, keeping the five ascending stitches on one side of the marked peak and the five descending stitches on the other. Do not sew the arches closed.
Cream Outline and Trefoil Tips
- Define the trefoil: Ch 3 and sl st into the top of the sc from which the chain began. Repeat twice more, inserting into the same sc each time. This makes three small loops sharing one base; none counts as an edging stitch.
- Round 4, first petal: Join cream with a sl st into the valley immediately before any petal. Ch 1. Sc in each of the first 5 fan stitches. In the marked trtr work 1 sc, make the trefoil into that sc, then work a second sc into the same trtr. Sc in each of the remaining 5 fan stitches. Sl st into the following valley sl st. Count: 12 edging sc, 1 trefoil, and 1 valley sl st.
- Round 4, remaining petals: Repeat the complete petal edging sequence five more times: sc in the first 5 fan stitches, work sc, trefoil, sc into the marked peak, sc in the last 5 fan stitches, then sl st into the following valley. On the last repeat, place the valley sl st into the same valley used for the cream join. Count for the complete round: 72 sc, 6 trefoils, and 6 valley slip stitches, excluding the initial join.
- Fasten off and remove the markers. Weave the cream tails through the backs of the cream stitches without pulling the outline inward. Secure the red center tail through several stitches in opposite directions.
Blocking the Flower
- Wet the flower in cool water and gently press out excess moisture with a towel. Lay it right side up and position one petal vertically at the top.
- Pin the six petal peaks at equal intervals around the center. Adjust the flower to approximately 13–15 cm across, keeping opposite tips equally distant from the middle.
- Open the three loops of each trefoil with separate pins. Ease the fan edges into smooth curves and keep all six inner openings visible. Allow the motif to dry completely.
- If additional firmness is needed, apply a light coat of cotton-compatible fabric stiffener before the final drying. Keep the bead, bell, and cords off the motif until this step is complete.
Hanging Loop, Bead, and Bow
- Make three cream chain cords, leaving approximately 12 cm tails at each end: one cord measuring 24 cm for the hanger, one measuring 32 cm for the bow, and one measuring 10 cm for the bell drop. Measure the relaxed chains without stretching. Fasten off each cord.
- Fold the hanger cord in half. Pass both ends down through the wooden bead, leaving an exposed loop approximately 9–10 cm long above the bead. Hold the bead approximately 1 cm above the top petal.
- Place one hanger end on each side of the top petal’s trefoil base. Using the tails, sew each end to the two cream sc worked into the marked peak. Make three secure passes per end, then weave the tails into the back of the cream border. The hanger must bear weight through these sc rather than through the decorative chain loops.
- Center the bow cord around the two hanger strands immediately beneath the bead and tie it into a bow. Adjust the loops to approximately 3 cm each and the tails to approximately 4–5 cm. Secure the knot with several small stitches of cream sewing thread. Weave each chain cord’s yarn tail back through its own chain.
Bell Drop and Final Assembly
- Thread one end of the 10 cm cream cord through the bell eye. Fold approximately 1 cm back against the cord and stitch the overlap firmly with sewing thread. If the chain will not fit through the eye, lay the chain end against the eye and sew through the eye and chain at least six times.
- Lay the ornament flat and place the bell over the flower center. Run the cord vertically up the middle of the top petal to the back of the bow knot. Adjust the cord so the bell hangs over the central ring without pulling the top petal downward.
- Fold any excess cord behind the bow and sew the upper end to the hanger attachment stitches. Add a small, loose thread tack between the cord and the top petal’s red trtr halfway down the petal to prevent the drop from swinging sideways. Keep the tack slack enough for the flower to lie flat.
- Hang the ornament and check its balance. If the bell twists, adjust its attachment before securing the thread ends. Confirm that the bead cannot slide over the bow and that the hanger stitches remain firm under the ornament’s weight.
Finishing
Weave away any remaining ends on the back, keeping them out of the open arches. Smooth the cream outline with your fingers and arrange the bow so the wooden bead sits directly above its knot.
Give the finished ornament a final hanging check before placing it on a branch or hook. Store it flat with the bell wrapped in a small piece of tissue to prevent the metal from catching the crochet. This decoration contains small parts; keep it out of reach of young children and pets.
Tips for Success
- Keep the first loop drawn up for each tall stitch close to the height of the surrounding work; an oversized loop makes the fan look loose.
- Count each fan as five stitches, one marked peak, and five stitches. This makes misplaced edging stitches easier to find.
- Slide the fan stitches along their supporting arch before edging so the valleys remain open and symmetrical.
- Work the valley slip stitches loosely enough to preserve the flower’s width.
- Attach the hardware only after blocking so moisture and stiffener stay off the wood and metal.
Common Mistakes to Avoid
- Working into the individual chains of an arch changes the fan spacing. Work all 11 stitches around the complete ch-5 arch.
- Counting a valley slip stitch as a petal stitch shifts the cream peaks. Each red fan contains exactly 11 stitches before its valley.
- Putting the trefoil into the red peak directly can leave a gap in the outline. Make it into the first cream sc at the peak, then add the second cream sc into the red peak.
- Pulling the edging tight cups the flower. Relax the cream stitches or increase the hook size for the edging if blocking cannot flatten it gently.
- Hanging the bell from a short, taut drop bends the top petal. Adjust the drop with the flower flat before sewing its upper end.
Ways to Customize This Pattern
- Use forest green for the flower and keep the cream edging, bead, and bell for a woodland version.
- Reverse the red and cream yarns while retaining the same stitch sequence and cord lengths.
- Use sport-weight cotton with a smaller hook for a smaller ornament; measure new cord lengths against the blocked flower.
- Replace each trefoil with one ch-3 picot, closing it into its base sc, for a quieter outline. The 72 edging sc remain unchanged.
- Omit the bell and its drop for a lighter ornament, retaining the bead, bow, and reinforced hanger attachments.
Frequently asked questions
The construction is a six-petal flower motif used as a Christmas hanging decoration. Its six points and cream outline also give it a snowflake-like silhouette.
A little movement is normal around the tall fans. Strong cupping usually means the arches or edging are too tight. Check for six ch-5 arches, 11 stitches per fan, and 12 cream sc per petal before adjusting hook size.
Yes, but the ornament may be softer and the stitch definition will differ. Follow the yarn label for blocking, avoid direct iron contact, and check that the bell does not stretch the upper petal.
One flower motif makes one ornament. It has six integral petals and does not require a second backing motif or any joining between separate flowers.
Spot-clean the crochet gently. For a full wash, remove the bell, bead, and cords first, hand-wash the flower according to the yarn label, and block it flat again before reassembly.
The finished Christmas Flower Crochet Ornament with a Bell

