Christmas Gazebo Crochet Pattern with Snowman and Lights
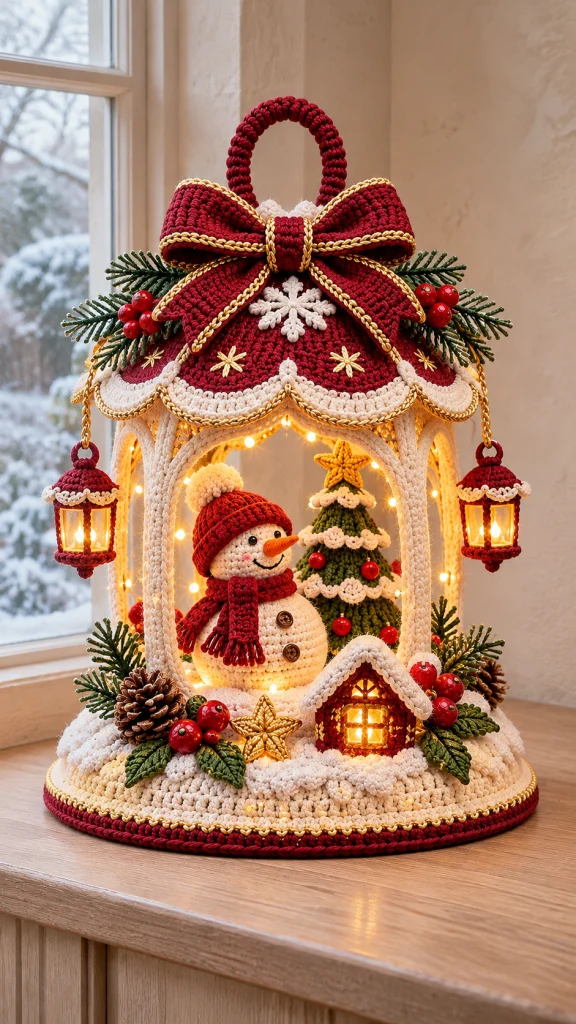
Advanced
For experienced crocheters who enjoy complex shaping, fine detail, and ambitious construction
Weekend Project
A satisfying weekend make — start Friday, finish Sunday, enjoy forever.
Handmade Gift
A beautiful keepsake — free forever. Read online or print at home.
About This Christmas Gazebo Crochet Pattern with Snowman and Lights
This Christmas gazebo crochet pattern creates a lighted holiday centerpiece with an ivory pavilion, a deep red canopy, gold edging, and a large tailored bow. A little snowman and a snow-trimmed tree stand inside, while two miniature lanterns and a snowy cottage bring the scene together.
The gazebo is a supported home decoration: its crocheted base, roof panels, post sleeves, and arches fit over a separate rigid craft frame. The snowman is one small element within the display. Shaped crochet, surface embroidery, miniature construction, and careful assembly make this an advanced project with plenty of satisfying detail.
Allow approximately 45–60 hours, plus drying time for blocking and frame preparation. The finished centerpiece measures about 32 cm across and 42 cm tall, including its decorative handle. It suits experienced crocheters who enjoy building a display in stages and adjusting fabric neatly around a measured structure.
Materials
- DK cotton yarn: approximately 650 m ivory, 400 m deep cranberry red, 180 m forest green, and 40 m orange.
- Fingering-weight yarn: approximately 100 m soft gold and 15 m black for embroidery.
- 3 mm crochet hook for the main fabric and 2.5 mm hook for miniature details and gold edging.
- Polyester stuffing, approximately 120 g.
- Two 5 mm black beads for the snowman’s eyes and two 10 mm brown buttons for its body.
- A smooth, sealed plywood base, 30 cm in diameter and approximately 6 mm thick.
- Six wooden dowels, 6 mm diameter and 22 cm long, for the upright posts.
- Six wooden strips, each 14 cm long between corner centers, joined into a regular hexagonal upper ring.
- A small wooden or rigid plastic ring, 2 cm outside diameter, for the roof crown.
- Six approximately 15.3 cm roof spokes, cut and fitted to connect the upper hexagon to the crown ring 6 cm above it.
- Wood adhesive and appropriate small craft fasteners for preparing the rigid frame.
- Two 25 mm rigid plastic washers or rings for the lantern floors, plus two 15 mm rings for their hanging eyes.
- Two clear acetate strips, each 7.5 × 3 cm, for the lantern glazing.
- A clear acetate rectangle, approximately 3 × 3 cm, for the cottage window.
- One 20 cm length of 8 mm cotton rope for the decorative top handle.
- Approximately 1 m of 3 mm cotton cord for the six arches.
- Two 15 cm lengths of fine gold craft chain and small connecting rings for hanging the lanterns.
- A low-voltage battery LED light string with approximately 30–40 cool-running lights and a switch; allocate two lights to the lanterns and one to the cottage.
- Removable cable ties or fine cotton ties for securing the lighting.
- Heavy sewing thread, tapestry needle, sewing needle, stitch markers, scissors, ruler, and blocking equipment.
- Optional small natural pinecones, cleaned and fully dried, for the base arrangement.
Abbreviations
chchainsl stslip stitchscsingle crochethdchalf double crochetdcdouble crochettrtreble crochetinc2 single crochet in one stitchdecsingle crochet 2 stitches togetherMRmagic ringBLOback loop onlyFLOfront loop onlyststitch or stitchesRigid Gazebo Frame
- Draw a centered circle with a 14 cm radius on the wooden base. Mark six equally spaced points around it; adjacent points are 14 cm apart.
- Secure one 22 cm upright at each marked point. Prepare snug mounting holes or use suitable small brackets and wood adhesive. Let all joints cure fully.
- Join the six upper strips into a regular hexagon with 14 cm sides, measured between post centers. Secure this ring across the six uprights, keeping it level.
- Temporarily position the 2 cm crown ring horizontally, centered 6 cm above the upper hexagon.
- Fit six roof spokes from the upper hexagon’s corners to evenly spaced points on the crown ring. Their approximate length is 15.3 cm; trim to the actual joints before fastening. Secure every connection and remove temporary supports after curing.
- Check that the frame stands level. Smooth all edges that will touch yarn. The structural height above the base is approximately 28 cm.
Snowy Circular Base Covers — Make Two
- Round 1: With ivory and the main hook, work 6 sc in MR. (6)
- Round 2: Inc in every st. (12)
- Round 3: Repeat sc, inc six times. (18)
- Round 4: Repeat 2 sc, inc six times. (24)
- Round 5: Repeat 3 sc, inc six times. (30)
- Round 6: Repeat 4 sc, inc six times. (36)
- Round 7: Repeat 5 sc, inc six times. (42)
- Round 8: Repeat 6 sc, inc six times. (48)
- Round 9: Repeat 7 sc, inc six times. (54)
- Round 10: Repeat 8 sc, inc six times. (60)
- Round 11: Repeat 9 sc, inc six times. (66)
- Round 12: Repeat 10 sc, inc six times. (72)
- Round 13: Repeat 11 sc, inc six times. (78)
- Round 14: Repeat 12 sc, inc six times. (84)
- Round 15: Repeat 13 sc, inc six times. (90)
- Round 16: Repeat 14 sc, inc six times. (96)
- Round 17: Repeat 15 sc, inc six times. (102)
- Round 18: Repeat 16 sc, inc six times. (108)
- Round 19: Repeat 17 sc, inc six times. (114)
- Round 20: Repeat 18 sc, inc six times. (120)
- Round 21: Repeat 19 sc, inc six times. (126)
- Round 22: Repeat 20 sc, inc six times. (132)
- Round 23: Repeat 21 sc, inc six times. (138)
- Round 24: Repeat 22 sc, inc six times. (144)
- Round 25: Repeat 23 sc, inc six times. (150)
- Round 26: Repeat 24 sc, inc six times. (156)
- Round 27: Repeat 25 sc, inc six times. (162)
- Round 28: Repeat 26 sc, inc six times. (168)
- Round 29: Repeat 27 sc, inc six times. (174)
- Round 30: Repeat 28 sc, inc six times. (180) Fasten off. Block both circles to 30 cm diameter.
- On the upper circle, mark the six post positions using the frame as a template. Pass each post gently between stitches before installing its upper connections; do not cut the crochet.
- Place the second circle beneath the wooden base. With cranberry, join corresponding outer stitches of both circles with 180 sc, enclosing the wooden edge. Join with sl st.
- Edge round 2: Ch 1, sc in each st around. Join with sl st. (180)
- Gold edge: With gold yarn, sl st loosely into each of the 180 stitches of the last ivory round immediately above the red band. Fasten off.
Ivory Posts and Arched Openings
- Post sleeve foundation: With ivory, ch 5. Sc in the second chain from the hook and each remaining chain. (4)
- Sleeve rows 2–48: Ch 1, turn, sc in each st. (4 per row) Make six strips. Each strip should measure approximately 22 cm long and wrap around a 6 mm post with a small seam allowance.
- Wrap one strip around each upright. Mattress-stitch the long edges together, then sew the lower ends to the base cover. Keep seams facing inward.
- Upper-ring cover: Ch 169. Sc in the second chain from the hook and across. (168)
- Cover rows 2–4: Ch 1, turn, sc across. (168 per row) Block the strip to 84 cm long, wrap it around the upper hexagonal ring, and sew the long edges together.
- Arch strips: Ch 37. Sc in the second chain from the hook and across. (36) Make six strips and block each to 16 cm long.
- Cut six 16 cm cord lengths. Fold each arch strip lengthwise around one cord and sew its long edges together.
- For each opening, sew the arch midpoint to the midpoint of an upper-ring side. Curve its two ends downward and sew each end to the adjacent post approximately 4 cm below the ring. Repeat for all six openings.
Cranberry Roof Panels — Make Six
- Row 1: With cranberry, ch 3. Sc in the second chain from the hook and in the last chain. (2)
- Even-numbered rows 2–28: Ch 1, turn, inc in the first st, then sc in every remaining st. Work this instruction separately on rows 2, 4, 6, 8, 10, 12, 14, 16, 18, 20, 22, 24, 26, and 28. The corresponding counts are 3, 5, 7, 9, 11, 13, 15, 17, 19, 21, 23, 25, 27, and 29.
- Odd-numbered rows 3–29: Ch 1, turn, sc to the last st, inc in the last st. Work this instruction separately on rows 3, 5, 7, 9, 11, 13, 15, 17, 19, 21, 23, 25, 27, and 29. The corresponding counts are 4, 6, 8, 10, 12, 14, 16, 18, 20, 22, 24, 26, 28, and 30.
- Row 30: Ch 1, turn, sc across. (30) Fasten off, leaving a long sewing tail. Block each panel to the stated roof dimensions.
- Join neighboring sloping edges with mattress stitch, matching all 30 row ends. Join the sixth panel to the first to form a canopy with six lower edges and a small crown opening. Keep seams on the underside.
- Ivory hem round 1: Join ivory at a lower corner. Work 30 sc across each panel’s lower edge. Join with sl st. (180)
- Hem round 2: Ch 1, sc in each st around. Join. (180)
- Scallop round: On each 30-stitch panel edge, repeat the following five times: skip 2 st, work 5 dc in the next st, skip 2 st, sl st in the next st. Repeat across all six panels. (30 shells)
- Gold outline: Join gold in a shell valley. Sl st in each stitch around the scalloped edge, keeping the tension loose. Fasten off.
- Place the canopy over the frame. Align its six seams with the roof spokes and center its crown opening over the small ring. Tie the underside to the frame at each roof corner and around the crown; ease the hem beyond the upper hexagon to form the eaves.
- Embroider one small gold starburst on each panel: make four straight stitches crossing at a common center, each approximately 1.5 cm long.
Large Bow and Decorative Handle
- Bow ribbon row 1: With cranberry, ch 15. Sc in the second chain from the hook and across. (14)
- Ribbon rows 2–72: Ch 1, turn, sc across. (14 per row) Block to approximately 7 × 33 cm.
- Join the short ends with a flat seam to make one loop. Flatten it with the seam at the back center, creating two broad bow wings.
- Bow tails row 1: Ch 15, sc in the second chain from the hook and across. (14)
- Tail rows 2–20: Ch 1, turn, sc across. (14 per row)
- Tail row 21: Ch 1, turn, dec, 10 sc, dec. (12)
- Tail row 22: Ch 1, turn, dec, 8 sc, dec. (10)
- Tail row 23: Ch 1, turn, dec, 6 sc, dec. (8)
- Tail row 24: Ch 1, turn, dec, 4 sc, dec. (6) Fasten off. Make a second tail.
- Gold edging: Work one loose gold sc into each stitch along the ribbon’s two long edges. Edge each tail with one sc per stitch or row end, adding one extra sc at each corner.
- Center band: Ch 7, sc in the second chain from the hook and across. (6) Work 14 more rows of 6 sc, turning with ch 1. Fasten off.
- Pinch the bow’s center. Place the two tail tops behind it, angled apart, and wrap the center band around all layers. Sew the band closed at the back.
- Handle sleeve: Ch 7, sc in the second chain from the hook and across. (6) Work 43 more rows of 6 sc. Wrap the resulting strip around the 20 cm rope and seam lengthwise.
- Bend the covered rope into an upright arch. Sew its ends securely to opposite sides of the roof crown ring, then sew the bow in front of the crown. The handle must remain decorative and must not be used to carry the centerpiece.
Snowman Body and Head
- Body round 1: With ivory and the detail hook, work 6 sc in MR. (6)
- Body round 2: Inc in each st. (12)
- Body round 3: Repeat sc, inc six times. (18)
- Body round 4: Repeat 2 sc, inc six times. (24)
- Body round 5: Repeat 3 sc, inc six times. (30)
- Body round 6: Repeat 4 sc, inc six times. (36)
- Body round 7: Repeat 5 sc, inc six times. (42)
- Body round 8: Repeat 6 sc, inc six times. (48)
- Body rounds 9–16: Sc in every st. (48 per round)
- Body round 17: Repeat 6 sc, dec six times. (42)
- Body round 18: Repeat 5 sc, dec six times. (36)
- Body round 19: Repeat 4 sc, dec six times. (30)
- Body round 20: Repeat 3 sc, dec six times. (24) Stuff firmly, keeping the underside slightly flattened.
- Body round 21: Repeat 2 sc, dec six times. (18)
- Body round 22: Repeat sc, dec six times. (12)
- Body round 23: Dec six times. (6) Fasten off and close the opening.
- Head round 1: Work 6 sc in MR. (6)
- Head round 2: Inc in each st. (12)
- Head round 3: Repeat sc, inc six times. (18)
- Head round 4: Repeat 2 sc, inc six times. (24)
- Head round 5: Repeat 3 sc, inc six times. (30)
- Head round 6: Repeat 4 sc, inc six times. (36)
- Head rounds 7–12: Sc in each st. (36 per round)
- Head round 13: Repeat 4 sc, dec six times. (30)
- Head round 14: Repeat 3 sc, dec six times. (24) Stuff the head.
- Head round 15: Repeat 2 sc, dec six times. (18)
- Head round 16: Repeat sc, dec six times. (12)
- Head round 17: Dec six times. (6) Close and sew the head to the body, with both closing points concealed at the neck.
- Sew the eyes between head rounds 8 and 9, leaving approximately 6 stitches between their centers. Embroider a curved black smile across rounds 10–12.
- Nose round 1: With orange, work 4 sc in MR. (4)
- Nose round 2: Sc in each st. (4)
- Nose round 3: Repeat sc, inc twice. (6)
- Nose round 4: Sc in each st. (6) Lightly stuff and sew the open edge between the eyes, with the point projecting forward.
- Sew the two brown buttons vertically on the body, approximately 2 cm apart. The dressed snowman should stand approximately 12–14 cm tall.
Snowman Hat and Scarf
- Hat round 1: With cranberry, work 6 sc in MR. (6)
- Hat round 2: Inc in each st. (12)
- Hat round 3: Repeat sc, inc six times. (18)
- Hat round 4: Repeat 2 sc, inc six times. (24)
- Hat round 5: Repeat 3 sc, inc six times. (30)
- Hat round 6: Repeat 4 sc, inc six times. (36)
- Hat round 7: Repeat 5 sc, inc six times. (42)
- Hat rounds 8–13: Sc in each st. (42 per round)
- Hat round 14: Working in BLO, sc in each st. (42)
- Hat rounds 15–17: Sc in each st. (42 per round) Fasten off and fold these last three rounds outward at round 14.
- Make a tightly tied ivory pompom approximately 2.5 cm across. Sew it to the hat crown, then secure the hat to the head with several small stitches.
- Scarf row 1: Ch 61. Sc in the second chain from the hook and across. (60)
- Scarf rows 2–5: Ch 1, turn, sc across. (60 per row) Fasten off.
- Add six short fringe bundles at each scarf end. Wrap the scarf around the neck, cross the ends in front, and tack it in place.
Snow-Trimmed Christmas Tree
- Round 1: With forest green and the detail hook, work 6 sc in MR. (6)
- Round 2: Sc around. (6)
- Round 3: Repeat sc, inc three times. (9)
- Round 4: Sc around. (9)
- Round 5: Repeat 2 sc, inc three times. (12)
- Round 6: Sc around. (12)
- Round 7: Repeat 3 sc, inc three times. (15)
- Round 8: Working in BLO, sc around. (15)
- Round 9: Repeat 4 sc, inc three times. (18)
- Round 10: Sc around. (18)
- Round 11: Repeat 5 sc, inc three times. (21)
- Round 12: Sc around. (21)
- Round 13: Repeat 6 sc, inc three times. (24)
- Round 14: Working in BLO, sc around. (24)
- Round 15: Repeat 7 sc, inc three times. (27)
- Round 16: Sc around. (27)
- Round 17: Repeat 8 sc, inc three times. (30)
- Round 18: Sc around. (30)
- Round 19: Repeat 9 sc, inc three times. (33)
- Round 20: Working in BLO, sc around. (33)
- Round 21: Repeat 10 sc, inc three times. (36)
- Round 22: Sc around. (36)
- Round 23: Repeat 11 sc, inc three times. (39)
- Round 24: Sc around. (39)
- Round 25: Repeat 12 sc, inc three times. (42)
- Round 26: Sc around. (42)
- Round 27: Repeat 13 sc, inc three times. (45)
- Round 28: Sc around. (45)
- Round 29: Repeat 14 sc, inc three times. (48)
- Round 30: Working in BLO, sc around. (48) Fasten off, leaving the bottom open.
- Snow edging: Join ivory to the first unused front loop of round 8. Repeat sl st in the next loop, 3 hdc in the next loop, sl st in the next loop five times. Join and fasten off. Repeat on rounds 14, 20, and 30, working 8, 11, and 16 repeats respectively.
- Tree base round 1: With green, work 6 sc in MR. (6)
- Base round 2: Inc around. (12)
- Base round 3: Repeat sc, inc six times. (18)
- Base round 4: Repeat 2 sc, inc six times. (24)
- Base round 5: Repeat 3 sc, inc six times. (30)
- Base round 6: Repeat 4 sc, inc six times. (36)
- Base round 7: Repeat 5 sc, inc six times. (42)
- Base round 8: Repeat 6 sc, inc six times. (48) Stuff the tree and sew this disk to its open bottom.
- Make six cranberry berries using the berry instructions below and sew them between the snowy bands. Sew a small gold star to the tip. The finished tree is approximately 15 cm tall.
Gold Stars and Ivory Snowflake
- Star center: With gold, work 10 sc in MR and join with sl st. (10)
- Star points: Repeat five times: ch 4; sl st in the second chain from the hook, sc in the next chain, hdc in the last chain; skip the next center st and sl st in the following center st. Fasten off. Make three stars: one for the tree and two for the base.
- For a firmer star, make a matching second star and sew the two layers together around their edges, matching all five points.
- Snowflake center: With ivory and the detail hook, work 6 sc in MR and join. (6)
- Snowflake arms: Repeat in each center st: sl st in the st, ch 6, sl st in the second and third chains from the hook, ch 3 and sl st in the same third chain to form a side branch, ch 3 and sl st in that same chain again, then sl st down the three remaining chains to the center. (6 arms)
- Block the snowflake flat and sew it to the front roof panel beneath the bow, keeping all six arms visible.
Hanging Miniature Lanterns — Make Two
- Floor round 1: With cranberry and the detail hook, work 6 sc in MR. (6)
- Floor round 2: Inc around. (12)
- Floor round 3: Repeat sc, inc six times. (18)
- Floor round 4: Repeat 2 sc, inc six times. (24)
- Floor round 5: Working in BLO, sc around. (24) Insert a 25 mm rigid washer or ring as a floor support.
- Window-frame round: Repeat four times: sc in the next st, ch 8, skip 5 st. Join to the first sc. (4 upright bases and 4 chain arches)
- Top rail: Sl st up the first chain arch to its midpoint. Ch 3, counting as one dc, then work 5 dc around that same arch and 6 dc around each remaining arch. Join to the top of the starting ch 3. (24)
- Roll the acetate into a cylinder approximately 2.3 cm in diameter and 3 cm tall. Overlap and stitch its edges through small needle holes. Slide it inside the crochet framework, keeping the four chain uprights outside it.
- Roof round 1: Join cranberry to the top rail. Repeat 2 sc, dec six times. (18)
- Roof round 2: Repeat sc, dec six times. (12)
- Roof round 3: Dec six times. (6) Leave a small opening for the light wire and fasten off.
- Ivory roof trim: Join ivory to any top-rail stitch. Repeat sl st in the next st, 3 hdc in the next st, sl st in the next st eight times. Fasten off.
- Cover a 15 mm hanging ring with 12 cranberry sc, working around the ring. Join and sew it vertically to the roof crown.
- Insert one LED into each lantern through the roof opening. Sew a small thread loop inside the roof to hold the wire clear of the acetate wall. Attach a 15 cm chain to the hanging ring.
Miniature Snowy Cottage
- Wall foundation: With cranberry and the detail hook, ch 32 and join carefully without twisting. (32)
- Wall rounds 1–2: Sc in every chain or stitch. (32 per round)
- Wall round 3: Ch 1, sc in the first 2 st, ch 4, skip 4 st, sc in the remaining 26 st. Join. (28 sc and one 4-chain window opening)
- Wall round 4: Ch 1, sc in the first 2 st, ch 4, skip the previous chain space, sc in the remaining 26 st. Join. (28 sc and one 4-chain opening)
- Wall round 5: Ch 1, sc in the first 2 st, work 4 sc around the chain space, sc in the remaining 26 st. Join. (32)
- Wall round 6: Sc around. (32) Fasten off. Shape the tube into a square with 8 stitches on each side; center the window on its front.
- Front gable row 1: Join cranberry to the first stitch of the front wall’s upper edge and sc across its 8 st. (8)
- Gable row 2: Ch 1, turn, dec, 4 sc, dec. (6)
- Gable row 3: Ch 1, turn, dec, 2 sc, dec. (4)
- Gable row 4: Ch 1, turn, dec twice. (2)
- Gable row 5: Ch 1, turn, dec. (1) Fasten off. Repeat all five gable rows on the opposite wall.
- Roof panel row 1: With ivory, ch 13. Sc in the second chain from the hook and across. (12)
- Roof panel rows 2–9: Ch 1, turn, sc across. (12 per row) Make two panels.
- Join the panels along one 12-stitch edge to form the ridge. Sew their front and back row ends to the gable slopes, leaving a small snowy overhang. Sew the lower long edges to the side walls.
- Sew acetate behind the window opening. Add one horizontal and one vertical gold strand across the window to form four panes.
- Place one LED inside the cottage, routing its wire beneath the open bottom. Sew the cottage’s lower edge to the base cover after positioning the light.
Berries, Leaves, and Fir Sprigs
- Berry round 1: With cranberry and the detail hook, work 6 sc in MR. (6)
- Berry round 2: Inc around. (12)
- Berry round 3: Sc around. (12) Add a small pinch of stuffing.
- Berry round 4: Dec six times. (6) Close the opening. Make 18 berries: six for the tree and twelve for four three-berry clusters.
- Leaf foundation: With green, ch 9.
- Leaf round: Starting in the second chain from the hook, work sl st, sc, hdc, dc, tr, dc, hdc, then 3 sc in the last chain. Along the opposite side of the foundation, work hdc, dc, tr, dc, hdc, sc, sl st. Join to the first sl st. (17) Make twelve leaves.
- Embroider a gold or lighter-green running stitch along each leaf’s center.
- Fir sprig foundation: With green, ch 17.
- First side: Starting in the second chain from the hook, repeat the following eight times: sl st in the next foundation chain, ch 4, sl st in the second chain from the hook and the next two chains, then sl st in the next foundation chain.
- Second side: Rotate the sprig and repeat the same eight-branch sequence along the opposite side of the foundation chain. Fasten off. Make ten sprigs.
- Sew four clusters of three berries, three leaves, and two sprigs: place two clusters at the roof’s front side corners and two on the base. Place the remaining two sprigs behind the tree.
Snowdrifts and Lighting
- Snowdrift foundation: With ivory, ch 25. Sc in the second chain from the hook and across. (24)
- Row 2: Ch 1, turn, sc across. (24)
- Row 3: Ch 1, turn, dec, 20 sc, dec. (22)
- Row 4: Ch 1, turn, dec, 18 sc, dec. (20)
- Row 5: Ch 1, turn, dec, 16 sc, dec. (18)
- Row 6: Ch 1, turn, dec, 14 sc, dec. (16)
- Row 7: Ch 1, turn, dec, 12 sc, dec. (14)
- Row 8: Ch 1, turn, dec, 10 sc, dec. (12) Fasten off. Make five pieces.
- Sew each snowdrift around its outer edge to the base cover, easing the fabric into a low mound. Add a little stuffing before closing. Keep the front edges of the cottage and snowman visible.
- Route the main LED string from a battery pack placed behind the gazebo, up the rear post, and beneath the eaves. Secure it with removable ties rather than piercing its insulation.
- Continue the string around the arches and down one rear post to the base. Position the allocated lantern and cottage lights before securing the remaining lights around the snowdrifts.
- Hang the lanterns from opposite front roof corners, using both the upper wooden ring and the crochet covering for support. Carry their fine light wires beside the chains and secure them with small thread ties.
- Switch on the lights and inspect every wire route before sewing down the scene. Keep the battery switch and battery compartment uncovered and reachable.
Finishing
- Set the tree toward the rear right of the gazebo and place the snowman slightly left of center. Turn the snowman’s face toward the main opening. Sew both bases to the upper base cover with several strong, concealed stitches.
- Place the cottage in front of the right-hand post, with its window facing outward. Sew around its lower edge while leaving a small rear gap for the light wire.
- Add the snowdrifts around the figures and cottage. Sew the two gold stars to the front snowbank at slightly different angles.
- Secure the greenery clusters and optional pinecones with heavy sewing thread. Keep the base trim visible and leave the main front arch open.
- Check the bow, canopy ties, lantern chains, and frame joints. Weave in all yarn ends and remove temporary pins.
Let the bow loops sit softly above the roof and arrange the tails so the snowflake remains visible. A little space between the figures makes the illuminated scene easier to see.
Lift the finished centerpiece from beneath its wooden base. Store it upright with the batteries removed, and support the bow with tissue so its shape stays crisp between seasons.
Tips for Success
- Block one roof panel over a paper template before making the remaining five; all six lower edges should measure 15 cm.
- Keep post-sleeve seams toward the interior and roof seams directly above the spokes for a tidy front view.
- Stuff the snowman’s underside less firmly than its sides so it sits securely on the base.
- Use loose gold edging stitches; tight metallic trim can curl the bow and draw up the roof scallops.
- Test the full lighting arrangement before sewing the cottage and snowdrifts in place.
Common Mistakes to Avoid
- Roof panels differ in size: block them together against one template before joining, and match row ends carefully.
- The canopy pulls the frame inward: loosen its attachment ties and check the panel width instead of stretching the wooden structure.
- The base cover cups or ripples: confirm the stitch counts and adjust blocking or hook size to obtain a flat 30 cm circle.
- The lantern top rail twists: keep the four chain arches upright around the acetate cylinder before shaping the roof.
- The battery compartment becomes trapped: route the pack behind the display and finish all surrounding stitching with the compartment accessible.
Ways to Customize This Pattern
- Replace cranberry with burgundy or deep blue while keeping the ivory structure and gold trim.
- Embroider the snowman’s eyes and buttons for an entirely stitched finish.
- Omit the lighting and acetate for an unlit display; retain the rigid lantern floor rings to preserve their shape.
- Add tiny embroidered gold dots to the roof panels, spacing them between the existing starbursts.
- Change the tree ornaments to gold berries using the same four-round berry construction.
Frequently asked questions
No. The posts, arches, canopy, and decorative handle are fabric coverings. The wooden base and frame carry the weight of the roof, bow, and hanging lanterns. Stiffening the crochet alone will not provide the same support.
For a different yarn, first match the blocked dimensions of a roof panel and post sleeve. Changing yarn weight without matching those dimensions requires a new frame and recalculated fittings. Keep the stated yarn weight for the most direct construction.
Remove the batteries and dust with a soft brush. Spot-clean accessible crochet with a lightly damp cloth. Do not immerse the assembled display because it contains wood, wiring, acetate, and optional natural pinecones.
No. It is a seasonal home decoration with a rigid frame, small ornaments, chains, and electrical components. Display it where the details can be enjoyed without being pulled or handled as toys.
This is an original written design that has not been physically sample-tested. Check the roof fit, base blocking, miniature lantern assembly, and lighting clearances with your chosen materials before completing the full display.
The finished Christmas Gazebo Crochet Pattern with Snowman and Lights

