Christmas Lantern Crochet Pattern with Bow and Holly
Advanced
For experienced crocheters who enjoy complex shaping, fine detail, and ambitious construction
Weekend Project
A satisfying weekend make — start Friday, finish Sunday, enjoy forever.
Handmade Gift
A beautiful keepsake — free forever. Read online or print at home.
About This Christmas Lantern Crochet Pattern with Bow and Holly
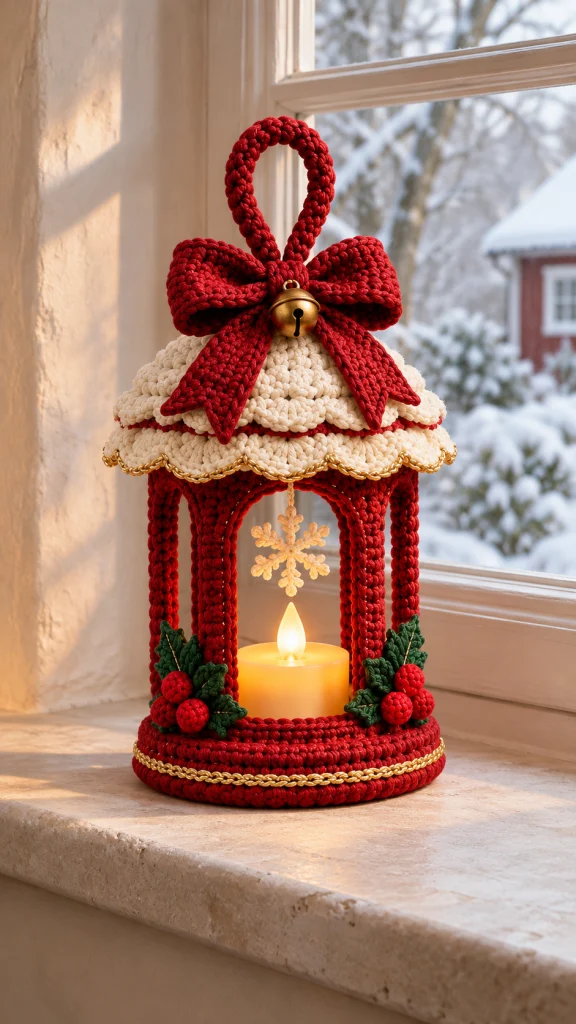
This Christmas lantern crochet pattern makes a structured holiday decoration with a red frame, a cream scalloped roof and a generous bow finished with a small brass bell. Holly leaves and berries dress the lower corners, while a delicate snowflake hangs above a battery-operated candle inside the open frame.
The lantern is built around two rigid rings and four uprights, with fitted crochet sleeves, a double-layer base and a removable roof. Two levels of cream scallops give the roof its snowy outline, and fine gold edging picks out the curves. The finished piece measures approximately 17 cm across the roof and 29 cm high, excluding its decorative loop.
Allow approximately 18–24 hours of crochet and assembly, plus drying and adhesive curing time. This advanced project suits makers comfortable with counted shaping, working into reserved loops, small thread details and assembling crochet around a rigid support.
Materials
- Worsted weight cotton in deep red: approximately 240 m.
- Worsted weight cotton in warm cream: approximately 150 m.
- Worsted weight cotton in forest green: approximately 35 m.
- Size 10 crochet cotton in cream: approximately 10 m.
- Fine, flexible metallic gold crochet thread: approximately 25 m.
- 3.5 mm crochet hook for the cotton pieces.
- 1.5 mm crochet hook for the snowflake; use the same hook for gold edging if comfortable.
- Two rigid craft rings, each 15 cm in outside diameter, with a cross-section no thicker than 4 mm.
- Four wooden dowels, each 18 cm long and 4 mm thick.
- Four lengths of 2 mm aluminum craft wire, each 21 cm long, for the upper arches.
- One smooth plastic canvas or rigid plastic base disk, 14 cm in diameter.
- Strong polyester sewing thread and a sharp sewing needle for securing the frame.
- Craft adhesive suitable for wood and the chosen rings; follow its curing instructions.
- Floral tape, wire cutters and round-nose pliers.
- One small brass-colored bell, approximately 20–25 mm wide.
- A small amount of polyester filling for the berries.
- One battery-operated LED pillar candle, approximately 6–7 cm wide and no more than 9 cm tall.
- Tapestry needle, stitch markers, scissors, rustproof pins and a blocking mat.
- Fabric stiffener for the snowflake and, optionally, the holly leaves.
Abbreviations
chchainsl stslip stitchscsingle crochethdchalf double crochetdcdouble crochettrtreble crochetincwork 2 sc in one stitchsc2togsingle crochet 2 stitches togetherMRmagic ringBLOback loop onlyFLOfront loop onlyststitchRigid Frame and Arches
- Mark four equally spaced points on each ring. Place the lower ring flat and align the upper ring directly above it.
- Position one 18 cm dowel between each pair of corresponding marks. Butt its ends against the inner faces of the rings. Apply suitable craft adhesive at every contact, then lash each joint securely with strong polyester thread. Check that all four uprights are vertical and the rings remain parallel. Let the adhesive cure fully.
- On each 21 cm wire, reserve 2 cm at both ends for attachment. Shape the central 17 cm into a rounded arch approximately 10.5 cm wide and 5.5 cm high. Fold each terminal tip back on itself with pliers so that no sharp point remains exposed.
- Fit one arch between every adjacent pair of uprights. Position its ends approximately 12.5 cm above the lower ring and its crown against the upper ring. Tape and lash the 2 cm attachment ends flat against the uprights, then lash each crown to the upper ring. There are four arches.
- Wrap all wire ends and bulky joints smoothly with floral tape. Test the frame on a flat surface; correct any rocking before adding crochet.
Red Base Circles — Make Two
- Round 1: With red and the 3.5 mm hook, work 6 sc in an MR. Tighten the ring. 6 st.
- Round 2: Inc in every st. 12 st.
- Round 3: Repeat (1 sc, inc) 6 times. 18 st.
- Round 4: Repeat (2 sc, inc) 6 times. 24 st.
- Round 5: Repeat (3 sc, inc) 6 times. 30 st.
- Round 6: Repeat (4 sc, inc) 6 times. 36 st.
- Round 7: Repeat (5 sc, inc) 6 times. 42 st.
- Round 8: Repeat (6 sc, inc) 6 times. 48 st.
- Round 9: Repeat (7 sc, inc) 6 times. 54 st.
- Round 10: Repeat (8 sc, inc) 6 times. 60 st.
- Round 11: Repeat (9 sc, inc) 6 times. 66 st.
- Round 12: Repeat (10 sc, inc) 6 times. 72 st.
- Round 13: Repeat (11 sc, inc) 6 times. 78 st.
- Round 14: Repeat (12 sc, inc) 6 times. 84 st.
- Round 15: Repeat (13 sc, inc) 6 times. 90 st.
- Round 16: Repeat (14 sc, inc) 6 times. 96 st. Sl st in the next st and fasten off. Block both circles flat to 15 cm in diameter.
- Place the circles with their wrong sides together and the plastic disk between them. Join red through corresponding edge stitches of both circles. Ch 1, then sc through both layers in each pair of stitches around. Join with a sl st. 96 sc. Fasten off.
- Set the assembled frame on the base, centering the lower ring over its perimeter. With red yarn, sew the base edge firmly around the lower ring at all 96 edge stitches. At each upright, take the sewing yarn around the joint without displacing the post.
Base Rim and Gold Band
- Round 1: Join red to an accessible base-edge stitch beside an upright. Ch 1 and sc in each of the 96 base-edge stitches, keeping this round outside the lower ring. Join with a sl st. 96 sc.
- Round 2: Ch 1 and sc in every st. Join with a sl st. 96 sc.
- Round 3: Ch 1 and sc in every st. Join with a sl st. 96 sc. Fasten off.
- Fold the three-round strip outward and down over the lower ring. Sew its free edge to the underside of the base, forming a rounded padded rim.
- Using gold thread, surface sl st around the middle of the red rim, following the horizontal line of Round 2. Keep the chain loose enough to sit on the surface without drawing the base inward. Fasten off beneath the base.
Upright Sleeves — Make Four
- Row 1: With red, ch 4. Sc in the second ch from the hook and in each remaining ch. 3 sc.
- Rows 2–40: Ch 1, turn and sc in all 3 st. Each row has 3 sc. Fasten off with a long sewing tail. Each strip should measure approximately 18 cm long and 1.5 cm wide.
- Wrap one strip lengthwise around each upright, with the starting row at the lower ring. Whipstitch the two long edges together along the inward-facing side of the post. Ease the strip over the taped arch attachments without stretching it lengthwise.
- Sew each sleeve’s bottom and top edges to the lower ring covering and the upper joint respectively. Keep all four sleeves at equal tension so the frame stays straight.
Arch Sleeves and Upper Ring Cover
- Arch sleeve Row 1: With red, ch 4. Sc in the second ch from the hook and in the remaining 2 ch. 3 sc.
- Arch sleeve Rows 2–37: Ch 1, turn and sc in all 3 st. Each row has 3 sc. Fasten off with a long tail. Make four strips, each approximately 17 cm long.
- Wrap a strip around the curved section of each wire arch. Sew the long edges together along the back of the wire, then sew each short end neatly to its upright sleeve. The crochet should conceal the exposed wire completely.
- Upper ring cover Row 1: With red, ch 4. Sc in the second ch from the hook and the remaining 2 ch. 3 sc.
- Upper ring cover Rows 2–104: Ch 1, turn and sc in all 3 st. Each row has 3 sc. The strip should fit around the approximately 47 cm ring circumference without pulling. Fasten off with a long tail.
- Wrap the upper ring with the strip, sewing the long edges together beneath the ring. Join the short ends behind one upright. Take extra securing stitches around each upright joint and arch crown.
- Optional gold detail: Couch one strand of gold thread along the front edge of each arch sleeve, using tiny sewing stitches approximately 1 cm apart. Secure the ends behind the upright sleeves.
Cream Shaped Roof
- Round 1: With cream, work 6 sc in an MR. 6 st.
- Round 2: Inc in every st. 12 st.
- Round 3: Repeat (1 sc, inc) 6 times. 18 st.
- Round 4: Repeat (2 sc, inc) 6 times. 24 st.
- Round 5: Repeat (3 sc, inc) 6 times. 30 st.
- Round 6: Repeat (4 sc, inc) 6 times. 36 st.
- Round 7: Repeat (5 sc, inc) 6 times. 42 st.
- Round 8: Repeat (6 sc, inc) 6 times. 48 st.
- Round 9: Sc in every st. 48 st.
- Round 10: Repeat (7 sc, inc) 6 times. 54 st.
- Round 11: Sc in every st. 54 st.
- Round 12: Repeat (8 sc, inc) 6 times. 60 st.
- Round 13: Sc in every st. 60 st.
- Round 14: Repeat (9 sc, inc) 6 times. 66 st.
- Round 15: Repeat (10 sc, inc) 6 times. 72 st.
- Round 16: Repeat (11 sc, inc) 6 times. 78 st.
- Round 17: Repeat (12 sc, inc) 6 times. 84 st. Place a removable marker in a front loop of this round; these loops hold the upper scallop tier.
- Round 18: Working in BLO throughout, sc in every st. 84 st. The front loops of Round 17 remain free.
- Round 19: Repeat (13 sc, inc) 6 times. 90 st.
- Round 20: Sc in every st. 90 st.
- Round 21: Repeat (14 sc, inc) 6 times. 96 st. Sl st in the next st and fasten off.
- Shape the roof over an inverted bowl approximately 15 cm across. Block the lower edge to fit the covered upper ring, keeping the crown softly domed. The roof should rest on the ring without being stretched tightly.
Two Scalloped Roof Tiers
- Upper tier: Hold the roof upright. Join cream in a free front loop of Round 17. Ch 1, then repeat (sc in the next free loop, skip 2 loops, 5 dc in the next loop, skip 2 loops) 14 times. Join to the first sc with a sl st and fasten off. There are 14 shells and 14 anchor sc, totaling 84 st.
- Lower tier: Join cream in a stitch of Round 21. Ch 1, then repeat (sc in the next st, skip 2 st, 5 dc in the next st, skip 2 st) 16 times. Join to the first sc with a sl st and fasten off. There are 16 shells and 16 anchor sc, totaling 96 st.
- Upper gold edging: With gold thread, join in an upper-tier anchor sc. Ch 1 and sc in each stitch around, working 1 sc in every anchor sc and each of the 5 dc of every shell. Join and fasten off. 84 fine sc.
- Lower gold edging: Repeat the same edging around the lower tier. 96 fine sc. Keep both gold edges relaxed so the shells retain their rounded shape.
- Pin each shell into a soft downward curve and lightly damp-block. Let the upper tier overlap the plain roof fabric above the lower tier.
Large Red Bow
- Bow band Row 1: With red, ch 49. Sc in the second ch from the hook and each remaining ch. 48 sc.
- Bow band Rows 2–12: Ch 1, turn and sc in all 48 st. Each row has 48 sc. Fasten off with a sewing tail. Block to approximately 24 × 5.5 cm.
- Join the two short ends with a flat seam to form a ring. Lay the ring flat with the seam at the center back. Pinch the middle into three small folds and stitch through the folds securely, creating two broad bow loops.
- Center wrap Row 1: Ch 5. Sc in the second ch from the hook and each remaining ch. 4 sc.
- Center wrap Rows 2–12: Ch 1, turn and sc in all 4 st. Each row has 4 sc. Fasten off with a long tail.
- Wrap the small strip around the pinched bow center and sew its short ends together at the back. Leave the bow separate until the tails and decorative loop are ready.
Pointed Bow Tails — Make Two
- Row 1: With red, ch 13. Sc in the second ch from the hook and each remaining ch. 12 sc.
- Rows 2–14: Ch 1, turn and sc in all 12 st. Each row has 12 sc.
- Row 15: Ch 1, turn, sc2tog, sc in the next 8 st, sc2tog. 10 st.
- Row 16: Ch 1, turn and sc in all 10 st. 10 st.
- Row 17: Ch 1, turn, sc2tog, sc in the next 6 st, sc2tog. 8 st.
- Row 18: Ch 1, turn and sc in all 8 st. 8 st.
- Row 19: Ch 1, turn, sc2tog, sc in the next 4 st, sc2tog. 6 st.
- Row 20: Ch 1, turn and sc in all 6 st. 6 st.
- Row 21: Ch 1, turn, sc2tog, sc in the next 2 st, sc2tog. 4 st.
- Row 22: Ch 1, turn and sc in all 4 st. 4 st.
- Row 23: Ch 1, turn and work sc2tog twice. 2 st.
- Row 24: Ch 1, turn and sc2tog. 1 st.
- Edging: Without turning, ch 1 and work down one side with 1 sc in each row end, 1 sc in each unused foundation chain across the top, and 1 sc in each row end up the other side. Work 2 additional sc into the final point stitch and join to the first edging sc. Fasten off. Ease the edging at the top corners so it lies flat.
- Sew both straight top edges behind the bow center, overlapping them slightly. Angle the points outward so they fall down opposite sides of the roof.
Decorative Top Loop
- Round 1: With red, ch 6 and join with a sl st to form a ring without twisting. Ch 1 and work 1 sc in each chain. 6 sc.
- Rounds 2–34: Sc in every st, working in a spiral. Each round has 6 sc. The hollow cord should measure approximately 15 cm long. Do not stuff it. Fasten off with a long tail.
- Flatten and stitch the two ends closed. Bring them together to form a teardrop loop approximately 7 cm high, and sew both ends firmly to the roof crown.
- Position the bow in front of the loop attachment. Sew through the bow center and roof fabric several times, keeping the scallops free. Sew the brass bell to the front of the bow center with strong thread.
Holly Leaves — Make Eight
- Foundation: With green, ch 10. Working into the second ch from the hook and onward, make sl st, sc, hdc, dc, tr, dc, hdc and sc in the next 8 chains. Work 3 sc in the final chain to turn the tip.
- Second side: Work along the unused loops on the opposite side of the foundation, making sc, hdc, dc, tr, dc, hdc, sc and sl st. Join to the first sl st. There are 19 perimeter stitches.
- Pointed edging: Ch 1. Along the first 8 perimeter stitches, work sc, sc, (sc, ch 3, sl st in the first of those 3 ch), sc, (sc, ch 3, sl st in the first of those 3 ch), sc, (sc, ch 3, sl st in the first of those 3 ch), sc.
- Across the 3 tip stitches, work sc in the first, (sc, ch 3, sl st in the first of those 3 ch) in the middle, and sc in the third.
- Along the final 8 perimeter stitches, work sc, (sc, ch 3, sl st in the first of those 3 ch), sc, (sc, ch 3, sl st in the first of those 3 ch), sc, (sc, ch 3, sl st in the first of those 3 ch), sc, sc. Join and fasten off with a sewing tail. Each leaf has 19 edging sc and 7 pointed chain details.
- Block each leaf to approximately 5 cm long. If desired, apply a little fabric stiffener. Embroider a fine gold running-stitch vein along the foundation chain, leaving both leaf edges flexible.
Red Holly Berries — Make Six
- Round 1: With red, work 6 sc in an MR. 6 st.
- Round 2: Inc in every st. 12 st.
- Rounds 3–4: Sc in every st. Each round has 12 sc. Add a small amount of filling after Round 4.
- Round 5: Sc2tog 6 times. 6 st. Fasten off with a sewing tail, thread through the front loops of the remaining stitches and draw closed.
- Arrange two holly clusters, each containing four leaves and three berries. Overlap the leaf bases and sew them together; sew the berries over the joined bases.
- Attach one cluster at each front upright’s foot, stitching through the upright sleeve and the base rim. Keep the center opening clear for the candle.
Suspended Six-Point Snowflake
- Round 1: With cream crochet cotton and the 1.5 mm hook, work 6 sc in an MR. Join to the first sc. 6 sc.
- Round 2: Ch 1. Repeat (sc in the next st, ch 3) 6 times. Join to the first sc. There are 6 sc and 6 chain spaces.
- Round 3: Sl st into the first chain space and ch 1. Work the following arm into each of the 6 chain spaces: sc in the space, ch 7, sl st in the second ch from the hook and in the next ch; ch 3, sl st in the second ch from the hook and in the next ch; sl st in the next unworked chain of the original ch-7 stem; ch 3, sl st in the second ch from the hook and in the next ch; sl st in each of the remaining 3 chains of the original stem; sc in the same chain space. Repeat this complete arm in every remaining chain space. Join to the first sc and fasten off. There are 6 branched arms and 12 anchoring sc.
- Pin the six main tips evenly around a circle approximately 5–6 cm across. Spread the two short branches on every arm. Apply fabric stiffener according to its directions and let dry completely.
- Tie a cream thread through the top arm. Suspend the snowflake from the front arch crown, with its top approximately 2 cm below the arch and its bottom at least 2 cm above the LED candle. Secure the knot behind the arch sleeve.
Roof Attachment and Finishing
- Make four roof ties: For each tie, join red yarn beneath the roof at the level of Round 20, ch 25 and fasten off. Space the ties at quarter points, aligned with the four uprights.
- Seat the roof on the covered upper ring. Pass each tie beneath the ring and tie it back onto itself in a small removable bow. Tuck the ends inside. Keep the upper and lower scallops outside the frame.
- Check the bow position, leaf clusters and snowflake clearance. Secure any loose attachment with matching yarn, then weave in all ends on hidden surfaces.
- Set the LED candle in the center of the base and switch it on. Confirm that the base stays flat and the candle can be removed through an open side without disturbing the snowflake.
Let the roof scallops settle naturally, then spread the bow loops with your fingers. A few small stitches beneath the tails can hold them against the roof while keeping their pointed ends free.
Display the lantern on a level shelf, mantel or windowsill. Lift it from underneath the base when moving it, and remove the candle before storing the decoration.
Tips for Success
- Check the 15 cm base fit before making the second circle. Change hook size if necessary; keeping 96 edge stitches preserves the roof and base proportions.
- Place upright sleeve seams toward the interior, where the candle and holly make them less noticeable.
- Try the roof on its ring before adding the gold edging. Correct the blocking while the cream fabric is still undecorated.
- Keep metallic edging looser than ordinary cotton crochet. A tight gold edge will pull the scallops into cups.
- Stiffen the snowflake separately and attach it only after it has dried completely.
Common Mistakes to Avoid
- Working Round 18 of the roof through both loops removes the upper-tier attachment line. Work BLO so all 84 front loops of Round 17 remain available.
- Counting the roof’s joining slip stitch as a new stitch shifts the scallops. Each upper shell repeat consumes 6 loops, and each lower repeat consumes 6 stitches.
- Pulling sleeve seams too tightly can bend the arches or tilt the posts. Sew with the frame standing upright and check its shape as you work.
- Using the crochet loop as a carrying handle strains the roof. Support the rigid base whenever moving the lantern.
- Hanging the snowflake too low crowds the candle. Shorten its suspension thread until there is at least 2 cm of clearance.
Ways to Customize This Pattern
- Use forest green for the frame, bow and loop while retaining the cream roof and red berries.
- Make an ivory version by replacing the red structural pieces with cream; keep the green holly and gold trim for definition.
- Replace gold edging with fine silver thread and use a silver-colored bell without changing any stitch counts.
- For a quieter finish, omit the arch embroidery while retaining the gold base band and scallop edges.
- Add a second snowflake to the rear arch, using a shorter suspension thread so the two motifs hang at different heights.
Frequently asked questions
No. Use only a battery-operated LED candle that stays cool during use. The cotton, filling, stiffener and frame coverings must be kept away from flames and heat.
The open sides and shaped arches depend on the rings, uprights and wire supports. Stiffening the crochet alone will not provide the same stable structure.
The written counts are designed for 15 cm rings. For a small difference in ring diameter, adjust hook size and block a sample base to fit. A substantially different diameter requires recalculating the base, roof, sleeve lengths and arch spans; simply adding roof rounds will alter the tier alignment.
Remove the LED candle and untie the roof. Dust with a soft brush and spot-clean the cotton with a barely damp cloth. Avoid soaking the assembled frame. Store upright in a box with tissue supporting the bow and scallops.
The finished Christmas Lantern Crochet Pattern with Bow and Holly

