Christmas Lantern Wall Hanging Crochet Pattern
Advanced
For experienced crocheters who enjoy complex shaping, fine detail, and ambitious construction
Weekend Project
A satisfying weekend make — start Friday, finish Sunday, enjoy forever.
Handmade Gift
A beautiful keepsake — free forever. Read online or print at home.
About This Christmas Lantern Wall Hanging Crochet Pattern
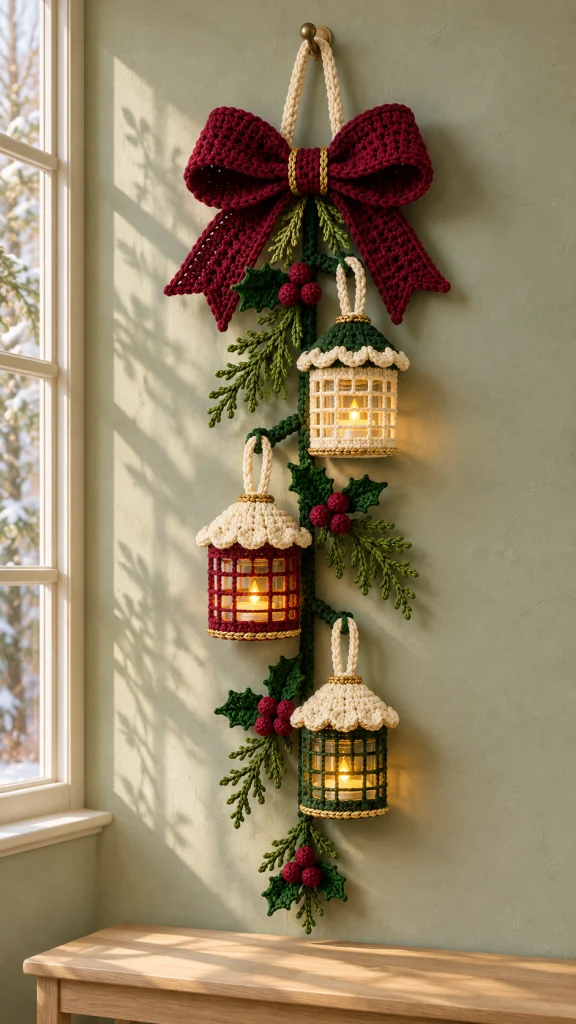
This Christmas lantern wall hanging crochet pattern brings together three glowing lanterns, a generous burgundy bow, and trailing holly and evergreen sprigs. The lanterns hang at staggered heights from a sturdy green cord, with scalloped roofs and touches of gold giving the arrangement its festive finish.
Allow approximately 18–24 hours for crocheting and assembly. Designed for advanced crocheters, the project combines shaped circles, open mesh, dimensional leaves, small berries, and careful arrangement. Battery-operated LED tea lights give the lanterns their warm glow.
The finished hanging measures approximately 36 inches long and 14 inches wide. Make the individual pieces first, then take your time positioning the greenery and lanterns so the whole arrangement hangs comfortably against a wall.
Materials
- Worsted-weight cotton yarn, approximately 160 yd (146 m) burgundy
- Worsted-weight cotton yarn, approximately 160 yd (146 m) dark green
- Worsted-weight cotton yarn, approximately 130 yd (119 m) cream
- Worsted-weight cotton yarn, approximately 35 yd (32 m) olive green
- Fine metallic gold yarn or embroidery thread, approximately 20 yd (18 m)
- 4 mm (G/6) crochet hook for the bow, cords, and lanterns
- 3.5 mm (E/4) crochet hook for leaves, berries, and sprigs
- Three clear, straight-sided plastic battery-operated LED tea light holders, approximately 3 in (7.5 cm) wide and 3 in (7.5 cm) tall, with removable lights or accessible switches
- Three battery-operated LED tea lights sized to fit the holders
- Small amount of polyester fiberfill for the berries
- Yarn needle
- Stitch markers
- Scissors
- Measuring tape
Abbreviations
chchaindcdouble crochethdchalf double crochetMRmagic ringreprepeatscsingle crochetsc2togsingle crochet two stitches togetherskskipsl stslip stitchststitchtrtreble crochetLantern bases and mesh bodies
- Make three, using the 4 mm hook: one cream, one burgundy, and one dark green. Work the base in joined rounds. Beginning chains do not count as stitches.
- Round 1: Make an MR, ch 1, work 6 sc into ring; join with sl st to first sc. Pull ring closed. (6 sc)
- Round 2: Ch 1, work 2 sc in each st around; join. (12 sc)
- Round 3: Ch 1, (sc in next st, 2 sc in next st) 6 times; join. (18 sc)
- Round 4: Ch 1, (sc in next 2 sts, 2 sc in next st) 6 times; join. (24 sc)
- Round 5: Ch 1, (sc in next 3 sts, 2 sc in next st) 6 times; join. (30 sc)
- Round 6: Ch 1, (sc in next 4 sts, 2 sc in next st) 6 times; join. (36 sc)
- Round 7: Ch 1, (sc in next 5 sts, 2 sc in next st) 6 times; join. (42 sc)
- Round 8: Ch 1, (sc in next 6 sts, 2 sc in next st) 6 times; join. (48 sc)
- Round 9: Ch 1, sc in the back loop only of each st around; join. (48 sc)
- Round 10: Ch 1, sc in each st around; join. (48 sc)
- Round 11: Ch 3, dc in the same st as join, (ch 2, sk 2 sts, dc in next st) 15 times, ch 2, sk final 2 sts; join with sl st to first dc, leaving the beginning ch 3 behind the work. (16 dc and 16 ch-2 spaces)
- Rounds 12–15: Sl st into first ch-2 space, ch 3, dc in same space, (ch 2, dc in next ch-2 space) 15 times, ch 2; join to first dc, leaving the beginning ch 3 behind the work. (16 dc and 16 ch-2 spaces per round)
- Round 16: Ch 1, sc in first dc, (2 sc in next ch-2 space, sc in next dc) 15 times, 2 sc in last ch-2 space; join. (48 sc)
- Round 17: Ch 1, sc in each st around; join and fasten off. (48 sc) Place a holder inside each body and check that it can be removed or opened to operate its light.
Scalloped lantern roofs
- Make three with the 4 mm hook: one dark green roof for the cream lantern and two cream roofs for the burgundy and dark green lanterns. Each roof is open at the top and rests over the lantern rim.
- Round 1: Ch 12, join with sl st to form a ring without twisting. Ch 1, sc in each ch; join to first sc. (12 sc)
- Round 2: Ch 1, 2 sc in each st around; join. (24 sc)
- Round 3: Ch 1, (sc in next st, 2 sc in next st) 12 times; join. (36 sc)
- Round 4: Ch 1, (sc in next 2 sts, 2 sc in next st) 12 times; join. (48 sc)
- Round 5: Ch 1, sc in each st around; join. (48 sc)
- Round 6: Ch 1, (sc in next st, sk 2 sts, 5 dc in next st, sk 2 sts) 8 times; join to first sc. (8 scallops) Fasten off.
- For the green roof, add a cream edge: join cream to any scallop anchor, ch 1, sc in each st around; join and fasten off. (48 sc)
- With gold thread, work a line of surface slip stitches around the top opening of each roof. Add a second gold line around the lower edge of each lantern body, keeping the stitches loose enough to retain the circular shape.
Lantern handles
- Using cream yarn and the 4 mm hook, make three handles. For each handle, ch 25, sc in second ch from hook and in each remaining ch. (24 sc) Fasten off, leaving a sewing tail at each end.
- Bring the ends of one handle together and sew them securely to opposite sides of the top opening of one roof. Repeat for the remaining roofs. Leave the central opening clear and keep each roof removable from its lantern body.
Burgundy bow
- Using burgundy yarn and the 4 mm hook, make the bow loop panel: ch 49.
- Row 1: Sc in second ch from hook and in each ch across; turn. (48 sc)
- Rows 2–12: Ch 1, sc in each st across; turn. (48 sc per row) Fasten off, leaving a long sewing tail.
- Bring the short ends together and sew them into a ring without twisting. Lay the seam at the center back, flatten the ring, and pinch its center to form two loops.
- Make two tails. For each tail, ch 15.
- Tail row 1: Sc in second ch from hook and in each ch across; turn. (14 sc)
- Tail rows 2–18: Ch 1, sc in each st across; turn. (14 sc per row)
- Tail row 19: Ch 1, sc2tog, sc in next 10 sts, sc2tog; turn. (12 sc)
- Tail row 20: Ch 1, sc2tog, sc in next 8 sts, sc2tog; turn. (10 sc)
- Tail row 21: Ch 1, sc2tog, sc in next 6 sts, sc2tog; turn. (8 sc)
- Tail row 22: Ch 1, sc2tog, sc in next 4 sts, sc2tog; turn. (6 sc)
- Tail row 23: Ch 1, sc2tog, sc in next 2 sts, sc2tog. (4 sc) Fasten off. Sew the straight upper ends of the tails behind the pinched bow center, angling them outward.
- Make the center wrap: ch 9; sc in second ch from hook and each remaining ch, turn. (8 sc)
- Center wrap rows 2–14: Ch 1, sc in each st across; turn. (8 sc per row) Fasten off with a long tail. Wrap snugly around the bow center and sew the short ends together at the back. Add a gold surface slip-stitch line along each long edge of the wrap.
Hanging cord and branches
- Using dark green yarn and the 4 mm hook, make the main cord: ch 121, sc in second ch from hook and in each ch across. (120 sc) Fasten off, leaving a long sewing tail. The cord should measure approximately 28 in (71 cm); adjust its length if your tension differs.
- Make three branch cords: for each, ch 19, sc in second ch from hook and each remaining ch. (18 sc) Fasten off with sewing tails.
- Using cream yarn and the 4 mm hook, make the top hanging loop: ch 37, sc in second ch from hook and each remaining ch. (36 sc) Fasten off, leaving sewing tails.
- Fold the cream strip into a loop and sew its ends to the back of the bow center. Sew the upper end of the green main cord to the same area, reinforcing the join.
- Sew the three green branches to the main cord at approximately 3, 11, and 19 in (7.5, 28, and 48 cm) below the bow. Angle the first and third branches right and the middle branch left.
Holly leaves
- Make eight leaves using dark green yarn and the 3.5 mm hook. For each leaf, ch 13.
- First side: Sl st in second ch from hook, sc in next ch, hdc in next ch, dc in next ch, ch 2 and sl st in second ch from hook to make a point, dc in next ch, hdc in next ch, dc in next ch, make another ch-2 point, dc in next ch, hdc in next ch, sc in next ch, sl st in next ch.
- Tip: In the last ch, work sl st, ch 2, and sl st in second ch from hook, then sl st again in the same last ch.
- Second side: Working along the opposite side of the foundation chain, sl st in next ch, sc in next ch, hdc in next ch, dc in next ch, make a ch-2 point, dc in next ch, hdc in next ch, dc in next ch, make a ch-2 point, dc in next ch, hdc in next ch, sc in next ch, and sl st in next ch. Fasten off with a sewing tail.
- With a short length of dark green yarn, sew a straight vein along the center of each leaf, taking care not to pull the leaf out of shape.
Berries
- Make 12 berries with burgundy yarn and the 3.5 mm hook. Work in continuous rounds and mark the first stitch of each round.
- Round 1: Work 6 sc in an MR. (6 sc)
- Round 2: Work 2 sc in each st around. (12 sc)
- Rounds 3–4: Sc in each st around. (12 sc per round)
- Round 5: Work sc2tog 6 times. (6 sc) Add a small pinch of stuffing before closing.
- Fasten off with a sewing tail. Thread the tail through the front loops of the remaining 6 sts, pull closed, and secure.
Evergreen sprigs
- Make four sprigs with olive yarn and the 3.5 mm hook. For each sprig, ch 25.
- First side: Sl st in second ch from hook, then sl st in each of the next 3 ch. Make a twig by chaining 7, sl st in second ch from hook and in each of the next 5 ch; sl st in each of the next 4 foundation ch. Make a second twig in the same way, then sl st in each of the next 4 foundation ch. Make a third twig in the same way, then sl st in each remaining foundation ch. Fasten off with a long tail.
- Thread the tail through the base of the sprig. Add three more twigs on the opposite side by joining yarn at intervals along the stem; for each twig, ch 7, sl st in second ch from hook and in each remaining ch, then fasten off and secure the ends. Each sprig has six twigs.
Finishing
Lay the hanging flat with the bow at the top. Slip each lantern handle over its branch, placing the cream lantern at the upper right, the burgundy lantern at the middle left, and the green lantern at the lower right. Tack the handles to the branches so they cannot slide, while keeping the roofs removable.
Arrange four clusters down the main cord. For each cluster, sew on two holly leaves, three berries, and one evergreen sprig. Turn the leaves and sprigs in different directions to fill the spaces around the lanterns without covering their openings.
Weave in all ends and reinforce the bow, branch, and handle joins. Insert the LED lights into their holders, place the holders in the lantern bodies, and set the roofs on top. Hang from a secure hook and adjust the branches until the lanterns sit level.
Tips for Success
- Choose straight-sided holders so the mesh sits evenly and the roofs can lift off easily.
- Keep the mesh chains relaxed; tight chains can pull the lantern body inward.
- Pin the branches and greenery in place before sewing, then lift the hanging to check its balance.
- Use small, firm stitches for the berries so the stuffing stays inside.
Common Mistakes to Avoid
- A rippled lantern base usually means extra increases were added; count each round before continuing.
- If the mesh twists, check that each new mesh round is worked into the chain spaces and that the beginning chain stays behind the work.
- If a lantern tilts, move its handle attachment points until they sit opposite each other and reinforce them.
- Do not sew the roof to the body or trap the light switch; the holder and light must remain accessible.
Ways to Customize This Pattern
- Make all three lantern bodies cream for a softer look, keeping the green and burgundy accents in the bow and foliage.
- Use dark green roofs on all three lanterns and add cream scallop edging to each one.
- Add more holly clusters by making two leaves, three berries, and one sprig for each extra cluster.
- Lengthen the main cord to space the lanterns farther apart; measure the finished cord before positioning the branches.
Frequently asked questions
No. Use battery-operated LED tea lights only, and choose lights that do not become hot. Keep the lights and their switches accessible.
Measure the holder across its base and compare it with the crocheted circle after Round 8. A different circumference requires recalculating the base and roof increases and keeping the final body stitch count divisible by six for the eight-style scallop repeat; the mesh also needs a count divisible by three.
Yes. The roofs rest on the bodies rather than being sewn in place, so you can lift a roof and remove or open its holder. Check access before attaching the handles to the branches.
Remove the lights and holders first. Gently spot-clean the yarn with a barely damp cloth, reshape the pieces, and let them dry completely before replacing the electrical components.
The finished Christmas Lantern Wall Hanging Crochet Pattern