Advanced
For experienced crocheters who enjoy complex shaping, fine detail, and ambitious construction
Weekend Project
A satisfying weekend make — start Friday, finish Sunday, enjoy forever.
Handmade Gift
A beautiful keepsake — free forever. Read online or print at home.
About This Crochet Ribbed Hobo Bag
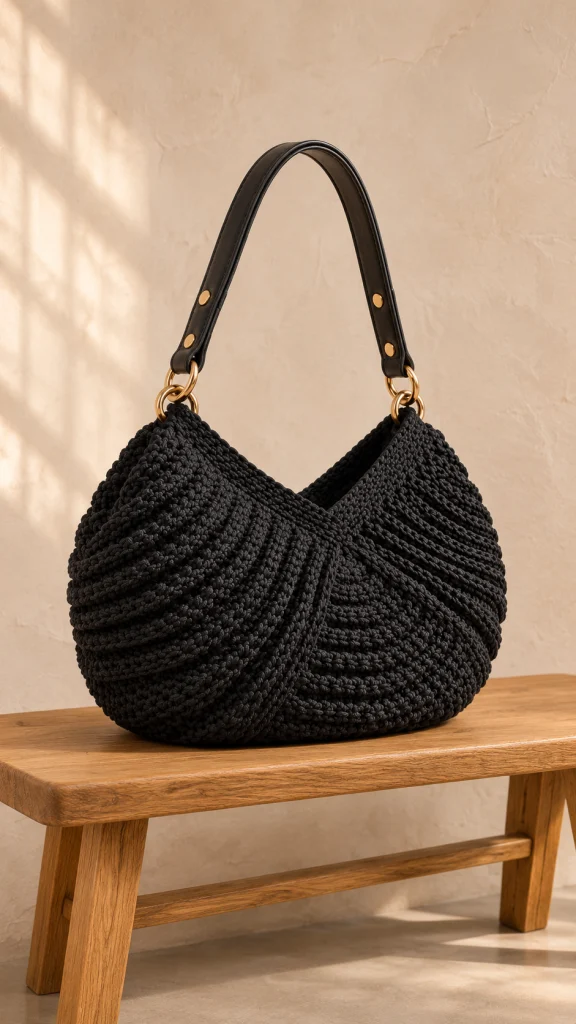
This crochet ribbed hobo bag pattern makes a roomy black shoulder bag with raised ribs that sweep toward a softly dipped opening. Gold-tone rings and a smooth black handle give the textured fabric a polished finish.
Allow approximately 14–18 hours for the shaped panels, careful seaming, and hardware. The project suits experienced crocheters who enjoy working short rows, matching directional fabric, and adding a tailored finish.
The bag is worked as two matching, shaped panels. Back-loop stitches create the ridges, while short rows give the lower body its curved profile. A narrow gusset joins the panels and adds useful depth.
Materials
- Approximately 650 m (710 yd) black bulky-weight cotton cord, about 3 mm thick
- 5 mm (US H/8) crochet hook, or size needed for gauge
- One black leather or leather-look shoulder handle, approximately 55 cm (22 in) long, with attachment rings or clasps
- Two sturdy gold-tone rings, approximately 2.5 cm (1 in) internal diameter, if not supplied with the handle
- Locking stitch markers
- Yarn needle with an eye large enough for the cord
- Strong black sewing thread and sewing needle
- Approximately 45 × 70 cm (18 × 28 in) sturdy black lining fabric
- One magnetic bag closure with backing washers, optional
- Scissors and measuring tape
Abbreviations
chchainscsingle crochetbloback loop onlysl stslip stitchststitchRSright sideShaped panels — make 2
- Ch 43. Row 1: Sc in the second ch from the hook and in each remaining ch; turn. (42 sc)
- Row 2: Ch 1, sc blo in each st; turn. (42 sc)
- Row 3: Ch 1, sc blo in 36 sts; turn, leaving 6 sts unworked. (36 sc)
- Row 4: Ch 1, sc blo in 36 sts; turn. (36 sc)
- Row 5: Ch 1, sc blo in 30 sts; turn, leaving 6 sts unworked. (30 sc)
- Row 6: Ch 1, sc blo in 30 sts; turn. (30 sc)
- Row 7: Ch 1, sc blo in 24 sts; turn, leaving 6 sts unworked. (24 sc)
- Row 8: Ch 1, sc blo in 24 sts; turn. (24 sc)
- Row 9: Ch 1, sc blo in 18 sts; turn, leaving 6 sts unworked. (18 sc)
- Row 10: Ch 1, sc blo in 18 sts; turn. (18 sc)
- Row 11: Ch 1, sc blo in 12 sts; turn, leaving 6 sts unworked. (12 sc)
- Row 12: Ch 1, sc blo in 12 sts; turn. (12 sc)
- Row 13: Ch 1, sc blo in 6 sts; turn, leaving 6 sts unworked. (6 sc)
- Row 14: Ch 1, sc blo in 6 sts; turn. (6 sc)
- Row 15: Ch 1, sc blo in 6 sts, then work 1 sc into the back loop of each of the next 36 available unworked stitches along the stepped edge; turn. (42 sc)
- Row 16: Ch 1, sc blo in each st; turn. (42 sc)
- Rows 17–30: Repeat Rows 3–16 once. The last row has 42 sc.
- Rows 31–44: Repeat Rows 3–16 once. The last row has 42 sc.
- Rows 45–58: Repeat Rows 3–16 once. The last row has 42 sc.
- Rows 59–72: Repeat Rows 3–16 once. The last row has 42 sc.
- Fasten off, leaving a long tail. The edge formed by the 42-stitch foundation and final row will be joined to form the curved lower portion. The opposite, shorter edge forms the dipped opening. Make the second panel the same way.
Shape and join the panels
- Lay one panel flat and bring its foundation edge and final row together, with their 42 stitches aligned. Join corresponding stitches with a sewn seam through both loops, creating a fan-shaped panel. This seam runs from the outer edge toward the center of the lower curve. Repeat for the second panel.
- Turn the panels so the more pronounced ridges face outward. Orient their seams as mirror images for the crossed-rib appearance. Mark the two high points at the ends of each panel’s short, dipped edge; these are the handle attachment points.
- Measure the long outer edge of one panel between the two marked high points, following the bottom curve. Record this measurement for the gusset.
Gusset
- Ch 11. Row 1: Sc in the second ch from the hook and in each remaining ch; turn. (10 sc)
- Row 2: Ch 1, sc blo in each st; turn. (10 sc)
- Repeat Row 2 until the strip, laid flat without stretching, matches the measured long outer edge between the markers. Count the rows and make a note of the total. Fasten off, leaving a long sewing tail.
- With the outside of one panel facing you, pin one long edge of the gusset evenly to the panel’s long outer edge, from one marker around the bottom to the other marker. Sew securely through both layers, easing the gusset around the curve without stretching it.
- Pin and sew the other long gusset edge to the matching edge of the second panel. Keep the panel markers and gusset ends aligned. The short edges between the markers remain open at the top.
Top edging and handle tabs
- With the outside facing, join cord with a sl st at a side peak. Ch 1 and work sc evenly around the entire opening, including the exposed short ends of the gusset; use approximately 1 sc in each row end and 1 sc in each stitch, easing as needed so the opening lies flat. Join with a sl st to the first sc. Record the stitch count.
- Ch 1, sc in each st around; join with a sl st to the first sc. The stitch count remains unchanged. Fasten off and weave in the ends.
- For each of two tabs, ch 9. Row 1: Sc in the second ch from the hook and in each remaining ch; turn. (8 sc)
- Rows 2–8: Ch 1, sc in each st; turn. (8 sc per row) Fasten off, leaving a long sewing tail.
- Pass one tab through each gold-tone ring. Fold each tab in half around its ring and sew both ends firmly to the inside of a side peak, catching the panel and gusset layers. Reinforce each attachment with several passes of cord and strong sewing thread.
- Attach the handle to the rings according to its hardware. If the handle has closed end loops, pass the tabs through those loops before sewing instead of using separate rings.
Finishing
Weave in all remaining ends through several stitches on the inside. Shape the bag by hand and check that the handle tabs sit at equal heights. Test the attachments with a gradually added light load, and reinforce any movement before carrying the bag.
For a lining, trace each finished panel onto the fabric, adding a 1 cm seam allowance and leaving the top edge open. Cut a fabric gusset to match the crocheted gusset, also adding seam allowances. Sew the fabric pieces together, fit the lining inside the bag with seam allowances hidden between the layers, and turn under the top edge. Hand-sew it just below the crochet edging. If using a magnetic closure, install it in reinforced lining fabric before sewing the lining into the bag.
Tips for Success
- Mark the first stitch after each short-row turn so the six-stitch steps stay easy to find.
- Keep the cord relaxed when working Row 15; pulling across the steps can pucker the fan.
- Match the gusset to the actual measured panel edge, since cord thickness and tension affect its length.
- Pin both gusset seams before sewing to check that the side peaks line up.
Common Mistakes to Avoid
- Skipping a stepped stitch on Row 15 reduces the full row count. Count all 42 stitches before continuing.
- Working into both loops throughout flattens the rib texture. Use the back loop on the specified panel rows.
- Stretching the gusset while attaching it can distort the bottom. Pin it at its resting length and ease the curve.
- Sewing tabs only to the top edging can strain the opening. Anchor them through the panel and gusset layers.
Ways to Customize This Pattern
- Use dark espresso or charcoal cord for a subtle change while keeping the sculptural ribs visible.
- Choose silver-tone rings and matching handle hardware for a cooler finish.
- Make the gusset wider by adding chains to its foundation; keep the same measured length and adjust the lining gusset to match.
- Add a divided slip pocket to the lining before assembling the fabric pieces.
Frequently asked questions
Yes. Choose a firm, low-stretch cord and make a gauge swatch first. A softer or thinner yarn will change the bag’s structure and dimensions and may need a sturdier lining.
The fan-shaped edge includes row ends and curved sections, so its length depends on your gauge and how the panel settles. Measuring the finished panel helps the gusset fit without pulling.
The bag can be used without one, but a lining helps contain small items and supports the crochet fabric. A firm lining is especially useful if you plan to carry heavier belongings.
Spot-clean the crochet according to the cord manufacturer’s instructions and keep moisture away from hardware and any handle material that is not washable. Reshape and dry flat.
The finished Crochet Ribbed Hobo Bag