Crochet Christmas Garland with Bows and Baubles
Advanced
For experienced crocheters who enjoy complex shaping, fine detail, and ambitious construction
Single-Day Project
A satisfying project you can complete in a single afternoon or evening.
Handmade Gift
A beautiful keepsake — free forever. Read online or print at home.
About This Crochet Christmas Garland with Bows and Baubles
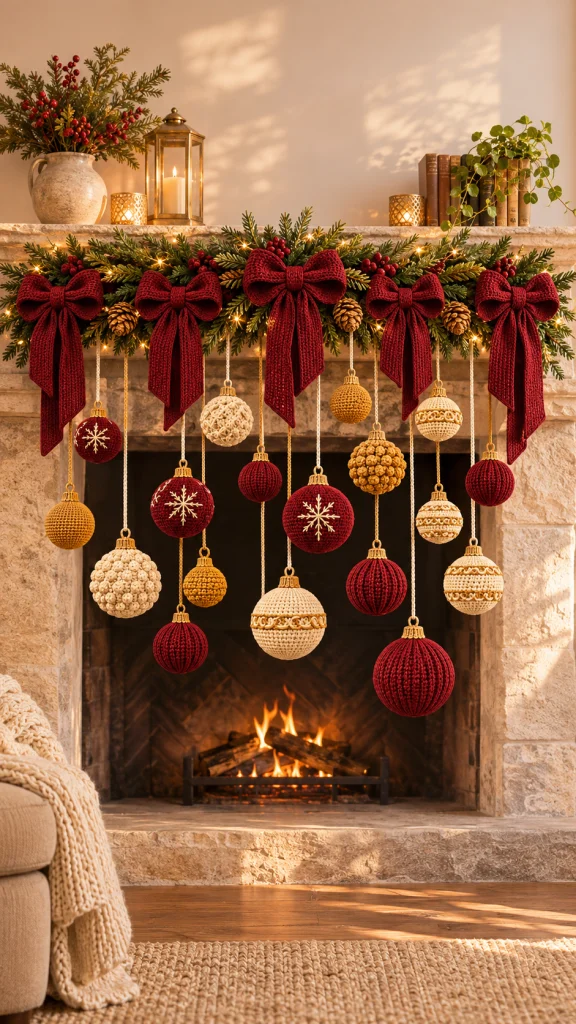
This crochet Christmas garland pattern brings together deep burgundy bows and hanging red, cream, and gold baubles against an evergreen base. The mix of smooth, ribbed, embroidered, and textured ornaments gives a mantel or window a festive layered look.
Allow approximately 25–35 hours to crochet and assemble the complete display. The project suits experienced crocheters who enjoy working small shapes, changing colors, and arranging several finished pieces into one decoration.
The greenery is a separate purchased base, so you can spread the bows and ornaments to suit your space. The instructions make four bows and twelve baubles, with optional pinecones, berries, and lights for the look shown.
Materials
- DK-weight yarn: approximately 300 g burgundy, 120 g cream, and 100 g mustard gold
- 3.0 mm crochet hook for baubles, caps, and hanging cords
- 3.5 mm crochet hook for bows
- Polyester fiberfill, approximately 100 g
- One artificial evergreen garland, approximately 150 cm (59 in) long
- Optional artificial berry sprigs and lightweight decorative pinecones
- Optional battery-operated LED string lights
- Yarn needle
- Stitch markers
- Scissors
- Measuring tape
- Removable ties or floral wire for securing decorations to the garland
Abbreviations
chchainscsingle crochetsl stslip stitchststitchinc2 single crochets in the same stitchdecsingle crochet 2 stitches togetherBLOback loop onlyMRmagic ringreprepeatSmooth baubles: make 6
- With the 3.0 mm hook, make 3 burgundy, 2 gold, and 1 cream. Begin each with 6 sc in an MR. (6 sts)
- Round 2: Inc in each st around. (12 sts)
- Round 3: [Sc in next st, inc] 6 times. (18 sts)
- Round 4: [Sc in next 2 sts, inc] 6 times. (24 sts)
- Round 5: [Sc in next 3 sts, inc] 6 times. (30 sts)
- Round 6: [Sc in next 4 sts, inc] 6 times. (36 sts)
- Rounds 7–12: Sc in each st around. (36 sts per round)
- Round 13: [Sc in next 4 sts, dec] 6 times. (30 sts)
- Round 14: [Sc in next 3 sts, dec] 6 times. (24 sts)
- Round 15: [Sc in next 2 sts, dec] 6 times. (18 sts)
- Stuff firmly and evenly, keeping the ball round.
- Round 16: [Sc in next st, dec] 6 times. (12 sts)
- Round 17: Dec 6 times. (6 sts)
- Fasten off, leaving a tail. Thread the tail through the front loops of the remaining 6 sts, pull closed, and weave in.
Ribbed baubles: make 3
- With burgundy and the 3.0 mm hook, ch 25. Row 1: Sc in the second ch from the hook and in each remaining ch; turn. (24 sts)
- Rows 2–40: Ch 1, sc in BLO of each st; turn. (24 sts per row)
- Fold the strip so the first and last rows meet. Sl st the corresponding stitches together through both layers to form a tube. (24 joining sl sts)
- Fasten off, leaving a long tail. Run the tail through the row ends around one opening and pull tightly closed; secure.
- Turn the tube so the joining ridge is inside. Stuff firmly, then run a length of burgundy yarn through the row ends at the other opening, pull closed, and secure. Shape the gathered ends into a rounded bauble.
Textured baubles: make 3
- With the 3.0 mm hook, make 2 cream and 1 gold. Work rounds 1–6 of the smooth bauble. (36 sts)
- Round 7: [Sc in next 2 sts, work the bobble described in the next step in the next st] 12 times. (36 sts)
- For each bobble, insert the hook into the indicated stitch, yarn over and pull up a loop, yarn over and pull through one loop; repeat this sequence in the same stitch twice more, then yarn over and pull through all 4 loops on the hook. Push the bobble to the outside.
- Round 8: Sc in each st around, working into the top of each bobble. (36 sts)
- Round 9: [Sc in next st, bobble in next st, sc in next st] 12 times. (36 sts)
- Round 10: Sc in each st around. (36 sts)
- Round 11: [Sc in next 2 sts, bobble in next st] 12 times. (36 sts)
- Round 12: Sc in each st around. (36 sts)
- Work rounds 13–17 of the smooth bauble, stuffing and closing as directed. The texture may make these baubles slightly wider.
Gold caps and hanging cords: make 12
- With gold and the 3.0 mm hook, work 6 sc in an MR. (6 sts)
- Round 2: Inc in each st around. (12 sts)
- Round 3: Sc in BLO of each st around. (12 sts)
- Rounds 4–5: Sc in each st around. (12 sts per round)
- Sl st in the next st and fasten off, leaving a tail for sewing. Place the cap over the gathered top of a bauble and sew its lower edge securely in place.
- For each cord, join gold yarn securely at the center of a cap. Ch a length of approximately 20–55 cm (8–22 in), varying lengths across the set. Fasten off with a long tail for tying; weave the starting end into the cap.
Burgundy bows: make 4
- For each bow loop piece, use burgundy and the 3.5 mm hook. Ch 19. Row 1: Sc in the second ch from the hook and each remaining ch; turn. (18 sts)
- Rows 2–64: Ch 1, sc in BLO of each st; turn. (18 sts per row)
- Fold the strip into a ring with the first and last rows aligned. Sl st corresponding stitches through both layers. (18 joining sl sts) Fasten off and place the seam at the center back.
- For each pair of tails, ch 19. Row 1: Sc in the second ch from the hook and each remaining ch; turn. (18 sts)
- Rows 2–110: Ch 1, sc in BLO of each st; turn. (18 sts per row) Fasten off. This long strip folds at its center to form two hanging tails.
- For each center wrap, ch 9. Row 1: Sc in the second ch from the hook and each remaining ch; turn. (8 sts)
- Rows 2–18: Ch 1, sc in BLO of each st; turn. (8 sts per row) Fasten off, leaving a sewing tail.
- Flatten the loop ring with its seam centered at the back. Pinch the middle into pleats. Fold the tail strip in half and place its fold behind the pinched loops.
- Wrap the short strip tightly around both pieces and sew its ends together at the back. Secure the wrap through the bow and tails with several stitches. Repeat for all four bows.
Embroidery and ornament details
- Choose two smooth burgundy baubles for snowflakes. With cream yarn, embroider three straight lines crossing at the center of each visible face, creating six spokes.
- Add a small diagonal stitch on each side of every spoke near its outer end. Anchor each yarn end under several stitches on the back of the bauble.
- For a gold band on the smooth cream bauble, thread gold yarn through the surface stitches around its widest point. Work a second parallel line one round away, then add small connecting stitches between the lines. Keep the yarn loose enough to preserve the round shape.
Garland layout and assembly
- Lay the evergreen garland flat at its intended 150 cm (59 in) length. Position the four bows approximately 10 cm (4 in), 53 cm (21 in), 97 cm (38 in), and 140 cm (55 in) from one end.
- Attach each bow at its center back with a removable tie or floral wire wrapped around the garland’s sturdy core. Point the folded tails downward.
- Arrange the twelve baubles between and beneath the bows, alternating colors and textures. Vary cord lengths so neighboring baubles hang at different heights.
- Tie each cord securely to the garland core, checking the display from the front before trimming or concealing the ends.
- If using berries, pinecones, or LED lights, attach them to the greenery with their fastenings concealed among the branches.
Finishing
Weave in any remaining yarn ends and gently adjust the bow loops, tails, and baubles by hand. Spread the evergreen branches around the ties to give the garland a full, balanced shape.
Hang the garland from secure supports suited to its weight. If displaying it over a fireplace, keep the yarn, greenery, cords, and lights well away from flames and heat; use the display on an unlit fireplace or choose a different location.
Tips for Success
- Stuff each smooth bauble gradually, especially before the opening becomes too small.
- Keep the bobbles facing outward as you work so the texture stays visible.
- Gather both ends of each ribbed tube firmly to keep its vertical ribs evenly spaced.
- Lay out every ornament before tying the cords permanently, and check the spacing from several steps away.
Common Mistakes to Avoid
- If a bauble develops a spiral bump, check that each increase or decrease round ends with the stated stitch count.
- If stuffing shows through, use a smaller hook or work more firmly.
- If a bow droops, sew through the center wrap and both layers beneath it before attaching it to the greenery.
- If a hanging bauble twists, retie its cord at the cap center and let it hang freely before securing it to the base.
Ways to Customize This Pattern
- Use all burgundy bows with cream and gold baubles for a restrained palette.
- Make extra smooth baubles and embroider initials or simple stars on their fronts.
- Shorten the display by placing the four bows closer together and trimming the evergreen base only if its construction allows it.
- Omit the long hanging cords and tie the baubles directly among the branches for a compact garland.
Frequently asked questions
Yes. A heavier yarn and suitable hook will make larger ornaments and bows, while finer yarn will make smaller pieces. Make one bauble first and adjust the number of ornaments and spacing to fit your garland.
Add chains until each cord reaches the desired length, leaving enough yarn at the end to tie it securely to the garland. Check the lowest ornament against furniture, walkways, and any heat source.
Remove the crochet pieces from the greenery first. Spot-clean them according to the yarn label and let them dry completely before reattaching; follow the manufacturer’s care instructions for the garland and lights.
Yes. Complete the caps and replace each long cord with a short hanging loop. The baubles can then decorate a tree or another suitable indoor display.
The finished Crochet Christmas Garland with Bows and Baubles