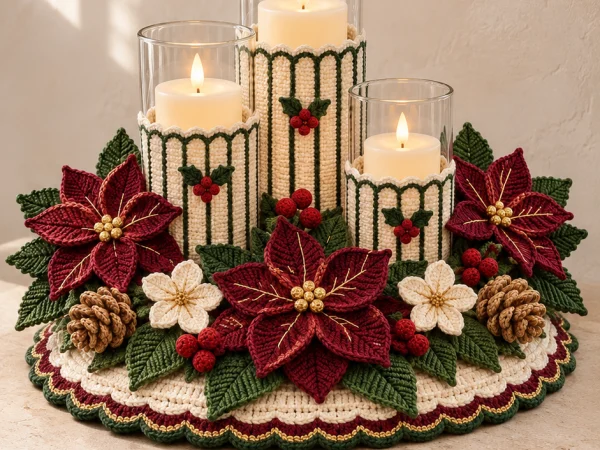
Poinsettia Candle Centerpiece Crochet Pattern
Advanced
For experienced crocheters who enjoy complex shaping, fine detail, and ambitious construction
Single-Day Project
A satisfying project you can complete in a single afternoon or evening.
Handmade Gift
A beautiful keepsake — free forever. Read online or print at home.
About This Poinsettia Candle Centerpiece Crochet Pattern
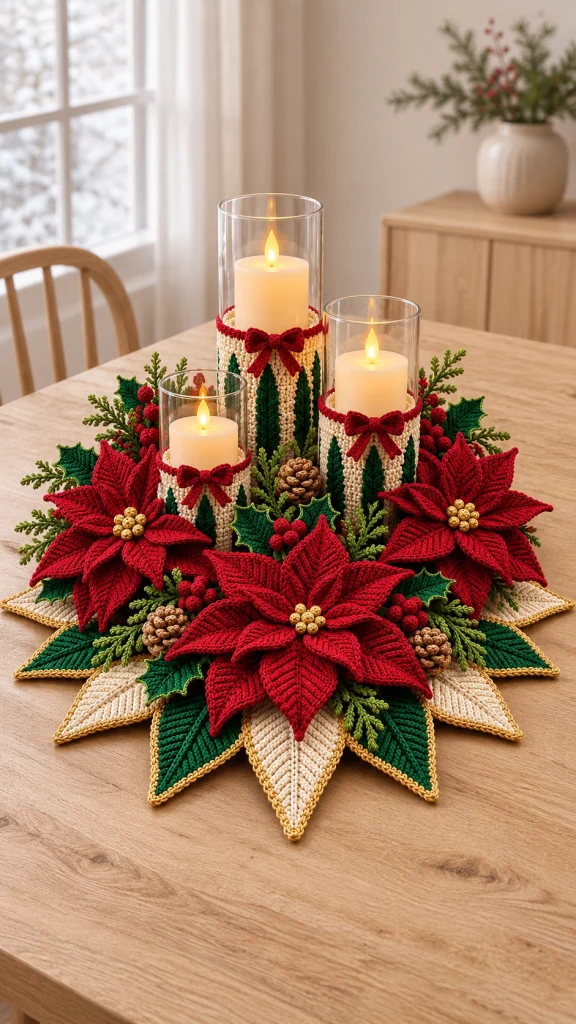
This crochet poinsettia centerpiece pattern brings three candle sleeves together with layered red flowers, pointed leaves, berries, and little pinecones. Its rich texture and separate shaped pieces make it a satisfying project for experienced crocheters who enjoy detailed assembly.
Allow approximately 20–25 hours to crochet and arrange the pieces. The finished display is about 22 inches across, though the exact size will depend on your tension and how widely you arrange the foliage. Use battery-operated pillar candles inside glass cylinders to create the warm glow shown in the inspiration.
Materials
- DK-weight cotton yarn: approximately 400 yd (366 m) dark green
- DK-weight cotton yarn: approximately 350 yd (320 m) deep red
- DK-weight cotton yarn: approximately 300 yd (274 m) cream
- DK-weight cotton yarn: approximately 100 yd (91 m) gold
- DK-weight cotton yarn: approximately 80 yd (73 m) medium green
- DK-weight cotton yarn: approximately 60 yd (55 m) brown
- 3.5 mm (E/4) crochet hook
- 3.0 mm crochet hook for berries
- Three straight-sided glass cylinders, each approximately 4 in (10 cm) in diameter, in assorted heights
- Three appropriately sized battery-operated pillar candles
- Removable firm circular base, approximately 14 in (36 cm) across, such as a fabric-covered craft board
- Small amount of polyester fiberfill
- Yarn needle and scissors
- Stitch markers and measuring tape
- Rustproof pins for blocking and assembly
Abbreviations
chchainscsingle crochethdchalf double crochetdcdouble crochetsl stslip stitchststitchsc2togsingle crochet two stitches togetherMRmagic ringRSright sideWSwrong sideBase circle
- With dark green and the 3.5 mm hook, make an MR. Round 1: Work 6 sc into the ring; pull closed. Place a marker in the first st and move it up each round. Work in continuous rounds. (6 sc)
- Round 2: Work 2 sc in each st. (12 sc)
- Round 3: Repeat [sc in next st, 2 sc in next st] 6 times. (18 sc)
- Round 4: Repeat [sc in next 2 sts, 2 sc in next st] 6 times. (24 sc)
- Round 5: Repeat [sc in next 3 sts, 2 sc in next st] 6 times. (30 sc)
- Round 6: Repeat [sc in next 4 sts, 2 sc in next st] 6 times. (36 sc)
- Round 7: Repeat [sc in next 5 sts, 2 sc in next st] 6 times. (42 sc)
- Round 8: Repeat [sc in next 6 sts, 2 sc in next st] 6 times. (48 sc)
- Round 9: Repeat [sc in next 7 sts, 2 sc in next st] 6 times. (54 sc)
- Round 10: Repeat [sc in next 8 sts, 2 sc in next st] 6 times. (60 sc)
- Round 11: Repeat [sc in next 9 sts, 2 sc in next st] 6 times. (66 sc)
- Round 12: Repeat [sc in next 10 sts, 2 sc in next st] 6 times. (72 sc)
- Round 13: Repeat [sc in next 11 sts, 2 sc in next st] 6 times. (78 sc)
- Round 14: Repeat [sc in next 12 sts, 2 sc in next st] 6 times. (84 sc)
- Round 15: Repeat [sc in next 13 sts, 2 sc in next st] 6 times. (90 sc)
- Round 16: Repeat [sc in next 14 sts, 2 sc in next st] 6 times. (96 sc)
- Round 17: Repeat [sc in next 15 sts, 2 sc in next st] 6 times. (102 sc)
- Round 18: Repeat [sc in next 16 sts, 2 sc in next st] 6 times. (108 sc)
- Round 19: Repeat [sc in next 17 sts, 2 sc in next st] 6 times. (114 sc)
- Round 20: Repeat [sc in next 18 sts, 2 sc in next st] 6 times. (120 sc)
- Round 21: Repeat [sc in next 19 sts, 2 sc in next st] 6 times. (126 sc)
- Round 22: Repeat [sc in next 20 sts, 2 sc in next st] 6 times. (132 sc)
- Round 23: Repeat [sc in next 21 sts, 2 sc in next st] 6 times. (138 sc)
- Round 24: Repeat [sc in next 22 sts, 2 sc in next st] 6 times. (144 sc)
- Round 25: Repeat [sc in next 23 sts, 2 sc in next st] 6 times. (150 sc)
- Round 26: Repeat [sc in next 24 sts, 2 sc in next st] 6 times. (156 sc)
- Round 27: Repeat [sc in next 25 sts, 2 sc in next st] 6 times. (162 sc)
- Round 28: Repeat [sc in next 26 sts, 2 sc in next st] 6 times. (168 sc)
- Round 29: Repeat [sc in next 27 sts, 2 sc in next st] 6 times. (174 sc)
- Round 30: Repeat [sc in next 28 sts, 2 sc in next st] 6 times. (180 sc)
- Sl st in the next st and fasten off. Block the circle flat to approximately 14 in (36 cm) across; adjust the supporting board to match the blocked circle.
Pointed base leaves
- Make 12: six in cream and six in dark green. With the 3.5 mm hook, ch 21. Round 1: Sc in second ch from hook, sc in next 3 chains, hdc in next 4 chains, dc in next 6 chains, hdc in next 4 chains, sc in next chain, 3 sc in last chain. Working along the opposite side of the foundation chain, sc in next chain, hdc in next 4 chains, dc in next 6 chains, hdc in next 4 chains, sc in next 4 chains. Join with a sl st to first sc. (40 sts)
- Round 2: Ch 1, sc in next 19 sts, 3 sc in next st at the point, sc in remaining 20 sts; join with a sl st to first sc. (42 sc)
- Fasten off the leaf color. Join gold at the rounded base and sl st loosely in each st around; fasten off, leaving a sewing tail. Sew a line of matching leaf-color stitches along the foundation chain for a raised center vein. Block each leaf to approximately 6 in (15 cm) long.
- Arrange the 12 leaves evenly around the base circle, alternating cream and green, with their rounded ends overlapping the circle by about 2 in (5 cm). Sew the overlapped ends securely to the circle, leaving the points free.
Poinsettia petals
- Make 24 petals in deep red with the 3.5 mm hook: eight for each of three flowers. Ch 16. Round 1: Sc in second ch from hook, sc in next 2 chains, hdc in next 3 chains, dc in next 5 chains, hdc in next 2 chains, sc in next chain, 3 sc in last chain. Working along the opposite side of the foundation chain, sc in next chain, hdc in next 2 chains, dc in next 5 chains, hdc in next 3 chains, sc in next 3 chains. Join with a sl st to first sc. (30 sts)
- Round 2: Ch 1, sc in next 14 sts, 3 sc in next st at the point, sc in remaining 15 sts; join with a sl st to first sc. (32 sc)
- Fasten off, leaving a sewing tail. Sew a raised vein along the foundation chain. Block the petals to approximately 4½ in (11.5 cm) long, pinching their tips into points.
- For each flower, overlap the rounded ends of five petals in a circle and sew them together. Place three petals on top, offset between the lower petals, and sew their bases to the first layer. Leave the points free.
Gold flower centers
- Make 18 small balls, six per flower, with gold yarn and the 3.0 mm hook. Round 1: Work 6 sc into an MR. (6 sc)
- Round 2: Sc in each st. (6 sc)
- Round 3: Work sc2tog three times. (3 sts)
- Fasten off with a sewing tail. Thread the tail through the remaining front loops and pull closed. Sew six balls closely together over the center of each poinsettia.
Holly leaves
- Make six in dark green with the 3.5 mm hook. Ch 13. Round 1: Sc in second ch from hook, hdc in next 3 chains, dc in next 3 chains, hdc in next 3 chains, sc in next chain, 3 sc in last chain. Working along the opposite side of the chain, sc in next chain, hdc in next 3 chains, dc in next 3 chains, hdc in next 3 chains, sc in last chain. Join with a sl st to first sc. (24 sts)
- Round 2: Ch 1, sc in next 2 sts, [ch 3, sl st in first ch, sc in next 4 sts] twice, ch 3, sl st in first ch, sc in next 2 sts, 3 sc in next st at the tip, sc in next 2 sts, [ch 3, sl st in first ch, sc in next 4 sts] twice, ch 3, sl st in first ch, sc in last st; join with a sl st to first sc. (26 sc and 6 points)
- Fasten off, leaving a sewing tail. Add a center vein in medium green and block the points outward.
Berries
- Make 18 with deep red and the 3.0 mm hook. Round 1: Work 6 sc into an MR. (6 sc)
- Round 2: Work 2 sc in each st. (12 sc)
- Round 3: Sc in each st. (12 sc)
- Round 4: Work sc2tog six times. (6 sts)
- Add a tiny pinch of fiberfill. Fasten off with a sewing tail, thread through the remaining front loops, and pull closed. Sew berries into six groups of three.
Pinecones
- Make three with brown and the 3.5 mm hook. Round 1: Work 6 sc into an MR. Work in continuous rounds. (6 sc)
- Round 2: Work 2 sc in each st. (12 sc)
- Round 3: Repeat [sc in next st, 2 sc in next st] 6 times. (18 sc)
- Rounds 4–6: Sc in each st around. (18 sc each round)
- Round 7: Repeat [sc in next st, sc2tog] 6 times. (12 sts)
- Stuff lightly. Round 8: Work sc2tog six times. (6 sts)
- Fasten off with a long tail, thread through the remaining front loops, and pull closed. With a separate brown strand, embroider staggered small V stitches over the surface to suggest overlapping scales.
Evergreen sprigs
- Make six with medium green and the 3.5 mm hook. Ch 25. Sl st in second ch from hook and in each remaining chain. (24 sl sts)
- At the base, ch 8; sl st in second ch from hook and in each of the next 6 chains. Sl st into the main stem approximately 5 sts from the base. (7 branch sl sts)
- Ch 7; sl st in second ch from hook and in each of the next 5 chains. Sl st into the main stem approximately 5 sts farther toward the tip. (6 branch sl sts)
- Ch 6; sl st in second ch from hook and in each of the next 4 chains. Sl st into the main stem approximately 5 sts farther toward the tip. (5 branch sl sts)
- Fasten off with a sewing tail. Make three sprigs with branches facing one side and three with branches facing the other side by turning the work before adding branches.
Candle sleeves
- Make three sleeves in cream with the 3.5 mm hook. First measure the cylinder circumference. Ch 42 for a starting circumference of approximately 12½ in (32 cm), or make a foundation chain long enough to fit snugly around your cylinder; use an even number of chains. Join with a sl st to the first chain without twisting.
- Round 1: Ch 1, sc in each chain around; join with a sl st to first sc. (42 sc, or your chosen even number)
- Round 2: Ch 1, sc in each st around; join with a sl st to first sc. The joining sl st and beginning ch do not count as stitches. (42 sc)
- Repeat Round 2 until the sleeve measures approximately 4 in (10 cm), 6 in (15 cm), or 8 in (20 cm), respectively, or reaches the desired height on your cylinders. Keep the top of each sleeve well below the cylinder rim.
- Change to deep red. Work one more round as Round 2. Fasten off and weave in ends. Make the remaining two sleeves in the same way.
Sleeve leaves and bows
- Make nine small leaves in dark green, three for each sleeve, with the 3.5 mm hook. Ch 9. Sc in second ch from hook, hdc in next 2 chains, dc in next 2 chains, hdc in next chain, sc in next chain, 3 sc in last chain. Along the opposite side, sc in next chain, hdc in next chain, dc in next 2 chains, hdc in next 2 chains, sc in last chain. Join with a sl st to first sc. (16 sts)
- Fasten off each leaf with a sewing tail. Sew three vertically and evenly spaced around each sleeve, keeping stitches inside the sleeve flat.
- Make three bows in deep red. For each bow, ch 31; sc in second ch from hook and in each chain across. (30 sc)
- Ch 1 and turn; sc in each st across. (30 sc)
- Fasten off with a long tail. Bring both ends to the center and sew them there to form two loops; wrap the tail tightly around the center several times. Sew one bow below the red trim on each sleeve.
- For each bow tail, cut two short red strands, fold each in half, and attach behind the bow center with a secure knot. Trim evenly and weave the strand ends into the sleeve.
Finishing
Weave in loose ends and remove the glass cylinders while arranging the crochet. Place the blocked base circle over the firm support. Position the three cylinders in a close triangle, with the tallest at the back, and mark their positions before removing them again.
Arrange the three poinsettias around the front and sides, keeping the marked cylinder spaces clear. Tuck the holly, berry clusters, pinecones, and evergreen sprigs between the flowers. Sew every piece securely to the base circle, catching the overlapped ends of the pointed base leaves as needed.
Slide the sleeves onto the cylinders, place the cylinders in their marked positions, and add the battery-operated candles. Keep the arrangement flat and stable on the table.
Tips for Success
- Block the pointed leaves and petals before assembly so their shapes stay distinct.
- Try the sleeve on its cylinder early; adjust the starting chain to fit your yarn and glass.
- Arrange all decorations around the empty cylinders before sewing to preserve enough space for them.
- Use several small stitches at each petal base so the layered flowers hold their shape.
Common Mistakes to Avoid
- If a leaf curls, loosen the gold slip-stitch edging and block it again.
- If a sleeve twists, check the foundation chain before joining and start the round again.
- If a flower looks flat, offset the upper petals between the lower petals and sew only their bases together.
- If the cylinders wobble, clear bulky stitches from beneath them and use a level, firm support.
Ways to Customize This Pattern
- Use burgundy petals and antique-gold centers for a deeper color palette.
- Make extra berry clusters to fill larger gaps between the flowers.
- Omit the gold edging or replace it with cream for a quieter finish.
- Adjust each sleeve’s starting chain and height to suit your own straight-sided cylinders.
Frequently asked questions
Use battery-operated candles. Yarn, fiberfill, and the supporting board can be damaged or ignited by heat or flame.
Make an even-numbered foundation chain that fits snugly around each cylinder, then work the stated rounds to the desired height. Keep the sleeve below the rim.
Remove the cylinders and candles, then gently spot-clean the crochet with a damp cloth. Let it dry completely and reshape any leaves before reassembling.
Yes. Use a smaller support and fewer base leaves, then arrange the flowers and cylinders before sewing. The final diameter will depend on the pieces you include.
The finished Poinsettia Candle Centerpiece Crochet Pattern