Poinsettia Crochet Candle Centerpiece
Advanced
For experienced crocheters who enjoy complex shaping, fine detail, and ambitious construction
Single-Day Project
A satisfying project you can complete in a single afternoon or evening.
Handmade Gift
A beautiful keepsake — free forever. Read online or print at home.
About This Poinsettia Crochet Candle Centerpiece
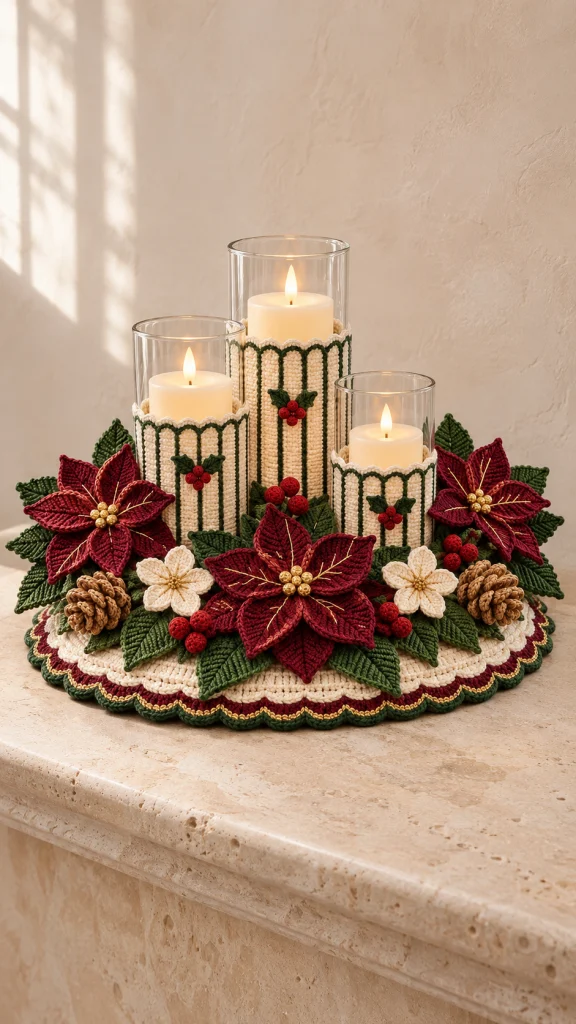
This crochet candle centerpiece pattern brings together a scalloped mat, three fitted candle sleeves, and a generous arrangement of poinsettias, greenery, berries, and pinecones. Deep red, forest green, cream, and small touches of gold give the display its traditional holiday look.
Allow approximately 25–30 hours for the crochet, embroidery, and assembly. The project suits advanced crocheters who enjoy shaping small pieces and arranging dimensional details. Use battery-operated LED pillar candles inside the glass cylinders so the yarn stays safely away from flames and heat.
Materials
- DK cotton yarn, cream: approximately 500 yd (457 m)
- DK cotton yarn, forest green: approximately 300 yd (274 m)
- DK cotton yarn, burgundy: approximately 220 yd (201 m)
- DK cotton yarn, golden brown: approximately 60 yd (55 m)
- Fine gold embroidery thread: approximately 15 yd (14 m)
- 3.5 mm (E/4) crochet hook for the base and sleeves
- 3.0 mm crochet hook for flowers, leaves, berries, and pinecones
- Three straight-sided glass cylinders, approximately 4 in (10 cm) in diameter and 6, 8, and 10 in (15, 20, and 25 cm) tall
- Three battery-operated LED pillar candles sized to fit inside the cylinders
- Small amount of polyester fiberfill for berries
- Gold beads, 15–21, for the large flower centers
- Tapestry needle and fine sewing needle
- Stitch markers, scissors, and measuring tape
- Sewing thread matching the yarn and beads
Abbreviations
chchaindcdouble crochethdchalf double crochetMRmagic ringscsingle crochetsc2togsingle crochet two stitches togethersl stslip stitchststitchtrtreble crochetRound Base
- With cream and the 3.5 mm hook, make an MR. Round 1: Ch 2, work 12 dc in the ring, and join with a sl st to the first dc. Tighten the ring. (12 dc)
- Round 2: Ch 2, work 2 dc in each st around; join. (24 dc)
- Round 3: Ch 2, work [dc in the next st, 2 dc in the next st] 12 times; join. (36 dc)
- Round 4: Ch 2, work [dc in the next 2 sts, 2 dc in the next st] 12 times; join. (48 dc)
- Round 5: Ch 2, work [dc in the next 3 sts, 2 dc in the next st] 12 times; join. (60 dc)
- Round 6: Ch 2, work [dc in the next 4 sts, 2 dc in the next st] 12 times; join. (72 dc)
- Round 7: Ch 2, work [dc in the next 5 sts, 2 dc in the next st] 12 times; join. (84 dc)
- Round 8: Ch 2, work [dc in the next 6 sts, 2 dc in the next st] 12 times; join. (96 dc)
- Round 9: Ch 2, work [dc in the next 7 sts, 2 dc in the next st] 12 times; join. (108 dc)
- Round 10: Ch 2, work [dc in the next 8 sts, 2 dc in the next st] 12 times; join. (120 dc)
- Round 11: Ch 2, work [dc in the next 9 sts, 2 dc in the next st] 12 times; join. (132 dc)
- Round 12: Ch 2, work [dc in the next 10 sts, 2 dc in the next st] 12 times; join. (144 dc)
- Rounds 13–18: Continue increasing by 12 dc in each round, adding one plain dc to each repeat: work [dc in the next 11, 12, 13, 14, 15, or 16 sts respectively, 2 dc in the next st] 12 times; join each round. Counts are 156, 168, 180, 192, 204, and 216 dc. Fasten off cream.
Scalloped Border
- Round 19: Join burgundy in any base st. Ch 1, sc in the same st, then work [skip 2 sts, 5 dc in the next st, skip 2 sts, sc in the next st] around, omitting the final sc because it is the first sc of the round. Join to the first sc. (36 shells and 36 sc)
- Round 20: Join gold embroidery thread at any sc. Ch 1, sc in each sc and each dc around; join. Fasten off. (216 sc)
- Round 21: Join forest green in any sc that sits above a burgundy sc. Ch 1, sc in the same st, then work [skip 2 sts, 5 dc in the next st, skip 2 sts, sc in the next st] around, omitting the final sc. Join and fasten off. (36 shells and 36 sc)
Cylinder Sleeves
- Make three sleeves with cream and the 3.5 mm hook. For each, ch 19 for the short cylinder, 27 for the medium cylinder, or 35 for the tall cylinder.
- Row 1: Sc in the second ch from the hook and in each remaining ch; turn. (18, 26, or 34 sc respectively)
- Row 2: Ch 1, sc in every st; turn. Repeat this row until the strip, stretched slightly, wraps snugly around its cylinder. Record the row count so the seam can be checked for fit.
- Fold the strip with its first and last rows together. Sl st through corresponding stitches across the short edges to form a tube. Fasten off and turn the seam to the inside. (18, 26, or 34 joining sl sts)
- With cream, join yarn at the upper edge. Work an even number of sc around the row ends, placing approximately one sc per row; join. Adjust by one stitch if necessary to obtain an even count.
- Top edging: Ch 1, sc in the first st, [skip the next st, 3 hdc in the next st, skip the next st, sc in the next st] around if the edge count is divisible by 4. If necessary, add or remove evenly spaced sc on the previous round to make it divisible by 4. Join and fasten off.
- With forest green, surface-embroider straight vertical lines at even intervals around each sleeve, then connect their upper ends with shallow arches just below the cream edging. Keep the stitches loose enough to retain the sleeve’s stretch.
Large Poinsettias
- Make three flowers with burgundy and the 3.0 mm hook. For each flower, work 6 sc in an MR; join to the first sc. (6 sc)
- Petal 1: Ch 11. Starting in the second ch from the hook, work sl st, sc, hdc, dc in each of the next 4 ch, hdc, sc, and sl st. Sl st in the next foundation sc. (10 stitches along the chain)
- Petals 2–6: Repeat the preceding petal sequence in each remaining foundation sc. Join at the center and fasten off, leaving a sewing tail. (6 petals)
- Make a second six-petal layer for each flower in the same way, using ch 9 for each petal and working sl st, sc, hdc, dc in each of the next 2 ch, hdc, sc, and sl st back along the chain. (8 stitches per petal)
- Place the smaller layer over the larger layer with petals offset. Sew the centers together. Embroider fine gold veins on the petals and sew 5–7 gold beads securely at each center.
Cream Flowers
- Make two flowers with cream and the 3.0 mm hook. Work 5 sc in an MR and join. (5 sc)
- For each of the 5 petals: Ch 7; starting in the second ch from the hook, work sl st, sc, hdc, dc, hdc, and sc; sl st in the next foundation sc. Join and fasten off with a sewing tail. (5 petals)
- Embroider a small cluster of gold knots at the center of each flower.
Leaves and Holly
- Make 18 large leaves with forest green and the 3.0 mm hook. For each, ch 13. Starting in the second ch from the hook, work sl st, sc, hdc, dc in each of the next 5 ch, hdc, sc, and sl st; work 3 sc in the last ch at the tip. (14 stitches on the first side and tip)
- Working along the opposite side of the foundation chain, work sl st, sc, hdc, dc in each of the next 5 ch, hdc, sc, and sl st. Join to the first sl st and fasten off with a sewing tail. (25 stitches around the leaf)
- Make 6 small holly leaves with forest green. For each, ch 7; starting in the second ch from the hook, work sl st, sc, hdc, dc, sc, and 3 sc in the last ch. Work sc, dc, hdc, sc, and sl st along the opposite side of the chain. Join and fasten off. (13 stitches)
- Embroider a center vein on each large leaf. Pinch and sew the base of each leaf for a gentle upward curve.
Berries
- Make 21 berries with burgundy and the 3.0 mm hook. Round 1: Work 6 sc in an MR. Work continuously and mark the first st. (6 sc)
- Round 2: Work 2 sc in each st. (12 sc)
- Round 3: Sc in each st. (12 sc)
- Round 4: Work sc2tog 6 times, adding a small pinch of fiberfill before the opening closes. (6 sc)
- Fasten off, draw the tail through the front loops of the remaining 6 sts, and pull closed. Leave a tail for sewing.
Pinecones
- Make two pinecones with golden brown and the 3.0 mm hook. Ch 25.
- Row 1: Work 3 hdc in the third ch from the hook, then 3 hdc in each remaining ch. (69 hdc)
- Fasten off, leaving a long tail. Roll the strip into a compact cone, with one end narrow and the other wider. Stitch firmly through the underside of all layers to hold the shape.
Finishing
Weave in the base and border ends. Lay the mat flat and arrange the three glass cylinders in a triangle, with the tallest at the back. Slide a sleeve over each cylinder. Keep the cylinders removable so the mat and sleeves can be cleaned separately.
Arrange the three poinsettias across the front and sides, with the two cream flowers and pinecones between them. Tuck the large leaves underneath, pointing outward. Sew the flowers, leaves, pinecones, and 12 berries securely to the mat, keeping the cylinder spaces clear. Sew a pair of small holly leaves and three berries to the front of each sleeve.
Place an LED pillar candle inside each cylinder. Check that the arrangement sits flat and that every bead and motif is firmly attached.
Tips for Success
- Measure the base after several rounds and adjust your hook if it is growing much larger or smaller than the gauge suggests.
- Try each sleeve on its cylinder before seaming; cotton stretches, so a slightly snug fit helps it stay in place.
- Pin every motif in position before sewing, leaving flat areas for the cylinders to stand securely.
- Steam-block the mat lightly if appropriate for your yarn, keeping the iron above the fabric rather than pressing the scallops flat.
Common Mistakes to Avoid
- If the base cups, check for missed increases and loosen your tension or use a larger hook.
- If the base ruffles, check for extra increases and try a smaller hook if the stitch counts are correct.
- If a sleeve slips down, remove the seam and shorten the strip by a few rows before seaming again.
- If flowers obscure the cylinders, move the motifs outward and check the arrangement before sewing.
Ways to Customize This Pattern
- Change the burgundy flowers to deep red or ivory while retaining the green leaves and gold details.
- Use cylinders of different heights and work each sleeve to the desired height using the same rectangular construction.
- Add more leaves or berry clusters around the back for a centerpiece visible from all sides.
- Replace the gold beads with embroidered knots for a softer, entirely sewn flower center.
Frequently asked questions
Use battery-operated LED candles for this display. Yarn and decorations are combustible, and glass can become hot around a real flame.
Choose a starting chain that gives the sleeve height you want, then work rows until the strip wraps snugly around the cylinder. Seam the short edges and adjust the top-edge stitch count to a multiple of four.
Remove the cylinders and LED candles first. Follow the yarn label; gentle spot cleaning is practical for the assembled mat, beads, and dimensional motifs. Dry it flat completely before replacing the cylinders.
Before adding the border, work additional dc rounds, increasing by 12 stitches in each round and adding one plain dc to each increase repeat. Add rounds in groups of three to preserve a stitch count divisible by six for the scalloped border.
The finished Poinsettia Crochet Candle Centerpiece