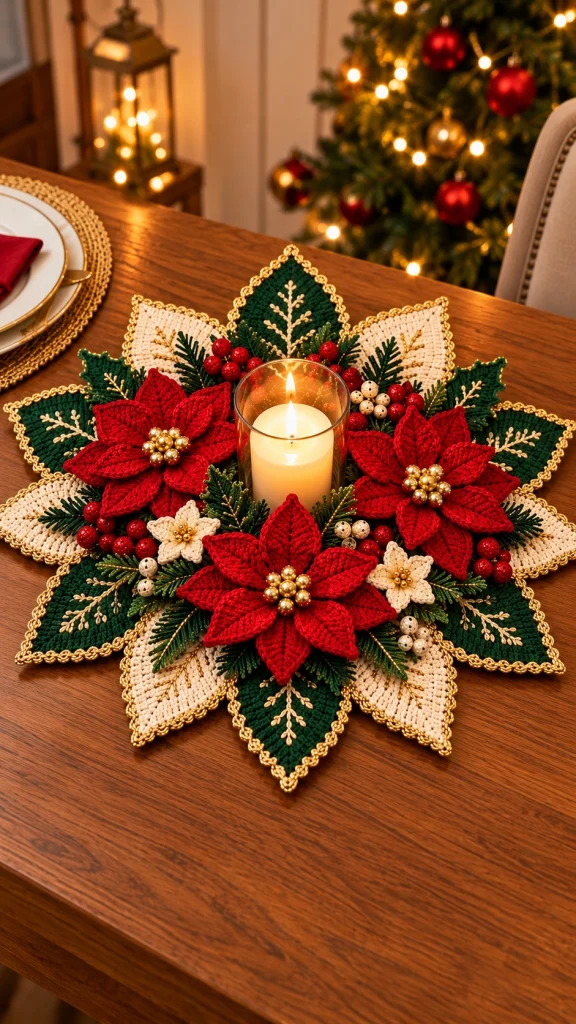
Christmas Poinsettia Crochet Candle Centerpiece – Free Advanced Pattern
Bring timeless elegance to your holiday table with this stunning Christmas Poinsettia Crochet Candle Centerpiece. Featuring three dimensional red poinsettia flowers, rich evergreen and ivory pointed leaves, delicate golden edging, decorative berries, and a glowing candle at its center, this handmade decoration creates a beautiful festive display.
Inspired by the reference image, this advanced crochet centerpiece combines layered floral motifs, individually shaped leaves, textured greenery, and carefully arranged embellishments to create a luxurious botanical design.
The rich red, forest green, warm ivory, and metallic gold color palette makes this crochet arrangement perfect for Christmas dining tables, mantel displays, holiday gatherings, and thoughtful handmade gifts.
Pattern Details
- Skill Level: Advanced
- Finished Diameter: Approximately 42–48 cm
- Finished Height: Approximately 8–12 cm, excluding candle
- Main Colors: Christmas red, forest green, warm ivory, and metallic gold
- Yarn Weight: DK-weight cotton yarn
- Hook Size: 2.5 mm and 3.0 mm
- Construction: Separate floral motifs, pointed leaves, greenery, and decorative berries assembled around a circular base
- Terminology: US crochet terms
- Estimated Time: 20–30 hours
Materials Needed
- 150 g deep Christmas red cotton yarn
- 150 g forest green cotton yarn
- 120 g warm ivory cotton yarn
- 30 g metallic gold crochet thread
- Small amount of dark green embroidery thread
- 2.5 mm crochet hook
- 3.0 mm crochet hook
- Gold decorative beads for flower centers
- Red and ivory decorative beads for berry clusters
- Polyester stuffing for crocheted berries
- Florist wire for shaping leaves, optional
- Stitch markers
- Tapestry needle
- Scissors
- Blocking mat and pins
- Clear glass candle holder
- Battery-operated LED pillar candle
- Optional circular felt backing
Safety Note: Use a battery-operated LED candle rather than a real flame. Cotton yarn, decorative thread, and artificial greenery are combustible. Keep the centerpiece away from open flames and heat sources.
Crochet Abbreviations
- MR: Magic ring
- ch: Chain
- sc: Single crochet
- hdc: Half double crochet
- dc: Double crochet
- tr: Treble crochet
- dtr: Double treble crochet
- sl st: Slip stitch
- inc: Increase
- dec: Decrease
- st: Stitch
- sp: Space
- BLO: Back loop only
- FLO: Front loop only
- FO: Fasten off
1. Crochet the Circular Centerpiece Base
The foundation of this arrangement is a flat circular crochet base that supports the flowers, leaves, and decorative greenery.
Using forest green yarn and a 3.0 mm hook:
Round 1: MR, work 6 sc into the ring. (6)
Round 2: Inc in every stitch around. (12)
Round 3: *Sc 1, inc* repeat around. (18)
Round 4: *Sc 2, inc* repeat around. (24)
Round 5: *Sc 3, inc* repeat around. (30)
Round 6: *Sc 4, inc* repeat around. (36)
Round 7: *Sc 5, inc* repeat around. (42)
Round 8: *Sc 6, inc* repeat around. (48)
Continue increasing six stitches per round, distributing increases evenly, until the circular base measures approximately 20–24 cm across.
Work one final round of sc without increasing.
Fasten off and weave in the ends.
Block the base flat before attaching the decorative elements.
2. Crochet the Large Red Poinsettia Flowers
The reference centerpiece features three prominent red poinsettia flowers arranged around the central candle.
Make three large poinsettia flowers.
Flower Center
Using red yarn and a 2.5 mm hook:
Round 1: MR, 6 sc. (6)
Round 2: Inc around. (12)
Round 3: *Sc 1, inc* repeat around. (18)
Fasten off, leaving a long tail for assembly.
Inner Petals – Make 6 per Flower
Using red yarn:
Row 1: Ch 13.
Row 2: Starting in the second chain from the hook, work sc 2, hdc 2, dc 4, hdc 2, sc 2.
Row 3: Ch 1, turn. Work sc 2, hdc 2, dc 4, hdc 2, sc 2.
Row 4: Work sc evenly around the petal, placing 3 sc at the pointed tip.
Fasten off, leaving a long sewing tail.
Outer Petals – Make 6 per Flower
Row 1: Ch 18.
Row 2: Starting in the second chain from the hook, work sc 2, hdc 3, dc 7, hdc 3, sc 2.
Row 3: Ch 1, turn. Repeat the stitch sequence.
Row 4: Sc evenly around the petal, adding extra stitches at the pointed end.
Row 5: Work one additional round of sc to strengthen the edge.
Fasten off.
Assemble the Poinsettia
- Arrange six outer petals in a circular formation.
- Overlap the narrow ends slightly.
- Sew the petal bases securely together.
- Position the six smaller petals above the outer layer.
- Rotate the inner petals so they sit between the outer petals.
- Attach the circular flower center.
- Sew a cluster of six to eight gold beads into the middle.
- Shape the petals to create a raised three-dimensional flower.
Repeat until you have three matching red poinsettia flowers.
3. Crochet the Small Ivory Poinsettias
Make two smaller ivory flowers to complement the large red poinsettias.
Using ivory yarn and a 2.5 mm hook:
Round 1: MR, 6 sc. (6)
Round 2: Inc around. (12)
Petal 1: Ch 9, work back along the chain with sc 1, hdc 2, dc 3, hdc 2.
Sl st into the next available base stitch.
Repeat to create six petals around the center.
Work a second layer of slightly smaller petals behind the first layer.
Attach three to five small gold beads in the center.
Fasten off and weave in the ends.
4. Crochet the Large Pointed Evergreen Leaves
The dramatic pointed leaves create the star-shaped silhouette of the centerpiece.
Make six large forest green leaves.
Using forest green yarn and a 3.0 mm hook:
Row 1: Ch 26.
Row 2: Starting in the second chain from the hook, work sc 3, hdc 4, dc 10, hdc 4, sc 4.
Row 3: Ch 1, turn. Sc 3, hdc 4, dc 10, hdc 4, sc 4.
Row 4: Work sc evenly around the entire leaf.
At the pointed tip, work 3 sc in the same stitch.
Row 5: Work one final round of sc.
Fasten off, leaving a sewing tail.
Golden Leaf Edging
Join metallic gold thread at the base of the leaf.
Work a decorative slip-stitch or picot edging around the outer edge.
For a delicate scalloped finish, repeat:
*Sl st, ch 3, sl st into the same stitch, skip 1 stitch.*
Continue around the leaf.
Fasten off and weave in the gold thread.
5. Crochet the Large Ivory Leaves
Make six ivory pointed leaves using the same construction as the green leaves.
For a balanced design, make the ivory leaves approximately 1–2 cm shorter than the green leaves.
Use warm ivory cotton yarn and a 3.0 mm hook.
Finish each ivory leaf with metallic gold edging.
These alternating green and ivory leaves form the beautiful star-shaped foundation visible in the reference photograph.
6. Add Decorative Gold Leaf Veins
The reference design features delicate golden botanical embroidery on the pointed leaves.
Using metallic gold embroidery thread and a tapestry needle:
- Begin at the base of the leaf.
- Embroider one central stem toward the pointed tip.
- Add short diagonal branches along both sides.
- Finish each branch with two or three small decorative stitches.
- Keep the design symmetrical.
- Secure the thread on the back of the leaf.
Repeat on all twelve pointed leaves.
For the most elegant result, keep the embroidery delicate rather than overly dense.
7. Crochet the Small Green Foliage
The arrangement includes additional evergreen foliage between the large poinsettia flowers.
Make approximately twelve small green leaves.
Using dark green yarn:
Row 1: Ch 13.
Row 2: Sc 2, hdc 2, dc 4, hdc 2, sc 2.
Row 3: Work sc around the entire leaf, adding 3 sc at the tip.
Fasten off.
For a more realistic appearance, create several leaves in slightly different lengths.
Arrange them beneath and between the large poinsettias.
8. Crochet the Evergreen Sprigs
Make approximately eight decorative evergreen sprigs.
Using forest green yarn and a 2.5 mm hook:
Step 1: Ch 25 to create the central stem.
Step 2: Starting near the end of the chain, create small side branches using chains of 4–6 stitches.
Step 3: Sl st back along each branch.
Step 4: Alternate branches on both sides of the central stem.
Step 5: Continue until the sprig has a full, feathery appearance.
Fasten off.
Make some sprigs longer than others to create a natural layered arrangement.
9. Crochet the Red Berry Clusters
The red berries add color, texture, and dimension throughout the centerpiece.
Make approximately 24–30 small berries.
Using red yarn and a 2.5 mm hook:
Round 1: MR, 6 sc. (6)
Round 2: Inc around. (12)
Rounds 3–4: Sc around. (12)
Round 5: *Sc 2, dec* repeat around. (9)
Add a small amount of polyester stuffing.
Round 6: Continue decreasing until the opening closes.
Fasten off, leaving a long tail.
Arrange berries in groups of three or five.
Sew each cluster together securely.
10. Make the Ivory and Gold Berry Accents
For additional contrast, create approximately twelve small ivory berries using the same instructions.
Attach small gold beads or embroider tiny gold dots on selected berries.
Keep the ivory berry clusters smaller than the red ones.
These details help create the luxurious appearance of the finished centerpiece.
11. Crochet the Candle Holder Sleeve
The central glass holder can be decorated with a removable crochet sleeve.
Using ivory yarn and a 2.5 mm hook:
Round 1: Ch enough stitches to fit comfortably around the glass holder.
Join into a ring without twisting.
Round 2: Sc around.
Round 3: *Dc, ch 1, skip 1 stitch* repeat around.
Round 4: Work dc into each chain space.
Round 5: Repeat the openwork pattern.
Round 6: Finish with a decorative sc border.
Fasten off.
Slide the sleeve around the glass holder, making sure it does not cover the top opening.
Use only with a cool-running battery-operated LED candle.
12. Arrange the Star-Shaped Foundation
Place the completed circular crochet base on a flat work surface.
Arrange the twelve large pointed leaves around the outside edge.
- Position one forest green leaf at the top.
- Place an ivory leaf beside it.
- Continue alternating green and ivory leaves.
- Overlap the bases slightly.
- Keep all pointed tips facing outward.
- Adjust the spacing to create a balanced star-shaped silhouette.
- Pin the leaves in place.
- Sew each leaf securely to the circular base.
Check the overall shape before continuing with the flowers.
13. Attach the Three Large Poinsettias
Position the three large red poinsettias around the center opening.
For a balanced arrangement:
- Place one flower toward the front.
- Position the second flower on the left.
- Position the third flower on the right.
Leave sufficient space in the middle for the glass candle holder.
Sew the flower bases securely to the circular foundation.
Keep the upper petals slightly raised for a realistic dimensional effect.
14. Add the Ivory Flowers and Greenery
Place the two smaller ivory poinsettias between the larger red flowers.
Arrange the green leaves beneath the flowers.
Insert the crocheted evergreen sprigs into the remaining spaces.
Keep the greenery directed outward to emphasize the radial arrangement.
Attach each element with matching yarn.
Make sure all decorative pieces are secure before adding the berries.
15. Add the Berry Clusters and Golden Details
Arrange red berry clusters around the poinsettias.
Position the ivory and gold berries between the green foliage.
Use the reference photograph as inspiration for a rich but balanced composition.
Keep the decorative berries grouped rather than spreading them evenly across every available space.
For a luxurious finish, add small metallic gold stitches along selected evergreen sprigs.
16. Position the Candle Holder
Place the glass holder in the center of the arrangement.
The holder should sit directly on a stable, heat-resistant surface rather than being supported by the crochet flowers.
Insert a battery-operated LED pillar candle.
Adjust the surrounding flowers so they frame the candle without obstructing the center.
The finished arrangement should have a balanced circular composition with the candle as the focal point.
17. Final Assembly and Finishing
- Inspect all floral attachments.
- Reinforce loose petals or leaves.
- Weave in all remaining yarn ends.
- Adjust the pointed leaves into a symmetrical star shape.
- Arrange the red poinsettias evenly.
- Secure the small ivory flowers.
- Distribute the greenery naturally.
- Check the decorative berry clusters.
- Trim any visible loose threads.
- Position the LED candle in the center.
Your Christmas Poinsettia Crochet Candle Centerpiece is complete!
18. Alternative Color Combinations
Classic Christmas Red and Green
Use deep red poinsettias, forest green leaves, warm ivory accents, and metallic gold edging for a traditional festive centerpiece.
Elegant Ivory and Gold
Create all poinsettias in ivory and use champagne gold edging for a sophisticated neutral holiday decoration.
Burgundy and Sage Green
Combine burgundy flowers with muted sage green leaves for a soft vintage-inspired appearance.
Winter White and Silver
Use white poinsettias, icy blue greenery, and metallic silver thread for a beautiful winter-themed centerpiece.
Rustic Cranberry and Cream
Choose cranberry red flowers, cream leaves, and natural cotton yarn for a cozy farmhouse-inspired design.
19. Advanced Crochet Tips
- Use cotton yarn for clearly defined stitches and structured petals.
- Maintain consistent tension across matching flower petals.
- Block pointed leaves before assembly.
- Shape the outer leaves symmetrically.
- Use small hidden stitches when joining floral components.
- Keep the large poinsettias raised above the leaf foundation.
- Use metallic thread sparingly for elegant highlights.
- Attach bead clusters securely.
- Arrange greenery in different lengths for a natural appearance.
- Test the completed arrangement on a flat table before displaying.
20. Care Instructions
To preserve the beauty of your handmade centerpiece:
- Dust gently using a soft brush.
- Spot clean with cool water and mild detergent.
- Avoid soaking the decorative beadwork.
- Do not machine wash the assembled centerpiece.
- Keep away from open flames and heat.
- Store flat in a dry container.
- Place tissue paper between raised flowers during storage.
- Avoid crushing the pointed leaves.
- Reshape petals gently before displaying each season.
Frequently Asked Questions
Is this crochet centerpiece suitable for beginners?
This is an advanced project because it involves multiple individually shaped floral pieces, dimensional layering, detailed embroidery, decorative edging, and careful assembly.
What yarn is best for crochet poinsettias?
DK-weight cotton yarn is ideal because it creates crisp petals and helps the flowers maintain their shape.
Can I use a real candle?
No. A battery-operated LED candle is strongly recommended because yarn and decorative embellishments can catch fire when exposed to heat or flame.
Can I make the centerpiece larger?
Yes. Increase the size of the circular base, enlarge the pointed leaves, and add more decorative greenery to achieve a wider arrangement.
Can I make the poinsettias in different colors?
Absolutely. Ivory, burgundy, dusty pink, champagne, and soft gold are beautiful alternatives.
Do I need florist wire?
Florist wire is optional. It can help shape the leaves, but firm cotton crochet and blocking may provide enough structure without it.
How many flowers are needed?
This design uses three large red poinsettias and two smaller ivory poinsettias, along with additional leaves, greenery, and berry clusters.
Can I use this centerpiece on a dining table?
Yes. Its flat, radial design makes it suitable for dining tables, provided it does not interfere with tableware and the central candle is battery-operated.
How long does the project take?
Experienced crocheters may need approximately 20–30 hours, depending on the complexity of the floral details and finishing work.
Can I sell finished centerpieces made from this pattern?
Yes. You may sell handmade centerpieces created using this original pattern. Credit to Cozy Crochet Patterns is appreciated.
Final Thoughts
This Christmas Poinsettia Crochet Candle Centerpiece is a beautiful celebration of handmade holiday craftsmanship.
With its rich red poinsettias, elegant evergreen and ivory leaves, intricate gold embroidery, decorative berries, and glowing central candle, this advanced crochet project creates a truly memorable festive decoration.
Whether displayed on a Christmas dining table, given as a thoughtful handmade gift, or enjoyed as part of your seasonal decorations, this crochet centerpiece adds warmth, elegance, and timeless charm to any home.
Save this free Christmas poinsettia crochet centerpiece pattern to Pinterest and share it with your crochet-loving friends!
Designer note: This is an original, untested pattern interpretation inspired by the supplied image, not an exact stitch-for-stitch reconstruction. Individual petal shaping, leaf proportions, base dimensions, and assembly may require adjustments to achieve the photographed appearance.

