Christmas Poinsettia Crochet Candle Centerpiece – Free Advanced Pattern
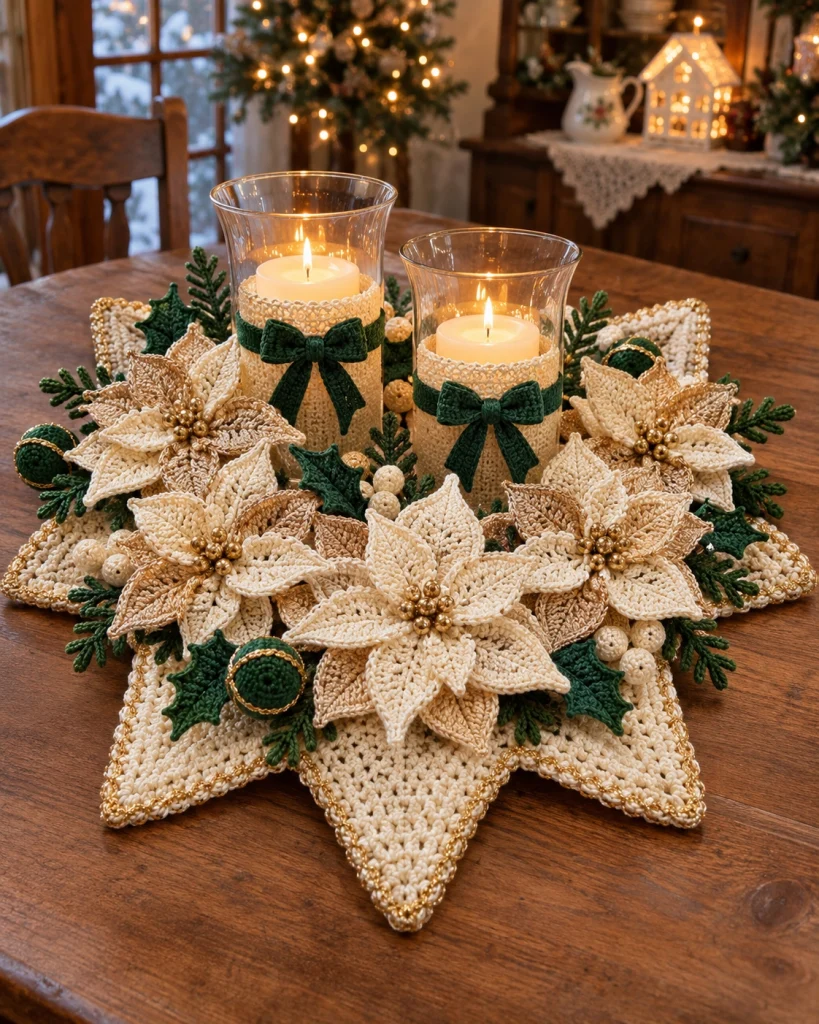
Create an elegant handmade holiday decoration with this stunning Christmas Poinsettia Crochet Candle Centerpiece! Featuring two glowing candle holders, layered ivory and champagne-gold poinsettias, deep green holly leaves, delicate evergreen branches, and a beautiful star-shaped crochet base, this festive arrangement brings timeless Christmas charm to any dining table.
This advanced crochet pattern combines textured floral motifs, dimensional petals, delicate lacework, decorative berries, and intricate assembly techniques. The combination of creamy white cotton, warm champagne accents, forest green foliage, and sparkling gold details creates a luxurious holiday centerpiece.
Inspired by the reference image, this original pattern recreates the centerpiece’s main elements using individually crocheted components. The instructions provide a practical handmade interpretation rather than an exact stitch-for-stitch reproduction.
Pattern Details
- Skill Level: Advanced
- Finished Size: Approximately 45–55 cm across
- Centerpiece Height: Approximately 20–25 cm, depending on the candle holders
- Construction: Modular crochet motifs with layered assembly
- Yarn Weight: Sport or DK cotton
- Hook Sizes: 2.0 mm, 2.5 mm, and 3.0 mm
- Terminology: US crochet terms
- Main Colors: Ivory, champagne gold, forest green, and metallic gold
- Estimated Time: 18–25 hours
- Lighting: Battery-operated LED candles only
Materials Needed
- Ivory cotton yarn – approximately 300–400 g
- Champagne beige cotton yarn – approximately 100 g
- Forest green cotton yarn – approximately 100–150 g
- Small amount of dark green cotton yarn
- Metallic gold crochet thread
- 2.0 mm crochet hook
- 2.5 mm crochet hook
- 3.0 mm crochet hook
- Gold decorative beads
- Small pearl beads
- Polyester fiberfill
- Stitch markers
- Tapestry needle
- Scissors
- Two transparent glass or acrylic candle holders
- Two battery-operated LED pillar candles
- Optional fabric stiffener
- Optional lightweight floral support or craft mesh
Safety: Use battery-operated LED candles only. Never use real flames near crochet, yarn, fabric stiffener, decorative beads, or artificial foliage. Keep battery compartments accessible.
Crochet Abbreviations
- MR: Magic ring
- ch: Chain
- sc: Single crochet
- hdc: Half double crochet
- dc: Double crochet
- tr: Treble crochet
- sl st: Slip stitch
- inc: Increase
- dec: Decrease
- st: Stitch
- sp: Space
- FO: Fasten off
- BLO: Back loop only
1. Crochet the Star-Shaped Centerpiece Base
The centerpiece begins with a large decorative star base featuring pointed sections and an elegant gold-trimmed border.
Using ivory yarn and a 3.0 mm hook:
Rnd 1: Make a magic ring. Ch 3 (counts as dc), work 11 dc into the ring. Join with sl st. (12 dc)
Rnd 2: Ch 3, dc in the same stitch, 2 dc in each remaining stitch. Join. (24 dc)
Rnd 3: Ch 3, dc in next stitch, (2 dc in next stitch, dc in next stitch) repeat around. Join. (36 dc)
Rnd 4: Ch 3, dc in next 2 stitches, (2 dc in next stitch, dc in next 2 stitches) repeat around. Join. (48 dc)
Rnd 5: Ch 3, dc in next 3 stitches, (2 dc in next stitch, dc in next 3 stitches) repeat around. Join. (60 dc)
Rnd 6: Ch 3, dc in next 4 stitches, (2 dc in next stitch, dc in next 4 stitches) repeat around. Join. (72 dc)
Rnd 7: Ch 3, dc in next 5 stitches, (2 dc in next stitch, dc in next 5 stitches) repeat around. Join. (84 dc)
Rnd 8: Ch 3, dc in next 6 stitches, (2 dc in next stitch, dc in next 6 stitches) repeat around. Join. (96 dc)
Rnd 9: Ch 3, dc in next 7 stitches, (2 dc in next stitch, dc in next 7 stitches) repeat around. Join. (108 dc)
Rnd 10: Ch 3, dc in next 8 stitches, (2 dc in next stitch, dc in next 8 stitches) repeat around. Join. (120 dc)
Continue increasing evenly if a larger central foundation is desired.
2. Form the Eight Star Points
Divide the 120 stitches into eight equal sections of 15 stitches.
Each section becomes one decorative star point.
Work each point separately in turned rows.
Row 1: Join ivory yarn at the beginning of one section. Ch 3, dc across 15 stitches. (15)
Row 2: Ch 3, turn, dc2tog, dc across until 3 stitches remain, dc2tog, dc in final stitch. (13)
Row 3: Repeat the decrease sequence. (11)
Row 4: Repeat. (9)
Row 5: Repeat. (7)
Row 6: Repeat. (5)
Row 7: Repeat. (3)
Row 8: Dc3tog across the remaining stitches. (1)
Fasten off.
Repeat for all eight points.
Block the completed star carefully so the points extend evenly.
3. Add the Gold Decorative Border
Using metallic gold thread and a 2.0 mm hook:
Join the thread at any point along the outer edge.
Work one round of single crochet evenly around the entire star.
At each star tip, work (sc, ch 2, sc) into the point.
For an elegant beaded finish, attach small gold beads at selected outer points using a tapestry needle.
Fasten off and weave in all ends.
4. Crochet the Large Poinsettia Petals
The centerpiece features five prominent poinsettia flowers with layered ivory and champagne petals.
For each large flower, make eight outer petals and six inner petals.
Large Outer Petal – Make 40
Using ivory or champagne yarn and a 2.5 mm hook:
Row 1: Ch 17.
Row 2: Starting in the second chain from the hook, sc 2, hdc 3, dc 6, hdc 3, sc 2. (16)
Work along the opposite side of the foundation chain:
Sc 2, hdc 3, dc 6, hdc 3, sc 2.
Join with a sl st.
Rnd 3: Ch 1, sc in each stitch around, working (sc, ch 2, sc) at the pointed tip.
Rnd 4: Work surface slip stitches along the center of the petal to create a raised vein.
Fasten off, leaving a long tail for assembly.
Gently shape the petal into a pointed oval.
Inner Petal – Make 30
Using ivory yarn:
Row 1: Ch 13.
Row 2: Starting in the second chain, sc 2, hdc 2, dc 4, hdc 2, sc 2.
Repeat along the opposite side of the foundation chain.
Rnd 3: Sc evenly around, creating a pointed tip with (sc, ch 2, sc).
Fasten off.
5. Assemble the Layered Poinsettias
For each flower:
- Arrange eight large petals in a circular formation.
- Overlap the petal bases slightly.
- Sew the bases together with matching yarn.
- Position six smaller petals above the first layer.
- Rotate the inner petals so they sit between the larger petals.
- Secure the inner layer firmly.
- Gather the center slightly to create a dimensional flower.
- Attach a cluster of small gold beads at the center.
Alternate ivory and champagne petals to recreate the soft, elegant two-tone appearance of the reference centerpiece.
Make five large flowers in total.
6. Crochet the Small Decorative Poinsettias
Make two additional smaller flowers to fill the arrangement.
Using ivory yarn:
Make six petals per flower using the inner petal instructions from Section 4.
Arrange the petals in a circular formation.
Sew the bases together.
Add a small cluster of gold beads at the center.
These smaller flowers provide balance between the larger poinsettias.
7. Crochet the Holly Leaves
The deep green holly leaves create beautiful contrast against the cream-colored poinsettias.
Make approximately 12–16 leaves.
Using forest green yarn and a 2.5 mm hook:
Row 1: Ch 17.
Row 2: Starting in the second chain from the hook, sc 2, hdc 3, dc 6, hdc 3, sc 2.
Work along the opposite side of the foundation chain using the same stitch sequence.
Rnd 3: (Sc 2, ch 3, sl st into first chain, sc 2) repeat around the leaf edge.
Adjust the placement of the chain-3 points to create the distinctive jagged holly silhouette.
Fasten off.
Using a tapestry needle, embroider a raised center vein with dark green yarn.
8. Crochet the Evergreen Branches
The arrangement includes slender green branches that extend naturally between the flowers.
Make approximately 10–14 branches.
Using dark green yarn and a 2.0 mm hook:
Step 1: Ch 30.
Step 2: Sl st into the second chain from the hook.
Step 3: Ch 6, sl st back along the chain, then sl st into the next stitch of the main stem.
Step 4: Repeat the branch-making process along both sides of the stem.
Step 5: Gradually shorten the side branches near the tip.
Fasten off.
Lightly block the branches to open their shape.
Arrange them around the poinsettias to resemble delicate evergreen foliage.
9. Crochet the Decorative Green Baubles
Small forest green ornaments with gold trim add depth and visual interest.
Make four decorative baubles.
Using forest green yarn:
Rnd 1: 6 sc in MR. (6)
Rnd 2: Inc around. (12)
Rnd 3: (1 sc, inc) x 6. (18)
Rnd 4: (2 sc, inc) x 6. (24)
Rnds 5–8: Sc around. (24)
Rnd 9: (2 sc, dec) x 6. (18)
Rnd 10: (1 sc, dec) x 6. (12)
Stuff firmly.
Rnd 11: Dec around. (6)
Fasten off and close.
Using metallic gold thread, embroider a narrow decorative line around the center of each bauble.
10. Crochet the Ivory Decorative Berries
Make approximately 18–24 small berries.
Using ivory yarn and a 2.0 mm hook:
Rnd 1: 6 sc in MR. (6)
Rnd 2: Inc around. (12)
Rnds 3–4: Sc around. (12)
Rnd 5: Dec around. (6)
Stuff lightly before closing.
Fasten off, leaving a sewing tail.
Group the berries in clusters of three or five.
Attach them between the holly leaves and poinsettias.
11. Crochet the Candle Holder Sleeves
The centerpiece includes two elegant candle holders wrapped in delicate ivory crochet sleeves and finished with forest green bows.
Measure the circumference and height of each candle holder before beginning.
Using ivory yarn and a 2.5 mm hook:
Foundation: Chain a multiple of four that fits comfortably around the holder without stretching excessively.
Join with a sl st, making sure the chain is not twisted.
Rnd 1: Ch 1, sc in each chain around. Join.
Rnd 2: Ch 3, dc in each stitch around. Join.
Rnd 3: Ch 4, skip 1 stitch, dc in next stitch. Repeat around.
Rnd 4: Ch 3, dc in each dc and chain space around.
Rnd 5: Ch 1, sc in each stitch around.
Repeat Rounds 3–5 until the sleeve reaches the desired height.
Finish with a decorative scalloped edge:
(Sl st, skip 1 stitch, 5 dc in next stitch, skip 1 stitch) repeat around.
Fasten off.
Make a second sleeve using the measurements of the smaller candle holder.
Keep the upper glass section uncovered so the LED candle remains clearly visible.
12. Crochet the Forest Green Bows
Make two bows using forest green yarn.
Bow Loops
Row 1: Ch 31.
Row 2: Starting in the second chain from the hook, sc across. (30)
Rows 3–8: Ch 1, turn, sc across. (30)
Fasten off.
Bring the two short ends together and sew them securely.
Pinch the center to create two bow loops.
Bow Center
Ch 8.
Sc in the second chain from the hook and across. (7)
Work three additional rows of sc.
Wrap the strip around the center of the bow and sew securely.
Ribbon Tails
Make two tails per bow.
Ch 21.
Sc in the second chain from the hook and across. (20)
Work four more rows of sc.
Fasten off.
Attach the tails beneath the bow.
Sew the finished bow to the front of the candle sleeve.
13. Add Decorative Gold Accents
Using metallic gold thread:
- Embroider fine outlines along selected poinsettia petals.
- Add a delicate gold trim to the outer star points.
- Decorate the green baubles with narrow gold bands.
- Attach small gold beads to the flower centers.
- Add subtle metallic highlights to selected evergreen branches.
Use gold sparingly to maintain the sophisticated appearance of the centerpiece.
14. Prepare the Centerpiece Layout
Lay the completed star-shaped base flat on a large table.
Before sewing any decorative elements permanently, arrange all components according to the following layout:
- Place the taller candle holder slightly left of center toward the back.
- Position the smaller candle holder to its right.
- Arrange one large ivory poinsettia at the front center.
- Position two additional poinsettias on the left side.
- Position two additional poinsettias on the right side.
- Fill the remaining gaps with smaller poinsettias.
- Place the holly leaves beneath and between the flowers.
- Extend the evergreen branches toward the outer star points.
- Arrange the ivory berry clusters in small groups.
- Add the green baubles near the front and sides.
Step back and check the arrangement from different angles before final assembly.
15. Assemble the Christmas Centerpiece
Once you are satisfied with the layout, begin attaching the decorations.
Step 1: Sew the holly leaves to the star base, positioning them beneath the planned flower locations.
Step 2: Attach the evergreen branches, allowing their tips to extend beyond the flowers.
Step 3: Sew the largest poinsettias into place.
Step 4: Add the smaller flowers to fill visible gaps.
Step 5: Attach the berry clusters between the flowers and foliage.
Step 6: Secure the decorative green baubles.
Step 7: Place the two candle holders in their designated positions.
Step 8: Insert the battery-operated LED candles.
Step 9: Adjust the bows so they face forward.
Step 10: Check the overall balance and make final adjustments.
For stability, position the candle holders on a firm, level surface beneath the arrangement. Do not rely on the crochet fabric alone to support their weight.
16. Shape and Block the Finished Flowers
To achieve beautifully defined poinsettia petals:
- Lightly dampen each flower with clean water.
- Shape the petals individually.
- Pin them onto a suitable blocking surface.
- Allow them to dry completely.
- Gently lift the outer petals to create dimension.
- Adjust the inner petals so the gold bead centers remain visible.
If desired, apply a small amount of fabric stiffener to the underside of the petals.
Allow all stiffened pieces to dry completely before placing them near the LED candle holders.
17. Optional Color Variations
Classic Christmas Red
- Deep red poinsettias
- Ivory star base
- Forest green foliage
- Gold decorative accents
- Red velvet-inspired crochet bows
Elegant Champagne Christmas
- Ivory and champagne poinsettias
- Soft beige star base
- Dark green foliage
- Metallic gold borders
- Champagne-colored bows
Winter Wonderland
- Snow-white poinsettias
- Silver decorative thread
- Sage green foliage
- Pearl bead centers
- White crochet candle sleeves
18. Tips for a Professional Finish
- Use cotton yarn for crisp, well-defined stitches.
- Maintain consistent tension throughout the project.
- Block the star base before attaching decorations.
- Make all large petals the same size for a balanced flower.
- Use matching yarn when sewing components together.
- Keep decorative gold details delicate and consistent.
- Arrange foliage in different directions for a natural appearance.
- Position the taller candle holder behind the smaller one.
- Avoid overcrowding the central section.
- Secure all beads carefully.
19. Care Instructions
- Remove the candle holders before cleaning.
- Dust the flowers gently with a soft brush.
- Spot-clean using a damp cloth.
- Avoid machine washing the assembled centerpiece.
- Do not soak stiffened petals.
- Store flat in a large protective box.
- Place tissue paper between dimensional flowers during storage.
- Keep away from direct heat and open flames.
Frequently Asked Questions
Is this Christmas crochet centerpiece suitable for beginners?
This is an advanced project because it combines lacework, shaped flower petals, dimensional motifs, decorative stitching, and complex assembly.
How large is the finished centerpiece?
The finished arrangement measures approximately 45–55 cm across, depending on yarn weight, hook size, and blocking.
Can I use real candles?
No. Battery-operated LED candles are recommended because yarn and decorative materials are flammable.
Can I make the centerpiece with only one candle?
Yes. You can position one large candle holder at the center and arrange the poinsettias evenly around it.
Can I make the poinsettias in red?
Absolutely! Deep red poinsettias with forest green leaves and gold centers create a beautiful traditional Christmas arrangement.
How do I keep the poinsettia petals from curling?
Block each petal carefully before assembly. A small amount of fabric stiffener may help maintain the desired shape.
Can I use acrylic yarn?
Cotton is preferred for its stitch definition and structure. Acrylic may be used for decorative elements, but it can behave differently during blocking and shaping.
Can I sell finished centerpieces made from this pattern?
Yes. You may sell handmade finished items made from this original pattern. Credit to Cozy Crochet Patterns is appreciated.
Final Thoughts
This Christmas Poinsettia Crochet Candle Centerpiece is a beautiful celebration of handmade holiday craftsmanship. With its intricate ivory flowers, champagne-gold petals, forest green foliage, sparkling decorative accents, and softly glowing LED candles, it creates a luxurious festive display.
Whether placed on a dining table, displayed on a sideboard, or given as a thoughtful handmade gift, this elegant crochet arrangement is sure to become a treasured part of your Christmas decorations.
Enjoy experimenting with different color combinations, creating dimensional flowers, and bringing your own artistic touches to this festive crochet project.
Save this free Christmas crochet centerpiece pattern to Pinterest and share it with your crochet-loving friends!
Pattern note: This original design is inspired by the supplied reference image. The pattern has not been sample-tested, and the finished dimensions are estimates. Check stitch counts, fit, and component placement before permanent assembly.

