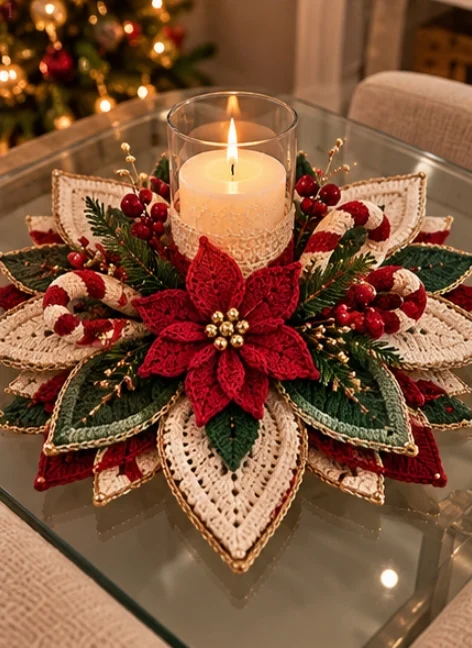
Christmas Poinsettia Crochet Candle Centerpiece – Free Holiday Table Decoration Pattern
Bring handmade Christmas elegance to your holiday table with this beautiful Christmas poinsettia crochet candle centerpiece. Featuring layered cream lace petals, deep green leaves, rich red poinsettia flowers, festive candy canes, and bright red berries, this decorative arrangement creates a stunning seasonal display around a glowing candle.
The centerpiece combines traditional crochet techniques with delicate botanical details. Its layered floral design resembles a festive Christmas flower, with a glass candle holder positioned in the center and surrounded by beautifully textured crochet decorations.
This free Christmas crochet centerpiece pattern is perfect for experienced crocheters who enjoy making elegant holiday decorations, handmade gifts, and unique festive table arrangements.
Important: Use a flameless LED candle for this project. Yarn and decorative fibers are flammable, and a glass holder does not make a real flame safe near crochet decorations.
Pattern Information
- Skill Level: Advanced
- Finished Diameter: Approximately 35–40 cm
- Finished Height: Approximately 12–15 cm, including the central candle holder
- Yarn Weight: Sport-weight or DK cotton yarn
- Hook Sizes: 2.5 mm and 3 mm
- Terminology: US crochet terms
- Construction: Layered crochet petals, individual poinsettia flowers, leaves, berries, candy canes, and a central decorative candle sleeve
- Estimated Time: 15–22 hours
Materials Needed
- 150–200 g cream cotton yarn
- 100–150 g dark forest green cotton yarn
- 100–150 g Christmas red cotton yarn
- Small amount of white cotton yarn
- Small amount of gold embroidery thread
- 2.5 mm crochet hook
- 3 mm crochet hook
- Yarn needle
- Scissors
- Stitch markers
- Polyester fiberfill for berries and candy canes
- Small gold beads for poinsettia centers
- Nonflammable decorative base or tray
- Clear glass candle holder
- Flameless LED pillar candle
- Optional removable floral support structure
Crochet Abbreviations
- ch: Chain
- sc: Single crochet
- hdc: Half double crochet
- dc: Double crochet
- tr: Treble crochet
- sl st: Slip stitch
- st: Stitch
- sp: Space
- sk: Skip
- MR: Magic ring
- inc: Increase
- dec: Decrease
- FO: Fasten off
- RS: Right side
- WS: Wrong side
Part 1: Crochet the Circular Base
The centerpiece begins with a sturdy circular crochet foundation that supports the decorative petals and floral elements.
Use cream cotton yarn and a 3 mm crochet hook.
Round 1
Make a magic ring.
Ch 3 (counts as first dc).
Work 11 dc into the ring.
Join with a sl st to the top of the beginning ch-3. (12 dc)
Round 2
Ch 3.
Work 1 dc in the same stitch.
Work 2 dc in each remaining stitch around.
Join with a sl st. (24 dc)
Round 3
Ch 3.
Work 2 dc in the next stitch.
*Dc in the next stitch, 2 dc in the following stitch.*
Repeat around.
Join with a sl st. (36 dc)
Round 4
Ch 3.
Dc in the next stitch.
Work 2 dc in the following stitch.
*Dc in the next 2 stitches, 2 dc in the following stitch.*
Repeat around.
Join with a sl st. (48 dc)
Round 5
Continue increasing evenly by working 2 dc into every fourth stitch.
Join with a sl st. (60 dc)
Rounds 6–12
Continue the established increase pattern, adding 12 stitches per round.
Keep the circular base flat.
Continue until the foundation measures approximately 20–22 cm across.
FO and weave in ends.
Part 2: Crochet the Large Cream Lace Petals
The outer layer features large pointed cream petals with decorative openwork stitches and elegant red edging.
Make 8 large cream petals.
Row 1
Using cream yarn, ch 5.
Sc in the second chain from the hook.
Sc in each remaining chain. (4 sc)
Row 2
Ch 1 and turn.
Work 2 sc in the first stitch.
Sc across to the final stitch.
Work 2 sc in the last stitch.
Rows 3–12
Continue increasing at both ends of every second row.
Work decorative chain spaces in alternating rows to create an open lace texture.
The petal should gradually widen into a pointed leaf-like shape.
Rows 13–20
Begin decreasing gradually at both ends of every second row.
Maintain the decorative openwork pattern.
Continue until the petal forms a symmetrical elongated point.
Edging
Attach red yarn.
Work sc stitches evenly around the entire petal.
At the pointed tip, work (sc, ch 1, sc).
Join with a sl st.
FO and weave in ends.
Repeat to make eight matching petals.
Part 3: Crochet the Dark Green Leaves
The dark forest green leaves create a rich botanical layer between the cream petals and red flowers.
Make 8–10 leaves.
Foundation
Using dark green yarn, ch 21.
Round 1
Sc in the second chain from the hook.
Hdc in the next 3 chains.
Dc in the next 12 chains.
Hdc in the next 3 chains.
Work 3 sc in the last chain.
Continue along the opposite side of the foundation chain.
Mirror the stitch sequence.
Join with a sl st.
Round 2
Ch 1.
Work sc stitches around the leaf.
At the tip, work (sc, ch 2, sc).
Join with a sl st.
Round 3: Decorative Texture
Work alternating hdc and dc stitches along the outer edges to create a slightly raised leaf surface.
Maintain a pointed tip.
FO and weave in ends.
Gold Leaf Edging
Attach gold embroidery thread.
Work a loose surface slip stitch around the leaf edge.
FO and secure the thread.
Repeat for all leaves.
Part 4: Crochet the Red Poinsettia Flowers
The centerpiece features a large red poinsettia flower with pointed petals and a decorative gold center.
Make one large poinsettia and two smaller flowers if desired.
Flower Center
Using red yarn, make a magic ring.
Work 6 sc into the ring.
Join with a sl st.
Petal 1
Ch 11.
Sc in the second chain from the hook.
Hdc in the next 2 chains.
Dc in the next 5 chains.
Hdc in the next chain.
Sc in the final chain.
Sl st into the flower center.
Petals 2–6
Repeat the petal instructions around the flower center.
Space the petals evenly.
Petal Edging
Work a round of sc stitches around each petal.
At each petal tip, work (sc, ch 1, sc).
Use surface slip stitches to create raised veins along the center of each petal.
Gold Center
Sew a small cluster of gold beads into the flower center.
Secure each bead firmly.
FO and weave in ends.
Part 5: Crochet the Christmas Candy Canes
Small red-and-cream candy canes add a playful festive accent to the centerpiece.
Make 3–4 candy canes.
Foundation
Using red yarn, make a magic ring.
Work 6 sc into the ring.
Rounds 2–5
Sc in each stitch around.
Change to cream yarn after the desired number of rounds.
Rounds 6–30
Continue working sc stitches in continuous rounds.
Alternate red and cream yarn every 3 rounds to create stripes.
Lightly stuff the tube as you work.
Finishing
Shape the upper section into a curved candy cane hook.
Use a flexible internal support only if it can be fully enclosed and securely anchored.
Close the opening with a yarn needle.
FO and weave in ends.
Part 6: Crochet the Red Berries
Small crochet berries create bright accents among the leaves and flowers.
Make approximately 12–18 berries.
Round 1
Using red yarn, make a magic ring.
Work 6 sc into the ring.
Round 2
Work 2 sc in each stitch around. (12 sc)
Round 3
Sc in each stitch around. (12 sc)
Round 4
*Sc in the next stitch, sc2tog.*
Repeat around.
Lightly stuff the berry.
Round 5
Work decreases around until the opening closes.
FO, leaving a tail for attachment.
Repeat until you have enough berries for the arrangement.
Part 7: Crochet the Decorative Candle Sleeve
The candle sleeve adds a soft cream crochet accent around the central glass holder.
Use cream yarn and a 2.5 mm crochet hook.
Foundation
Ch enough stitches to fit loosely around the lower portion of your glass candle holder.
Join with a sl st to form a ring, ensuring the chain is not twisted.
Round 1
Ch 1.
Sc in each chain around.
Join with a sl st.
Round 2
Ch 3.
*Skip 1 stitch, dc in the next stitch, ch 1.*
Repeat around.
Join with a sl st.
Round 3
Ch 1.
Sc in each stitch and chain space around.
Join with a sl st.
Rounds 4–6
Repeat the decorative openwork sequence until the sleeve reaches the desired height.
FO and weave in ends.
Keep the sleeve removable and use it only with a flameless LED candle arrangement.
Part 8: Assemble the Layered Centerpiece
Step 1
Place the circular crochet base on a flat work surface.
Step 2
Arrange the eight cream lace petals evenly around the outer edge.
Step 3
Overlap the petal bases slightly to create a symmetrical flower shape.
Step 4
Sew each petal securely to the circular base.
Step 5
Arrange the dark green leaves between the cream petals.
Step 6
Attach the leaves using matching green yarn.
Step 7
Position the large red poinsettia near the front of the centerpiece.
Step 8
Sew the poinsettia securely into place.
Step 9
Add the smaller red flowers among the leaves.
Step 10
Position the crochet candy canes on opposite sides of the arrangement.
Step 11
Attach the red berries in small clusters.
Step 12
Arrange any additional cream decorative elements around the center.
Step 13
Place the glass holder and flameless LED candle in the center.
Step 14
Adjust the decorative elements until the centerpiece looks balanced from every angle.
Part 9: Finishing Details
- Weave in all loose yarn ends.
- Secure each flower and leaf firmly.
- Adjust the pointed cream petals to create a symmetrical arrangement.
- Shape the green leaves to provide dimension.
- Arrange berry clusters naturally between the flowers.
- Position the candy canes so their striped details remain visible.
- Check that the central candle holder sits flat and stable.
- Use only a flameless LED candle.
- Keep the crochet decoration away from open flames and hot surfaces.
Color Variations
Customize this Christmas crochet centerpiece with your favorite holiday colors.
- Classic Christmas: Red, forest green, cream, and gold.
- Winter Wonderland: White, silver, icy blue, and pale gray.
- Elegant Burgundy: Burgundy, champagne, dark green, and antique gold.
- Rustic Christmas: Terracotta, ivory, olive green, and warm brown.
- Vintage Holiday: Dusty rose, cream, sage green, and muted gold.
- Luxury Christmas: Emerald green, deep red, ivory, and metallic gold.
Helpful Crochet Tips
- Use cotton yarn for clear stitch definition.
- Block the cream lace petals before assembly.
- Keep the petal sizes consistent.
- Use stitch markers to maintain even spacing.
- Work the poinsettia petals with firm tension.
- Secure decorative beads carefully.
- Use matching yarn when sewing individual elements together.
- Arrange all components before attaching them permanently.
- Keep the centerpiece symmetrical.
- Use a sturdy removable base for easy storage.
- Choose an LED candle that produces no exposed flame.
- Store the finished centerpiece flat when not in use.
Frequently Asked Questions
Is this Christmas crochet centerpiece beginner-friendly?
This project is best suited to advanced crocheters because it combines multiple decorative elements, lace stitches, shaping, and detailed assembly.
What yarn is best for this centerpiece?
Sport-weight or DK cotton yarn is recommended for its structure, durability, and stitch definition.
Can I make the centerpiece larger?
Yes. Increase the size of the circular base and add more decorative petals and leaves.
Can I make a smaller centerpiece?
Yes. Use fewer petals, smaller flower motifs, and a smaller central candle holder.
Can I use a real candle?
No. This crochet decoration should be used with a flameless LED candle only. Crochet yarn and decorative fibers can ignite when exposed to flames or excessive heat.
Can I remove the candy canes?
Yes. The candy canes are optional and can be replaced with additional leaves, berries, or flowers.
Can I make the flowers in different colors?
Absolutely. White, burgundy, blush pink, and champagne-colored poinsettias all create beautiful variations.
How do I keep the petals flat?
Block the finished petals and secure them to the circular foundation using small stitches.
Can I use this centerpiece as a gift?
Yes. This handmade Christmas centerpiece makes a thoughtful gift for crochet lovers and holiday decorating enthusiasts.
Can I sell finished centerpieces made from this pattern?
Yes. You may sell handmade centerpieces created using this original pattern. Credit to the pattern designer is appreciated.
Care Instructions
- Remove the LED candle and glass holder before cleaning.
- Spot clean gently with a damp cloth.
- Use mild detergent when necessary.
- Avoid soaking decorative beads or internal supports.
- Do not wring or twist the crochet pieces.
- Reshape petals and leaves while damp.
- Allow the centerpiece to air dry completely.
- Keep away from direct heat.
- Store flat in a dry container.
- Use tissue paper to protect delicate flowers during storage.
Final Thoughts
This Christmas poinsettia crochet candle centerpiece brings together beautiful crochet textures, festive botanical details, and timeless holiday colors. The layered cream lace petals, rich green leaves, red poinsettia flowers, cheerful candy canes, and decorative berries create a stunning handmade arrangement that looks beautiful on a Christmas dining table, coffee table, or holiday display.
Whether you create this centerpiece for your own home or as a thoughtful handmade gift, it is a wonderful way to celebrate the beauty of crochet and festive craftsmanship.
Love this free Christmas crochet centerpiece pattern? Save it to Pinterest and share it with your crochet-loving friends for more beautiful handmade holiday inspiration!

